Oracle Purchasing

The purchasing process flow within the Procure to Pay business flow focuses on procurement activities from the request of goods and services to their eventual receipt.

Throughout the purchasing process you are able to:
Route transactions according to your approval structure. Approval authorization limits are defined by amount, charge account, item category, and location. For documents that require your approval, you can review and approve transactions on-line. Also, you can see the full transaction detail and review the action history before you approve a transaction.
View Approval Status. Purchasing automatically displays the approval status of your transaction and informs you whether it is Approved, Cancelled, In Process, Incomplete,Pre-Approved, Rejected, or Returned. You know where your transaction is within this flow at all times.
• Automatically generate distribution accounts. Purchasing uses Account Generator to enter the distribution automatically whenever possible.
• Provide attachments as notes on transaction headers and lines.

Set ups

Use the Buyers window to define and maintain your buyers. Buyers can review all requisitions using the Requisitions window, and only buyers can enter and autocreate purchasing documents. See the Document Types window for rules governing access to documents

Prerequisites
• Define employees before performing this step. See the online help for the Enter Person window for details.
• Define locations before performing this step

Define employee

HRMS Management -> HRMS Manager -> People -> Enter & maintain
Purchasing -> Setup -> Personnel -> Employee (Only if HRMS is not available)

 
Define Buyer
Enter the Name of an employee who you want to define as a buyer. If the name you want does not appear in the list of values, use the Enter Person window to enter that person as an employee

Purchasing -> Setup -> Personnel -> Buyers


Approval Groups

Jobs and Positions

Job: Generic Title or Role within a Business Group, independent of any single organization. Required. Usually more specific if positions are not used.
ex: system engineer
  • Required
  • Generic within Business Group
  • Independent of any single organization
  • Jobs can occur in many organizations
  • Holds Fair Labor Standards Act (FLSA) Code
  • Holds Equal Employment Opportunity (EEO) Work Category
  • Holds Evaluation Criteria Information
  • Associated with Worker’s Compensation Codes
Position: Specific occurrence of one job, fixed within an organization. Not required.
ex: system engineer(trainee), ass. system engineer, senior system engineer
  • Optional
  • Specific occurrence of one job
  • Must be unique within an organization
  • Linked to an Organization, Job and Location
  • Shared with Other Applications (i.e. Purchasing)
  • Position Hierarchies control access to information (security)
Jobs and Positions - Similar Functionality:
  • Valid Grades
  • Evaluations
  • Competencies
  • Skills
  • Work Choices
  • Not Date Tracked
Some Advantages of Using Positions:
Define jobs more specifically · Reporting · Views
Position hierarchies for P.O. approvals
Position hierarchies for security
Positions are better (than Job and Supervisor) for P.O. approvals

Defining Approval Groups
Use the Approval Groups window to define and update approval groups. Once you have defined an approval group here, you can then use it to assign approval functions to jobs or positions in the Approval Assignments window. You cannot delete an approval group that is used in an active assignment. You can enable or disable the entire approval group, or you can enter inactive dates for individual approval rules.


1. Enter the Name of the approval group. You can change existing  approval group names, but names must be unique.
2. Select Enabled to permit the approval group to be assigned to a position/job in the Approval Assignments window.
3. Choose one of the following Objects:
Document Total – (Required) The document total refers to the monetary limit on an individual document. For this option, the Type defaults to Include, and you can enter only the Amount Limit (required) and the Inactive Date (optional).

Account Range – (Required) For this option, you enter the accounting flexfields for the Low and High Values. Include Type rules identify accounts that you want to be included on the document. Exclude Type rules identify accounts that you do not want on the document. If you do not enter a rule for an account, the default is to exclude the account. If you enter only an Exclude Type rule, Purchasing does not automatically include everything else.
For example, entering only the following account includes account 01.000.0451 and excludes all else: Account Range Include 01.000.0451 01.000.0451
Entering only the following account excludes all accounts:Account Range Exclude 01.000.0451 01.000.0451
Entering only the following two accounts includes all accounts except 01.000.0451:
Account Range Include 00.000.0000 ZZ.ZZZ.ZZZZ
Exclude 01.000.0451 01.000.0451
The Inactive Date is optional, but you must enter an Amount Limit for Include Type rules.

Item Category Range – For this option, you enter the purchasing category flexfields for the Low and High Values. Include Type rules identify manufacturing categories that you want to be included on the document. Exclude Type rules identify categories that you do not want on the document. If you do not define a rule for a category, the default is Include. The Inactive Date is optional, but you must enter an Amount Limit for Include Type rules.

Item Range – For this option, you enter the item flexfields for the Low and High Values. Include Type rules identify items that you want to be included on the document. Exclude Type rules identify items that you do not want on the document. If you do not define a rule for an item, the default is Include. The Inactive Date is optional, but you must enter an Amount Limit for Include Type rules.

Location – The location refers to the deliver–to location on a requisition as well as the ship–to location on purchase orders and releases. Include Type rules identify locations that you want to be included on the document. Exclude Type rules identify locations that you do not want on the document. For this option, you enter the location in the Low Value field. If you do not define a rule for a location, the default is Include. The Inactive Date is optional, but you must enter an Amount
Limit for Include Type rules.

4. Select the rule Type: Include or Exclude indicates whether to allow objects that fall within the selected range.

5. Enter the Amount Limit. This is the maximum amount that a control group can authorize for a particular object range. This field is required only for Include type rules.

6. Enter the Low Value. This is the lowest flexfield (accounting, purchasing category, or item) in the range pertinent to this rule. When the object is Location, enter the location. You cannot enter this field when the object is Document Total.

7. Enter the High Value. This is the highest flexfield (accounting, purchasing category, or item) in the range pertinent to this rule. You cannot enter this field when the object is Location or Document Total.

Assigning Approval Groups
Use the Assign Approval Groups window to assign approval groups and approval functions to positions or jobs. If you are using approval hierarchies (the Use Approval Hierarchies option in the Financials Options window is enabled), you must first use the Approval Groups window to establish rules for your approval groups. Then you can assign approval groups to positions in this window.

When you are not  using approval hierarchies, you can use this window to assign approval groups and approval functions to jobs within your organization.

1. Enter the Position for which you want to assign approval groups and approval functions. If the Use Approval Hierarchies option in the Financial Options window is not enabled, this field is not applicable.
If you are not using approval hierarchies, enter the Job.

2. Select the approval function you want to assign to this position or job.
Approve internal requisition
Approve Purchase requisition
Approve Standard purchase order
Approve Blanket agreement
Approve Blanket release
Approve planned purchase orders
Approve contract purchase orders
Approve Schedule release


3. Enter the approval group that you want to assign to the selected position or job. The list of values includes only enabled approval groups with at least one approval rule.

4. Enter the Start Date and End Date for the assignment.

Defining Purchasing Options

Use the Purchasing Options window to define default values and controls for functions throughout Purchasing. You can often override purchasing options when you are creating documents. You can define specific categories of options when you select one of the following:

Defining Control Options

1. Enter the Price Tolerance Percentage. This is the percentage by which the autocreated purchase order line price cannot exceed the requisition line price. If you select Enforce Price Tolerance Percentage, you can create, but not approve, purchase orders for which this tolerance is exceeded. There is no restriction on how much a price can decrease, but changes to the line (quantity or unit of measure for example) may cause the price tolerances to be exceeded.
Note: If the price on a requisition line is zero, then price tolerance checks do not apply.

2. Select Enforce Price Tolerance Percentage if you want Purchasing to enforce the price tolerance percentage.

3. Enter the Price Tolerance Amount. This is the dollar amount by which the autocreated purchase order line price cannot exceed the requisition line price.
Note: If you set both price tolerance percentage and amount values, the system will apply the more restrictive of the two.

4. Select Enforce Price Tolerance Amount if you want Purchasing to enforce the price tolerance amount.

5. Select one of the following values for the Enforce Full Lot Quantity option:
None: The requisition quantity is not rounded to the lot quantity.
Automatic: The requisition quantity is forced to the rounded quantity.
Advisory: An advisory message suggesting rounding and a suggested rounding quantity are displayed, but you can override.
Enforce Full Lot Quantity is used for rounding quantities on Internal Requisitions, for example:
System Options Enforce Full Lot Quantities = Yes Items Rounding Factor = 75% Items Unit of Issue = DZ Unit of Measure on Internal Requisition = Each
If the user enters 6 Each on the Internal Requisition, the quantity will be rounding to 0. If the user enters 11 Each on the Internal Requisition, the quantity will be rounded to 12 Each.

6. Select Display Disposition Messages if you want to see any disposition messages defined against inventory items when they are placed on requisitions.

7. Select the Receipt Close Point, which is when the shipment is closed for receiving: Accepted (passed inspection), Delivered, or Received. Note that you need to set the receipt close tolerance percentage in the Default Options window.

8. Select Notify If Blanket PO Exists if you want to be notified of existing blanket purchase agreements when you create a requisition, purchase order, or blanket purchase agreement line for the item. If you sourced the item, you see the following message: Blanket purchase order [number] already exists for this item. Your requestors can directly create a release for the blanket purchase agreements instead of creating a requisition or purchase order if you allow your requestor to enter releases. See: Viewing and Responding to Notifications.

9. The Cancel Requisitions options apply only to requisitions from which purchase orders were autocreated. Select one of the following:
Always: When canceling the purchase order, Purchasing also cancels the requisition.
Never: When canceling the purchase order, Purchasing does not cancel the requisition, so it is again available for inclusion on a purchase order.
Optional: When canceling the purchase order, you are given the option to cancel the requisition. See: Controlling Documents.

10. You can define for each item whether you allow updating of the item description during the creation of requisition, RFQ, quotation, or purchase order lines. This update affects only the line you are creating. Select Allow Item Description Update if you want Yes to be the initial default of the Allow Description Update attribute when you are defining a new item.

11. Select a Security Hierarchy, which is a position hierarchy from the Position Hierarchy window. When the Security Level is set to Hierarchy for a document in the Document Controls window, this position hierarchy governs access security for the document.
Attention: This field is enterable only when the form is accessed from the Purchasing menu.

12. Select Enforce Buyer Name to enforce entry of only your name as the buyer on purchase orders. Otherwise, you can enter the name of any active buyer.

13. The PO Output Format selection defines the output format for purchase orders sent to the supplier using print, e-mail, or fax. It also enables functionality related to that output format.
PDF: Purchase orders are output in the Adobe Portable Document Format (PDF). You can view the purchase order fully formatted from the Enter Purchase Order window, Purchase Order Summary window, Change History page, Oracle iProcurement, and Oracle iSupplier Portal. You can also communicate the purchase order to the supplier from the Purchase Order Summary window.
Text: Purchase orders are output in text.
Note: Your ability to communicate the purchase order to the supplier from the Approval window remains the same with either setting. Only the formatting of the output changes.

14. Select Enforce Supplier Hold if you do not want to be able to approve purchase orders created with suppliers that are on hold. Use the Suppliers window to place suppliers on hold.
Note: Even if you put a supplier on hold in the Suppliers window, you can still approve a purchase order to that supplier if Enforce Supplier Hold is not checked here.

15. If you have selected Gapless Invoice Numbering for the entire business unit or for a specific supplier site, enter the SBI Buying Company Identifier, which is an identifier included in the invoice number created by the Pay on Receipt process. This portion of the invoice number identifies the buying business unit and for invoices is combined with the prefix defined by the PO: ERS Invoice Number Prefix profile.

16. Select Gapless Invoice Numbering to enable gapless (no breaks in numbering) invoice number generation for your buying organization during Pay on Receipt processing.

Receipt Accounting Options
1. Choose one of the following Accrue Expense Items options:
At Receipt: Accrue expense items upon receipt. You can override this flag in the Shipment Details window when you are entering purchase orders and releases.
Period End: Accrue expense items at period end.
Attention : When using Cash Basis Accounting, you should set this option to Period End, but you will not normally run the
Receipt Accrual – Period End process.

2. For Accrue Inventory Items, you currently have only one choice:  On Receipt.

3. Enter the default Expense AP Accrual Account.

4. An offset is an accounting entry that is created to offset, or balance, another accounting entry. Automatic Offset Method is the method used to automatically create the account for the offsetting transaction. Here the offsetting account is the Receiving Inspection Account, which offsets the Accrual Account transaction at the time of receipt and the Charge Account at the time of delivery. The Automatic Offset Method controls which of the two accounts are used as the base account and which as the overlay account, as well as which segment is used to overlay the base account segment.

Choose one of the following Automatic Offset Method options:
None: No substitutions are made and the Receiving Inspection account for the destination organization is used.
Balancing: The base account is the Receiving Inspection Account for the destination organization and the balancing segment is overlaid with the balancing segment of the Charge Account.
Account: The base account is the Charge Account and the account segment is overlaid with the account segment of the Receiving Inspection Account.

Defining Default Options
1. Select one of the following Requisition Import Group By options  for requisitions imported through the requisition open interface:
All (not grouped), Buyer, Category, Item, Location, or Supplier.

2. Select the currency Rate Type that defaults on requisitions, purchase orders, RFQs, and quotations. If the Rate Type is User, you can override this default for each document line. If either your functional currency (defined in your set of books) or your transaction currency (the currency you enter in a purchasing document window) is Euro (the European Monetary Unit currency), and the other is another European currency, Purchasing defaults in the appropriate conversion Rate Type, Rate, and Rate

3. Enter the Minimum Release Amount that defaults on blanket, contract, and planned purchase orders. This amount is in your functional currency.

4. Select the Price Break Type that defaults on blanket purchase orders:
Cumulative: Price breaks apply to the cumulative quantity on all release shipments for the item.
Non–cumulative: Price breaks apply to quantities on individual release shipments for the item.

5. Select the Price Type that defaults on purchase orders. Use the Lookup Codes window to define price types.

6. Enter the Quote Warning Delay. This is the number of days before a quotation expires that you want to receive an expiration warning. When a quotation is due to expire within the number of days you provide here, you receive the following message in the Notifications Summary window: Quotations active or approaching expiration: [number].

7. Select RFQ Required to require an RFQ for an item before you can autocreate the corresponding requisition line onto a purchase order.
You can override this value for each item or requisition line.

8. Enter the Receipt Close tolerance percentage for your shipments.
Purchasing automatically closes a shipment for receiving if it is within the receiving close tolerance at the receiving close point. Set the receiving close point in the Control Options window. You can override this option for specific items and orders.

9. Enter the Invoice Close tolerance percentage for shipments. Purchasing automatically closes a shipment for invoicing if it is
within the invoicing close tolerance at billing, when Payables matches invoices to purchase orders or receipts. You can override this option for specific items and orders.

10. Select a default Line Type for requisition, RFQ, quotation, and purchase order lines. When you create any of these documents, the line type is part of your item information. You can override the line type for each document line.
Attention: This field is enterable only when the form is accessed from the Purchasing menu.

11. Select one of the following options for Match Approval Level:
Two–Way: Purchase order and invoice quantities must match within tolerance before the corresponding invoice can be paid.
Three–Way: Purchase order, receipt, and invoice quantities must match within tolerance before the corresponding invoice can be paid.
Four–Way: Purchase order, receipt, inspection, and invoice quantities must match within tolerance before the corresponding
invoice can be paid.
Note :  The Invoice Match Option in the purchase order Shipments window and the Match Approval Level here are independent options. The Invoice Match Option determines whether Payables performs invoice matching to the purchase order or the receipt. You can perform whichever Invoice Match Option you want on a shipment regardless of the Match Approval Level you choose here.

Tax Defaults Options
The tax defaults you select in this window are used in the following windows and processes in Purchasing:

A Tax Code defined in the Purchase Order Preferences window overrides any tax defaults you set here.

Check one or more of the tax defaults sources from which your purchasing documents default tax codes.
Supplier – The tax code defaults from the Invoice Tax Code value in the Invoice Tax region of the Suppliers window.
Supplier Site – The tax code defaults from the Invoice Tax Code in the Invoice Tax region of the Supplier Sites window (accessible from within the Suppliers window).
Ship–To Location – The tax code defaults from the Tax Code you entered in the Location window.
Financial Options – The tax code defaults from the Tax Code in the Financials Options window.
Item – The tax code defaults from the Tax Code value you entered in the Purchasing region of the Master Item or Organization Item windows. The tax code defaults first from the item and the ship–to organization, if available; if not, it defaults from the item and inventory organization.

In the Hierarchy column, enter a ranking number (starting with 1) for each of the tax defaults sources you checked (even if you checked only one).
For example, you may check Item, Supplier Site, and Supplier and rank them 3, 2, and 1 respectively. This means that when your purchasing documents default tax information, they look first for tax information from the supplier; if that tax information is not found, they look next for tax information from the supplier site; if that’s not found, they look for tax information corresponding to the item

Internal Requisition Options
1.Select the default Order Type for internal requisitions.
Order types are defined in Order Management. The order type you choose here is the type that Purchasing uses to create sales orders from internal requisitions.

2. Select the default Order Source for internal requisitions.
Purchasing defaults and only uses Internal. This is the source Order Import uses to transfer internal requisitions from Purchasing to Order Management.
Attention:
i. The following two fields are enterable only when the form is accessed from the Purchasing menu.
ii. The Order Type field is visible only if the application Oracle Order Management is installed.

Defining Numbering Options


Purchasing numbers requisitions, purchase orders, quotations, and RFQs within operating units in a Multi–Org setup. So, for example, Purchasing allows the same requisition number to be used by different operating units.
Purchasing also numbers receipts within inventory organizations rather than across inventory organizations. So, for example, the same receipt number could be used by different inventory organizations. To define receipt numbering options, see Defining Receiving Options.

1. Select the [Document] Number Entry method for RFQ, quotation, purchase order, and requisition numbers:
Automatic: Purchasing automatically assigns a unique sequential number to each document when you create the document.
Manual: You provide a document number manually when you enter the document.
Attention :
You can change the method of entering document numbers at any time. If you originally allow manual entry and switch to automatic entry, make sure to enter a Next Number that is higher than the highest number you assigned manually.

2. Select the [Document] Number Type you want Purchasing to use for RFQ, quotation, purchase order, and requisition numbers:
Numeric or Alphanumeric.
Attention :
i. You can change the document number type from Numeric to Alphanumeric whenever you want. You can change the document number type from Alphanumeric to Numeric only if all your current document numbers are numeric.
ii. If you choose Automatic document number entry, you can generate only numeric document numbers, but you can still import either numeric or alphanumeric values from another purchasing system.
iii. If you import purchasing documents from a foreign system that references alphanumeric numbers, you must choose Alphanumeric as your number type, regardless of your numbering method.

3. Enter the Next Number. This is the starting value you want Purchasing to use for generating unique sequential document numbers if you choose Automatic document number entry. Purchasing displays the next document number that will be used for a new document when you create the new document. You cannot enter this field if you choose Manual document number entry.
If you use Master Scheduling/MRP, Inventory, Work in Process, or any non–Oracle system to create requisitions automatically, you must also let Purchasing number the corresponding requisitions automatically.

Purchasing Option in R12


Select RFQ Required to require an RFQ for an item before you can autocreate the corresponding requisition line onto a purchase order. You can override this value for each item or requisition line.

Defining Receiving Options

Use the Receiving Options window to define options that govern receipts in your system. Most of the options that you set here can be overridden for specific suppliers, items, and purchase orders.


Receipt Date
1. Enter the maximum acceptable number of Days Early and Days Late for receipts.
2. Enter the Action for Receipt Date Control. This field determines how Purchasing handles receipts that are earlier or later than the allowed number of days selected above. Choose one of the following options:
None – Receipts may exceed the allowed days early or late.
Reject – Purchasing does not permit receipts outside the selected number of days early or late.
Warning – Purchasing displays a warning message but permits receipts outside the selected number of days early or late.

Over–receipt
1. Enter the maximum acceptable over–receipt Tolerance percentage.
2. Enter the Action for Overreceipt Quantity Control. This field determines how Purchasing handles receipts that exceed the
quantity received tolerance. Choose one of the following options:
None – Receipts may exceed the selected tolerance.
Reject – Purchasing does not permit receipts that exceed the selected tolerance.
Warning – Purchasing displays a warning message but permits receipts that exceed the selected tolerance.

Miscellaneous
1. Check Allow Substitute Receipts if you want to receive substitute items in place of ordered items. You must define substitute items in the Item Relationships window before you can receive them. You can override this option for specific suppliers, items, and orders.
2. Check Allow Unordered Receipts if you want to receive unordered items. You can later match the unordered receipts to a purchase order. If you enable this option, you can override it for specific suppliers and items.
3.  Select Allow Blind Receiving if you want blind receiving at your site. Blind receiving helps you ensure that receivers record the exact amount they receive. With blind receiving, you cannot see the quantity due or the quantity ordered for shipments when you receive items. Purchasing ignores all quantity receipt tolerances to help ensure that you can receive the exact amount the supplier shipped.
4. Check Allow Express Transactions to enable express deliveries and receipts.
5. Check Allow Cascade Transactions to enable cascading for receipts and receiving transactions.
6. Select Validate Serial Numbers on RMA Receipts if you want serial numbers validated. Restricts serial numbers displayed in the list of serial numbers for an RMA line.
7. Enter the Default Receipt Routing that you assign goods: Direct Delivery, Standard Receipt, or Inspection Required. You can override this option at receipt time by changing the destination type for specific suppliers, items, and orders if the RCV: Allow Routing Override user profile is set to Yes.
8. Enter the default RMA Receipt Routing that you assign goods: Direct Delivery, Standard Receipt, or Inspection Required.
9. Enter the Enforce Ship To location option to determine whether the receiving location must be the same as the ship–to location. Choose one of the following options:
None – The receiving location may differ from the ship–to location.
Reject – Purchasing does not permit receipts when the receiving location differs from the ship–to location.
Warning – Purchasing displays a warning message but permits receipts when the receiving location differs from the ship–to
location.
10. Choose an action for ASN Control. This field determines how Purchasing handles receiving against purchase order shipments for which an Advance Shipment Notice (ASN) exists. Choose one of the following options.
None – Purchasing does not prevent or warn you when you try to receive against a purchase order shipment for which an ASN exists.
Reject – Purchasing gives you a message and prevents you from receiving against a purchase order shipment for which an ASN exists.
Warning – Purchasing gives you a message informing you that an ASN exists for the purchase order shipment and lets you decide whether to receive against the purchase order shipment or its ASN.

Receipt numbers
1. Choose the Entry method for receipt numbers.
Automatic: Purchasing automatically assigns a unique sequential number to each receipt when you create the receipt.
Manual: You provide a receipt number manually when you enter the receipt.
Purchasing numbers receipts within inventory organizations rather than across inventory organizations. So, for example, the same receipt number could be used by different inventory organizations.
Attention: You can change the method of entering receipt numbers at any time. If you originally allow manual entry and switch to automatic entry, make sure to enter a Next Number that is higher than the highest number you assigned manually.

2. Choose the receipt number Type you want Purchasing to use for receipt numbers: Numeric or Alphanumeric.

3. Enter the Next Receipt Number. This is the starting value you want Purchasing to use for generating unique sequential receipt numbers if you choose Automatic receipt number entry.
Purchasing displays the next receipt number that will be used for a new receipt when you create the new receipt. You cannot enter this field if you choose Manual receipt number entry.

Accounting
1. Enter the accounting flexfield for the default Receiving Accrual Account.
2. Enter the account number for the Retroactive Price Adjustment Account. This is the account that receiving will use to post an adjusting entry for changes in pricing after a shipment has been received and accrued.
3. Enter the account number for the Clearing Account. This is the account that is used for intercompany receivables in the procuring organization when the receiving organization is not the same as the procuring organization.

Lookup & Quality Inspection Codes

Use the Oracle Purchasing Lookups window to define lookup codes in Purchasing. Purchasing uses lookup codes to define lists of values throughout the system. A lookup category is called a lookup type, and the allowable values for the lookup type are called lookup codes. You can add your own codes to those initially provided for some of the lookup types, depending on your Access Level.

For example, Purchasing supplies the following Supplier Type codes: Employee and Supplier. You might want to define an additional code called Consultant to use for the purchase of consulting services.


Attention: You cannot change or delete codes once you have added and saved them, but you can change the code descriptions.

Enter one of the following predefined lookup Types: 1099 Supplier Exception, Acceptance Type, FOB (free on board), Freight Terms, Minority Group, Pay Group, PO/Requisition Reason, Price Type, Quotation Approval Reason, Reply/Receive Via, and Supplier Type.

Quality Inspection Codes
Use the Quality Inspection Codes window to define and update your inspection codes. You can define as many codes for inspection as you want. Each code must have a corresponding numerical ranking, which provides an inspection scale. You use these inspection codes when you receive and inspect the items you ordered.
 
Enter a Ranking number that corresponds to a specific quality code. This value must be between 0 and 100, where 0 represents the lowest quality. For example, 10 might represent a quality ranking of Poor, while 90 might represent a quality ranking of Excellent. Purchasing lists these rankings when you inspect your receipts.

Enter a Quality Code to indicate a particular quality standard. For example, you might want to define Excellent Condition or
Damaged as quality codes.

Line Types in Purchasing

Oracle Purchasing provides the line type feature so that you can clearly differentiate orders for goods from those for services or outside processing. In addition, the services related line types support a broad range of service categories including general business services, consulting services, and contingent labor.

Usage
Requestors and buyers generally order both goods and services by quantity. You order the number of items you need in a specific unit of measure and at a given price. For instance, a buyer could order 10 computer terminals at a price of $1500 each. Later, the receiving agent records the receipt of one crate of 5 terminals. The accounts payable department receives a bill for 5 terminals, and matches the invoice against the original purchase order. Sometimes, you also need to order services in the same way. For example, you purchase 40 hours of product training at a rate of $40 per hour. You simply record the hours of training ordered and the price per hour. Once you receive the training, you record the hours received.

However, you sometimes order services by amount rather than by quantity. For example, a project manager orders $10,000 of consulting services to install a local area network. In this case, the buyer only needs to record the total amount of the service. When half of the work is complete, the project manager records a receipt of $5000. The consulting firm may send an invoice for the complete amount of the service, or it may send partial invoices. In either case, the accounts payable department must match the invoice to the original purchase order or receipt by amount.

Purchasing provides you with the features you need to order both goods and services. You should be able to:
• Create your own purchasing document line types. For each line type, you should be able to specify the value basis: amount or quantity. If you have implemented Oracle Services Procurement, you have the additional value basis of fixed price
or rate. For both amount and quantity based line types, you can specify default values for category, unit of measure, and whether you require receipt. For quantity based lines, you can specify whether the line type is used for outside processing.
• Create a purchasing document with any combination of line types you need.
• AutoCreate purchase order lines from your requisition lines, grouping requisition lines for the same line type and item onto
the same purchase order lines.
• Create services purchase order lines by selecting a fixed price or rate based line type, category, description, and amount for the line.
• Create amount–based purchase order lines by selecting an amount–based line type, category, item description, and total
amount for the line.

Defining Line Types

Use the Line Types window to define and update line types.


1. Enter the Name and Description of the line type.

2. Enter the Value Basis for the line type.
Amount: Receive items by amount. You cannot change the unit of measure and unit price on purchasing document lines.
Fixed Price: If Oracle Services Procurement is implemented, enter services by amount only. Receive items by amount. You cannot change the unit of measure and unit price on purchasing document lines.
Quantity: Receive items by quantity. Outside Processing line types must have this value basis.
Rate: If Oracle Services Procurement is implemented, enter services by rate (price) and amount. Receive items by amount.
Attention: You can not change line type attributes after transactions have been created for that line type.

3. Enter the Purchase Basis for the line type.
Goods: For quantity value based line types. (Quantity)
Services: For amount and fixed price based line types.(Amount)
Temp Labor: If Oracle Services Procurement is implemented, for fixed price and rate based line types.

4. Enter the default purchasing Category for items with this line type.
You can override this purchasing category on purchasing document lines.

5. Select Receipt Required if you want this as the default on your purchasing document shipments with this line type. You can overrule the default when you enter the shipment.

6. Enter the default Unit of measure for items with this line type. You must enter a default unit when you use the Amount value basis for your line type. You can override this unit of measure on your purchasing document lines only when you use non-Outside Processing line types with Quantity value basis.
If you use the Amount value basis, you may want to choose your functional currency as the unit of measure. For example, if your functional currency is US dollars, you may want to define a unit of measure USD that you can use for your line types with the Amount value basis.
If Oracle Services Procurement is implemented, line types with a rate value basis the unit of measure class can be restricted by the setting of the profile PO: UOM Class for Temp Labor Service.

7. Enter the default Unit Price for items with this line type. Purchasing automatically enters a unit price of 1 when you use the Amount value basis and prevents you from updating this price when you create your line type. You can override this unit price on your purchasing document lines only when you use line types with Quantity value basis.

8. Select Outside Processing to restrict this line type to purchasing outside processing. Also, when you use an outside processing line type on a purchasing document, your choices for the item are limited to outside processing items. You can select this check box only if the value basis is Quantity and if you are using Work in Process.

Approval, Security, and Control

Human Resources and Purchasing share job and position information if they are installed together. You should consider your requirements from both perspectives before deciding on an approval/security structure.

Jobs and Positions
Human Resources uses jobs to classify categories of personnel in your organization, and associates information like the exempt/non–exempt code and EEO code with individual jobs.

  • Examples of a typical job include Vice President, Buyer, and Manager. Positions represent specific functions within these job categories.
  • Examples of typical positions associated with the Vice President job include Vice President of Manufacturing, Vice President of Engineering, and Vice President of Sales.
  • Human Resources uses position hierarchies to define management line reporting and control access to employee information.
  • Review your Personnel department’s system requirements before you decide how you want to use positions, jobs, and position hierarchies in Purchasing
Approval Hierarchies
Approval hierarchies let you automatically route documents for approval. There are two kinds of approval hierarchies: position
hierarchy and employee/supervisor relationships.

If you choose to use employee/supervisor relationships, you define your approval routing structures as you enter employees using the Enter Person window. In this case, Purchasing does not require that you set up positions.

If you choose to use position hierarchies, you must set up both jobs and positions. While positions and position hierarchies require more initial effort to set up, they are easy to maintain and allow you to define approval routing structures that remain stable regardless of how frequently individual employees leave your organization or relocate within it.

Security Hierarchies
Security hierarchies let you control who has access to certain documents. For example, you can create a security hierarchy in which only you and other buyers in that hierarchy can view each other’s purchase orders.

Security hierarchies are not an alternative to approval hierarchies, but something different altogether. Changes you make to a security hierarchy do not affect the approval hierarchy and vice versa.

If you want to specify a Security Level of Hierarchy for any of your document types, you must first define all positions which should have access to the documents you want to restrict in this manner. (Even if you are using jobs to route documents for approval, you must define positions before you can enable this Security Level). You then define a security position hierarchy, and specify it in the Purchasing Options window.


Approval and Security Setup Steps


1. Use the Financials Options window to indicate whether you want to route documents for approval using position hierarchies or employee/supervisor relationships. This decision applies only to the Business Group you choose for your Purchasing installation in the Financials Options window.

If you choose to use position hierarchies, you must define positions in addition to jobs. You later build your hierarchies by referencing these positions.

2. Use the Job window to create each of the job titles in your organization (for example: Buyer, Supply Base Engineer). If you are not using positions, you assign one or more employees to each job. If you are using positions, you assign one or more positions to each job, and later assign one or more employees to each position.
Attention: You assign authorization rules to jobs or positions based on your decision in Step 1.
It is important to ensure that your job/position infrastructure supports the different approval levels in your organization.
For example, if your purchasing staff includes a Junior Buyer, a Senior Buyer, a Supply Base Manager, and a Purchasing Manager, all of whom have different authorization levels for different document types, you should define a different job or position for each role. If your purchasing department is comprised of five employees with common authorization limits, then a singleapproval group (see steps 7 and 8) could be given to those five jobs or positions.

3. Use the Position window to create each of the positions in your organization. This step is required if you plan to use either security or position approval hierarchies.

4. Use the Position Hierarchy window to build and administer your position hierarchies. There are two distinct uses for position hierarchies in Purchasing:
1) document approval routing and
2) document security control. You can use a single position hierarchy for both purposes.

5. Use the Purchasing Options window to choose a single security hierarchy for your installation if you want to use the document Security Level of Hierarchy for any or all of your document types.
Attention: Note that a security hierarchy controls which positions (and therefore which employees) have access to a particular document type. It does not control whether an employee has the authority to approve a document or perform other actions.
An Off–line approver is a valid employee with approval authority, but without access to the relevant form. An On–line approver is an active employee with approval authorization, and with access to the relevant form.

6. Use the Document Types window to specify distinct security and approval controls for each document type/subtype.

7. Use the Approval Groups window to define approval authorization rules.

8. Use the Assign Approval Groups window to associate approval rules with a specific job or position and a document type.

9. Use the Enter Person window to assign employees to jobs or positions. If you are not using position approval hierarchies for document routing, you must provide the employee’s supervisor.

10. Run the Fill Employee Hierarchy process. This process creates an employee–populated representation of your approvals hierarchy and should be run whenever you make a structural or personnel change to your hierarchies or assignments. You can set up this process to run automatically at predefined intervals.

Step 3 : Define position

Use the Positions window to create each of the positions in your organization. This step is required if you plan to use either security or position approval hierarchies


Navigation : HRMS -> Work Structures -> Position -> Description


Step 4 : Position Hierarchies

Use the Positions window to create each of the positions in your organization. This step is required if you plan to use either security or position approval hierarchies.

  • Use the Position Hierarchy window to build and administer your position hierarchies. There are two distinct uses for position hierarchies in Purchasing:1) document approval routing and 2) document security control. You can use a single position hierarchy for both purposes.
  • If you build multiple hierarchies for use in the approval process, it is useful to give them meaningful names. This helps employees quickly choose the appropriate approval path when moving documents from one approval hierarchy to another.
  • While you can include a position in many hierarchies, it can appear only once within a single hierarchy.
  • If you want to use the document Security Level of Hierarchy for any or all of your document types, the hierarchy you specify in the Purchasing Options window must include all the positions in your organization that should have access to these documents.
  • When you build your hierarchies, always begin with the most senior position and work down. Use your organization charts and predefined special approval paths to facilitate this process.


Step 2 : Define Job

Jobs can be generic or specific roles within your enterprise. By definition they are independent of organization structures and are generally used where there is flexibility in employee roles. A ’Job Name’ is a unique combination of values in the segments of the job flexfield structure that you have linked to your Business Group. Enter the FLSA codes for every job you define. For EEO–1 and AAP reporting, you must also enter EEO–1 codes, salary codes and Job Groups.


Step 6b : Approval Routing

Purchasing lets you route documents for approval based on either position hierarchies or employee/supervisor relationships.


Owner Can Approve : Prevent or allow document owners to approve the documents they create.

Can Change to Forward–To :
Prevent or allow changes to the default forward–to employee.
If you are using position approval hierarchies and there is more than one employee associated with a particular position, Purchasing defaults a Forward–To employee in the Approvals window based on alphabetic order. If you are using position approval hierarchies and allow changes to the Forward–To employee, the list of values in the Approvals window includes all employees in the selected hierarchy.
If you are routing documents using employee/supervisor relationships and you allow changes to the Forward–To employee, the list of values in the Approvals window includes all employees defined in the Business Group you specify in the Financials Options window.

Can Change Forward–From :  Prevent or allow changes to the default forward–from employee. This control applies only to requisitions. If you allow changes to the forward–from employee, Purchasing restricts the Forward–From list of values in the Approvals window to requestors associated with the requisition you are trying to approve.
This flexibility allows you to build an approval history including the original requestor rather than the preparer.

Can Change Approval Hierarchy :
This control applies only if you are using position approval hierarchies. Prevent or allow changes to the default approval hierarchy. If you allow changes to the default approval hierarchy, the list of values in the Approvals window includes all hierarchies defined in the Business Group you specify in the Financials Options window.
Attention: When you submit a document for approval, Purchasing verifies that you are included in the default position hierarchy for your document. If you are not included in this hierarchy, and Allow Change to Approval Hierarchy is set to
No, you cannot approve the document or route it to another employee.
 
Forward Method : Select Direct to route documents to the first employee with enough authority to approve them. Select Hierarchy to route documents to the next person in the approval hierarchy or reporting infrastructure regardless of authority.
Approval authority is determined by the approval rules you define in the Define Approval Groups and Assign Approval Groups windows. For example, a hierarchy of three approvers consists of one with a $1,000 approval limit, one with a $5,000
approval limit, and one with a $10,000 approval limit. In a Direct forward method, a document totalling $7,000 is routed directly to the approver with the $10,000 approval limit. In a Hierarchy forward method, the document routes to all three
approvers, stopping at the $10,000 approver.

Default Hierarchy :
This control applies only if you are using position approval hierarchies. You must specify a default approval hierarchy for each document type.

Combine these controls to build an approval routing policy that is as strict or as flexible as your needs warrant. For example, if you set Allow Change to Approval Hierarchy and Allow Change to Forward–To to No, Purchasing forces employees to route all documents according to the approval hierarchy or employee /supervisor relationships that you define. If you set these controls to Yes, Employees can route documents for approval with a high degree of autonomy and flexibility within the structures you define.

Step 7 : Approval Authorization Rules (Groups)

You can define flexible groups of authorization rules (Approval Groups) which you assign to specific document types and jobs or
positions (based on your implementation). These authorization rules are comprised of include/exclude and amount limit criteria that you specify for Document Total, Account Range, Item Range, Item Category Range, and Location. You can associate multiple approval groups (collections of authorization rules) with a single document/job or position combination to create unique approval structures in support of your organization’s signature policies. Finally, you link employees to authorization limits when you assign them to jobs or positions.

When you attempt to approve a document, Purchasing evaluates the authorization rules associated with your job or position and the document type to determine whether you have adequate authority. If you do not have enough authority to approve the document, Purchasing provides default routing information based on your approval setup. Depending on the level of routing flexibility you specify, approvers may or may not be able to change these defaults.


Step 8 : Using Approval Assignments

Use the Assign Approval Groups window to associate approval groups with a specific job or position and a document type including: Purchase Requisition, Internal Requisition, Standard Purchase Order, Planned Purchase Order, Blanket Purchase Agreement, Contract Purchase Agreement, Scheduled Release, and Blanket Release. You can associate multiple approval groups with a single document type/job or position combination. Whenever you associate two or more approval groups with a single document type/job or position combination, Purchasing uses the most restrictive rule to evaluate authorization limits.
Attention: While individual approval groups do not require an enabling Account Range Include rule, every document type for
each job/position must be associated with at least one approval group with this characteristic. Otherwise, employees in the
associated job or position will be unable to approve this document type.

If no approval groups are associated with a particular document type for a given job or position, then employees assigned to this job or position will be unable to approve documents of this type.

Step 9 : Assigning Employees

To assign employee to jobs or positions:
1. Use the Enter Person window to assign employees to jobs or positions. If you are not using position approval hierarchies for document routing, you must provide the employee’s supervisor.


2. Before you can reference your position hierarchies in Purchasing, you must run the Fill Employee Hierarchy process. This process creates an employee–populated representation of your approvals hierarchy and should be run whenever you make a structural or personnel change to your hierarchies or assignments. You can set up this process to run automatically at predefined intervals.
The process creates an error log which lists all positions to which no employee is assigned, but having such positions is a benign
error that does not hamper system operation.

Requisition

With on–line requisitions, you can centralize your purchasing department, source your requisitions with the best suppliers, and ensure that you obtain the appropriate management approval before creating purchase orders from requisitions.

You can use Master Scheduling/MRP to generate on–line requisitions automatically based on the planning requirements of your manufacturing organization. 
You can use Inventory to generate on–line requisitions based on replenishment requirements. 
You can use Work in Process to generate on–line requisitions for outside processing requirements. 
Finally, you can use Purchasing to create internal requisitions, which are handled as internal sales orders and are sourced
from your inventory rather than from outside suppliers like purchase requisitions

Requisition Types
Purchase Requisitions
Use the Requisitions window to create requisitions. You must choose the requisition type (internal or purchase). You can also provide a description, unlimited notes, and defaults for requisition lines.
For each requisition line, you choose the item you want to order along with the quantity and delivery location. You can get sourced pricing from catalog quotations or open blanket purchase agreements. You can also choose a price from a list of historical purchase order prices.
In the Distributions window, you can charge the item to the appropriate accounts, or you can let the Account Generator create the accounts for you. Once you complete the requisition, you send it through the approval process.
 
Internal Requisitions
Unlike purchase requisitions, which are supplied from purchase orders, internal requisitions are supplied from internal sales orders. Internal requisitions are not picked up when you AutoCreate RFQs or purchase orders, nor can they be assigned to a buyer in the Assign Requisitions window.

Reserving Funds for Requisitions
Purchasing lets you reserve or encumber funds for requisitions which are not sourced to an encumbered blanket purchase agreement (or global agreement). If you are using budgetary control, you can also check to see whether funds are available before you encumber the requisition. If you have problems reserving funds for a requisition, the Approval Errors window lets you review the reasons.

Purchasing automatically transfers the encumbrance from the requisition to the purchase order when you successfully approve the purchase order on which you placed the requisition. Purchasing also automatically transfers the encumbrance back to the requisition when you cancel the purchase order.
Note: Even if someone with sufficient approval authority approves a requisition, its status may still be Pre–Approved if funds were not able to be reserved at the time of approval. A Pre–Approved requisition does not show up as supply until its status changes to Approved. Once funds are reserved for the Pre–Approved requisition, the requisition’s status changes to Approved and shows up as supply.

Requisition Structure
Headers
The requisition header contains detail relating to the overall purchase requisition. There can be only one header per requisition.
Lines
The requisition line contains details about the goods or services you want to order. There must be at least one line per requisition.
Distributions
Distributions contain the internal accounting distributions.

Internal Requisitions

Internal requisitions provide the mechanism for requesting and transferring material from inventory to other inventory or expense locations. When Purchasing, Order Management, Shipping Execution, and Inventory are installed, they combine to give you a flexible solution for your inter–organization and intra–organization requests.
With Internal requisition You can be able to:

  • Use internal requisitions to move inventory items from one inventory organization to another, even if that organization belongs to a different operating unit, legal entity, or set of books
  • Set up your supply chain and automatically source your requirements from inventory or suppliers : Purchasing and Inventory combine to provide the flexibility you need to define your item sourcing information. You can use the default
    sourcing options to automatically determine the correct source type and source for your requests. You can specify either Inventory or Supplier as the default source type, as well as the source organization and subinventory for internal requests.
  • Define your inter–organization shipping network, and optionally require that you use internal orders for your inter–organization transfers : Inventory provides the features you need to define your inter–organization shipping network. For transfers between two organizations, you can specify whether to use intransit or direct shipments. You can also require internal orders for transfers between specific organizations.
  • Use intransit inventory when you want to track items as they move between organizations
  • Automatically generate inventory replenishment requisitions and fulfill them via internal or external suppliers : Inventory generates replenishment requisitions through min–max planning, reorder point planning, subinventory replenishment for
    replenishment counts, and Kanban replenishment. Purchasing uses your item sourcing information to create inter–organization or subinventory transfer requests.
  • Automatically source MRP generated requisitions to internal or external suppliers : MRP generated requisitions are sourced using the same item sourcing information that you define for inventory replenishment and on–line requisitions. For ”buy” items, the Requisition Import process uses the item sourcing information to create either a purchase requisition or an
    inter–organization internal requisition for planned orders.
  • Creating Online Requisitions : You can create on–line internal requisitions for both expense and inventory destinations using the same windows you use to create purchase requisitions. You can combine inventory and supplier sourced requisition lines on the same requisition. Also, Purchasing uses your item sourcing information to default the correct source type and supplier for the item and destination. You can define requisition templates for commonly requested internally sourced items.
Baisc Order Flow
The Order flow of internal SO is shown in below diagram.
 
Minimum Set Ups

Material movement from M1(Destination-PO) to M2(Source-OM)
1. Item Setup

Navigate to Inventory -> Items -> Master Items
a.     Apply the 'Purchased Item' template
b.    Internal Ordered  Internal Orders Enabled
c.    Assignment in both orgs

2. Cost Set up (M2)
a.  Navigate to Inventory -> Costs -> Item Costs
Cost Element : Material
Sub-Element : Material
Basis : Item
Rate or Amount : 23
Cost Type : Pending

b.  Inventory -> Costs -> Standard Cost Update -> Update Costs
Run the standard cost update and verify that a new line is added at item cost with frozen cost.

3. Shipping Network Setup
Verify setup for inter organization Shipping Network between M2 and M1
- Navigate to Inventory -> Setup -> Organizations -> Shipping Networks
Transfer Type : Intransit
FOB : Receipt
Receipt Routing : Direct
Internal Order Required : checked

4. Define Inter-Location Transit Times (optional for testflow)
- Go to Inventory -> Setup -> Organizations -> Inter-Location Transit Times
- Go to View -> Find and enter
Origin Type : Location
Origin : M2- Boston
Destination Type : Location
Destination : M1- Seattle
- Enter the Ship Method and Intransit Time such as :
Ship Method : Airborne
Intransit Time : 5
Default Method  : check

5.  Need to define customer location associations for both source and destination operating units
a. Org M1 needs to defined as a customer
Create a location which can be used as the ship to location for customer M1 and enter this in ship to to site Interla location
b. Do the same location association for the other organization by defining a new address (This setup is required if its across OU/SOB)
b. No Sales Credit in sales person.

6. Verify the transaction type and order source (this is already done in Vision environment)
a. Order Type : New_Internal_ordertype in M2
       The internal sales order in OM will be created with this order type
Order Source : Internal
       The internal sales order will be imported into OM with this order source
New_Internal_ordertype should have Shipping source type as internal.

b. A new document category is attached with the above order type. Attach a document sequence to it.

c. Navigate to Purchasing -> Setup -> Organizations -> Purchasing Options (M2)
- Click on the Internal Requisitions tab
- Notice the Order Type and Order Source setup

Important Points
1.  An Internal Order does not generate an Accounts Receivable invoice.
2. The price on the internal sales order line comes directly from the price on the requisition line. OrderImport does not use the price list to recalculate the line price.
Although internal requisitions use the item’s cost as the price, Order Management requires price lists to process all sales orders. Define a price list for use with the internal requisition order type. You do not need to add any lines to the price list.
However, the price that is used when posting the intercompany payables and receivables information is the item cost plus any markup defined in the shipping network.

3. The process that would do the accounting entries is also indicated – Cost processor, Inter-Company Invoicing, Receiving processor.
4.  An Internal Order is view only, changes can only be made to Shipping information.
5.  An Internal Order can only have one schedule date, and cannot be split into multiple partial quantities/shipments.
6.  Getting error - APP-18370 Incomplete Ship Set - when trying to Pick Release order.  Make sure that the item setup does not have the item set to ATO.
7.  The user creating a requisition attached as an employee in Human Resources.

Create internal requisition

Demand for inventory requests can come from several sources. The primary sources are:
• Online user’s request for stock items out of inventory
• Inventory Replenishment Requests
• Oracle Master Scheduling/MRP and Supply Chain Planning generated requisitions
• External system’s requests

To create an internal requisition manually, navigate to Purchasing -> Requisitions -> Requisitions


1. Select requisitions type as Internal.
2. Enter the following details in line
  • Line Type defaults from the DEFAULT tab in purchasing options, change it if required.
  • Enter the item, UOM defaults from the UOM for the item in validation org of the item master.(Notes: if there is some list price value in org1 and no price in item master org then the list price in org1 wont default to item in line , why????)
  • Price is the standard cost of the item

  • Enter quantity, need by date and TAX as applicable.
3. Enter the destination organization and location.
(Be sure that the org where the IR is created is defined as a customer and has a valid shipto location)

4. Enter the source organization and sub inventory of the source inventory.

Save the record and approve the newly created internal requisition.

Internal Requisition Approvals
After you create an internal requisition, you can optionally require approval. For on–line requests, you can set up approval rules that are specific for internal requisitions, or you can share the same rules you use for purchase requisitions. If you do not require additional approval steps, you can set up rules so that you can always complete and approve the document in the Requisitions window.

Min–max planning, Reorder Point planning, Kanban and MRP generated requisitions are loaded as approved requisitions through the Requisitions Open Interface.
If you set the Inventory Profile INV: RC Requisition Approval to Unapproved, you can optionally load Subinventory Replenishment requisitions as unapproved and use the document approval functionality in Purchasing. This profile option affects only Subinventory Replenishment requisitions.

Creation of Internal Sales Orders

Once you approve inventory sourced requisition lines, Purchasing translates the requisition into an internal sales order, providing the link between the requestor’s requirement and the physical demand against inventory. You run two separate batch processes to create the internal sales order from the approved requisition:

  • Create Internal Sales Orders.
  • Order Import.
Create ISO
Purchasing uses location associations to create internal sales orders from internal requisitions for a given deliver–to location. When you associate a customer and customer site with a location and then enter an internal requisition with that location as the deliver–to point, Purchasing uses the associated customer and customer site on the internal sales order that it creates. The associated customer site becomes the ship–to site for Order Management’s ship confirmation.


Internal orders are automatically scheduled by setting the Schedule Ship Date on the sales order to the Need–by Date from the requisition. If you specify a subinventory on the internal requisition line, Order Management reserves the goods and uses only the specified subinventory for allocation. If the goods do not exist at the specified subinventory, Order Management backorders them, even if they do exist in another subinventory.


Run Import Orders

Order Import creates internal sales orders from the records in the interface table, and determines the order cycle and
defaults values based on the order type.


A Multi–Org implementation of Purchasing enables separate operating units within an organization to operate independently of each other. However, you may still need to obtain goods from another operating unit, and Purchasing supports this. You can create an internal sales order for an item in another operating unit. When creating this internal sales order, you must create it in the destination organization’s operating unit, and all Order Management activity must take place within that destination operating unit. For example, the following table lists the generalized steps involved and indicate the organization in which they take place.


When you use internal sales orders to transfer goods from another operating unit, the items’ transfer cost is posted to the intercompany payables and receivables accounts as defined in the shipping network and an intercompany invoice can be generated.


Management of Internal Sales Orders

You manage internal sales orders using some of the same windows as customer sales orders. Once you import an internal requisition using OrderImport, you can use the Sales Orders window to change the reserved quantity, schedule date, ship–to contact, and shipment priority. The destination organization has complete visibility to any  changes in incoming supply based on schedule date changes or partial shipments.

The price on the internal sales order line comes directly from the price on the requisition line (which is the standard cost of sourcing organization - om). OrderImport does not use the price list to recalculate the line price. However, the price that is used when posting the intercompany payables and receivables information is the item cost plus any markup defined in the shipping network.

Once an internal sales order is scheduled, it is visible as demand. You can reserve inventory for internal requisitions either to the organization, or the organization and subinventory levels. Order Management does not process internal sales order lines for the Receivables Interface, even if the Receivables Interface is an action in the order cycle for the internal sales order.

Purchase Order

Purchasing provides the Purchase Orders window that you can use to enter standard and planned purchase orders as well as blanket and contract purchase agreements. You must be defined as a buyer to use this window.

Purchase Order Types


Purchasing provides the following purchase order types: Standard Purchase Order, Planned Purchase Order, Blanket Purchase Agreement, and Contract Purchase Agreement.
You can use the Document Name field in the Document Types window to change the names of these documents. For example, if you enter Regular PO in the Document Name field for the Standard Purchase Order type, your
choices in the Type field in the Purchase Orders window will be Regular Purchase Order, Planned Purchase Order, Blanket Purchase Agreement, and Contract Purchase Agreement.


Standard Purchase Orders
You generally create standard purchase orders for one–time purchase of various items. You create standard purchase orders when you know the details of the goods or services you require, estimated costs, quantities, delivery schedules, and accounting distributions. If you use encumbrance accounting, the purchase order may be encumbered since the required information is known.

Planned Purchase Orders
A planned purchase order is a long–term agreement committing to buy items or services from a single source. You must specify tentative delivery schedules and all details for goods or services that you want to buy, including charge account, quantities, and estimated cost.

You can issue scheduled releases against a planned purchase order to place the actual orders. If you use encumbrance accounting, you can use the planned purchase order to reserve funds for long term agreements. You can also change the accounting distributions on each release and the system will reverse the encumbrance for the planned purchase order and create a new encumbrance for the release.

Blanket Purchase Agreements
You create blanket purchase agreements when you know the detail of the goods or services you plan to buy from a specific supplier in a period, but you do not yet know the detail of your delivery schedules.
  • You can use blanket purchase agreements to specify negotiated prices for your items before actually purchasing them.
  • Blanket purchase agreements can be created for a single organization or to be shared by different business units of your organization (global agreements). You can encumber funds for a blanket purchase agreement.
  • You can issue a blanket release against a blanket purchase agreement to place the actual order (as long as the release is within the blanket agreement effectivity dates). If you use encumbrance accounting, you can encumber each release.
Global Blanket Agreements
You may need to negotiate based on an enterprises' total global purchase volume to enable centralizing the buying activity across a broad and sometimes diverse set of businesses. Using global agreements (a special type of blanket purchase agreement), buyers can negotiate enterprise-wide pricing, business by business, then execute and manage those agreements in one central shared environment. Enterprise organizations can then access the agreement to create purchase orders that leverage pre-negotiated prices and terms. You can encumber funds for a global agreement.

Contract Purchase Agreements
You create contract purchase agreements with your suppliers to agree on specific terms and conditions without indicating the goods and services that you will be purchasing.

You can later issue standard purchase orders referencing your contracts, and you can encumber these purchase orders if you use encumbrance accounting.

Global Contract Agreements
You can use global contract agreeements (a special type of contract purchase agreement) to centralize a supplier relationship. Buyers throughout the enterprise can then leverage this relationship by referencing this global contract agreement in your standard purchase orders.


Financials Options

1. Accounting
Future Periods. Payables displays the number of future periods you use in your set of books. Payables uses this value to limit the number of future periods you can maintain in the Control Payables Periods window. You can enter invoices in future periods.

Liability. Payables assigns this account as the default Liability Account for all new suppliers you enter. You can override this value during supplier entry. If you use Accrual Basis accounting, then the Liability Account for an invoice determines the liability account(s) charged when you create accounting entries for invoices.

Prepayment. The Prepayment account and description for a supplier site's invoices. The Financials option value defaults to new suppliers, and the supplier value defaults to new supplier sites.

Future Dated Payment. If you use future dated payments, then enter a value for Future Dated Payment account. This value defaults to all new suppliers and new bank accounts. The supplier value defaults to all new supplier sites. The bank account value defaults to new payment documents.
When Payables accounts for future dated payments, it uses the Future Dated Payment Account from either the supplier site or the payment document, depending on the option you select in the Payment Accounting region of the Payables Options window.

If you relieve liability payment time, this should be an asset account. If you relieve liability at future dated payment maturity, then this should be a liability account.

Discount Taken. If you choose to distribute your discounts to the system Discount Taken Account, Payables uses this account to record the discounts you take on payments. Use the Payables Options window to select your method for distributing discounts for your invoices.

PO Rate Variance Gain/Loss. Payables uses these accounts to record the exchange rate variance gains/losses for your inventory items. The variance is calculated between the invoice and either the purchase order or the receipt, depending on how you matched the invoice. These accounts are not used to record variances for your expense items. Any exchange rate variance for your expense items is recorded to the charge account of the purchase order. Payables calculates these amounts during Payables Invoice Validation.

Expenses Clearing. This account is required when you use the Company Pay payment option of Oracle Internet Expenses. Payables uses this as a temporary account to record credit card transaction activity. Payables debits this account when you create an invoice to pay a credit card issuer for credit card transactions. Payables credits this account with offsets to the original debit entries when you submit Expense Report Import for an employee expense report entered in Internet Expenses that has credit card transactions on it.

Miscellaneous. Used only when importing invoices submitted via iSupplier Portal or XML Gateway.
If you enter a value here then the system uses this account for all Miscellaneous charges on invoices your suppliers enter in iSupplier Portal. If you do not enter a value here then the system prorates Miscellaneous charges across Item lines on iSupplier Portal invoices.
The system also uses this value for any miscellaneous charges your suppliers send in XML invoices. If you do not enter a value here then import prorates miscellaneous charges across Item lines for XML invoices.

2.1 Supplier Entry Financials Options
The options you define in this region are used to control supplier entry and purchase order matching.
RFQ Only Site. Default value for all new suppliers. You cannot create purchase orders in Purchasing for a supplier site which is an RFQ Only Site.

Hold Unmatched Invoices. If you enable this option for a supplier site, Payables applies a Matching Required hold to an invoice if it has Item type distributions that are not matched to either a purchase order or receipt. Payables applies the hold during Payables Invoice Validation. You cannot pay the invoice until you release the hold. You can release this hold by matching the invoice to either a purchase order or receipt, and resubmitting Payables Invoice Validation, or you can manually release the hold in the Holds window of the Invoice Workbench. Payables will not apply a hold if the sum of the invoice distributions by accounting code combination is zero.

Invoice Match Option. Indicate how you want to match most invoices. Defaulting is in the following order but can be overridden at any level: Financials options > supplier > supplier site > purchase order shipment. The value at the purchase order shipment controls to which purchasing document type you can match an invoice.
  • Purchase Order. Match invoices to purchase orders.
  • Receipts. Match invoices to purchase order receipts.
Supplier Number Entry. You can enter your supplier numbers manually or let Payables automatically generate sequential supplier numbers for you. You can change the number entry method at any time.

Automatic. The system automatically assigns a unique sequential number to each supplier when you enter a new supplier.
Manual. You enter the supplier number when you enter a supplier.
Attention: Be careful if you switch from manual to automatic entry. Each supplier number must be unique. When you use manual entry, you can assign any number and in any order. If you switch to automatic after entering supplier numbers manually, the system may try to assign a number that you already assigned. If you switch from manual to automatic entry, make sure the next available number for automatic entry is larger than the largest number you have already recorded.

Supplier Number Type. Type of supplier number you want Payables to use for supplier number entry.
Alphanumeric. Numbers, characters, or a combination.
Numeric. Numbers only.
After you begin entering suppliers, you can change your Number Type from numeric to alphanumeric at any time; however, you can change your Number Type from alphanumeric to numeric only if all your current supplier numbers are numeric.

Next Automatic Number. If you select the Automatic Supplier Number Entry method, enter the starting value you want the system to use for generating unique sequential supplier numbers. After you enter a number and save your changes, the system displays the number that it will assign to the next new supplier you enter.

2.2
Supplier-Purchasing


The options you define in this region, except for Inventory Organization, are used as default values for the Purchasing region of the Suppliers window. The supplier values default to new supplier sites for the supplier, which default to new purchasing documents for the supplier site.

Note: If you use the Multiple Organizations Support feature, values you enter in this window will default to both the Supplier and Supplier Site.

You can override defaulted values during entry of the supplier, supplier site, and purchasing documents.

2.3 Supplier-Payables
The options you define in the region, except for Receipt Acceptance Days, are used as default values for the Payment region of the Suppliers window. The supplier values default to new supplier sites for the supplier, which default to new invoices for the supplier site. You can override these values during entry of the supplier, supplier site, and invoice.

Payment Terms. Payables uses payment terms to automatically calculate due dates, discount dates, and discount amounts for each invoice you enter. If the terms you want to use are not on the list of values, you can define additional terms in the Payment Terms window. See: Scheduling Invoice Payments.

Payment Method. The invoice payment method you use most frequently. See: Defining and Maintaining Payables Payment Documents.
  • Check. You can pay with a manual payment, a Quick payment, or in a payment batch.
  • Clearing. Used for recording invoice payments to internal suppliers.
  • Electronic. You generate an electronic payment file that you deliver to your bank to create payments.
  • Wire. Used to manually record a wire transfer of funds between your bank and your supplier's bank.
Receipt Acceptance Days. If you create interest invoices for late payment, enter the number of days in your receipt acceptance period. If you enable the Recalculate Scheduled Payment Payables option, then Payables Invoice Validation recalculates your invoice due date based on this value. See: Interest Rates.

Always Take Discount. Enable this option to have Payables always take an available discount for a supplier, regardless of when you pay the invoice. See: Discounts.

Pay Alone. If an invoice has the Pay Alone option enabled, Payables creates a separate payment for each invoice. If the Pay Alone option is not enabled for an invoice, the invoice will be paid with other invoices for the same supplier site on a single payment.

3. Encumbrance

To use encumbrance accounting or budgetary control, you must install Payables, Purchasing, and General Ledger. Use this region to enable encumbrance accounting and to specify the default encumbrance types Payables assigns to your invoices, and Purchasing assigns to your requisitions and purchase orders.

If you enable encumbrance accounting or budgetary control, Purchasing creates encumbrances when you reserve funds for a requisition or purchase order. If you use the perpetual accrual method in Purchasing, Purchasing reverses purchase order encumbrances when you inspect, accept, and deliver the units. If you are using the periodic accrual method in Purchasing, Payables reverses the purchase order encumbrances when you create accounting entries for invoices.

Payables creates encumbrances when there is a variance between a matched invoice and the purchase order to which it is matched, and when the invoice encumbrance type is different from the Purchasing encumbrance type. See also: Encumbrances in Payables.

Oracle Financials provides two predefined encumbrance types that you can use to identify requisition, purchase order, and invoice encumbrances: Commitment and Obligation. You can define additional encumbrance types in Oracle General Ledger in the Encumbrance Types window.

Use Requisition Encumbrance. Enable this option to encumber funds for requisitions. If you enable this option, Purchasing creates journal entries and transfers them to General Ledger to encumber funds for purchase requisitions.

Encumbrance Type. If you enable Use Requisition Encumbrance, you must select an encumbrance type by which you can identify your requisition encumbrance journal entries. Purchasing assigns this encumbrance type to the encumbrance journal entries it creates for purchase requisitions.

Reserve at Completion.
If you enable Use Requisition Encumbrance, indicate whether you want requisition preparers to have the option to reserve funds. If you do not enable this option, only requisition approvers will have the option to reserve funds.

Use PO Encumbrance. Enable this option to encumber funds for purchase orders, purchase order and receipt matched invoices, and basic invoices (not matched). If you enable this option, Purchasing encumbers funds for purchase orders and Payables encumbers funds for variances during Payables Invoice Validation for purchase order and receipt matched invoices. If you enable this option and enter a non-purchase order matched invoice, Payables will encumber funds for it during Payables Invoice Validation. All Payables encumbrances are reversed when you create accounting entries. If you enable Use Requisition Encumbrance, you must also enable this option.

PO Encumbrance Type. If you enable Use Purchase Order Encumbrance, select a purchase order encumbrance type by which you can identify your purchase order encumbrance journal entries. Purchasing assigns this encumbrance type to the encumbrance journal entries it creates for purchase requisitions and purchase orders.

Invoice Encumbrance Type. If you use purchase order encumbrance, select an invoice encumbrance type by which you can identify your invoice encumbrance journal entries. Payables assigns this encumbrance type to the encumbrance journal entries that it creates. We recommend that you use an encumbrance type different from the Purchasing encumbrance type so you can identify invoice encumbrances.

4. Tax Financials Options
Rounding Rule. Select the method you want the system to use to round the tax amount when it calculates tax in Payables and Purchasing. For example, the calculated tax is 5.988 and your precision is 2 decimal places. If your rounding rule is Up and the currency is USD, then the system will enter 5.99 for the tax amount.

Payables uses the rounding rule you select to calculate tax on invoices, recurring invoices, expense reports, and purchase orders. The value you enter here defaults to new suppliers. You can override this value at any level. If you update it in the Financials Options window, it will not affect existing suppliers and will default only to new suppliers.

Payables rounds to the Minimum Accountable Unit if you entered a value for that field. Otherwise, it rounds to the precision you enter. The examples below assume you are using a Minimum Accountable Unit of .01 and the currency is USD.

Up. Round up. For example, round $5.988 to $5.99
Down. Round down. For example, round $5.988 to $5.98
Nearest. Round to the nearest number, and if the difference between Up and Down is equal, round Up. For example, round $5.988 to $5.99
Payables also uses the rounding rule you select to calculate the splitting of tax between recoverable and nonrecoverable tax lines. See: Calculation of Tax Distributions.

Precision.
Enter a one-digit whole number to indicate to which decimal place you want to round automatically-calculated tax amounts in Payables and Purchasing. For example, the calculated tax amount is $121.011 and you round Nearest. If the precision is 2, the system will enter $121.01. If the precision is 0, the system will enter $121.00.

The system will use the lower of the precision entered here and the default precision for the currency. For example, if your functional currency is USD, and you enter a precision of 3, the system will use a precision of 2.

The system uses the value you enter for this option for all new tax amounts that are calculated automatically. This is the precision value for tax calculation throughout the system and you cannot override it anywhere else.

The system will disregard any value you enter for Precision if you enter a value in the Min Accountable Unit field.

Min Accountable Unit. Indicate the smallest monetary unit to which you want to round the tax amount. For example, the currency is USD, the calculated tax is 5.541, and your Rounding Rule is Nearest. If your Minimum Accountable Unit is .01 (one cent), the system will enter 5.54. If your Minimum Accountable Unit is .05 (five cents), the system will enter 5.55.

Attention: Do not enter a minimum accountable unit that has more decimal places than your functional currency or your invoice distribution amounts may not match your invoice amount after rounding. This may cause a distribution hold on your invoice.

The system uses the value you enter for this option for all new tax amounts Payables calculates automatically. The precision used in tax calculations will be the same number of decimal places as your Minimum Accountable Unit. This is the precision value for tax calculation throughout the system and you cannot override it anywhere else.

Default Tax Code. Tax code default value for the Invoice Tax Code option in the Suppliers window. In addition, you can include this tax code value in your Tax Code Defaults hierarchy that you define in the Payables Options window if you select Financials Option as a hierarchy source. This hierarchy is used throughout Payables to default tax code values to documents. See: Defaulting Tax In Payables.

If you choose a tax code for which you have defined different tax rates for different effective date ranges, (or include such a tax code in a tax group), Payables automatically uses the appropriate rate during invoice entry based on the invoice date, or for an expense report, the receipt date.

Member State. The location of your company or organization. Payables uses this country name to determine if your company or organization is located in a member state of the European Union (EU).

VAT Registration Number. The Value-Added Tax (VAT) registration number for your organization. Your organization is assigned a VAT Registration Number if you register to pay VAT. The first two characters of a VAT registration number are the country code for the country or state where the registered company or organization is located. Payables prints this number on the header of the Intra-EU VAT Audit Trail Report.

Enable Recoverable Tax. Enable this option if you want Payables to do any of the following:
  • flag tax type distributions as recoverable for reporting purposes
  • split taxes into separate recoverable and nonrecoverable lines. For more details, see: Partially Recoverable Tax.
  • automatically calculate tax and prorate it back to the GL account of the taxable distribution. See: Using the Automatic Tax Calculation Feature to Prorate Tax in the Invoice Workbench.
Default Recovery Rate. If you want to specify a rate that will default to tax recovery rules and tax codes you define, then enter the rate.

5.
Human Resoure
  • In HR tab we mention the employee number generation method.
  • If we follow position hirerachry or not

Purchase Order Preferences

Definition
Use the Preferences window to enter values that will default to all purchase order headers, lines, shipments and distributions that you enter. By using preferences, you have essentially gained an additional level of defaults in the Default Value Hierarchy. Recall that the Purchasing Default Value Hierarchy includes the following: Financials Options, Purchasing/Receiving Options, Supplier, Supplier Site, Item and PO Documents.


Benefits
Although setting preferences is optional, you will want to selectively enter preferences for data that would be repetitively entered on multiple lines, shipments or distributions. Preferences, therefore, reduce the amount of data entry required to complete purchase orders. For example, if you’re creating a purchase order for four items, all of which are needed by the same date, specify a Need-By date in the Preferences window that will default to all four lines. If, however, all four items were needed by a different date, it wouldn’t save any time to use the Preferences window to specify a Need-By date.

How Long are Preferences Effective?
Session preferences must be set each time you log into the applications or even change responsibilities. While in a session, however, preferences remain in effect unless you explicitly clear or change them.

Apply Preferences to Save
Once the desired preferences have been set, you must click the Apply button to save them. If you simply close the Preferences window, either no preferences will be set or previously set preferences will remain in effect.

When you save your work in the Lines tabbed region in the Purchase Orders window, Purchasing creates a shipment using the organization and ship–to location if you provided valid values in the defaults region. Then, if it is successful in creating a shipment, Purchasing creates a distribution using these values. Similarly, when you save your work in the Purchase Order Shipments window, Purchasing creates a distribution if it does not already exist and if you provided a valid organization here. You can update these shipments and distributions by navigating to the Purchase Order Shipments or Purchase Order Distributions windows.

Purchasing can create shipments only when it has default information that meets the following criteria:
  •  There must be an organization and a location.
  •  The location must belong to the organization or not be assigned to any organization.
  •  If the line contains an item (and optionally a revision), that item (and revision) must be valid in the default shipment organization.

Purchasing can create distributions only when it has default information that meets the following criteria:
  •  If the Destination Type is Inventory, the line must have an item that is stock enabled in the ship–to organization. Also, if a default subinventory has been entered, it must be defined in the ship–to organization.
  •  The Account Generator must be able to supply the accounts. If the Destination Type is Expense, you can enter a default charge account, which overrides any account supplied by the Account Generator.
  • If you are using encumbrance accounting, you must enter a default GL date.
Purchasing uses the preferences you enter in this window for the current line and all subsequent purchase order lines that you enter during this user session. Thus, for existing purchase orders, the defaults apply only to new lines, shipments, and distributions that you add during this session. If you want to clear the default information, either choose Delete Record in the Purchase Order Preferences window or exit the application. The default values are only valid for the session in which you are currently working. The are not saved to the database.

Entering main preferences
Navigate to the Purchase Order Preferences window by selecting Preferences on the Tools menu in most of the purchase orders and releases windows.
 
  • Select Confirming Order to indicate that this order is confirming a previous informal order with the supplier.
  • If you are referencing contract purchase agreement on a standard purchase order, enter the Contract number. The contract must be effective; that is, the current date has to be within the effective date and the expired date of the contract. If you reference a contract purchase agreement on a standard purchase order line, Purchasing adds the total amount of the purchase order line to the total amount of the contract.

Purchase Order Headers

The upper part of the Purchase Orders window has the following display–only fields:
Created – The system date is displayed as the creation date.

Contact- Contact person of the supplier site.

Currency – Purchasing displays the functional currency. This is overridden by supplier currency information.

Total – For standard and planned purchase orders, Purchasing displays the current Total order amount.

Amount Agreed – For blanket and contract purchase agreements only, Purchasing displays the agreed–to amount for the agreement.
The amount Released value should not exceed the Amount Agreed. (Note also that if you change the Amount Limit in the Terms and Conditions window, the Amount Agreed should be equal to or less than the Amount Limit.)

Released – For blanket and contract purchase agreements only, Purchasing displays the current total amount Released. The
amount released is 0.00 until you create releases against the blanket purchase agreement or reference the contract on a standard purchase order.


Purchase Order number: Enter a unique Purchase Order number. The Revision is displayed to the right of the number. If you chose automatic purchase order number generation in your Purchasing Options, the cursor does not enter this field and the number is generated when you save your work.

Order Type: Choose the purchase order Type Standard Purchase Order, Planned Purchase Order, Blanket Purchase Agreement, Contract Purchase Agreement. Attention: The names of the above purchase order types can be modified in the Document Types window.

Supplier: Enter the name of the Supplier for this purchase order. To approve a purchase order, you must provide a supplier.
Attention: You cannot change the supplier once you approve the purchase order. The purchase order becomes a legal document when you approve it. To change the supplier after you approve a purchase order, you must cancel the existing purchase order and create a new one for the other supplier

Supplier Site: Enter the Site of the supplier you want to use for your purchase order. If the supplier you choose has only one site, it is defaulted into this field. Before you can approve a purchase order, you must provide a site.

Once the purchase order is approved, you can change the supplier site only if the PO: Change Supplier Site profile
option is set to Yes. And only sites with the same currency as the previous site can be used.
If you change the supplier site, the revision will be incremented, and will require reapproval. You cannot enter the supplier site until you have entered a supplier.
You can optionally enter the name of the Contact at the supplier site. If the supplier you choose has only one contact name, it is defaulted into this field. You cannot enter a contact until you have entered a supplier site.

Ship To and Bill To : Enter the Ship To and Bill To locations for the purchase order. If you entered a supplier and supplier site, the Ship To and Bill To defaults reflect the locations you assigned to the supplier or supplier site. You can accept these values or change them to other locations

Buyer Name : If the Enforce Buyer Name option in your Purchasing Options is set to Yes, your name is displayed as the Buyer, and you cannot change this value. Otherwise, you can enter the name of any buyer.

Status – Possible order status values are:
Incomplete :The order has not been approved.
Approved :You have approved the order.You can print it and receive items against it.
Requires Reapproval :You approved the order and then made changes that require you to reapprove it.

P–Card – Purchasing displays a procurement card number if the purchase order was created from an iProcurement requisition that used a corporate credit card for the purchase. This field displays if the profile option PO: Use P–Cards in Purchasing is set to Yes. Only the last four digits are displayed. Procurement cards can be used for items with a Destination Type of Expense, for documents that do not contain a Project number, and for standard purchase orders or releases only.

Description - Enter a Description of the purchase order. These comments are for internal use only and do not print on the purchase order. You can enter up to 240 characters. If you want to add unlimited notes, use the Attachments feature.

Global box - For blanket or contract purchase agreements, check the Global box to indicate that this is a global agreement that can be assigned to other operating units. This checkbox cannot be deselected once you have saved the document.

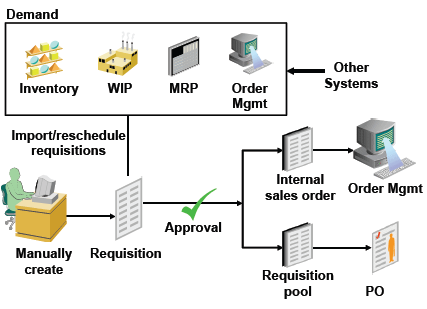
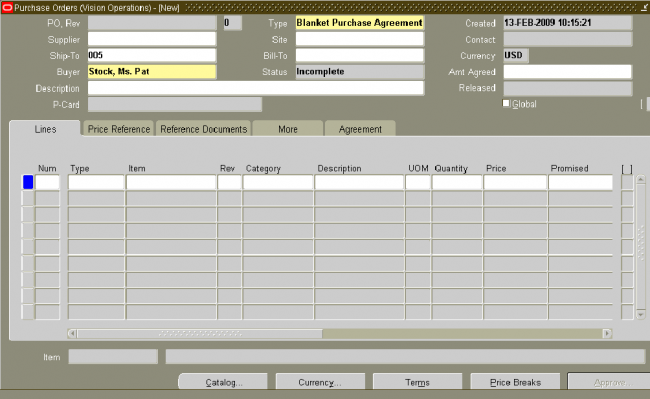
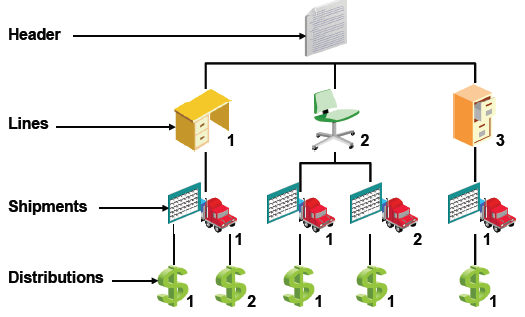
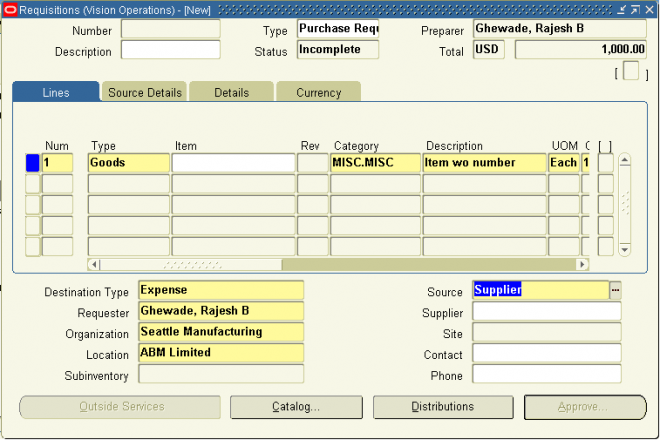
Purchase Order Lines

1. Lines
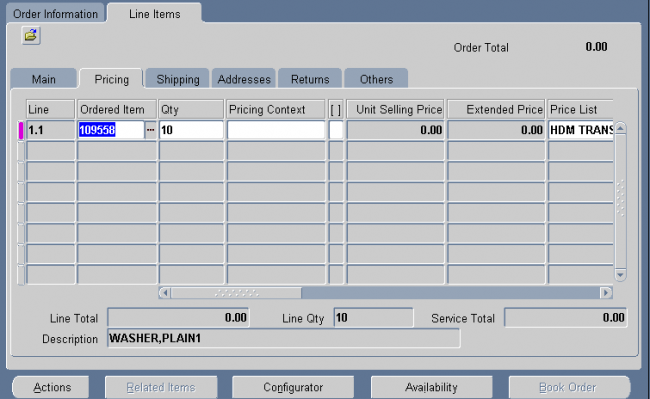
Use the Lines tabbed region in the Purchase Orders window to create purchase order lines.
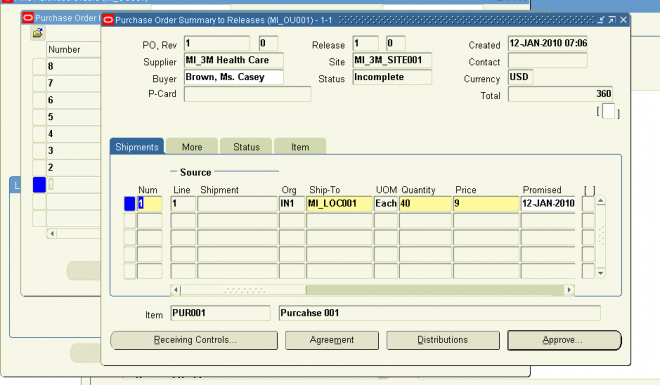
When you save your work, Purchasing creates shipments and distributions if sufficient valid default information is available. Use the Purchase Order Shipments window to review, edit, and create multiple shipment lines for each purchase order line


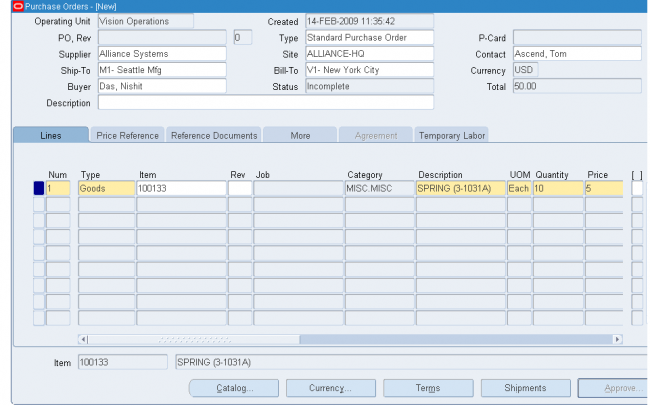
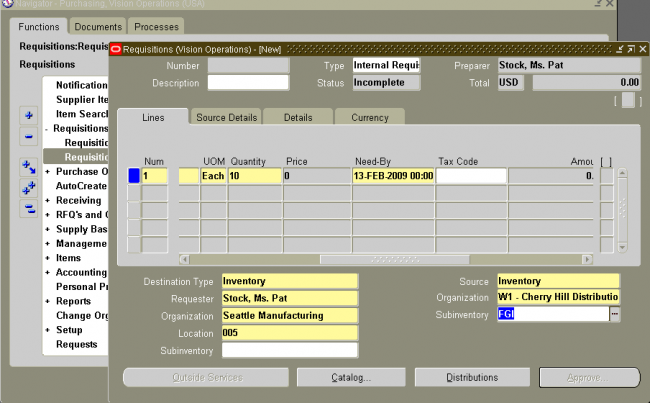
1. Enter the purchase line Number for the purchase order line. If you start a new purchase order line, Purchasing displays the next sequential line number available. You can accept this number or enter any line number that does not already exist.
This number is used for all tabbed regions in the Purchase Orders window.

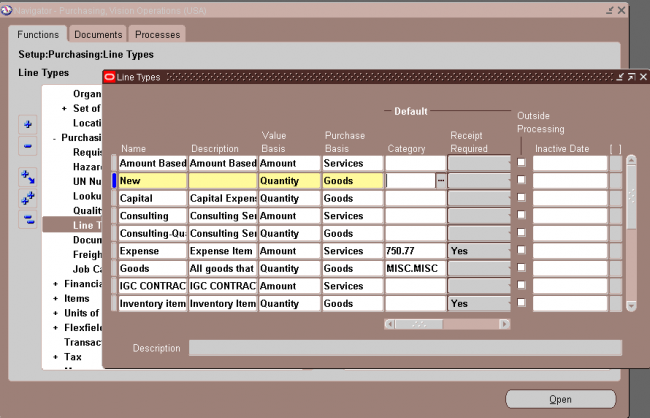
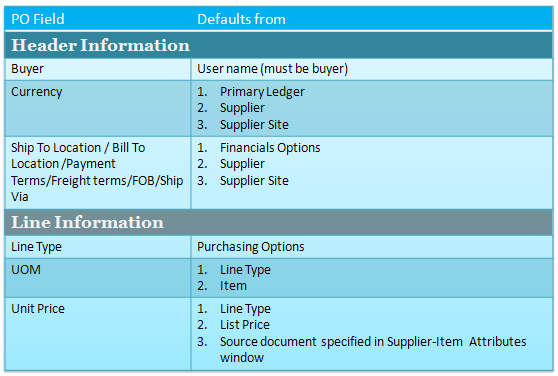
2. Enter the line Type for the item. When you create your purchase order line, you enter a line type as part of your item information. When you enter a line type, Purchasing automatically copies the corresponding defaults. You can change the
line type after you have saved your work, if the change is in the same line type class, but Purchasing won't automatically copy the new defaults. If you change the line type before you save your work, Purchasing automatically copies the new
defaults if the new line type is in a different line type class.

You can enter predefined items for your purchase order line only when you specify a quantity based line type. If Bills of Material and Work in Process are installed and you have defined an outside processing line type, you can enter that type here to purchase outside processing.

To enter lines for services, you can specify a line type that has its basis as amount. If Oracle Services Procurement is implemented, services lines with a rate based line type can be entered or fixed price based line type can be created from the Supplier Item Catalog.

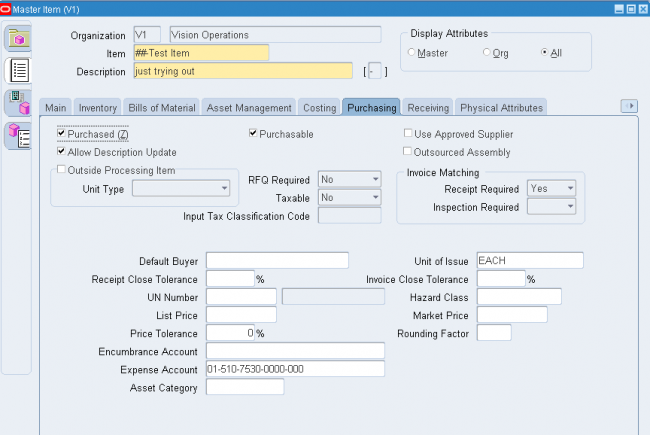
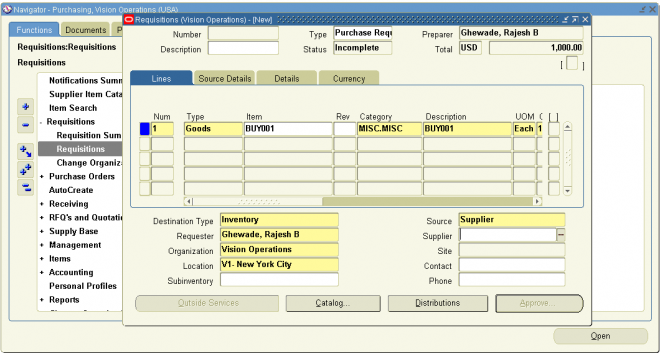
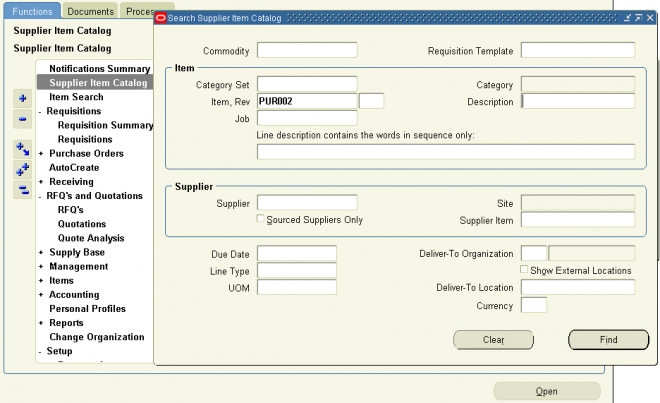
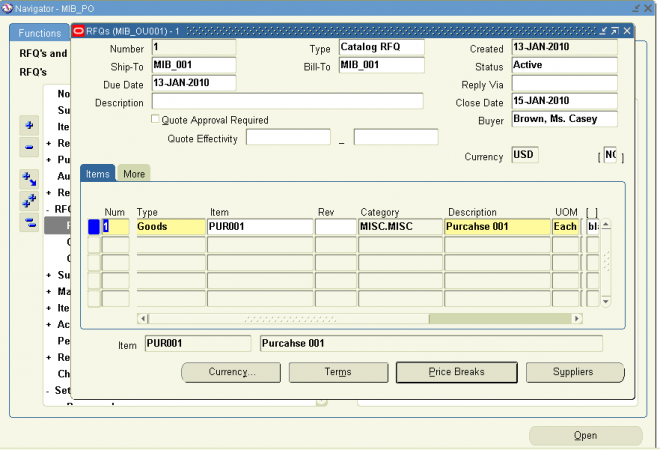
3. Enter the Item you want to purchase. If you enter an item, Purchasing displays the purchasing category, item description, unit of measure, and unit price associated with the item. To create a purchase order line for a one-time item, simply skip the item number field and enter a purchasing category and an item description. If you are purchasing outside processing, you can enter only outside processing items.
If you enter an item that is under automatic sourcing control the unit price will be displayed and reference information included from the most current agreement available to Oracle Purchasing.Note that you cannot enter an outside processing item in a global agreement, regardless of the item's defining organization.

4. Enter the total Quantity you are ordering on the purchase order line.

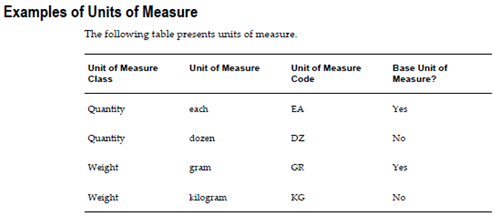
5. Enter the UOM of the item. The unit of measure qualifies the quantity you enter on the purchase order line. When you choose a line type, its default unit of measure appears here. When you choose an item number, its unit of measure overrides the line type default. You can change the UOM until the item has been received, billed, or encumbered. If the line is sourced to a quotation or global agreement, you cannot change the UOM after the line has been saved.

6. Enter the unit Price for the item. If you choose an item, the default price is the list price for the item. Otherwise, the default price is from the line type. The Amount field displays the unit price multiplied by the quantity. If you entered an item that is under automatic sourcing control the unit price will be displayed from the most current agreement available to Oracle Purchasing.
Note: If you manually override the defaulted price, Oracle Purchasing does not recalculate the price when pricing related
changes are made to the purchase order

7. Enter the Promised date and time that the supplier promised delivery of the items.
Multiple distributions, Promised date, and Need-By date display as "multiple" at the line level.

8. Enter the Need By date and time when the requester needs the item. If you are using Master Scheduling/MRP, you must provide either a need-by date or a promised-by date for shipments that correspond to purchase order lines with Master Scheduling/MRP planned items. A need-by date is also required for Inventory planned items.

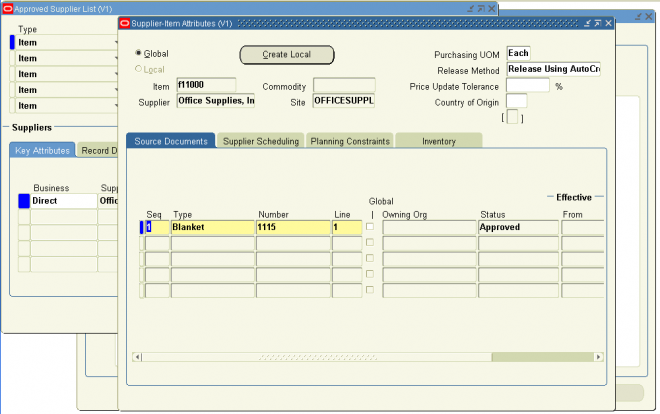
9. Supplier item shows if there is any supplier cross reference item

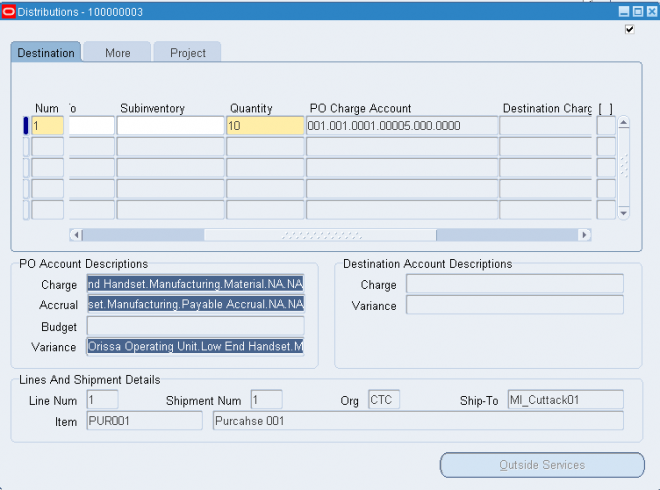
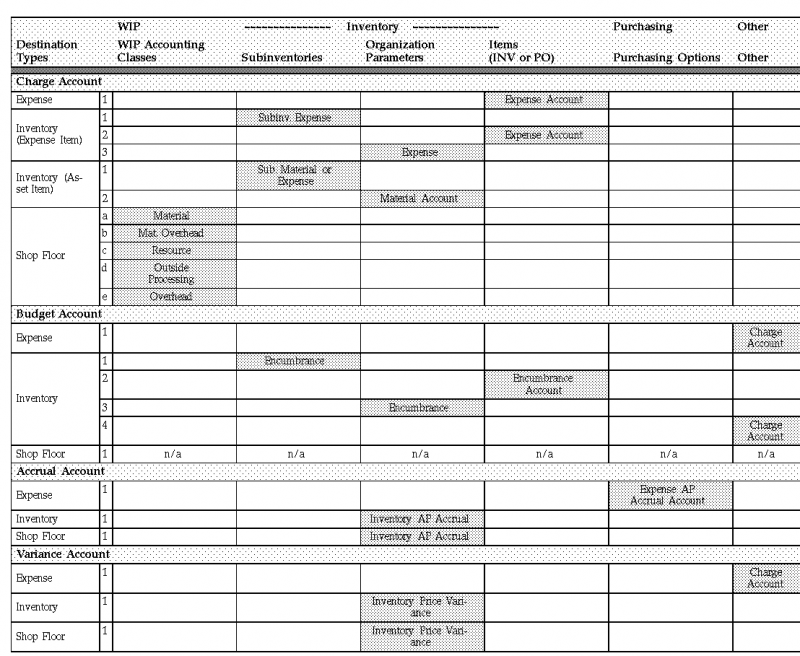
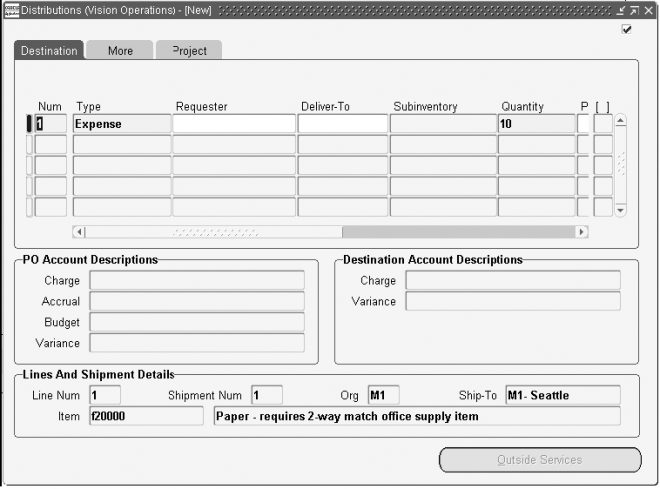
10. Charge account field shows
Charge A/C in distribution line - In case of standard PO
Blank - In case of BPA
A/C or Multiple - In case of planned purchase order
When planned PO is created the charge A/C in line level shows the charge A/C in distribution level. After we create a release against the PPO with a quantity less than orginial quantity in the PPO the charge A/C in line level changes to Multiple.

2. Price Reference
 

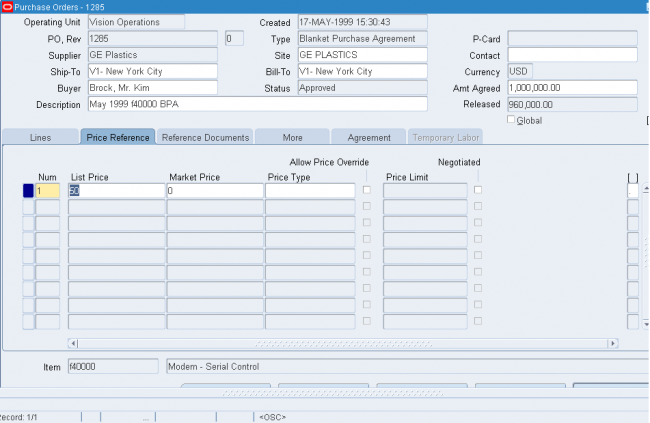
1. Enter the List Price for the item. If you have entered an item, Purchasing displays the list price for the item.  You
can accept the default list price or change it. Use this field to help evaluate your buyers. Purchasing uses the list price you enter here in the savings analysis reports.

2. Enter the latest Market Price for the item. If you enter an item, Purchasing displays the market price for the item. Use this field to help evaluate your buyers. Purchasing uses the price you enter here in the savings analysis reports if you do
not provide a value in the List Price field

3. Enter the Price Type from your lookup codes.

4. For planned purchase orders and blanket purchase agreements only, check Allow Price Override to indicate that the release price can be greater than the price on the purchase agreement line. If you allow a price override, the release price cannot exceed the Price Limit specified on the line. If you do not allow a price override, Purchasing displays on the release the shipment price from the purchase agreement and prevents you from updating it. You cannot enter this field if the line type is amount based.

5. If you allow price override, enter the Price Limit. This is the maximum price per item you allow for the item on this agreement line.

6. Select Negotiated to indicate that the purchase price is negotiated. If the actual price is greater than or equal to the list price, then the field is unchecked as the default. If the actual price is less than the list price, then the field is checked as the default. You can accept the default value or change it.

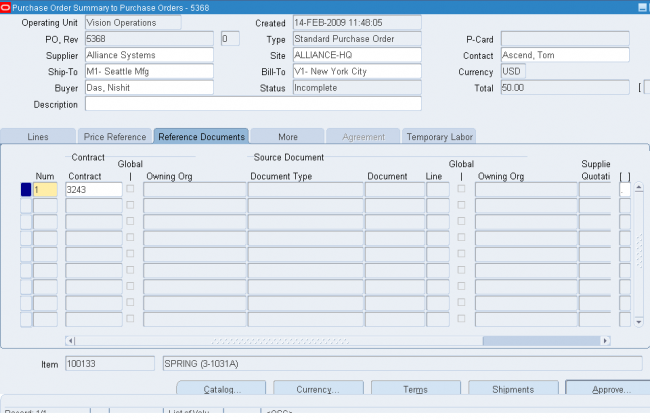
3. Purchase Order Reference Document
 
Use the Reference Documents tabbed region in the Purchase Orders window to enter reference document information for purchase order lines.
Purchasing lets you reference quotation information on your purchase orders.
 
Enter the Contract purchase agreement number. You cannot enter a contract number until you have entered a supplier in the header, and the contract must be for this supplier. The contract you choose must be effective; that is, the current date has to be within the effective date and the expired date of the contract. If you reference a contract purchase agreement on a standard purchase order line, Purchasing adds the total amount of the purchase order line to the total amount of the contract purchase agreement. Purchasing lists only those contracts with the same supplier as the one on your standard purchase order.

If this purchase order references a global agreement then Global will be checked and the Owning Org will display the organization that owns the global agreement.
Important: If you have not yet provided a supplier on your standard purchase order, you cannot choose any contracts for your purchase order lines. If you want to change the supplier on your standard purchase order after you reference a contract on your purchase order lines, you must remove the references to the contract purchase agreement, or you will not be able to approve the purchase order. Purchasing lets you change suppliers only on standard and planned purchase orders with the status Incomplete

4. PO More TAB3

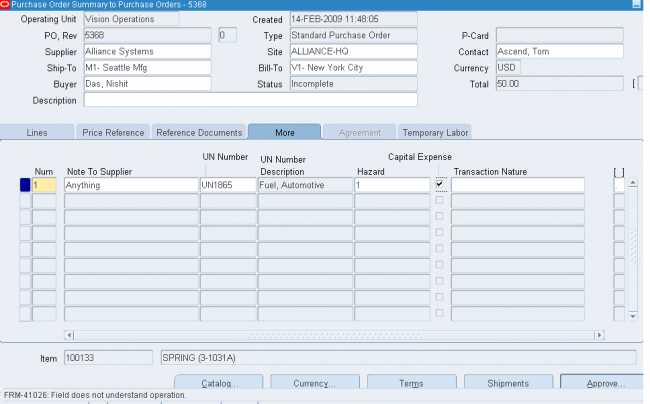
1. Enter a Note to the Supplier for the purchase order header. You can enter up to 240 characters. If you want to enter unlimited notes, use the Attachments feature.
2. Enter the UN identification Number for the item on the purchase order line. The default, if present, is from the item record.
3. Enter the Hazard Class for the item on the purchase order line. If you enter a UN number, Purchasing displays the corresponding hazard class. The default, if present, is from the item record.
4. Select Capital Expense to indicate that the purchase is a capital expenditure.

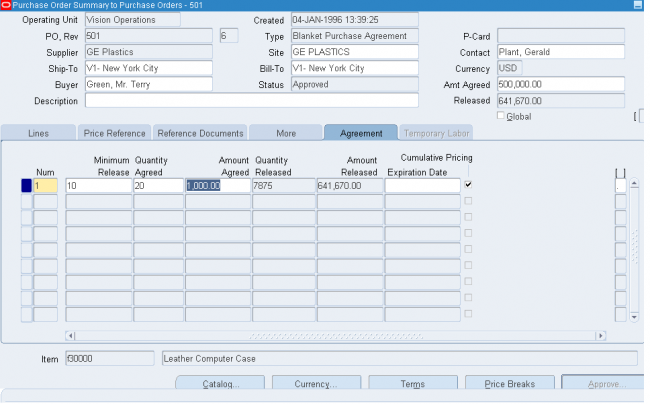
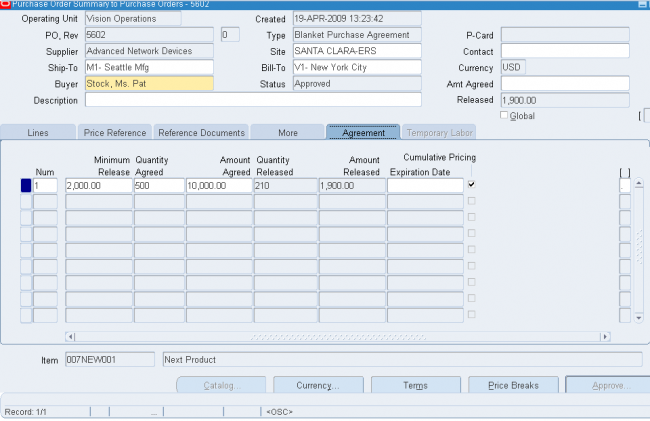
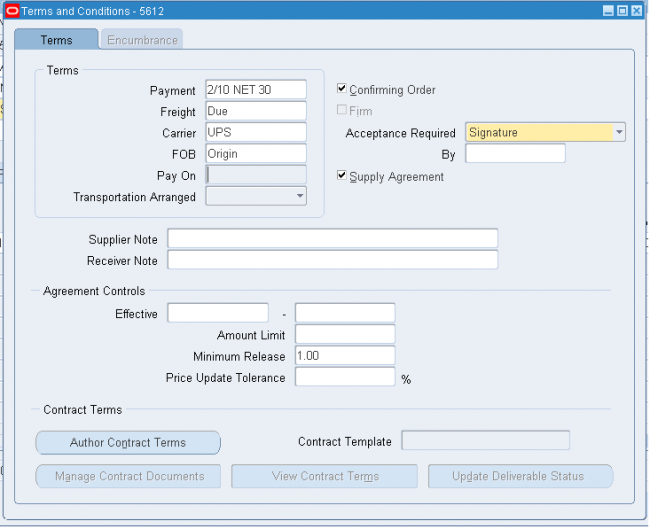
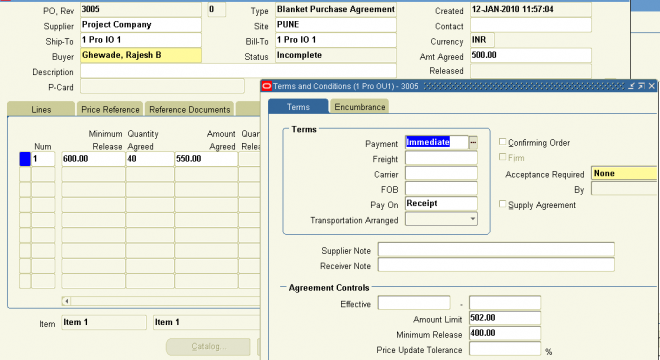
5. Purchase Agreement Information


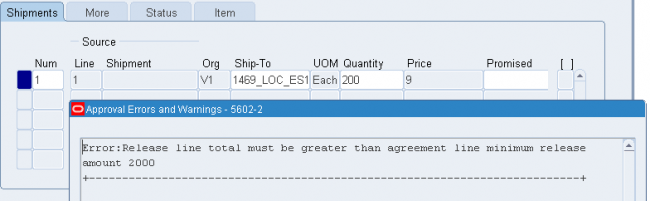
1. In the Agreement tabbed region of the Purchase Orders window (when you've selected a Type of Blanket Purchase Agreement), enter the Minimum Release Amount against this purchase agreement line.

2. Enter the Quantity Agreed. This is printed on your purchase orders. Purchasing does not automatically compute the quantity agreed from the amount agreed. Use the Amount Agreed field to provide agreed amounts.

3. Enter the Amount Agreed. Purchasing does not automatically compute the amount agreed from the quantity agreed.

4. Optionally enter an Expiration Date to prevent ordering of the item after that date.
If the item on the agreement has expired but already exists on an open release, you can still use the release. However, the expired line item will not be used for sourcing, and any future releases you create will not allow using the expired item.

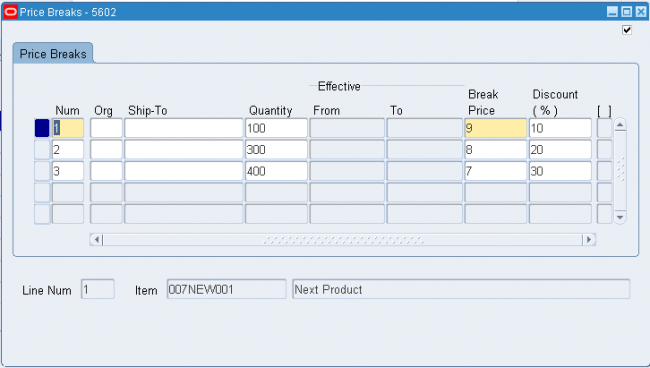
5. Select Cumulative Pricing if you want Purchasing to choose the price break by adding the current release shipment quantity to the total quantity already released against the purchase agreement line. Otherwise, Purchasing chooses the price break by using the individual release shipment quantity.

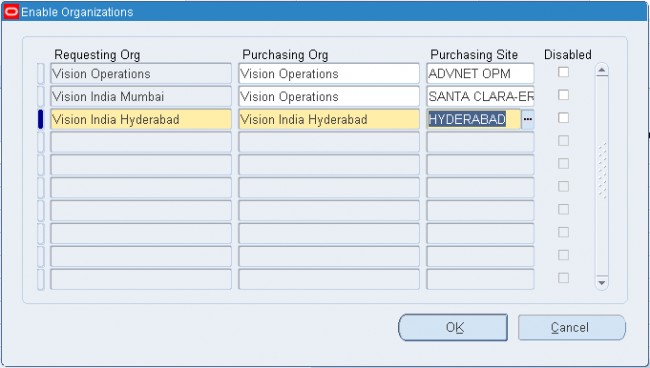
Note: Cumulative Pricing can not be used with global agreements. Organizations can take advantage of negotiations completed with suppliers by other business units. To do this the original blanket purchase agreement or contract purchase
agreement is first created as a global agreement (Global checkbox). Then the agreement is enabled for use in the authorized business units (operating units). 


Entering Currency Information

(Usage
Most of the time the primary currency we have defined in our GL is used for creating purchase order but if the supplier requests and we want to do the payment to the supplier in a different currency we can do that by changing the currency in PO currency form.
The convesrion rate is required as the system 'll transact only in the functional currency. The conevrsion rate can be globally mentained by using a corporate rate but in case of smaller firm where couple of people deals with the purchasing then they can use the user conversion type and put any conversion rate)

Use the Currency window to enter and change currency information for purchase orders, RFQs, and quotations.
For purchase orders, you can change currency information until the purchase order is approved or encumbered. Note that changing the purchase order supplier to one that uses a different currency overrides any information you have entered in this region.


1. Purchasing displays the functional Currency from your Primary Ledger, and you can accept or change the currency. If you change the currency, you must update the unit price on all lines to reflect what that price would be at the new currency.

The best practice is to enter the supplier information in header and then change the currency. You can change the currency information before entering the supplier information but after that when you enter the supplier name, the currency information 'll automatically change.

If you change the currency information after entering the Line details then the system 'll show below error message.

2. You can enter a Rate Type only if the currency for this document is different from your functional or base currency. The default is the currency rate type from the Purchasing Options window.
Purchasing supplies you with one of two predefined currency rate types: User or EMU Fixed. A rate type of User means that you can enter a conversion rate between the foreign currency (or transaction currency in a document entry window) and the base currency (or functional currency, defined in your set of books). A rate type of EMU Fixed means that if either your transaction currency or your functional currency is Euro (the European Monetary Unit currency) and the other is another
European currency, Purchasing automatically enters a conversion Rate Date and Rate for you that you cannot change.

You can define additional currency rate types in the Daily Conversion Rate Types window, and you can enter User or one of your additional types as the default.
Note that you cannot approve a purchase order without a rate type if you are not using your functional currency.

3. The default Rate Date is the current date. Purchasing uses this date to obtain the currency conversion rate from your conversion definitions and displays the rate if it finds one.

4. If the rate type is User, you can enter the conversion rate between the foreign currency and your functional currency. This rate corresponds to the value of your foreign currency in your functional currency. For example, if your functional
currency is US Dollars, the foreign currency is British Pounds, and 1 British Pound equals 2 US Dollars, you should enter 2 in this field. For other rate types, when you enter a rate date for which a rate has been defined, Purchasing displays the rate.

Receiving PO

Receiving is essentially a two step process - you receive onto your receiving dock and then the second step is to deliver to either an Expense destination (like an office supply room) or to an Inventory destination (like a subinventory in a warehouse). There are also intermediate steps in the receiving flow process after receipt for Inspection capability to inspect the received items before delivering.

The accounting transactions essentially mirror the above receiving flow, to allow visibility of the various liabilities as products, goods and services essentially flow through the receiving business processes you will encounter accounting entries in various accounts for each step in each process.

You can print the receiving and inspection documentation you need. For example, you can print Receipt Travelers. Also, you can prepare for incoming receipts by printing the Expected Receipts Report to help you identify items and quantities you expect to receive. You can use this report to plan your work, identify receipts satisfying an urgent demand, and control unexpected receipts. Finally, you can produce summary and detail receiving transaction reports by item, supplier, purchase order number, and/or receiving date range.

Receiving Locations

Receiving locations are designated areas in which you temporarily store items before you deliver them to their final destinations. Your receiving dock and the area in which items are inspected are receiving locations. Receiving locations are not required when the routing is Direct Receipt, when you are delivering goods to their final locations. However, when the routing is Standard Receipt, you initially receive the items into a receiving location, and you must specify the receiving location. If the routing is Inspection Required, you could transfer the items to an inspection location before delivering them to their destination. If necessary, you can create additional receiving locations, such as a cold storage area where items can be held pending inspection.

Important Features
1. Receive services, inventory, expense, and outside processing items using one screen. You acknowledge receipt of services by receiving amounts of the service, generally related to receipt of an invoice. You receive inventory items to expense or asset Subinventories, you receive expense items to the requestor, and you receive outside processing to the shop floor

2. Distinguish closed for invoicing from closed for receiving. Purchasing automatically closes your purchase order for receipt when it is fully received. You can manually close partially received purchase orders if you no longer expect any more receipts against them. Close for invoicing and close for receiving are managed using tolerances. You can specify that when you have received a certain percentage of a shipment, Purchasing will close the receipt. This is a soft close, and you can reopen the receipt. Purchasing rolls up closing to the line and header level, and "Closed" information does not show in the Open Purchase Orders Report. Also, if there is a remaining balance, closed quantities are no longer visible as supply scheduled receipts to MRP/ATP.

3. Decide how you accrue un-invoiced receipts. For instance, you can accrue receipts perpetually or at period-end for expense items. Purchasing uses perpetual accrual for your inventory and shop floor item receipts. Purchasing and Inventory together provide you with perpetual visibility and control on your accrued liabilities for inventory items. Inventory lets you maintain the value of your inventories on a perpetual basis. And Purchasing automatically records your accrued liability in your general ledger as you enter receiving transactions. Purchasing also provides you with complete visibility and control of your inventories values, accrued liabilities for inventory and non-inventory items, purchase price variances, and invoice price variances. And Purchasing provides you with the information you need to facilitate your period close and your inventory, purchasing, and payables reconciliation process.

4. Identify and handle hazardous materials. You can use attachments to provide detailed handling instructions. Purchasing displays hazardous material information in the receiving, transfer, and inspection windows as well as on the Receipt Traveler.

5.1. Record returns to suppliers. You can return items that are damaged on receipt or that fail your inspection process. If you return items that you have already delivered to inventory, Purchasing automatically updates the inventory stock levels.
5.2. Enable the automatic creation of debit memos for Return to Supplier transactions.

Accounting transactions in PO

Definition of Items used in Purchasing
There are 3 kinds of  Items used in Purchasing.

Expense Items -               Referred to as Item A
Inventory Expense Items - Referred to as Item B
Inventory Asset Items  -    Referred to Item C

1) Expense Items - Referred to as Item A.
These items normally have  the following attributes.
       INVENTORY_ASSET_FLAG = N
        PURCHASING_ITEM_FLAG = Y
        INVENTORY_ITEM_FLAG =  N
       
2) Inventory Expense Items - Referred to as Item B
These items normally have  the following attributes.
    INVENTORY_ASSET_FLAG = N
    PURCHASING_ITEM_FLAG = Y
    INVENTORY_ITEM_FLAG =  Y
       
3) Inventory Asset Items  - Referred to Item C
These items have  the following attributes.
    INVENTORY_ASSET_FLAG = Y
    PURCHASING_ITEM_FLAG = Y
    INVENTORY_ITEM_FLAG =  Y
    COSTING_ENABLED_FLAG = Y 

PO Account Generator
The account generator behaviour will also depend on
- the destination org (on the po shipment)
- the destination type (inventory or expense) on the po distribution


You also need to remember that the item expense account defaults from the org when items are created, but you probably need to set a specific value for an item.

PO Accountings
1. Receving A/C - Defaults fro receving options for the receving organization

2.1.  I/V A/P Accrual account A/C - Defaults from Org parameter Other Acc tab

2.2  Expense A/P accrual A/C - Default from purchasing parameter Receipt Accounting tab

3.1 PO Distribution Charge (Delivery Acc) for Non Inventory Expense A/C -  Defaults from Item Exp A/C
                            
3.2 Delivery Acc for Asset Item A/C -  Mat. A/C from
                                                                        i>Sub Inevntory
                                                                        ii>Org Parameter

3.3 PO Distribution Charge Delivery Acc for Inevntory Expense A/C -  Defaults from A/Cs in following precedence
                                                                           i>Sub Inventory Expense A/C
                                                                           ii>Expense A/c in Item Master if above A/C is not available
                                                                           iii>Expese A/C from Org parameter if above 2 A/Cs are not avaialble

3.4
When Purchase Order is created with out an item number (In case of Non_inventory Items, item number exists but the inventory field is disabled but PO can also be created for items which are not defined in inventory) with value basis as Amount (i.e. Purchase basis as Service) - The PO charge A/C needs to be manually entered.

Notes:
1. We can have two differnt distribution lines for a single shipment.
In case of inventory items if the item is received in two differnt subinventories then we can create two differnt distribution lines for the same shipment and the charge a/c would default from subinventories if exits
In case of Non-Inventory items we can manually select as many charge a/cs as required.

2. In standard PO WF For an inventory expense PO charge a/c to default from the sub-inventory level, the item must be restricted to the subinventory.

1. Inventory Asset Items
Receiving:
Receiving Inspection account @ PO price XX Dr.
                                               Inventory A/P Accrual account @ PO price XX Cr.
Delivery:
Subinventory accounts(PO Charge A/c) @ standard cost XX  Dr.
                                               Receiving Inspection account @ PO price XX Cr.
                                               Debit/Credit Purchase Price Variance
and, if applicable
       Subinventory Mat Over Head XX Dr
                                                     MOH Absorption XX Cr
PPV = (PO unit price – standard unit cost) x quantity received

Invoice:
Inventory A/P Accrual account Dr.
                                                Supplier Liability A/C cr.

2. Inventory Expense Items
Receiving:
Receiving Inspection account @ PO price XX Dr.
                                                Inventory A/P Accrual account @ PO price XX Cr.
Delivery:
Sub inv Expense A/c(PO Charge) Dr.
                                                 Reciving Valuation A/c Cr.
Invoice:
Inventory A/P Accrual account Dr.
                                                 Supplier Liability A/C cr.

3. Fixed Asset Item (Same as 4. Expense Items Accrual @ Receipt)
Receiving:
Receiving Inspection account @ PO price XX Dr.                                                       Org Parameter
                                                Expense A/P Accrual account @ PO price XX Cr.        Purchaing Parameter
Delivery:
Asset clearing accounts(PO Charge A/c) @ standard cost XX  Dr.                         item/employee
                                               Receiving Inspection account @ PO price XX Cr.
                                               Debit/Credit Purchase Price Variance                           PPV=Chrage AC
Invoice:
Expense A/P Accrual account Dr.
                                               Supplier Liability A/C cr.                                                    Supplier Site

POST Mass addition:
Asset Cost A/C Dr.                                                                                                          Asset category
                                            Asset Clearing A/C Cr.                                 

Depriciation :
Depriciation expense A/C Dr.                                                                         Asset - Expense A/C
                                                  Accumulate Depriciation Exp Cr.                 Asset Category


4. Expense Items Accrual @ Receipt

Receiving:
Receiving Inspection account @ PO price XX Dr.
                                                Expense A/P Accrual account @ PO price XX Cr.
Delivery:
Item Expense A/c(PO distribution charge A/C) @ PO price XX Dr.
                                                Receiving Inspection account @ PO price XX Cr.
Encumbrance @ PO price XX Dr.
                                                Reserve for Encumbrance @ PO price XX Cr.
Invoice:
Expense A/P Accrual account Dr.
                                                 Supplier Liability A/C cr.

5. Expense Receipts Accruals–Period End
There would be no accounting in exepnse material receving and delivery.
When an invoice is created and matched to the PO for the expense item, charge a/c is debited to Supplier Liability A/C.
PO Charge A/C (Item Exp./Sub Exp.) Dr.
                                    Supplier Liability A/C Cr.


Purchasing does not record any accounting entries for expense during a receiving transaction if you use period–end accruals. You record all of your uninvoiced liabilities at month end using the Receipt Accruals – Period–End process. Use the Receipt Accruals – Period End process to create period–end accruals for your uninvoiced receipts for expense distributions. Purchasing creates an accrual journal entry in your general ledger for each uninvoiced receipt you choose using this form. If you use encumbrance or budgetary control, Purchasing reverses your encumbrance entry when creating the corresponding accrual entry.
Purchasing never accrues an uninvoiced receipt twice. Each time you create accrual entries for a specific uninvoiced receipt, Purchasing marks this receipt as accrued and ignores it the next time you run the Receipt Accrual – Period–End process. Purchasing creates accrual entries only up to the quantity the supplier did not invoice for partially invoiced receipts.

Purchasing creates the following accounting entries for each distribution you accrue using the Receipt Accruals – Period–End process:
PO charge account @ Uninvoiced Quantity x PO unit Price XX  Dr.
                                                                Expense A/P accrual account @ Uninvoiced Quantity x PO price XX  Cr.

As soon as you open the next period, Purchasing reverses the accrual entries using the following accounting entries:
Expense A/P accrual account @ Uninvoiced Quantity x PO price XX  Dr.
                                                                 PO charge account @ Uninvoiced Quantity x PO unit Price XX Cr.


6. Standard Invoice
Charge Acoount Dr.
                     Supplier Liability A/C Cr.

Encumbrance Accounting
1. PO Approval/Fund reserved
Encumbrance (Budget A/C in PO distribution) A/C Dr.

When the program - Create Journal runs in GL the encumbrance A/C is created and after posting into GL the Reserve Encumbrance A/C is credited.
So Final Accounts
Encumbrance A/C Dr.
                      Reserve for Encumrance Cr.

2. Receving
Recving Inspection A/C Dr.
                         A/P Accrual A/C cr.

3. Delivery
Inv valuation  Dr.
                        Receiving Inspection Cr.
                        Encumbrance Reversal Cr.
   Purchase price variance or rate variance

4. Invoice
In case of matched with a PO, Payables encumbers funds for variances during Payables Invoice Validation for purchase order and receipt matched invoices.
If you enter a non-purchase order matched invoice, Payables will encumber funds for it during Payables Invoice Validation.
All Payables encumbrances are reversed when you create accounting entries. If you enable Use Requisition Encumbrance, you must also enable this option.

Expense Items
Receiving:
Reciving Valuation A/c Dr.

                                  
Expense A/P Accrual A/c Cr.
Delivery:
Expense A/c Dr.

                                  
 Reciving Valuation A/c Cr.

Inventory Expense Items
Receiving:
Reciving Valuation A/c Dr.

                                  
Inv. A/P Accrual A/c Cr.
Delivery:
Expense A/c Dr.

                                  
 Reciving Valuation A/c Cr.

Asset Items
Receiving:
Reciving Valuation A/c Dr.

                                  
Inv. A/P Accrual A/c Cr.
Delivery:
Mat. Valuation A/c Dr.

                                  
 Reciving Valuation A/c Cr.

Entering Express Receipts

The express function is a quick method of entering receipts and receiving transactions. This function is available in the Receipts window if you have specified or inferred a source in the Find Expected Receipts window. (The source would be inferred if you entered, for example, a purchase order number.) In the Receiving Transactions window, the express function is available for deliveries regardless of your search criteria in the Find Receiving Transactions window. Performing any manual action in a line disables the Express button, and it is not enabled until you have again selected the Find button.

When you select the Express button in the Receipts window, Purchasing displays the Express Details window in which you must enter the destination: Final Destination or Receiving location. When you select the OK button, all lines are selected and the Express button changes to Unexpress. When you select the Express button in the Receiving Transactions window, all lines are selected and the Express button changes to Unexpress. In either case, you can select the Unexpress button to return to manual mode. Otherwise, you can deselect lines to omit them from express processing and then save your work to initiate express processing.

Note: You cannot perform data collection using Oracle Quality when you select the Express button in the Receiving Transactions window


To find source documents:
1. Navigate to the Find Expected Receipts window by selecting Receipts on the menu.
2. Enter search criteria to find the source documents for which you want to enter express receipts. You must include the supplier or organization in the source criteria.
3. Select the Find button to display the Receipts window with line(s) available for receipt displayed in the Lines alternative region.
 

To enter express receipts:
1. Select the Express button to open the Express Details window.
2. Select the Destination Type: Final Destination or Receiving location.
3. Select the OK button. This changes the Express button to Unexpress and selects all the lines for express receipt.
4. Optionally deselect individual lines to omit them from the express receipt.
5. Save your work to begin express receipt validation processing.
 

Cascading Receipts and Receiving Transactions

The Cascade function facilitates the distribution of a given quantity of an item from a single supplier across multiple shipments and distributions. This function is available in the Receipts window if you have specified or inferred a source and an item in the Find Expected Receipts window. (The source and item would be inferred if you entered, for example, a purchase order number.) In the Receiving Transactions window, the cascade function is available for deliveries if you have specified or inferred an item in the Find Receiving Transactions window. Performing any manual transaction in a line disables the Cascade button, and it is not enabled until you have again selected the Find button in the appropriate Find window.

When you select the Cascade button, Purchasing displays the Cascade Details window in which you must enter the cascade quantity and the unit of measure. When you select the OK button, the cascade process begins.

The process starts at the first displayed line and allocates the supply available to receive/deliver to that line from the cascade quantity you entered. The process continues to the next line and again allocates the quantity available to receive/deliver, continuing until either the process reaches the last queried line or the cascade quantity is exhausted. Since the lines are displayed in order by promised date/need-by date, the process operates as a First In/First Out procedure. If you entered a cascade quantity larger than the quantity available to receive/deliver, Purchasing displays a dialog window explaining that the process could allocate only so many. If the quantity available to receive/deliver is greater than the cascade quantity, the last receipt/delivery may be partial. To clearly indicate that the cascade quantity has been exhausted, Purchasing displays a transaction quantity of 0 for the remaining lines.
 

The cascade function does not modify any destination information; it uses the information defined by the routing and defaulted from the shipment.

If a given shipment line has multiple distributions and the default routing for that line is direct receipt, the cascade process explodes the line and allocates the quantity available on the shipment line to the component distributions based on the supply available for the distribution. If you have over distributed a given line, Purchasing allocates all remaining supply for the shipment to the last distribution. If you have over delivered the transactions with prior receipts or transactions, then the process may fill the lines with undesired values, but you can reallocate in this situation once the cascade process is complete.

Record validation is disabled during the cascade process to facilitate the running of the process, but all lines are validated when you save them. Quantities are applied to lines in the expectation that you will transact the line as the default routing intended. However, you can manually override these values.

Accountings in PO

Inventory Accruals
Inventory and Purchasing provide you with visibility and control of your accrued liabilities for inventory items. Purchasing automatically records the accrued liability for your inventory items at the time of receipt as perpetual accruals. This transaction is automatically recorded in your general ledger at the time of receipt (unless you specified otherwise when setting up periodic costing). The inventory expense is recorded at delivery if you use Standard Delivery and at receipt if you use Direct Delivery. You have options to determine whether Purchasing and Inventory reverse encumbrances. The option used is dependent on how you compare encumbrance to budget balances in inventory for your organization.

Expense Period–End Accruals
Purchasing optionally accrues uninvoiced receipts of non–inventory items when you close a period. You can choose which uninvoiced receipts are accrued. At period end, Purchasing automatically creates a balanced journal entry for each uninvoiced receipt, which will automatically be reversed at the beginning of the next period. Purchasing creates a reversing entry for the encumbered amount corresponding to the expense while creating an accrual entry for the receipt in the general ledger if you are using encumbrance at your site.

Expense Perpetual Accruals
Purchasing optionally provides you with the ability to accrue non–inventory liabilities at the time of receipt. If you choose at time of receipt, Purchasing records an accrued liability and charges your receiving inspection account for each non–inventory receipt. This transaction is automatically recorded in your general ledger at the time of receipt. Purchasing creates a reversing entry for the encumbered amount at the time you deliver the goods to the final inventory or expense destination. When an invoice is matched to a purchase order and approved in Payables, it is not necessary for Payables to record an
encumbrance for the expense. However, Payables will record an encumbrance for invoice price variance or exchange rate variance, if the variance exists.

Purchase Price Variance
Purchasing and Inventory provide you with visibility and control of your purchase price variances. When you use standard costing, Purchasing and Inventory automatically calculate and record purchase price variances as you receive your inventory items into inventory. If desired, Purchasing and Inventory automatically calculate and record purchase price variances for your outside processing receipts into work in process. You can use the Purchase Price Variance Report to review the accuracy of the standard costs for your purchased items and services.

Invoice Price Variance (IPV) and Exchange Rate Variance
Purchasing and Inventory provide you with visibility and control of your invoice price and exchange rate variances. When Payables accounts for invoices, it automatically creates accounting entries for price and exchange rate variances. You can use the Invoice Price Variance Report to review the accuracy of your purchase order prices.

Foreign Currencies
If the purchase order uses a foreign currency, Purchasing converts the purchase order price to the inventory functional currency. Inventory uses this converted value for receiving accounting purposes. Payables allows you to record exchange rate invoice variance to separate accounts.

Nonrecoverable Tax
If you use nonrecoverable or partially recoverable tax, the nonrecoverable tax amount is included in your period-end or perpetual accrual accounting. Nonrecoverable tax is also included in the invoice and exchange rate variances. Changing the exchange rate on the receipt may affect the nonrecoverable tax amount. See: Tax Defaults in Purchasing. See: Entering Receipt Lines.

Accrual Reconciliation and Write-Off
Purchasing and Inventory provide you with a complete reconciliation report of all of your accounts payable accrual transactions. You can quickly identify any mismatched items and write-off accrual transactions from your receiving, accounts payable, inventory, and work in process subledgers. See: Reconciling A/P Accrual Accounts Balance.

Expense Accrual Reporting
You can use the Uninvoiced Receipts Report to analyze your uninvoiced receipt liabilities for non-inventory purchases when you create accrual entries for them in your general ledger. You can control the amount of expenses you accrue by supplier and purchasing category. You can obtain detailed information about the purchase order receipts you accrued during your accounting period. See: Uninvoiced Receipts Report.

Period-End Accruals and Encumbrance
For period-end accruals when using encumbrances, Purchasing creates a reversing entry for the encumbered amount corresponding to an expense while creating an accrual entry for the receipt in the general ledger. When you accrue your receipts, Purchasing ensures that you do not duplicate entries for the period. At the beginning of the following period, you reverse the accrual entry for the expense and recreate the encumbrance entry you reversed in the previous period using General Ledger. See: Receipt Accruals - Period End Process.
If you use nonrecoverable or partially recoverable tax, the nonrecoverable tax amount is included in your encumbrances.

Inventory and Perpetual Expense Accruals and Encumbrance
For perpetual expense and inventory accruals, Purchasing and Inventory create a reversing entry for the encumbered amount at the time you deliver the goods to the final inventory or expense destination. When an invoice is matched to a purchase order and approved in Payables, it is not necessary for Payables to record an encumbrance for the expense. However, Payables will record an encumbrance for invoice price variance or exchange rate variance, if the variance exists.
If you use nonrecoverable or partially recoverable tax, the nonrecoverable tax amount is included in your encumbrances.

You need to define the following accounts before entering transactions in Purchasing and Inventory.

1. Receiving Account
Enter the general ledger account to record the current balance of material in receiving and inspection.Use the Define Organization or Receiving Options window to set up this account.
 

2.a. Inventory A/P Accrual Account

Enter a general ledger account to accumulate the inventory accounts payable accrual for this organization. This is the account used by Purchasing to accrue your payable liability when you receive your items. This account represents your uninvoiced receipts and is usually part of your accounts payable liabilities in the balance sheet. Payables relieves this account when the invoice is matched and approved.


2.b. Expense A/P Accrual Account
Enter a general ledger account to accumulate the expense accounts payable accrual for your purchasing installation. This is the account used by Purchasing to accrue your accounts payable liability for expense items at time of receipt when your Expense Accrual Option is On Receipt, or at period-end when your Expense Accrual Option is Period End. This account represents your uninvoiced receipts and is usually part of your accounts payable liabilities in the balance sheet.

Use the Purchasing Options window to set up this account.

3.a Purchase Price Variance Account
Enter a general ledger account to accumulate purchase price variance for this organization. The purchase price variance account is usually an expense account. This is the variance that you record at the time you receive an item in inventory, and is the difference between the purchase order cost and an item's standard cost. Purchasing calculates purchase price variance as:

PPV = (PO unit price - standard unit cost) X quantity received

Purchase price variance is not used for average costing.

Use the Organization Parameters window to set this account.

3.b. Invoice Price Variance Account
Enter a general ledger account to accumulate invoice price variance for this organization. This is usually an expense account.

IPV = (PO unit price - Invoice Price) X quantity invoiced

Invoice price variance is the difference between the purchase order price for an inventory item and the actual invoice price multiplied by the quantity invoiced.
Purchasing uses this account on the PO distribution when the requisition or purchase order is created. When Payables matches and approves the invoice, Payables uses the invoice price variance account from the purchase order to record invoice price variance entries. In addition, if you have exchange rate variances, Payables also records invoice price variance for exchange rate gains and losses.

Use the Organization Parameters window to set this account.

3.c. Exchange Rate Gain or Loss Accounts
Enter general ledger accounts to accumulate exchange rate gains or losses for this organization. These are usually expense accounts.
Exchange Rate Gain Or Loss = (Exchange rate used for PO - Exchange rate used for Invoice Price)

Exchange rate gain or loss accounts are used to record the difference between the exchange rate used for the purchase order and the exchange rate used for the invoice.

Use the Accounting region of the Financials Options window to set up these accounts.

4. Mat. Valuation Account
If the material that we deliver is an inventory asset then the inv valaution account that we define in organization parameter gets debited.


If the material that we deliver is an inventory expense item then the expense account that is attached to the item in item master PO tab is debited.


If the material that we deliver is an non-inventory expense item then the expense account that is attached to the oraganization(or subinventory if the subinventory has a differnt excepnese a/c) parameter

Account Generator

The default Account Generator processes in Oracle Purchasing build a charge, budget, accrual, and variance account for each purchase order, release, and requisition distribution based on the distribution's Expense, Inventory, or Shop Floor destination type. Oracle Purchasing always builds these accounts using the Account Generator; you cannot disable this feature.


All purchase orders, requisitions, and releases require accounting distributions. Oracle Purchasing automatically builds a charge, budget (if using budgetary control), accrual, and variance account for each document distribution.

Oracle Purchasing provides you with the features you need to:

  • Improve accuracy and speed document generation by automatically constructing accounting distributions.
  • Relieve buyers, requestors, and document preparers from the responsibility of specifying which accounts should be charged for their purchases.
  • Customize Account Generator account construction rules to match your business rules.

How to Use the Account Generator
The Account Generator in Oracle Purchasing utilizes Oracle Workflow. You can view and customize Account Generator processes through the Oracle Workflow Builder. You can also monitor account generation through the Oracle Workflow Monitor.

Before using the Account Generator on a production database in Oracle Purchasing to build accounts for purchase order, release, and requisition distributions, you must:

  • Define your Accounting Flexfield structure for each set of books.
  • Define flexfield segment values and validation rules.
  • Choose whether you want to use the default Account Generator processes, or if you need to customize them to meet your accounting needs.

Then do one of the following for each set of books

  1. Choose to use the default Account Generator processes.
  2. Customize the default Account Generator processes, test your customizations, and choose the processes for a flexfield structure, if necessary.


What the Account Generator Does in Oracle Purchasing

For Inventory charge account construction, the Account Generator further distinguishes between asset and expense purchases based on the item and subinventory that you provide for the distribution. If you select an expense item, the Account Generator disregards the subinventory and builds an expense charge account. If you select an asset item, the Account Generator evaluates the subinventory to decide whether to build an expense or asset charge account.

    Additional Information: You classify a subinventory as Expense or Asset by selecting the Asset Subinventory check box in the Oracle Inventory Subinventories window. You classify an item as Expense or Asset by selecting the Inventory Asset Value check box in the Costing section of the Master Item window. (This window is accessible through Inventory or Purchasing.)

When the Account Generator locates a source account based on the distribution destination type, it copies complete code combinations (full Accounting Flexfields) from designated fields to destination Accounting Flexfields. The default Oracle Purchasing processes do not build individual flexfield segments.
 

For example, to populate the Accrual account for distributions with an Expense destination type, the Account Generator locates the Expense AP Accrual Account that you specify in the Purchasing Options window as part of your application setup, and copies it into the Accrual Account Flexfield in your document.

Default Account Generator Account Sources

The horizontal axis lists the Oracle products and windows you use to specify the source accounts that the Account Generator references in Oracle Purchasing. The vertical axis lists the possible destination types for each account type the Account Generator constructs. The body of the matrix lists the fields you use to enter the reference accounts.

When more than one option is indicated for a particular account/destination type combination, the Account Generator attempts to locate the primary source account identified on the matrix with a 1. If this reference account is unavailable or not appropriate for the distribution information you provide, the Account Generator tries the source indicated as 2 and so on until it either successfully locates a reference account, or fails.

    Suggestion: Minimize your setup by specifying source accounts at the appropriate level of detail for your business. For example, you can specify the charge account source for Inventory (expense) destination types at the subinventory, item, or organization level. If an organization level account is sufficient for your business needs, it is not necessary to specify item or subinventory accounts.

For Shop Floor destination types, the Account Generator constructs the charge account based on the resource cost element associated with the Outside Processing job or schedule. In this case, the Account Generator selects one of the five possible source accounts; it does not step through a hierarchy of choices as it does for other destination types. Finally, the Account Generator does not construct a budget account for Shop Floor distributions, even if you are using encumbrance. Oracle Purchasing never encumbers outside processing purchases.

    Attention: The default Oracle Purchasing Account Generator processes includes one rule for building Expense destination charge accounts. If you specify an expense account for each of your predefined items, the Account Generator copies this code combination to the Charge Account field of your destination documents. If you are buying one-time or predefined items with no associated expense account, the Account Generator is unable to build a charge account. In this case, you can either manually specify a charge account in your document or you can design a custom Account Generator function to build Expense destination charge accounts based on field values like Requestor.

While you cannot edit the accrual, budget, or variance accounts that the Account Generator constructs, you can override or specify the charge account for uncommitted Expense distributions. In this case, you can either edit the charge account that the Account Generator constructs for you, or you can specify a default charge account in the Defaults region of your document. When you specify a default charge account, it always overrides any expense charge account that the Account Generator tries to provide.


Purchase Order Defaulting Rules

Purchasing uses a comprehensive defaulting mechanism to provide most required purchase order information and minimize document creation time. For example, when you are entering a standard purchase order and you want only one shipment and distribution for each purchase order line, you do not need to navigate beyond the Lines tabbed region unless you want to change the default information in the shipments and distributions that Purchasing automatically creates.

Note that the Account Generator may be unable to build accounts for a number of reasons related to defaults. For example, if you have entered a one-time item and there is no default account for your user or category. In this case, you must enter distributions in the Distributions window.


Item revision : The latest Item revision does not default onto a requisition or  purchase order for an inventory item that is revision controlled. This is currently standard functionality to not default a revision at the  requisition line level.  The same is true at the PO line level also.  The only  place we default the revision is on the receipt.  At time of receipt we do  default the latest revision although we allow the user to override the revision  with any valid revision.

Blanket Purchase Agreement

Enter the header line and price break information and save it.
Agrrement TAB


Minimum Release : The minimum amount of any BPA release. System wont allow to approve any release for this BPA for any values less than this amount.
While trying to approve a release of amount below than minimum release system 'll show below error message.


Price Break


As per the above price break, when a relase of quantity 100 is made the supplier gives a discount of 10%. Similraly when the release quantity is more than 300 quantity that shipment gets a discount of 20%.
If the cumulative pricing is enabled then when we make a release of
first 50 quantities the discount is zero
next 40 quantities the discount is zero
next 40 quantities the discount is 10%
next 280 quantities the discount is 20%
but if cumulative pricing is not enabled then the discounts for above cases would be
first 50 quantities the discount is zero
next 40 quantities the discount is zero
next 280 quantities the discount is 10%

Global Agreement
Organizations can take advantage of negotiations completed with suppliers by other business units. To do this the original blanket purchase agreement or contract purchase agreement is first created as a global agreement (Global checkbox). Then the agreement is enabled for use in the authorized business units (operating units).
(Note: The disadvantage of using global agreement is that cumilative pricing cant be used for global agreements)
 
To enable organizations for a global agreement:
1. From the Purchase Orders window, open a global agreement and select Enable Organizations from the Tools menu.
2. Select the Requesting Org operating unit. This organization can create requisitions that reference the global agreement.
3. Select the Purchasing Org operating unit. This organization creates purchase orders for the Requesting Org selected in the previous step.
Note: If encumbrance is enabled, the Requesting Org and the Purchasing Org must be the same.
4. Select the Purchasing Site. This is the supplier site in the purchasing organization which will fulfill the order.
5. To disable the global agreement in an organization check the Disabled box.
6. Click the OK button to save your organization assignments.
 

Purchase Order Components and Record Structure


Header
Each purchase order has a header that provides the supplier’s name/number and address (through sites), basic ship-to and bill-to addresses (through locations) and a status.

Lines
Goods or services ordered are listed on the Lines region, including quantities, price, need-by date, notes to supplier and price reference information. You can order system items or onetime items (a category and description). Even companies who are not inventory focused can benefit from defining system items to reduce data entry requirements for their staff.

Shipments
Use the Shipments window to specify inventory organizations, ship-to locations and the date you want your supplier to deliver the items on the purchase order line. A purchase order line with a quantity of six items can, for example, have two scheduled shipments on separate dates.

Distributions
Use the purchase order Distributions window to enter distribution information for purchase order shipments or to view distributions that Purchasing has automatically created for you.
You can enter multiple distributions per shipment line. You can also view the on-line requisitions included on the purchase order or enter information about paper requisitions in this window.

Defining Units of Measure

Units of measure are used by a variety of functions and transactions to express the quantity of items.

  • Defining units of measure is the second step in unit of measure management.
  • The values defined in the Units of Measure window provide the list of values available in unit of measure fields in other windows.
  • Units of measure are not organization-specific.

Primary Unit of Measure
Theprimary unit of measure is the stocking unit of measure for an item in a particular organization. The primary unit of measure is an item attribute that you specify when defining each item.

Prerequisites
You must define at least one unit of measure class.

Enter UOM from UOM Class FORM

After defining the UOM class click on Uint of measure button to enter a new UOM.
Enter the UOM namd and short name. Save the form
 

Define a UOM in UOM form
Navigate to the Units of Measure window.

1. Enter a unique name for the unit of measure.
2. Enter a unique abbreviation for the unit of measure with a maximum length of three characters.
For example, EA for each or HRS for hours.
3. Enter a unit of measure class.
4. Indicate if this is the base unit of measure for the unit of measure class.


To delete a unit of measure:
1. You can delete existing units of measure that are not base units of measure if no standard or item specific conversions are defined.

To make a unit of measure inactive:
1. Enter the date on which the unit of measure becomes inactive. As of this date, you can no longer assign standard or item-specific conversions to the unit of measure.

To change Base UOM:
Its not possible to change the base UOM from one UOM to another UOM
 

Entering Purchase Order Details Information

Use the Terms and Conditions window to enter terms, conditions, and control information for purchase orders. Discussed in this section are:

  • Purchase Order Terms
  • Agreement Controls
  • Contract Terms
  • Encumbrance Controls
1. Enter the Payment terms for the purchase order. Purchasing displays default payment terms that you can accept or change.

2
. Enter the Freight terms for the purchase order. Purchasing displays default freight terms that you can accept or change.

3
. Enter the Freight Carrier for shipment of the purchase order. Purchasing displays a default freight carrier that you can accept or change.

4
. Enter the FOB point for the purchase order. Purchasing displays a default free on board (FOB) designation that you can accept or change.

5
. Optionally select a value in the Pay On field to enable or disable Payment on Receipt for this document.
Receipt is defaulted in this field if the supplier site is set up as a Payment on Receipt site in the Supplier Sites window. Receipt means that Payment on Receipt will automatically generate an invoice for this purchase order.
Select Null if you do not want Payment on Receipt to automatically create an invoice for this document. If the supplier site is not set up as a Payment on Receipt site, this field is disabled, and you cannot change it.

6
. Select the Acceptance Required method. If you select a method, you can enter the due By date, when you require the supplier to return an acceptance for your purchase order.
Document only: Acceptance is entered for the entire document.
Document or Shipment: Acceptance is entered for the document or for individual shipments.
Document and Signature: If Oracle Procurement Contracts is implemented, acceptances are entered for the entire document with a signature. This method causes the approved document to have a status of Pre-Approved until
signatures are completed.

7. Select Confirming Order to indicate that the purchase order is a confirming order. A confirming order is an order that you are submitting formally to confirm a verbal order already placed with the supplier. For confirming orders, Purchasing prints the following on the purchase order header: This is a confirming order. Do not
duplicate.

8. Select Firm to indicate that the purchase order is firm. Firm your purchase order when you want to indicate to Master Scheduling/MRP or your manufacturing application that it should not reschedule this purchase order shipment.

9. Select Supply Agreement if you want Oracle Supplier Scheduling to communicate releases against this blanket purchase agreement to suppliers. Supplier Scheduling can communicate releases against a blanket purchase agreement only when this option is selected.

10. For planned purchase orders, blanket purchase agreements, and contract purchase agreements, enter
  • the Effective start date for the purchase order
  • the Effective expiration date for the purchase orde
  • the Amount Limit (for the total of all releases) and the Minimum Release Amount that can be released against this purchase order. For blanket and contract purchase agreements, the Amount Limit must be equal to or greater than the Amount Agreed.

Purchase Order Shipments

Use the Shipments window to enter multiple shipments for standard and planned purchase order lines and to edit shipments that Purchasing automatically created for you. A purchase order shipment specifies the quantity, ship-to organization and
location, date you want your supplier to deliver the items on a purchase order line, and country of origin for the items. When you save your work, Purchasing creates distributions if sufficient valid default information is available and if there are no
existing distributions.

For standard and planned purchase orders, you can navigate to the Shipments window by selecting the Shipments button in the Purchase Orders window.

Shipments Tab
1. Enter the line Number for the shipment line. If you enter a new shipment line, Purchasing displays the next sequential line number available. You can enter any line number that does not already exist.

2. Enter the ship-to Organization. If you entered an item, you can pick only organizations in which the item is defined. If you entered a revision number on the purchase order line, then the item revision must also be defined in the organization. Note that you cannot update the organization once you have saved your work if the shipment has distributions.

3. Enter the Ship-To location for the shipment. You can pick any location that does not have an organization or any location whose organization matches the organization in the previous field.

4. Enter the Quantity (Amount, if using Oracle Services Procurement) for the shipment. This value must be greater than 0. The default is the quantity from the corresponding Purchase Order Line. If you decrease this quantity, Purchasing
automatically defaults the quantity ordered of the next line to the total quantity that you have not yet placed on a shipment line. The UOM is displayed to the right of the Quantity.

5. Enter the date and time that the supplier Promised delivery of the items. This promised date is printed on the purchase order shipment. The default is from the Purchase Order Preferences window.

6. Enter the Need By date and time when the requestor needs the item. This date is printed on the purchase order if you do not enter a promised date. The default is from the Purchase Order Preferences window.
If you use Purchasing with Master Scheduling/MRP, you must provide a need-by date for purchase order shipments with Master Scheduling/MRP planned items. You must also provide a need-by date for Inventory planned items

More Tab
 
1. Enter the Receipt Close Tolerance percent for your shipments. Purchasing automatically closes a shipment for receiving if it is within the receiving closing tolerance at the receiving close point. You need to set the receiving close point in the
Purchasing Options window.

2. Enter the Invoice Close Tolerance percent for your shipments. Purchasing automatically closes a shipment for invoicing if it is within the invoicing closing tolerance at billing, when Payables matches invoices to purchase orders or receipts.

3. Select one of the following options for Match Approval Level:
Two-Way: Purchase order and invoice quantities must match within tolerance before the corresponding invoice can be paid.
Three-Way: Purchase order, receipt, and invoice quantities must match within tolerance before the corresponding invoice can be paid.
Four-Way: Purchase order, receipt, accepted, and invoice quantities must match within tolerance before the corresponding invoice can be paid.
If you enter an item, a value for this field is defaulted from Item master else it 'll default from purchasing option.

4. Select an Invoice Match Option:
Purchase Order: Payables must match the invoice to the purchase order.
Receipt: Payables must match the invoice to the receipt.
Choose Receipt if you want to update exchange rate information on the receipt or if you want your accounting to use exchange rate information based on the receipt date. (If you use Periodic Costing, you must match to the receipt to ensure accurate cost accounting.)
The Invoice Match Option defaults from the Supplier Sites window. You can change the Invoice Match Option on the shipment until you receive against the shipment.
Note: The Invoice Match Option and the Match Approval Level are independent options. You can perform whichever Invoice Match.
The point to be noted here is
  • If you have match option set to 'Purchase Order' in PO, then you can create an invoice against this supplier and match only at 'PO' level in AP. Which means, in AP system will not allow you to match this invoice at 'PO receipt' level.
  • If you have match option set to 'Receipt' in PO, then you can create an invoice against this supplier and match only at 'Receipt' level in AP. Which means, in AP system will not allow you to match this invoice at 'PO' evel.                             
Therefore, you can match Invoice only to the document purchase order or receipt specified by the invoice match option on the purchase order shipment. 

5. Select Accrue at Receipt to indicate that the items on this purchase order line accrue upon receipt. Inventory destined items always accrue upon receipt. For expense items, if the Accrue Expense Items flag in the Purchasing Options window is set to Period End, the items cannot accrue upon receipt, and you cannot change the shipment level default. If the Accrue Expense Items flag is set to At Receipt, the default is to accrue upon receipt, but you can change it to Period End

6. Select Firm to firm the purchase order shipment. Firm your purchase order when you want to indicate to Master Scheduling/MRP or your manufacturing application that it should not reschedule this shipment.

7. The VMI box will be checked if this item is under vendor managed inventory control.

8. The Consigned box will be checked if this is a supplier consigned item.

Status TAB
For each shipment, Purchasing displays the Status and the quantity Ordered, Received, Cancelled, and Billed

Entering Purchase Order Distributions

Use the purchase order Distributions window to enter distribution information for purchase order shipments or to view distributions that Purchasing has automatically created for you. You can enter multiple distributions per shipment line. You can also enter information about paper requisitions in this window.

Navigate to the Distributions window by selecting the Distributions button in the Shipments window.


1. Enter the line Number for the distribution line. If you enter a new distribution line, Purchasing displays the next sequential line number available. You can enter any line number that does not already exist.

2. The destination type determines the final destination of the purchased items. Choose one of the following options:
Expense - The goods are delivered to the requestor at an expense location. The destination subinventory is not applicable.
Inventory - The goods are received into inventory upon delivery. You can choose this option only if the item is stock enabled in the ship-to organization.
Shop Floor - The goods are delivered to an outside processing operation defined by Work in Process. You can choose this option only for outside processing items.

^
If a single PO shipment has two differnt desintaion types then it result in 'Multiple' shipment destination type

3. Enter the Requestor and Deliver To location for this distribution. If the destination type is Inventory, you can also enter the Subinventory.

4. Enter the Quantity (Amount, if using Oracle Services Procurement) of the purchase order shipment that you want to charge to the Accounting Flexfield. The default value comes from the quantity you enter in the Shipments window. If you decrease the default quantity, Purchasing automatically defaults on the next distribution line the total quantity you have not yet assigned to a distribution line.

5. Enter the purchasing accounts. When you save your changes in this window, Purchasing uses the Account Generator to automatically create the following accounts for each distribution:
Charge: the account to charge for the cost of this item in the purchasing operating unit
Accrual: the AP accrual account in the purchasing operating unit
Variance: the invoice price variance account in the purchasing operating unit
Destination Charge: the account to charge for the cost of this item in the destination operating unit
Destination Variance: the invoice price variance account in the destination operating unit
Note: The last two accounts are created only if the receiving destination operating unit is different than the purchasing operating unit and there is a transaction flow defined between the two organizations

Examples:
PO Charge
01-000-1410-0000-000
Inventory Material Value (Asset A/C)

Accrual
01-000-2210-0000-000
Accounts Payable (Liability A/C)

Budget A/c

Variance A/C
01-510-5220-0000-000
Invoice Price Variance (Liability A/C)

All these accounts are created by PO Account generator and cant de modified the only exception is the PO Charge account for expense destination type, which can be manually changed/updated.

Approval Assignments

Use the Assign Approval Groups window to associate approval groups with a specific job or position and a document type including: Purchase Requisition, Internal Requisition, Standard Purchase Order, Planned Purchase Order, Blanket Purchase Agreement, Contract Purchase Agreement, Scheduled Release, and Blanket Release. You can associate multiple approval groups with a single document type/job or position combination. Whenever you associate two or more approval groups with a single document type/job or position combination, Purchasing uses the most restrictive rule to evaluate authorization limits.

Attention: While individual approval groups do not require an enabling Account Range Include rule, every document type for each job/position must be associated with at least one approval group with this characteristic. Otherwise, employees in the associated job or position will be unable to approve this document type.

If no approval groups are associated with a particular document type for a given job or position, then employees assigned to this job or position will be unable to approve documents of this type.


To assign approval groups:

   1. Navigate to the Assign Approval Groups window.

   2. Select the Operating Unit for this approval group assignment.

   3. Enter the Position for which you want to assign approval groups and approval functions. If the Use Approval Hierarchies option in the Financial Options window is not enabled, this field is not applicable.
**The orgnization is the business group where theposition is defined.

   4. If you are not using approval hierarchies, enter the Job.

   5. Select the approval function you want to assign to this position or job.

   6. Enter the approval group that you want to assign to the selected position or job. The list of values includes only enabled approval groups with at least one approval rule. See: Defining Approval Groups.

   7. Enter the Start Date and End Date for the assignment.
Attention: The start and end dates that you assign here are the effectivity dates of the assignment. When the system date reaches the end date of the assignment, the rule no longer applies. There is no explicit warning that the rule is no longer in effect.

   8. Save your work.

Choosing a Set of Books

Your set of books defines the account structure, accounting calendar, and functional currency your organization uses to record transactions in Payables. If you are not using the Multiple Organization support feature, you can choose one primary set of books for each installation of Payables. You can choose one primary set of books for each installation of Payables. You can choose a secondary set of books in the Accounting Methods region of the Payables Options window if you are keeping both an accrual and cash set of books.

Your system administrator associates sets of books with one or more responsibilities. Your responsibility determines with which set of books you are working. You have the option of setting up multiple organizations within one installation of Payables. Your system administrator associates a responsibility with a particular organization and set of books. The name of your set of books appears on all reports you generate in Payables.

If you use the Multiple Reporting Currencies feature, read the Multiple Reporting Currencies in Oracle Applications manual for information on your sets of books.

Attention: You cannot change your Set of Books selection in this window after you save it.

To choose your primary set of books:

1. Navigate to the Choose Set of Books window.
2. Enter the name of the Set of Books you want to use.
3. Save your work.

Requisition Templates

Use the Requisition Templates window to define requisition templates.
These templates automate requisitioning of commonly ordered items like office supplies. To create a requisition for office supplies, requestors in your organization simply use your template and enter the quantity of each item they want to order.

To create a template, you can specify the items individually or you can reference an existing requisition or purchase order. If you reference an existing document, Purchasing adds all lines on the document to the template. You can reference multiple documents to add all their lines to the same template.

After you define a template, you can reference the template in the Supplier Item Catalog. When you do so, Purchasing displays all template lines that are valid for the destination organization, and you can use any of these lines on your requisition. You can create requisitions with this template as long as the requisition creation date is before the template inactive date.

To define requisition templates:

Navigate to the Requisition Templates window by selecting Requisition Templates from the menu.

1. Enter the requisition Template name and Description.
2. Enter the Inactive Date after which you do not want any requestor to create a requisition from this template.
3. Enter the requisition Type: Internal or Purchase. In either case, you can enter individual requisition lines of either type.
4. If this template is to be used in Oracle iProcurement, select the Reserve PO Number option.
No prevents the requester from reserving a purchase order number at the time the requisition is approved.
Optional allows the requester to reserve a purchase order number at the time the requisition is approved.
Yes will automatically reserve a purchase order number at the time the requisition is approved.

To manually add lines to a template:
1. Use the Lines region to manually add new lines to the template. You can also remove lines that you have copied from a base document, and you can change certain information in these lines.
2. Enter a Number in this field to identify the sequence of the line on your requisition. Purchasing provides default sequence numbers in increments of one.
3. Enter the line Type. You can enter or change information in this field only for new lines. The default is from the Purchasing Options window.
4. Enter the Item number. You can enter or change information in this field only for new lines.
5. For new lines only, you can enter the item Revision number.
6. If you entered an item, Purchasing displays the purchasing Category, and you cannot change it. Otherwise, you must enter a purchasing category.
7. The Source type determines the source of the requisitioned items. The choice you have in this field is dependent on your user profile options and the system profile options. At either level, you may be restricted to one of the following options: Inventory or Supplier.
Note that if you have both options, you can source requisition lines independently of the requisition type. You can even mix inventory and supplier sourced requisition lines in the same requisition. Purchasing creates one internal sales order for each inventory source type requisition line on this requisition. The supplier source type requisition lines go onto purchase orders, either automatically with AutoCreate Documents or manually with the Purchase Orders window.
8. Enter the default unit of measure.
9. Optionally, enter a suggested quantity for requisitioners in Oracle iProcurement.
10. For supplier sourced lines, you can enter the unit price, and this price is used in the Requisitions window. For inventory sourced lines, the cursor does not enter this field, and the price in the Requisitions window is the actual cost from inventory.
11. If Oracle Services Procurement is implemented, enter an amount for a fixed price services line type. Amount is required and the source type must be Supplier.
12. Indicate that this line was from a negotiated source by checking the Negotiated checkbox. You can change it only if your responsibility has that function enabled.

To copy lines to a template:

1. Select the Copy button to open the Base Document window.
2. Enter the Base Document Type: Purchase Order or Requisition.
3. Enter the base document Number from which you want to copy lines to the template.
4. Choose the OK button to copy all lines of the base document onto the template. You can choose the Cancel button to return to the Requisition Templates window without copying. You can place lines from multiple documents onto the same
requisition template.

To enter sourcing information:
You can enter sourcing information for the current line in the lower part of the screen.
1. For supplier source type lines, you can enter the name of the Buyer to whom you want to assign the requisition line. The buyers can query requisition lines that you assign to them when they AutoCreate purchase orders.
2. For supplier source type lines, you can select RFQ Required to indicate that you want to require an RFQ before the buyer can create a purchase order for the requisition. Purchasing displays a warning message if you try to create a purchase order without a required RFQ.
3. For supplier source type lines, you can enter a suggested Supplier for your requisition items. You can choose a supplier from the list of available suppliers. Alternatively, you can suggest a new supplier by entering the name of the supplier directly.
4. For supplier source type lines, you can enter the supplier Site. You can enter this field only if you provide a suggested supplier name.
You can choose a supplier site from the list of values. Alternatively, you can enter a new site directly.
5. For supplier source type lines, you can enter the name of your Contact at the supplier site.
6. For supplier source type lines, you can enter the Supplier Item number.
7. For inventory source type lines, you can specify the source Organization.
8. For inventory source type lines, you can optionally specify the Subinventory source. If you do so, Oracle Order Management reserves the goods and uses only the specified subinventory for allocation. If the goods do not exist at the specified subinventory,
Order Management backorders them, even if they do exist in another subinventory.

PO Communication to Suppliers

In a business climate that is more global and electronic everyday, enterprises are being asked to produce procurement documents in a variety of different forms. This section discusses the setup steps which define your supplier’s preferred communication method. Oracle Purchasing supports the following methods of communicating purchase orders:

  • Print
  • Facsimile (fax)
  • Electronic mail (e–mail)
  • Extensible Markup Language (XML)
  • Electronic Data Interchange (EDI)
Print purchase orders
The standard way to communicate purchase orders to your supplier is by printing them and sending a copy to the supplier in the mail. This method requires that your system administrator configure the printers attached to your computer system.

Your purchase order can be printed using text or PDF (Adobe Portable Document Format) formatting. If you choose text format, you can print at the time you approve the purchase order or when you submit the Printed Purchase Order and Printed Change Order reports. If you choose PDF format, you can create the PDF at the time you approve the purchase order, from the Purchase Order Summary window, or the PO Output for Communication process.

Setup steps for printed purchase orders:
1. Navigate to the Supplier Sites window.
2. Under the General tab, choose Printed Document as the Supplier Notification Method.

Fax purchase orders
You can send facsimiles of purchase orders using text or PDF formatting. If you choose text format and compatible fax software (such as RightFax) is installed, you can fax at the time you approve the purchase order or when you submit the Printed Purchase Order and Printed Change Order reports. If you choose PDF format, you can fax at the time you approve the purchase order, or from the Purchase Order Summary window.

This communication method requires that your system administrator configure your Oracle Application to support fax transmission.
Setup steps for faxed purchase orders:
1. Navigate to the Supplier Sites window.
2. Under the General tab, choose Fax as the Supplier Notification Method. Enter a default fax number for the supplier site. You can change the default fax number or the notification method at the time of document communication

Centralized Procurement Setup

Oracle Purchasing provides features to enable consolidation of similar functions across all of your global business units. This consolidation is typically referred to as centralized procurement or sourcing service centers. The goal of which is to create autonomous procurement business units within the enterprise.

Centralized Procurement Accounting
In a centralized procurement environment you may create a purchase order in one operating unit, but require shipment to a different operating unit. Accounts are provided to ensure proper financial reconciliation between the procuring business unit and the receiving business unit using intercompany invoicing. This accounting requires that a transaction flow is defined between the two organizations.

Global Agreements
Global agreements are agreements (blanket purchase agreements or contract purchase agreements) with a supplier that can be shared between business units. Global agreements empower the centralized service unit to negotiate on behalf of some or all other business units and store the negotiation outcome in a single document. This single document can then be used for automatic sourcing of requisition demand from any enabled business units.

Centralized Procurement Automatic Sourcing
Sourcing rules, sourcing rule assignments and approved supplier lists (global ASL) are created in the owning business unit. The global agreements referenced by automatic sourcing are then available for execution in all business units enabled by the buyer. Complete process automation is achieved by defining sourcing rule assignments for the global agreements in the executing business unit.

Centralized Procurement Step by Step

Define Transaction Flows
Transaction flows define the procurement relationship between different operating units. The details of this relationship define how the expenses are transferred from one business unit to the other (could be a different set of books).
Defining a transaction flow consists of these steps:

  • Define transaction flow
  • Define intermediate nodes
  • Define intercompany relationship
Define Global Agreements
Global agreements are blanket purchase agreements and contract purchase agreements which have been created to be used in a centralized procurement environment. Defining a global agreement consists of these steps:
  • To take full advantage of all centralized procurement features, set the profile HR: Cross Business Groups to Yes at the site level.
  • Define a supplier site for the supplier in each operating unit that will be defined as a purchasing organization for the global agreement. The supplier site names do not need to be the same as the supplier site name in the global agreement.
  • Create a new blanket purchase agreement or contract purchase agreement with the Global checkbox enabled.
  • Enable the the global agreement (select the purchasing organization and purchasing site) for those operating units that are authorized to order referencing the global agreement.
  • Define sourcing rule assignments for the global agreement in the executing operating unit.
Global Buyer Setup Steps
Enterprises using centralized purchasing can set up a global buyer which can create, update, and default onto purchasing documents. This enables buyers from multiple business units to fully participate in these actions without redundant setup procedures.
1. Define the global buyer as an employee in the business group that the buyer belongs to using the Oracle Human Resources Enter Persons window.
2. Define the global buyer as a buyer using the Oracle Purchasing Enter Buyers window. This can be done in any business group.
3. Set profile option HR: Cross Business Groups to Yes at the site level.
4. Assign as many Oracle Purchasing responsibilities as required to this global buyer. These responsibilities do not need to be linked to any specific business group.

Global Requester Setup Steps
Enterprises using centralized purchasing can set up a global requester.
This enables requisition creation from multiple business units (operating units).
1. Set profile option HR: Cross Business Groups to Yes at the site level.
2. Assign the Oracle Purchasing responsibility associated with the operating unit to the requester. You can assign all that are needed.
3. Requester selects the appropriate responsibility and creates the requisition.

Global Supervisor Setup Steps
Enterprises using centralized purchasing can set up a global supervisor to approve purchase requisitions. This enables approvals from multiple business units.
Note: The global supervisor feature is only available to those enterprises using the employee/supervisor approval path.
1. Define the supervisor and assign to an approval group as you would normally set them up.
2. Set profile option HR: Cross Business Groups to Yes at the site level.Once the profile is set to Yes, requisitions can be routed and forwarded to individuals in different business groups. The action history reflects the names of those who take action even though they are in different business groups.

Expense Charge Account Rules

When determining the default charge account for a line with a destination type of expense, the account generator may reference the charge account defined on the employee record. If the account generator references the employee record, then the Expense Charge Account Rules enable you to override one or multiple segments of that default account based on the item category. This ability to override does not interfere with the action of the account generator, but simply replaces those segments you configure after the account generator has created a charge account.

Note: This feature is available for lines containing one–time or inventory items as long as their destination type is expense.

The account segments defined in this window can only be used when the following conditions are true:

  • Destination type is expense
  • Purchase order was not created from a requisition
  • Account was not set in preferences
  • Account was not sucessfully derived from project–based rules
  • Account was not sucessfully derived from the item setup
Setup Steps
1. Navigate to the Expense Charge Account Rules window. (Seeded as: Setup > Financials > Accounting > Expense Account Rules)

2. Select the Item Category in Account Rule Value. Duplicate rules for the same category.

3. Select the account Segment Name. Duplicate rules for the same account segment are not permitted.

4. Select the account in Segment Value that you want to override the employee charge account segment for this item category.

5. Save your work.

Document Approval Process

Purchasing lets you approve requisitions, standard and planned purchase orders, blanket and contract purchase agreements, and releases using a common process. When you complete your documents and are ready to initiate the approval process, select the Approve button in the document entry window to open the Approve Document window.

In the Approve Document window, choosing Submit for Approval (and then choosing OK) approves the document if Owner Can Approve is enabled for the specific document type in the Document Types window and you have the authority to approve the document. If the document requires someone else’s approval, choosing Submit for Approval (and then choosing OK) automatically submits the document to that person (or routes it to multiple approvers) for approval, based on your approval hierarchy setup.

Purchasing offers the following document approval actions in the Approve Document window: Reserve or Unreserve (if using
encumbrance / budgetary control)
, Submit for Approval, and Forward. You can also change the approval hierarchy from within the Approve Document window if Allow Change to Approval Hierarchy is selected for the document type in the Document Types window. You can also specify a Forward To person if you want the document to be approved by someone outside the approval hierarchy.

Purchasing offers several methods for supplier notification. You can select the Print option, and the document will automatically be printed once it is approved. In addition, certain documents can be transmitted electronically by facsimile, e–mail, electronic data interchange (EDI), or extensibile markup language (XML). When submitting a blanket purchase agreement for approval, the Approve Document window can optionally provide the ability to automatically create or update supplier sourcing business rules. When you select the Approve button in a document entry window, Purchasing performs submission checks to verify that the document is complete and in an appropriate state for the action you chose. Status checks are performed when you take an approval action

Notifications Web Page
You can also approve documents through the Notification Details Web page, accessible through the Notifications Summary menu in Purchasing. The Notifications Summary page lists all the documents awaiting your approval, so that you can manage your pending approval queue and take approval actions. After opening a notification, you can drill down to the document itself, and review it and its action history. You can also modify the document if Approver Can Modify is enabled for the  document type. (After you modify a document, you need to return to the notification to take an approval action.)

You can also view and respond to notifications through e–mail. Oracle Applications uses Oracle Workflow technology to route notifications through e–mail. This way, an approver who has easier access to e–mail than to the Purchasing application can view notifications and take approval actions.

More on Approval

Approval Workflow
Purchasing uses Oracle Workflow technology to handle the entire approval process. When you take an approval action in the Approve Document window or the notification, or through the Web or e–mail, you are ”submitting” the approval action to Workflow. Workflow works in the background, using the approval controls and hierarchies you’ve defined to route documents for approval. Because Workflow handles your approval process in the background, you can use Oracle Workflow Builder’s easy interface to modify your approval process.

Approved Documents and Supply
A Pre–Approved document does not show up as supply. A Pre–Approved document is one that meets the following conditions:

  • A person with the final authority to approve the document approves it, but then forwards it to someone else for additional approval, thus changing its status to Pre–Approved.
  • Your organization uses encumbrance (reserves funds for documents), and the document is authorized for approval but funds have not yet been reserved for it. Even if someone with sufficient approval authority approves the document, its status may still be Pre–Approved if funds were not able to be reserved at the time of approval. Once funds are reserved for the approved document, the document changes its status to Approved.
A Pre–Approved document does not show up as supply until its status changes to Approved.
When you make a change to an approved document that changes its status to Requires Reapproval, that change (for example, to quantity) does not show up as supply until the document has been approved again.

Approved requisition lines that have a line type based on rate or fixed price do not show up as supply.

Offline Approvers
An offline approver is someone who does not log on to Oracle Applications, but uses someone else to approve on his or her behalf. All approvers, including offline approvers, need to have a logon user name. Even if the approver is set up as an employee in the approval hierarchy, Purchasing cannot continue with approval without that employee’s also having a logon user name.

If in the Approve Document window you forward to an approver who does not have a logon user name, Purchasing alerts you right away. If an approver without a logon user name is already included in the approval hierarchy, the approval workflow will fail at that approver.  (The document will remain In Process.)

To include the offline approver in document approvals, you need to:
  • Assign the offline approver a logon user name.
  • Use the notification handling feature to forward the offline approver’s documents to a proxy approver—someone who canlog on to Oracle Applications and approve the document on the offline approver’s behalf.
You need to do both of these steps. The approval process needs to know the offline approver’s logon user name before it can route that person’s documents to the proxy approver. Both of these steps are described below.

When you designate a proxy approver to approve on the offline approver’s behalf, the offline approver, not the proxy approver, shows up as having approved the document in the Action History window.

To designate a proxy approver:
1. Assign the offline approver a logon user name if the approver does not already have one.
2. In the Purchasing or System Administrator responsibility, in the Workflow menu, navigate to Notification Rules, which opens a Web page.
In the System Administrator responsibility, the Workflow Administrator > Notification Rules menu enables you to reassign
anyone’s notifications. In the Purchasing responsibility, the Workflow User > Notification Rules menu enables you to reassign
only your notifications.
3. Designate a proxy approver for the offline approver by following the instructions in Defining Rules for Automatic Notification Handling, Oracle Workflow Guide. The instructions for defining these rules refer to a role. For Purchasing, role means the user for whom you are designating a proxy approver.
When you reach the Find Notification Routing Rules Web page, enter the user name of the offline approver.
If you want to designate the proxy approver for both requisitions and purchase orders, when you reach the step about selecting the workflow (item type) for which you need to create the proxy approver, select the PO Requisition Approval workflow. Then repeat the steps for the PO Approval workflow, for purchase orders. (Recall that different document types are tied to their corresponding workflows—usually to either the PO Requisition Approval workflow or the PO Approval workflow—in the Document Types window during Purchasing setup. For example, the PO Approval workflow handles all purchase order types, unless you’ve set up the Document Types window to do differently.)

Once you have selected the workflow, you will be presented with a list of the notifications within the workflow. For offline approvers, you may want to select All notifications.

When you reach the step that asks you to enter a comment, it is advisable to enter a comment—for example, ”This document requires your approval on Joan’s behalf.” This helps the proxy approver know whether it is just another document in his or her queue, or a document that needs to be approved for someone else.

Mass Forwarding Documents

Use the Forward Documents window to forward all or selected documents awaiting approval from one approver to a new approver. This lets you keep your documents moving when the original approver of a document is unavailable.

Document Control Overview

Purchasing allows you to control the status of your requisitions, planned and standard purchase orders, blanket and contract purchase agreements, and releases during the document life cycle. Purchasing provides you with the features you need to satisfy the following basic needs. You should be able to:

  • Delete unapproved documents or unapproved lines, shipments, and distributions that you add to previously approved documents
  • Terminate existing commitments to buy from suppliers by fully or partially cancelling your documents
  • Control how Purchasing automatically closes documents for receiving and invoicing activity
  • Indicate that no further internal activity is expected or allowed on completed orders by final closing them
  • Freeze or unfreeze documents to control whether modifications are allowed
  • Place documents on hold to prevent printing, receiving, invoicing, and approval until the hold is removed
  • Firm purchase orders to prevent Oracle Master Scheduling/MRP and Supply Chain Planning from suggesting reschedules in, cancellations, or new planned purchase orders within the time fence created by your firm date
Document Security determines the documents on which you can perform control actions.
If the document is a global agreement, the Manage Global Agreements function security determines if you can perform control actions.

Entering Requisition

Use the Requisitions window to:

  • Enter internal and purchase requisitions. Your approval and security setup options determine which types of requisitions you can enter.
  • Take approval actions on individual requisitions online.
  • Edit requisitions. Your approval and security setup options determine which requisitions you can edit.
To enter requisition header information:

1. Navigate to the Requisitions window from the menu, by selecting  the New button in the Find Requisitions and requisitions summary windows, or by selecting the Requisitions button in the Order Pad of the Supplier Item Catalog.

The upper part of the Requisitions window has the following display–only fields:
Preparer – Your employee name from the Application User window.

Status – The requisition status:
Incomplete :  The requisition is incomplete, or the preparer has not yet submitted the requisition to an approver.
Rejected : The approver rejected the requisition.
Returned :  A buyer rejected the requisition. Purchasing returns to the preparer all requisition lines within the same requisition that are not on a purchase order.
Total : The currency code and the base currency total amount of all lines in this requisition.

2. Enter a unique Requisition number. If automatic requisition number generation is active, the cursor does not enter this field and the number is generated when you save your work

3. Choose the Requisition Type:
Purchase Requisition – The requisition lines are usually satisfied from an outside supplier by means of a purchase order.
Internal Requisition – The requisition lines are usually satisfied from inventory by means of an internal sales order.
When you enter requisition lines you can source them independently of the document type. You can mix inventory and
supplier sourced requisition lines in the same requisition of either document type.

To open the Supplier Item Catalog:
With the cursor in a requisition line row, select the Catalog button to open the Supplier Item Catalog.

To take approval actions:

After completing a requisition, select the Approval button to open the Approve Documents window.

To check funds:
Select Check Funds on the Tools menu.

To unreserve funds:
If budgetary controls are enabled you can unreserve funds.
1. Select Unreserve from the Tools menu.
2. Enter the Unreserve Date.
3. Check Use Document GL Date to Unreserve to use the document’s distribution GL dates for the funds reversal instead of the unreserve date.
4. Click OK to reverse the the funds reservation on this document.

To enter requisition preferences:
Select Preferences on the Tools menu to open the Requisition Preferences window.

To reaccess a requisition quickly:
Choose Place on Navigator from the Action menu. Choose the Documents tabbed region in the Navigator to later access the requisition more quickly.
Note: Once you place a document in the Navigator, it is the first thing you see in the Navigator the next time you log into
Purchasing. Choose Functions to return to the Purchasing menu.

Entering Requisition Lines

Use the Items tabbed region in the Requisitions window to enter requisition line information.
You can choose a predefined item or you can an enter an item without an item number.

To enter requisition line information:
Navigate to the Items tabbed region in the Requisitions window.


1. Enter a line Type for the requisition line. Line types help you define how you want to categorize your items. The default for this field is the Line Type from the Purchasing Options window.  If you change this line type, defaults from the Line Types window appear in the Category, UOM and Price fields, and the cursor moves to the Category field.

For purposes of requisition line entry, line types are handled in three classes: amount–based, quantity–based, and outside
processing
. The defaults that appear when you enter a line type are cleared if you change the line type to a different class.
Once you have committed a line, you can change the line type only to another line type of the same class.

If Oracle Services Procurement is implemented, you can also select a fixed price service line type. If you select the fixed price service line type the Item, Quantity, UOM, and Price fields are not available for update.

2.1  For quantity–based line types and outside processing line types, enter the Item you want to request. Purchasing displays defaults for purchasing category, item description, unit of measure, and unit price for this item.

Enter the Revision (if any) that corresponds to the item you want to order.

2.2. Enter the purchasing Category. You cannot change the category if you provide an item number in the Item field.

2.3. Enter the item Description to explain the item in further detail.
When you enter an item number, Purchasing displays the item description from the Items window. You can change this
description only if the Allow Description Update attribute for the item is enabled.

2.4. Enter the unit of measure (UOM) you want to use for your requisition line. If you enter an item number, Purchasing defaults the unit of measure for this item. If you change this value, the quantity is rounded again if appropriate, and the price is recalculated. If you enter a line type that is amount based, Purchasing uses the unit of measure that you assigned to that line type in the Line Types window. You cannot change the unit of measure of amount based items.

3.1. Enter the Quantity you want to request for the item. You can enter decimal quantities, but you must enter a value greater than 0.  You can use the Catalog button to get price breaks for different quantities from catalog quotations or blanket purchase agreements.
If Quantity Rounding is enabled, Purchasing either displays the rounded quantity you should have entered in a warning message or it updates the quantity to the appropriate rounded quantity. The rounding is based on the Unit of Issue (or primary unit of measure if the Unit of Issue is not defined) and the Rounding Factor defined for the item in Inventory. Rounding is up or down to the nearest whole Unit of Issue/primary unit of measure using the rounding factor.

3.2. Enter the unit Price for the item. You can enter the price in decimal format. You must enter a value greater than or equal to 0. If you enter an item number, Purchasing defaults a price for this item, but you can change this value. Your price may change if you enter a suggested supplier and a source document later.
Unit prices are in the functional currency. If you need to enter a foreign currecny, see the instructions below.
If you create a requisition line for an amount based line type, Purchasing sets the price to 1, and you cannot change it.

4.  Enter the Need By date and time for the requested items. This is required only for planned items. You must enter a date greater than or equal to the requisition creation date.
The Charge Account is rolled up from a single distribution after the distribution is created. If more that one distribution is created for the line, Multiple is displayed.

The lower part of the screen below the Lines tabbed region consists of optional fields for which the default can be set in the Requisition Preferences window.

5. Enter or use the default Tax Code for taxable items.
The tax code defaults from the Tax Defaults region in the Purchasing Options window.
Accept the default tax code or select another. You cannot override the tax code if the profile option Tax: Allow Override of Tax Code is set to No, or the shipment has been received.
If on the requisition you change a tax source, such as Supplier or Site, then Purchasing does not redefault a new Tax Code on the current line, but does default it on new lines. The same is true even after you override the Tax Code: Purchasing does not redefault it on current lines when you change a tax source.
Note: If you change the Tax Code after already creating distributions for the line, the associated Recovery Rate on those
distributions is not redefaulted for the new Tax Code.

6. If Oracle Services Procurement is implemented and you have selected a fixed price based line type, enter the Amount.

7.1. Enter the Destination Type
Expense – The goods are delivered to the requestor at an expense location. The destination subinventory is not applicable.
Inventory – The goods are received into inventory upon delivery.
Shop Floor – The goods are delivered to an outside processing operation defined by Work in Process. Purchasing uses this option for outside processing items. If Enterprise Asset Management is installed, you can use this destination for one–time (description based) and non–stocked items to be delivered to a maintenance work order location.

7.2. Enter the name of the employee who is requesting the item. You must provide a Requestor before you can approve the requisition. The default is the requisition preparer.

7.3. Enter the Organization.

7.4. Enter the delivery Location for the requested items. Purchasing defaults the deliver–to location that you assign to the employee in the Enter Person window. You must provide a deliver–to location before you can approve the requisition. Before the source of the line can be Inventory, the deliver–to location must be linked to a customer address in the Customer Addresses window.

7.5. Enter the Subinventory. This field applies only when the Destination Type is Inventory.

8.1. Enter the Source type. The source type determines the source of the requisitioned items. The choice you have in this field is dependent on the PO: Legal Requisition Type profile option. You may be able to use either the Inventory or the Supplier source type, or both types.

Note: If you have both options, you can source requisition lines independently of the document type. You can even mix inventory and supplier sourced requisition lines in the same requisition. Purchasing creates one internal sales order for all inventory source type requisition lines on this requisition. The supplier source type requisition lines are placed onto purchase orders with the AutoCreate Documents window.
Even if you are restricted to one type, Purchasing restricts the source type as appropriate for the item. If you are restricted to Inventory but you are requesting a Supplier item (Purchased Item attribute – Yes, Internal Ordered Item attribute – No), the source type can be only Supplier. Conversely, if you are restricted to Supplier requisitions and you ask for an Inventory item (Purchased Item attribute – No, Internal Ordered Item attribute – Yes), the source type can be only Inventory. This is allowed because a requestor may not know the item source type.

For Inventory source type lines, you can enter a default Organization and Subinventory. If you specify a subinventory for
an internal requisition line, Order Management reserves the goods and uses only the specified subinventory for allocation. If the goods do not exist at the specified subinventory, Order Management backorders them, even if they do exist in another
subinventory.
You can not enter an internal order for an Oracle Services Procurement fixed priced service requisition line type.

For the Supplier source type, enter the suggested Supplier, Supplier Site, Contact, and Phone. For the Inventory source type, enter the Organization and Subinventory.

9.1. If Oracle Process Manufacturing (OPM) application is installed and implemented, you are a process manufacturing user, and the selected purchasing organization is a process organization, then the process fields are enabled. The three process fields are Secondary UOM, Secondary Quantity, and Grade.
Note: Both Source and Destination organizations should be either process enabled or not process enabled.

1. If the OPM item is dual UOM controlled, then:
The Secondary UOM defaults to the value specified in the inventory item master table. You cannot change this field.
Depending on the selected dual UOM indicator, the Secondary Quantity is calculated.
• Non–dual: The secondary quantity is disabled.
• Fixed: The secondary quantity is calculated using the conversion routine. You can change the secondary quantity and the primary Order Quantity is updated to reflect the change.
• Default: The secondary quantity is calculated using the conversion routine. You can change the secondary quantity
within the deviation limits specified in the item definition in  OPM. The Primary Order Quantity is not updated to reflect the
change.
• No default: The secondary quantity is not calculated but you can enter the secondary quantity within the deviation limits specified in the item definition. The primary Order Quantity is not updated to reflect the change.

2. If the OPM item is grade controlled, then the Grade field is enabled and you can enter the grade. Grade represents the
requested quality control grade for the selected item.
Note: All process items are flagged as Purchasable for use by Oracle Purchasing when they are synchronized to Oracle Inventory.

10. Save your work. If you save a requisition line without entering a distribution, Purchasing tries to generate a distribution line for you, using the Account Generator based on the information you have entered. If you want your distribution account numbers to be generated based on project information, you must enter project information in the Requisition Preferences or Requisition Distributions windows before committing the distribution line.

To enter line source details for the Supplier source type
Navigate to the Source Details tabbed region. When the source type is Supplier, you can enter the Note to Buyer, Buyer, RFQ Required, Supplier Item number, source Document Type (Blanket, Contract, or Quotation), source Document, and document Line Number.

If you have chosen a global agreement as the source document the Global box will be checked and the owning organization displayed.
If Oracle Project Contracts is installed you can enter Contract number and Rev (version number) in this region. Additional
project contract information can be entered in the Distributions window.

To enter line details
Navigate to the Details tabbed region. You can enter a Justification, Note to Receiver, Transaction Nature, Reference Number, UN Number, and Hazard class.

To enter line currency information
1. Navigate to the Currency tabbed region.

2. Enter a suggested currency for the requisition line. This must be an enabled code from the Currency window. The cursor enters the remaining currency fields only if you have entered a currency here.

3. Purchasing supplies you with one of two predefined currency rate types: User or EMU Fixed. A rate type of User means that you can enter a conversion rate between the foreign currency (or transaction currency in a document entry window) and the base currency (or functional currency, defined in your set of books). A rate type of EMU Fixed means that if either your transaction currency or your functional currency is Euro (the European Monetary Unit currency) and the other is another European currency, Purchasing automatically enters a conversion Rate Date and Rate for you that you cannot change.
You can define additional currency rate types in the Define Daily Conversion Rate Types form, and you can enter User or one of your additional types.

4. Enter the currency rate date.

5. Enter the currency conversion rate. Purchasing overrides this default when you are entering requisition lines if the rate type is not User and if you have established a rate for the rate type and date.

To enter outside processing information:
Select the Outside Services button to open the Outside Services window for outside processing line types.

Entering Requisition Distributions

Use the Distributions window to enter requisition distributions or to view distributions that Purchasing has automatically created for you. You can charge the cost of this requisition line to multiple Accounting Flexfields or update the default values you provided in the Requisition Preferences window.

Note: If the line source type is Inventory, you cannot approve the requisition if you enter more than one distribution line.

To enter requisition distributions

1. Navigate to the Distributions window by selecting the Distributions button in the Requisitions window. You begin in the
Accounts tabbed region.

2. Enter the Quantity (Amount, if using Oracle Services Procurement) you want to distribute. The quantity must be in decimal format.
Purchasing displays the quantity you have not yet assigned to an Accounting Flexfield. Multiple distribution quantities must total to the requisition line quantity.
Using decimal quantities in this field, you can easily distribute costs across distributions using percentages. For instance, you can have a simple quantity of one (1) on your requisition line. If you want to charge one Accounting Flexfield for 30% of the cost of the item and another Accounting Flexfield for 70% of the cost of the item, simply enter .3 and .7 as the respective quantities for the requisition distribution lines.

3. When you enter a Charge Account, Purchasing uses the Account Generator to automatically create the following accounts for each distribution:
• Accrual: the AP accrual account
• Variance: the invoice price variance account
If you are using encumbrance control, Purchasing also creates the
following account for each distribution:
• Budget: the encumbrance budget account
The Account Generator creates these accounts based on predefined rules.

With one exception, you cannot create or update these accounts manually. If the requisition line destination type is Expense, however, you can change the default charge account supplied by the Account Generator.

4. Change or accept the default Recovery Rate for taxable items.
The recovery rate is the percentage of tax that your business can reclaim for credit. The recovery rate defaults in based on the Tax Code on the line in the Requisitions window and the setup in the Financials Options window.
You can change the recovery rate if the profile option Tax: Allow Override of Recovery Rate is set to Yes, and the shipment has not been received. Depending on the setup in the Financials Options window and the type of tax, only certain recovery rates may be allowed.
If on the requisition you change a tax source, such as Supplier, Site, or Tax Code, then Purchasing does not redefault a new Recovery Rate on the current distribution, but does default it on new distributions you create.
You can choose to use a different recovery rate for different distributions, even if they use the same tax code.

5. Enter the GL Date that you want to use when you reserve funds.
You can enter a GL Date only if you set up your financials options to use encumbrance for requisitions. The Reserved check box indicates whether funds have been reserved. The default is the current date.
If you enter a date that belongs to two separate accounting periods, Purchasing creates a journal entry in the first accounting period that contains this date.

Entering Requisition Preferences

Use the Requisition Preferences window to enter requisition line defaults (including currency, destination, project, and sourcing default information). These defaults are applicable during this user session to all new requisition lines you create after you set the defaults until you exit Purchasing. You can override these defaults for specific lines.

To enter main preferences:

1. Navigate to the Requisitions Preferences window by selecting Preferences on the Tools menu in the Requisitions window or in the Requisitions Headers, Lines, and Distributions Summary windows. In the Main tabbed region, you can enter the defaults described in the following steps.

2. Enter the Need By date and time.

3. Enter the GL Date to be used when funds are reserved. You can enter a GL Date only if you set up your financials system options to use encumbrance or budgetary control for requisitions.

4. Enter the Charge Account for the cost of the items on the requisition line. The account you enter here is used only for
expense destinations, and it overrides any account built by the Account Generator.

5. Enter a Justification for your requisition line. Buyers and approvers can review this justification.

6. For Internal requisitions only, enter a Note To Receiver. For example, you could note that the receiver should unpack your requested items or that only you can accept delivery. For both internal and purchase requisitions, you can provide additional notes to the receiver by using attachments.

7. Enter the default Reference Number for all requisition lines. You use the reference number to match your requisition line with a specific work, project, etc.

8. Enter the Transaction Nature.

9. Check Urgent to indicate that your requisition should be expedited. Buyers have the option to process urgent requisitions faster when they AutoCreate purchase orders from requisitions.

10. Enter a default suggested Currency for the requisition lines. This must be an enabled code from the Currency window.

11. Enter the default Rate Type. You can also set this default in the Purchasing Options window.
Purchasing supplies you with one of two predefined currency rate types: User or EMU Fixed. A rate type of User means that you can enter a conversion rate between the foreign currency (or transaction currency in a document entry window) and the base currency (or functional currency, defined in your set of books). A rate type of EMU Fixed means that if either your transaction currency or your functional currency is Euro (the European Monetary Unit currency) and the other is another European currency, Purchasing automatically enters a conversion Rate Date and Rate for you that you cannot change.

You can define additional currency rate types in the Daily Conversion Rate Types window.

12. Enter the default currency Rate Date.

13. Enter the default currency conversion Rate. Purchasing overrides this default when you are entering requisition lines if the rate type is not User and if you have established a rate for the rate type and date.

14. Enter the Destination Type to indicate the final destination of the purchased items:
Expense – The goods are delivered to the requestor at an expense location.
Inventory – The goods are received into inventory upon delivery.
This option is appropriate only if the item is stock enabled in the deliver–to organization.
Shop Floor – The goods are delivered to an outside processing operation defined by Work in Process. This option is appropriate only for outside processing items. If Enterprise Asset Management is installed, you can use this destination for one–time (decription based) and non–stocked items to be delivered to a maintenance work order location.

15. Enter the Requestor. This is the employee who requests the quantities on the requisition lines. Purchasing copies this name as the requestor for every requisition line.

16. Enter the Organization. The default is the requestor’s organization.  The List of Values displays all valid receiving organizations.

17. Enter the delivery Location for all requisition lines. The default is the requestor’s location. You can pick any location that does not have an organization or any location whose organization matches the deliver–to organization. See: the online help for the Enter Person window.
If the Destination Type is Inventory, you can also enter the Subinventory.

18. Enter the Source type: Inventory or Supplier. If you have both options, you can source requisition lines independently of the document type. You can also mix inventory and supplier sourced requisition lines in the same requisition. Purchasing creates one internal sales order for all Inventory source type requisition lines on this requisition. You can use the Autocreate Documents window to place Supplier source type requisition lines onto purchase orders.
For Inventory source type lines, you can enter a default Organization and Subinventory. If you specify a subinventory for
an internal requisition line, Order Management reserves the goods and uses only the specified subinventory for allocation. If the goods do not exist at the specified subinventory, Order Management backorders them, even if they do exist in another
subinventory.
For Supplier source type lines, you can enter the following defaults:
Buyer, Note to Buyer, Supplier, Site, Contact, and Phone. You can also check RFQ Required to indicate that you want to require an RFQ before the buyer creates a purchase order for the requisition.
If RFQs are required and you AutoCreate a purchase order before creating an RFQ for the requisition line, Purchasing displays a warning message. You can also set this default in the Purchasing Options window.

Using Requisition Templates

From the Requisitions window, use the Supplier Item Catalog window and Requisition Templates to create requisitions more easily.
Please check set up @
http://www.oracleug.com/user-guide/purchasing-overview/requisition-templates

To use requisition templates to enter requisitions:

1. Navigate to the Requisitions window by selecting Requisitions from the menu.
2. Enter requisition header information.
3. Navigate to the Items tabbed region.
4. Select Catalog to open the Search Supplier Item Catalog window.
5. Select the desired Requisition Template from the list of values.
6. Choose the Find button to open the Supplier Item Catalog window and display the template lines.
7. Copy the desired lines to the Order Pad.
8. Choose the Select button to close the Supplier Item Catalog window and transfer the order pad lines to the requisition.
9. Save your work.

Demand for Internal Requisitions

Demand for inventory requests can come from several sources. The primary sources are:

  • Online user’s request for stock items out of inventory
  • Inventory Replenishment Requests
  • Oracle Master Scheduling/MRP and Supply Chain Planning generated requisitions
  • External system’s requests
Online Requests
On–line requisitions give you the choice of supplier or inventory sourced requisitions. Default sourcing information is determined by the requisition type, the item, and the destination of the request. When you enter a requisition, Purchasing automatically selects the correct source type and source information for the item and destination.
To restrict certain users to internal requisitions only, set their profile PO: Legal Requisition Type to Internal. Purchasing then requires that they source all internally orderable items from inventory.

For frequently requested items, you can define requisition templates to create internal requisitions quickly. Requestors can pull up the template they need, fill in the need–by date and destination of the request, and specify the quantity for each desired item. Internal requisitions also use the Account Generator, which automatically builds account distributions. You can specify only one accounting distribution per inventory sourced line.

Inventory Replenishment Requests
Inventory automatically generates requisitions to maintain an item’s stock level. The requisitions may request stock from an internal predefined source organization or from an outside supplier.
Inventory generates replenishment requests automatically using the following methods:
  • Min–Max Planning
  • Reorder Point Planning
  • Subinventory Replenishments for Replenishment Counts
  • Kanban Replenishments
All inventory replenishment methods create requisitions via the Requisitions Open Interface.
Attention: If the destination subinventory uses locator control, you must specify a primary locator for direct
inter–organization and subinventory transfers.
Suggestion: You can interface with third–party systems to enter count information and load it into Inventory using the
Replenishment Interface. Inventory automatically creates replenishment requisitions using the source and planning
method you define.

Kanban Replenishments
In a pull–based system, inventory items for a particular part or assembly area are replenished as soon as they are needed. When the items are needed, kanban cards in Oracle Inventory change their Supply Status to Empty, and Inventory generates the kanban replenishment request automatically. Then Requisition Import in Purchasing validates and imports replenishment requests as requisitions. If the Source Type of the request is Supplier, Purchasing creates a blanket release (if a blanket agreement exists) or a standard purchase order (if a valid quotation exists) for the item. If the Source
Type is Inter–Org, Requisition Import generates an internal requisition for the item.

Once Purchasing approves the standard purchase order, blanket release, or internal requisition, Inventory automatically receives a status for the kanban card of In Process.

In Purchasing, Kanban replenishment requests look like any other purchasing document, and you receive them like you do any other shipment. As soon as you receive the item for delivery through the Receipts or Receiving Transactions windows in Purchasing, Inventory automatically receives a status for the kanban request of Full, indicating that the inventory supply has been replenished.

MRP Generated Requisitions
Master Scheduling/MRP creates requisitions for ”buy” items when you release them using the Planner Workbench. MRP generated requisitions are sourced using the same rules as on–line and inventory replenishment requisitions. However, since MRP is planning for the entire organization, inventory sourced requisitions for MRP planned orders must be inter–organization transfer requests. You cannot request subinventory transfers using internal requisitions for MRP planned orders, unless you specify a non–nettable source subinventory on the internal requisition.

External Systems
You can automatically import internal requisitions from other Oracle Applications or existing non–Oracle systems using the Requisitions Open Interface. This interface lets you integrate the Purchasing application quickly with new or existing applications. Purchasing automatically validates your data and imports your requisitions. You can import requisitions as often as you want. Then, you can review these requisitions, approve or reserve funds for them if necessary, and place them on internal sales orders.

Internal Requisition Approvals

After you create an internal requisition, you can optionally require approval. For on–line requests, you can set up approval rules that are specific for internal requisitions, or you can share the same rules you use for purchase requisitions. If you do not require additional approval steps, you can set up rules so that you can always complete and approve the document in the Requisitions window.

Min–max planning, Reorder Point planning, and MRP generated requisitions are loaded as approved requisitions through the
Requisitions Open Interface. If you set the Inventory Profile INV: RC Requisition Approval to Unapproved, you can optionally load Subinventory Replenishment requisitions as unapproved and use the document approval functionality in Purchasing. This profile option affects only Subinventory Replenishment requisitions.

An internal requisition corresponding to a kanban card in Oracle Inventory enters Purchasing through Requisition Import with a status of Approved. (If encumbrance/budgetary control is on, Purchasing sets the status to Pre–Approved.) As soon as the internal requisition is approved, Inventory automatically receives a status for the kanban card of In Process.

Requisition supply is created for the destination organization as soon as the requisition is approved. If you create approved requisitions through Requisition Import, supply is created at the time the requisition is created. Master Scheduling/MRP and Inventory planning get complete visibility to the incoming internal requisition supply so the planning processes do not create additional reorders for items that you have already requested.

More on Purchasing

Entering and Viewing Purchase Order Acceptances
Use the Acceptances window to view and enter purchase order acceptances from your suppliers. The original copy of the purchase order you send to the supplier is a legal offer to buy. A binding purchase contract does not exist until the supplier accepts your offer either by performing the contract or formally accepting the offer by returning an acceptance document to you.

You indicate on your standard purchase orders, purchase agreements, and releases whether you require your suppliers to accept your orders by a specific date. Purchasing notifies you in the Notifications Summary window of the orders for which the suppliers have not responded by the acceptance due date.

To view acceptances
Navigate to the Acceptances window by selecting Acceptances from the Tools menu in the Purchase Orders, Releases, and
Purchase Order Summary windows when you do not have a purchase order open. Purchasing displays the Acceptances
window with all previously accepted purchase orders for review.

To enter acceptances

1. Navigate to the Acceptances window by selecting Acceptances from the Tools menu in the Purchase Orders Releases, and Purchase Order Summary windows.
You can accept only purchase orders and releases that you approved at least once and that are not closed.

2. In the Action field, enter the results of your supplier follow–up.
You can easily record the type of follow–up you performed such as Follow–up telephone call, Follow–up letter, or Fax follow–up. You can also use this field to record the outcome of the follow–up such as Will call back, No answer, Schedule slippage, or Cannot fulfill order.

3. Enter the Revision number. The default is the current revision. Purchasing removes the notification from the Notifications
Summary window only when you record the acceptance of the most recent revision.

4. Enter the Action Date for the acceptance transaction. Today’s date is the default, but you can enter any date.

5. Enter the Accepted By person. Your name is the default.

6. Enter the Role or title of the accepting person.

7. Select Accepted to indicate that the supplier accepted the purchase order. If you accept the most recent revision, Purchasing removes the acceptance requirement and the acceptance date from your purchase order or release. Purchasing also deletes the corresponding notification from the Notifications Summary window if any late acceptance notification exists for this order.

Entering Purchase Order Notification Controls

Use the Notification Controls window to enter notification controls for planned purchase orders, contract purchase agreements, and blanket purchase agreements. For these documents, you can establish expiration and release control notification conditions and specify the number of days before the condition is met that you want to be notified. When the notification conditions are met, Purchasing sends you an alert, using Oracle Alert (or e–mail).

To enter notification controls

1. Select Notification Controls on the Tools menu in the Purchase Orders window to open the Notification Controls window and display any existing controls. The Notification Controls option is active on the menu only when there is no unsaved information for the purchase order.

2. Enter one of the following notification Conditions:
Amount Not Released – If you choose this condition, you can optionally specify effective and expiration dates, but you must
specify the amount not released.
Amount Released – If you choose this condition, you can optionally specify the effective and expiration dates, but you must specify the amount released.
Expiration – Before you can use this condition, you must have specified an expiration date for the purchase order in the Details window. If you choose this condition, you must enter an effective date, and you can optionally enter an expiration date.

3. Enter the Warning Delay. This is the number of days before the expiration date that you want to be alerted. The warning delay is applicable only to the Expiration condition and helps you calculate the effective date.

4. Purchasing calculates the Effective Date based on your warning delay and the expiration date, but you can change this date. The effective date is required for the Expiration condition.

5. Purchasing displays the Expiration Date from the Terms and Conditions region as the default, but you can change this date.
Attention: If you do not enter an expiration date and your condition continues to be met, the alert will be issued forever.
Therefore, we recommend entry of an expiration date.

6. The Percent field is applicable only when you have already entered an order line. For the Amount Released (or Not Released) conditions, you can enter a percentage of the order line total, and Purchasing calculates the amount.

7. When the amount released (or not released) reaches the Amount you enter here, Purchasing sends you an alert. If you have already entered an order line, Purchasing calculates the percentage and displays it in the Percent field.

8. Select the Done button to save your work and return to the Purchase Orders window.

Amount Agreed & Minimu Release


Amount Agreed - Header and Line - The max amount
Minimum Release(Amount) - Line and T&C
Quantity Agreed - Line - The maximum rls quantity
- T&C shoule be greater than equal to Amount Agreed

Entering Releases

Use the Releases window to enter, edit, and approve releases against blanket purchase agreements or planned purchase orders.

 
To enter release headers:
1. Navigate to the Releases window by selecting Releases from the menu or selecting the New Release button in the Find Purchase Orders window.

2. Enter the PO number for the release you want to create. The list of values displays all blanket and planned purchase order numbers that have been approved, the document type, status, supplier, buyer, and effectivity date range (global agreements are not available for releases). When you select a purchase order, Purchasing displays the Supplier, Site, and Currency for that order.
Purchasing also displays the Status of the release and the current Total amount of the release.
Note: Purchasing displays a P–Card number if the purchase order used one. A procurement card purchase order is created from a iProcurement requisition that used a corporate credit card for the purchase. This field displays if the profile option PO: Use P–Cards in Purchasing is set to Yes. Only the last four digits of the procurement card are displayed. Procurement cards can be used for items with a Destination Type of Expense, for documents that do not contain a Project number, and for standard purchase orders or releases only.

3. Purchasing displays the next Release number available. You can change the release number to any number that does not already exist.

4. Enter the Created date. The default is the system date, but you can change this.

5. If the Enforce Buyer Name option in the Purchasing Options window is set to Yes, your name is displayed as the Buyer, and you cannot change this value. Otherwise, you can enter the name of any buyer.

6. Enter release shipment line information in the Shipments tabbed region.

Entering Release Shipments
Use the Shipments tabbed region to enter shipment lines for planned and blanket releases and to edit shipments that Purchasing automatically generated for you. A purchase order shipment specifies the quantity, ship–to location, date you want your supplier to deliver the items on a purchase order line, and country of origin for the items.

Sourcing, RFQs, and Quotations

Purchasing provides you with request for quotation (RFQ), and quotation features to handle your sourcing needs. You can create an RFQ from requisitions, match supplier quotations to your RFQ, and automatically copy quotation information to purchase orders.

  • Purchasing provides complete reporting to control your requests for quotations and evaluate supplier responses.
  • Identify requisitions that require supplier quotations and automatically create a request for quotation.
  • Create a request for quotation with or without approved requisitions so that you can plan ahead for your future procurement requirements.
  • Record supplier quotations from a catalog, telephone conversation, or response from your request for quotation. You can also receive quotations electronically.
  • Review, analyze, and approve supplier quotations that you want available to reference on purchase orders and requisitions. You should be able to evaluate your suppliers based on quotation information.
  • Receive automatic notification when a quotation or request for quotation approaches expiration.
  • Review quotation information on–line when creating purchase orders or requisitions and copy specific quotation information to a purchase order or requisition.
  • Identify a supplier that you want to use only for receiving RFQs and quotations. You can later be able to access purchase history to help you decide if the quotations are acceptable.
  • Review the purchase history for a specific item. You can identify the suppliers you used in the past, quantities you ordered, and pricing information. You can match this information to specific purchase orders.
  • Simplify the sourcing of commonly purchased items. You can define requisition templates for your commonly purchased items. Requestors can use these requisitions templates to create simple, pre–sourced requisitions.
  • Source the items for which you negotiated purchase agreements automatically. If you created sourcing rules and Approved Supplier List entries for the items, supplier information is entered automatically in the Requisitions window when you create requisitions. You can also place supplier information for items onto blanket purchase order releases.
  • Specify planning constraints, such as lead time, minimum order quantity, or fixed lot multiples, for each supplier site for an item so that if a supplier cannot currently meet your demand, Supply Chain Planning automatically uses another supplier that you specify.
  • Electronically Received Catalog Information : You can receive price/sales catalog information electronically from
    your supplier through the Purchasing Documents Open Interface. The information is imported directly as blanket purchase agreement lines or catalog quotations.
  • AutoCreating RFQ and Quotation Information : You can AutoCreate RFQs directly from requisitions. You can also
    Copy quotations directly from RFQs to facilitate recording responses from your suppliers. (If you receive catalog information from your supplier electronically, that information is sent automatically in the form of a catalog quotation)
  • Supplier Lists : Purchasing lets you create supplier lists so that you can predefine groups of suppliers to whom you want to send RFQs. You can establish supplier lists according to criteria you define (item, manufacturing category, geographic location, or other) and you can combine supplier lists to produce many copies of your RFQ automatically.
  • Purchasing History : Purchasing lets you review your purchase price history information to help you source your items better. You can either review all historical prices for a particular item or the last prices you paid for a specific item by quantity. You can review the detailed information of the purchase order corresponding to this last price.
  • Automatic Sourcing : Automatic sourcing automatically defaults sourcing information onto the requisitions, blanket purchase orders, or quotations you create. You can easily assign any item with an item number to a specific blanket
    purchase agreement or quotation you created. Purchasing automatically assigns the name of the supplier for the blanket purchase order and quotation to any requisition for this item. (If you receive catalog information from your supplier electronically—and you specified sourcing rules to be sent electronically also—then the sourcing rule and Approved Supplier List entry for this supplier is entered in your system automatically.)

Basics of RFQs and Quotations

A request for quotation (RFQ) is sent to a supplier to request pricing and other information for an item or items. A quotation is the supplier’s response to that RFQ. Some examples of how you send an RFQ to a supplier include creating an RFQ in the RFQs window and sending it by facsimile, making a phone call, or using Oracle iSupplierPortal.

One way a supplier can send a quotation, whether or not in response to an RFQ, is through the Purchasing Documents Open Interface. If you don’t receive quotations electronically from your supplier, you can create the quotation manually using the Quotations window, or copy the quotation from an RFQ.

Using Quotation Information on Your Documents
Purchasing lets you use your quotation information when you build purchase orders.

Using Quotation Information for a Purchase Order

When you create a purchase order (manually or from requisitions), you can use the Supplier Item Catalog window to retrieve quotation information. (The Supplier Item Catalog window can include quotations sent to you by your supplier through the Purchasing Documents Open Interface.) Purchasing provides all your approved quotation shipment information for a specific item or manufacturing category. You can copy this quotation shipment to an existing blanket purchase agreement or standard purchase order when you add this item or purchasing category to a purchase order line. You can sort this quotation information according to your needs, using criteria such as price or quantity. You can easily evaluate the source that is best for an item.

After you select the quotation shipment you want to use, Purchasing copies the item unit price, quantity, unit of measure, supplier product number, inspection required status, receipt required status, quotation number, quotation type, and supplier quotation number on your purchase order. Purchasing also copies the quotation item description on your purchase order if you define your items to do so. Purchasing automatically warns you when the terms and conditions of the quotation are different from the terms and conditions of your purchase order. The original purchase order terms and conditions remain unchanged.

Using Partial Quotation Information on a Requisition
When you enter an item or purchasing category on a requisition line, you can use the Supplier Item Catalog window to access quotation shipment information for the item or category. After you select the quotation shipment you want to use, Purchasing automatically copies the item unit price, quantity, unit of measure, supplier product number, supplier name, supplier site, and supplier contact to your requisition line. Purchasing also copies the quotation item description on your
purchase order if you define your items to do so.

Types of Quotations and RFQs
There are three types of quotations and RFQs that come with Purchasing by default:
Bid: Used for a specific, fixed quantity, location, and date. For example, a Bid would be used for a large or expensive piece of equipment that you’ve never ordered before, or for an item that incurs transportation or other special costs. You cannot specify price breaks for a Bid quotation or RFQ.
Standard: Used for items you’ll need only once or not very often, but not necessarily for a specific, fixed quantity, location, and date. For example, you could use a Catalog quotation or RFQ for office supplies, but use a Standard quotation or RFQ for a special type of pen you don’t order very often. A Standard quotation or RFQ also includes price breaks at different quantity levels.
Catalog: Used for high–volume items or items for which your supplier sends you information regularly. A Catalog quotation
or RFQ also includes price breaks at different quantity levels.

For all three types, you can define effectivity dates at the header level.
For Catalog and Standard quotations, you can also specify effectivity dates for individual price breaks. (For a Bid, you cannot specify effectivity dates at the shipment level.) You can also define your own RFQ or quotation types using the
Document Types window.

Overview of the Supplier Item Catalog

The Supplier Item Catalog provides a simple mechanism for locating items and their source information for the purpose of creating purchase order and requisition lines. You can open the catalog from an existing requisition or purchase order and add lines to that document. Alternatively, you can open the catalog from the Navigator and search for item information from there.
Search Supplier Item Catalog Window

Purchasing displays the Search Supplier Item Catalog window whether you invoke the Supplier Item Catalog from the menu or from a requisition or purchase order. To invoke the Supplier Item Catalog from a requisition or purchase
order, select the Catalog button when the cursor is in the Lines tabbed region.

The Supplier Item Catalog does not support Outside Processing. However, you can open the Catalog from an outside processing line in a requisition or a purchase order to find other items. In the search window, lists of values show only valid values. For example, inactive suppliers are not displayed. The ”Item description contains the words” field is used for keyword
searches. If you search for ”desk executive mahogany”, you get any item whose description includes all three words. In this case you could widen the search by removing ”mahogany” and/or ”desk.” The words in the description do not have to occur in the order listed, so searches on ”desk executive” and ”executive desk” would get the same result: all items whose description included both of the words.

The Deliver To Organization and Location (when invoked from the menu or a requisition) are the Ship To Organization and Location when the window is invoked from a purchase order. Lists of values display deliver–to or ship–to values, as appropriate. For query purposes, the deliver–to actually uses the associated ship–to information.

Supplier Item Catalog Window

There are four tabbed regions in the upper screen of this folder window, but Function Security can be used to determine whether a user will be able to see all of them. A profile option (PO: Default Supplier Item Catalog Option) determines which of these tabbed regions is the default when the catalog opens from the menu and for the first time in a user  session that the catalog opens from a requisition or purchase order. If you close the catalog and reopen it from a purchase order or requisition during the same session, the default source region is the last onepreviously open.

The regions are
Negotiated Sources: Long term agreements with a supplier that support repetitive buys: Blanket purchase agreements,
quotations, planned purchase orders, and global agreements enabled for your operating unit. This tabbed region is a folder.

Actual past buys: Standard purchase orders, scheduled releases, blanket releases. This tabbed region is a folder.

Sourcing rules: There are + and – iconic buttons just below the region box. Select the + icon or Expand Sourcing Rules on the Tools menu to display source documents for the rule in a folder region. Use the – icon or Collapse Sourcing Rules on the Tools menu to collapse the region displaying the documents.  You must be in the documents region to add to the Order Pad or to select a price.

Requisition Templates: The PO: Legal Requisition Type profile option governs whether templates for supplier and internally sourced lines are displayed.This tabbed region is a folder. 

Using the Order Pad
Open the Supplier Item Catalog window by choosing Catalog in the Requisitions window to view and use the Order Pad. (The Order Pad is not available when you open the Supplier Item Catalog from the Purchase Orders window.) Select a line and click the Add button or double click to highlight the selected line in a source region and add it to the Order Pad. Validation takes place at this point, and if there is a problem, Purchasing displays a message window with an explanation.
Depending on the problem, you may or may not be permitted to add the line. Also, if Disposition messages are enabled for the Purchasing Inventory organization, they are displayed as lines and added to the Order Pad.

Order Pad Options
You enter Order Pad defaults and options in the Order Pad Options window. Navigate to the Order Pad Options window by opening the Supplier Item Catalog from a requisition and choosing the Options button while you are on the Order Pad. (Note: The Order Pad is not available when you open the Supplier Item Catalog from the Purchase Orders window.) The Order Pad Options window includes the Copy Option tabbed region, where you can specify the Supplier, Supplier Site,
Supplier Contact, FOB, Carrier, Payment Terms, and Freight Terms to be copied to the purchase order header.

Receiving Price/Sales Catalog Information Electronically

Your supplier can send you the latest price/sales catalog information and responses to requests for quotation through the Purchasing Documents Open Interface. The Purchasing Documents Open Interface processes catalog data in the Oracle Applications interface tables to ensure that it is valid before importing it into Purchasing.

One way to import catalog data into the Purchasing Documents Open Interface, and finally into Purchasing, is through Electronic Data Interchange (EDI). EDI programs import the catalog information into Purchasing directly as blanket purchase agreement lines or catalog quotations, whichever you choose. You can also choose to have the programs  automatically populate the item master and/or apply sourcing rules to the imported item information. If you import price/sales catalog
information as blanket purchase agreement lines, you can also specify release generation methods. You can import new documents, replace existing documents entirely, or update existing documents.

The catalog information is sent by the supplier in the form of a ”flat  file.” Your supplier can send you flat files with any of three kinds of action codes: Original, Replace, or Update. An Original file is one in which all the catalog information is new to your system. A Replace file replaces already–created blanket purchase agreement lines or catalog quotations with new documents containing new price/sales catalog information. (The Purchasing Documents Open Interface program replaces the old documents by invalidating their effectivity dates; then it creates new documents with the new price/sales catalog information and the old effectivity dates.) An Update file updates existing blanket purchase agreement and catalog quotation lines without replacing the documents entirely. It updates the unit Price, item Description, unit of measure (UOM), Price Breaks, Expiration Date, and the supplier URL descriptive flexfield if you use one.
Note: An Update submission does not update the UOM on an agreement line for which an open release exists. Instead, it
uses the Expiration Date field to expire the line on the agreement, and creates a new line with the updated UOM,
which will be used on future releases.

The Purchasing Documents Open Interface also imports price breaks. In an updated price/sales catalog, if the supplier updates an item’s price, the Purchasing Documents Open Interface deletes the item’s price breaks since they are no longer current with the new price. If the supplier sends new price breaks for an existing line, the current price breaks are deleted and the new price breaks sent by the supplier are created.

The Purchasing Documents Open Interface supports the Oracle e–Commerce Gateway transmissions of the price/sales catalogs (ANSI X12 832 or EDIFACT PRICAT) and responses to RFQs (ANSI X12 843 or EDIFACT QUOTES). For e–Commerce Gateway to distinguish between Original, Replace,  and Update action codes, you need to set up code–conversion categories and values in e–Commerce Gateway.

Other setup includes making sure that default category sets are set up appropriately for both Purchasing and Inventory, setting Purchasing profile options, and allowing updating of the item master if you want to update the item description in the item master as well as on the blanket purchase agreement or quotation. For complete instructions on setup requirements, see the Oracle Manufacturing, Distribution, Sales and Service Open Interfaces Manual.

You can also import standard purchase orders through the Purchasing Documents Open Interface, using your own import program. You cannot update or replace existing standard purchase orders through the Purchasing Documents Open Interface. You must use the Change Order API. 

General Ledger encumbrance accounting

Setups
1.1 Define Reserve for Encumbrance account for each set of books.
When you post encumbrance transactions, General Ledger automatically posts offset amounts to this account.

1.2. Enable Budgetary Control for your set of books to automatically create encumbrance entries from Oracle Purchasing and Oracle Payables.
owever, you need not define budgetary control options for your detail or summary accounts nor must you define budgetary control groups.

2. Open encumbrance years to enter and post encumbrance entries to future periods. Your initial encumbrance year is opened automatically when you open your first period for your set of books. General Ledger uses the last period of your latest open encumbrance year to determine how far to calculate your project-to-date encumbrance balances.

3.1 Define Encumbrance Types
3.2 Define Budget
3.3 Define Budget Organization
3.4 Define Budgetary Control Groups
3.5 Assign Budgetary Control Groups

4. Define financial encumbrance options in Purchasing and Payables in the Financials Options window.

Process
1. Entering Budget
Budget entries can be entered either through the Enter Budget Amounts form or through the Enter Budget Journals form.
Budget journals needs to be posted to GL.

2. Encumbrance Accounting Flow from Purchasing
Requisition Encumbrance
You may enable this option to encumber funds for requisitions. If you enable this option, Purchasing creates journal entries and transfers them to General Ledger to encumber funds for purchase requisitions.

If you enable Use Requisition Encumbrance, you must select an encumbrance type by which you can identify your requisition encumbrance journal entries. Purchasing assigns this encumbrance type to the encumbrance journal entries it creates for purchase requisitions. If you enable Use Requisition Encumbrance, you can indicate whether you want requisition preparer to have the option to reserve funds. If you do not enable this option, only requisition approvers will have the option to reserve funds.

PO Encumbrance
Enable this option to encumber funds for purchase orders, purchase order and receipt matched invoices, and basic invoices (not matched). If you enable this option, Purchasing encumbers funds for purchase orders and Payables encumbers funds for variances during Payables Invoice Validation for purchase order and receipt matched invoices. If you enable this option and enter a non-purchase order matched invoice, Payables will encumber funds for it during Payables Invoice Validation. All Payables encumbrances are reversed when you create accounting entries. If you enable Use Requisition Encumbrance, you must also enable this option.

If you enable Use Purchase Order Encumbrance, select a purchase order encumbrance type by which you can identify your purchase order encumbrance journal entries. Purchasing assigns this encumbrance type to the encumbrance journal entries it creates for purchase requisitions and purchase orders. If you use purchase order encumbrance, select an invoice encumbrance type by which you can identify your invoice encumbrance journal entries. Payables module assigns this encumbrance type to the encumbrance journal entries that it creates. It is recommended that you use an encumbrance type different from the Purchasing encumbrance type so you can identify invoice encumbrances

2.1 Users can enter, approve and reserve Funds for Requisition.

Navigation: Requisitions -> Requisitions.
Create a requisition, reserve and approve the requisition. When approved users can do a funds check in GL and this should be in requisition phase, provided requisition is the type of encumbrance Users have attached at requisition level in Financial options. Reserving the requisition kicks of the funds checker program and encumbrance line gets created in the table GL_BC_PACKETS. The encumbrance journal entries get created when the program – Create Journal Entries is run from GL.
The data in GL_BC_PACKETS table would get deleted, only when the Create Journal Program in GL is run and the journal gets posted.
The Transaction Created can have the following feature
Balance Type         = E (Encumbrance)
Encumbrance Type    = REQ (Requisition)
CCID            = CCID given in Requisition Distribution


2.2 Navigation: Auto Create
Find your requisition, Select the requisition and go to automatic.  Make sure that the supplier information is entered and select create.  This creates the PO. Complete, reserve and approve the PO.  When approved users can do a funds check and this should be in PO phase, assuming PO encumbrance is the type attached at PO level.
No journal entries are created at this stage but similar to the previous step Users can create encumbrance entries by Create Journal Entry program.  While using PO Encumbrance, users cannot change price, quantity, shipment or currency once a PO has been reserved and approved, the only way to deal with such a situation is to cancel the existing PO and create a new one when a PO is cancelled system takes care of adjusting encumbrance.
The encumbrance created on Requisition is relived when the PO encumbrance is created and Funds are reserved for the PO.
NOTE: The important point over here is that if a user creates the PO manually, it can lead to the duplication of reservation of funds for the same transaction.  This is because system treats PO as a separate transaction and the user can end up having double reservation for the same transaction one at requisition level and other at PO level.  Hence it is suggested to use only Auto Create mode to create a PO, while using Encumbrance Accounting.
The Transaction Created can have the following feature:
Balance Type         = E (Encumbrance)
Encumbrance Type    = PO (Purchase Order)
CCID            = CCID given in PO Distribution
    
2.3 Receiving Receipts
On receipt of the goods, the entries are made as follows:
Navigation: Receiving Receipts
Query the PO. Mark as receipt and save. Depending on the routing users may have to deliver it. Once the goods are received system creates Journal entries for the Receiving transaction. At this point PO encumbrance is relieved.  Otherwise, it gets relieved when Users post the invoice from payables to GL in Accrual basis of Accounting.  In case of Cash basis of accounting PO encumbrance gets relieved when Users post payment information from Payables.
The PO encumbrance is getting relieved based on the setup the user has made, depending on whether the period-end or on-line accrual is selected.
If on-line accrual method is selected, the PO encumbrance can be relieved when the goods are received.  In case of period-end accrual, we need run the period-end accrual process.

NOTE: Important reports that can be used to track the encumbrance entries are:
1. Requisition Distribution Detail Report.
2. Purchase Order Distribution Detail Report.
3. Encumbrance Detail Report.

3. Payables
Once the Goods are received and matched against the Purchase Order, the next step is to create an invoice for the Goods received.  Invoice can be created at the following scenarios.
3.1    Enter Unmatched Invoices
Navigation: Invoices -> Entry -> Invoices
This is applicable where no purchase order is created.  For example, where the invoice has to be created for the services rendered (Audit Fees). 
•    There is no separate step to reserve funds in AP unlike in PO.  In AP, Validation process takes care of the funds reservation.
•    If the invoice is created and matched with PO and the amount matched is equals to PO, then the encumbrance type can be reclassified from PO to INV and no additional entries are generated.
•    Payable also creates encumbrance when users successfully approve an invoice having a quantity or price variance with the matched PO.
•    If Users match an invoice to a PO, Payable automatically creates an entry in GL to reverse the PO encumbrance and the Invoice Encumbrance comes into picture
•    Encumbrance Entries are created when an invoice is validated and approved. The actual entries are created when we transfer to GL through Payables Transfer to GL program and imports the journals into GL. This will bring two entries, the Actual and the Invoice encumbrance relief
•    You need to run the Create Journal Entry program to bring in the PO Encumbrance relief and the Invoice encumbrance lines into GL
Select the Account Combination at the header level, as in the Assignments window in the Budget Organization.  If budgetary control group is used, create a budgetary control group with the source Payables and Category as Manual.

3.2    Entering Invoices and Match with Purchase Order
Navigation: Invoices -> Entry -> Invoices
Complete by entering invoice number, date and amount. Navigate to match and in the Find Window the PO number is displayed.  Flag the lines and select Match.  You can flag multiple PO lines to match with the Invoice.
The PO distributions lines can be copied to the Invoice distributions. Users can approve the invoice.  When approved the funds is checked automatically by the system.
The Transaction Created can have the following features:
Balance Type         = E (Encumbrance)
Encumbrance Type    = INV (Invoice)

Entering RFQs

There are three methods of creating an RFQ -  manual entry , auto creating from requisition and by copying a blanket purchase agreement.

Each RFQ consists of header, line, and shipment information. You can send the RFQ to as many suppliers you want and decide how much item information to provide to the suppliers.
Note: Whether or not you send an RFQ, suppliers can send you catalog quotations electronically, through the Purchasing Documents Open Interface.

To Manually enter RFQ:

1. Navigate to the RFQs window by selecting RFQs from the menu.Purchasing displays today’s date as the Created date and the functional Currency from your set of books.

2. Enter a unique number for the RFQ. In the Purchasing Options window, you can choose whether RFQ numbers are numeric or alphanumeric and whether Purchasing automatically generates them when you save your changes.

3. In the Type field, enter one of the document names defined for RFQs. The list of values lists the Document Type (Document Name) and Quotation Class from the Document Types window.
For existing RFQs, the list of values includes only RFQs with the same Quotation Class.

4. Enter the Ship–To and Bill–To locations for the items on the RFQ.

5. Use the Status field to control the status of the RFQ:
In Process – The initial status when you create the RFQ.
Active – Choose this status when the RFQ is complete and you are ready to send it to your suppliers. Only Active RFQs are printed.
Printed – The status assigned to the RFQ when you have printed at least one copy of it. You must change the status to Active if you want to reprint the RFQ.
Closed – Choose this status to close the RFQ when all suppliers have responded or when you no longer want responses. When you close an RFQ, Purchasing deletes all follow up notifications associated with it.

6. Enter the Due Date when you want your suppliers to reply. Purchasing prints the reply due date on the RFQ. Purchasing
notifies you if the current date is between the RFQ reply due date and the close date and if the RFQ is Active. Purchasing knows that a supplier replied to an RFQ if you enter a quotation for this supplier referencing the RFQ.

7. Enter the Reply/Receive Via code for the method you want the supplier to use to send the quotation. For example, by mail, telephone, or FAX.

8. Enter the Close Date for the RFQ. Purchasing prints the close date on the RFQ. Purchasing notifies you if the current date is between the RFQ reply due date and the close date and if the RFQ is Active. Purchasing warns you when you enter a quotation against this RFQ after the close date.

9. Select Require Quote Approval to enforce approval of any quotation referencing this RFQ before the quotation can be used for a purchase order.

10. Purchasing displays your name as the Buyer. You can forward the RFQ to another buyer by choosing the name of this buyer from the list of values. The buyer you enter receives all notifications regarding this RFQ.

11. Enter the beginning and ending Effectivity Dates for the supplier quotation.

12. Enter RFQ lines in the Lines tabbed region

Entering RFQ Supplier Information
Use the RFQ Suppliers window to:
  • Enter the suppliers to which this RFQ will be sent. You can also delete suppliers from the RFQ until you have printed the RFQ for them.
  • Review the supplier activity.
  •  
Entering RFQ Price Break Information
Use the RFQ Price Breaks window to enter pricing information for RFQs.
Attention: Use this window to request as many price breaks as you want. You can provide multiple price breaks if you want to receive quotations from your suppliers for different terms, ship–to locations, or quantities

Autocreating RFQ from Requisition
 
Copying BPA to Requisition

Entering Quotations

There are three methods of creating an RFQ -  manual entry , by copying a RFQ and receiving catalog quotations electronically from your suppliers through the Purchasing Documents Open Interface.

To manually enter quotation

1. Navigate to the Quotations window by selecting Quotations from the menu. Purchasing displays the functional Currency from your set of books.

2. Enter a unique number for the quotation. In the Purchasing Options window, you can choose whether quotation numbers are numeric or alphanumeric and whether Purchasing automatically generates them when you save your changes.

3. In the Type field, enter one of the document names defined for quotations. The list of values lists the Document Type (Document Name) and Quotation Class from the Document Types window. For existing quotations, the list of values includes only quotations with the same Quotation Class.

4. If you copied this quotation from an existing RFQ, Purchasing displays the corresponding RFQ number, which you can override. You can also manually provide an RFQ number. Purchasing verifies the supplier and supplier site you provide and lets you choose from a corresponding list of RFQs. If you want to enter a quotation as a response to an RFQ for a supplier you did not provide on the RFQ supplier list, you need to modify the RFQ supplier list first. If you change the supplier or supplier site information on this quotation after you enter an RFQ number, Purchasing removes the RFQ number, and you must re–enter it.
If you enter the number of an RFQ for which you already entered a response for this supplier and supplier site, Purchasing displays a warning message but permits your entry.
Attention: If you are entering a quotation that is a response to an RFQ you previously sent to the supplier, you need to provide this RFQ number to indicate to Purchasing that the supplier responded.

5. Enter the Supplier for this quotation. When you enter a supplier name, Purchasing uses the default terms, conditions, and currency information for this supplier in the Quotation Terms and Currency windows. The list of values displays the supplier name, number, Tax ID number, and VAT number.

6. Enter the supplier Site for this quotation. You do not need to provide a supplier site for a quotation. When you enter a supplier site, Purchasing uses the default terms, conditions, and currency information for this supplier site in the Quotation Terms and Currency windows.

7. Enter a supplier Contact for this quotation.

8. Enter the Ship–To and Bill–To locations for the items on the quotation.

9. Use the Status field to control the status of the quotation:
In Process – The initial status when you create the quotation.
Purchasing sends you notifications that the quotation is awaiting completion.
Active – Choose this status when the quotation is complete and you are ready to approve it. Only Active quotations can be approved.
Closed – When you enter a quotation, you provide an expiration date for it. Purchasing sends you a notification when the quotation approaches expiration using the warning delay you provided in the quotation header. You can manually close the quotation to acknowledge the notification. If you do not acknowledge the notification by closing the quotation, the status of your quotation is still Active. You cannot use Closed quotation information on purchase orders.

10. Enter the Supplier Quote number.

11. Select Approval Required to indicate that approval is required to purchase goods based on this quotation.

12. The Response Date is the date you actually received the quotation. Purchasing defaults today’s date as the response date, but you can change this date.

13. Enter the beginning and ending Effective Dates for the quotation.

14. Purchasing displays your name as the Buyer. You can forward the quotation to another buyer by choosing the name of this buyer from the list of values. The buyer you enter receives all notifications regarding this quotation.

15. Enter quotation lines in the Lines tabbed region.

Copying Quotations from RFQs
Use the Copy Documents window to create quotations directly from RFQs. Quotations you receive in response to an RFQ usually match the format of your RFQ. To create a quotation from an RFQ, open the original RFQ and choose Copy Document from the Tools menu. You can copy the complete RFQ or part of it to your quotation. You can then edit the quotation to provide detailed quotation line information. Project and task information, if any, is carried from an RFQ when you copy a quotation from it.

Supply Base Management


1. Supplier

Please check the below link
http://www.oracleug.com/user-guide/accounts-payable/suppliers

2. Automatic Sourcing
Concept

3. Sourcing Rule/BOD
http://www.oracleug.com/user-guide/ascp/sourcing-rules
http://www.oracleug.com/user-guide/ascp/bills-distribution


4. Assignment Set
http://www.oracleug.com/user-guide/ascp/assignment-sets

5. Approved Supplier List
http://www.oracleug.com/user-guide/purchasing-overview/approved-supplier-list
http://www.oracleug.com/ebs-modules/ascp/supplier-capacity


6. Supplier List


7. Managing Buyer Workload


Overview of Automatic Sourcing

Oracle Purchasing allows users to automatically source items from suppliers based on the sourcing rules and purchase agreements. The business needs of sourcing are :

  • Automatically default supplier and pricing information onto requisition lines
  • Source the item from negotiated purchase agreements
You can easily assign any item with an item number to a specific purchase agreement or quotation. Purchasing automatically assigns the name of the supplier for the purchase agreement and quotation to any requisition for this item.

To achieve automatic sourcing, use the Sourcing Rule and Sourcing Rule/Bill of Distribution Assignments windows to create sourcing rules. Optionally use the Approved Supplier List and Supplier–Item Attributes windows to specify source document information for a particular item, supplier, and site.

PROCESSING OVERVIEW
Sourcing rule describes which supplier and supplier site while approved supplier list describes pricing details from document and line details of that supplier and supplier site combination.

Sourcing rule is mandatory which identifies the supplier and supplier site for the sourcing to happen. Sourcing rule and approved supplier list can be local and global. Once the sourcing rule is identified by sourcing functionality next is to find the source document for that supplier and supplier site combination.
Following flowchart explains you how the sourcing functionality works in defaulting the source document.

It first checks for the Profile option "PO: Automatic Document Sourcing".

Consider if the value is set to ‘Yes’. This enables Purchasing to default the most recent source documents automatically. If more than one source document is entered, Purchasing uses a blanket purchase agreement over contract and quotation, even if they were created more recently. If there are only blanket purchase agreements or only quotations, Purchasing uses the one that was created most recently.

If the Profile PO: Automatic Document Sourcing is set to ‘No’ then it checks for the ASL setup.
Global ASL entries are valid for all inventory organizations. Local ASL entries are specific to a single inventory organization.
If two ASL entries exist for the same item or commodity, one Global entry that applies to all organizations and one local entry that applies only to the local inventory organization, the local entry takes precedence. Also if ASL entries exist for the item and category (for which the same item is assigned), item ASL takes precedence over commodity ASL.

Below is the matrix, which shows the resulting document, created from the requisitions when it has the following source document.
  • Source Document              Resulting Document
  • Quotation                           Standard purchase order
  • Contract purchase order        Standard purchase order
  • Local BPA                            Blanket release
  • Global BPA                           Standard purchase order
  •  
One can also accomplish an automatic creation of Sourcing Rules, Sourcing Rule Assignments and Approved Supplier List entries during Blanket Agreement approval Submission. The system automatically creates the relevant entries, once the Blanket Agreement is approved. 

Profile Options
  1. MRP: Default Assignment Set => Define with desired Assignment Set
  2. PO: Automatic Document Sourcing => Yes
  3. PO: Allow Auto-generate Sourcing Rules => CREATE AND UPDATE
  4. PO: Allow Autocreation of Oracle Sourcing Documents => Yes

Create ASL And Sourcing Rule From BPA

Setups
1. Check the following profile options

  •     PO: Allow Auto-generate Sourcing Rules = CREATE AND UPDATE
  •     PO:Allow autocreation of Oracle Sourcing documents= Yes
  •     MRP: Default Assignment Set
Profiles can be set at User, Responsibility, Application and Site Level After setting or adjusting any profile, log back into the application.

2.  Change the PO Approval Workflow definition using Workflow Builder:
Attributes
- Create Sourcing Rule Flag: "Y"
- Update Sourcing Rule Flag: "Y"
- PO SR Rule Name Prefix: "PURCH" - Default Value
- PO Assignment Type ID for SR: "3 - Item level "
- PO Sourcing Organization ID:  Set to Inventory Org in which ASL needs to be created

Complete Process
1. Create A Blanket Purchase Order
    Item should be taken for which the ASL and souring rule is required
    Effectivity date for the BPA should be specified

2. Save and Approve this Blanket Purchase Agreement.

3. Run the Workflow background process
    Item Type : PO Approval
    Deffered Activity: Yes

4. Navigate to the Supply Base> Approved Supplier List
    Query on the Item and check ASL is created
    Go into Attributes and Document is attached with the specifed Release method

5. Supply base-->Assign sourcing rule
    Query the assignment set defined in MRP: Default Assignment Set   
    Query the item mentioned in BPA and note down the sourcing rule attached  against that item
    Verify the Sourcing rule

The sourcing rule and approved supplier list automatically created as global upon BPA approval. In 11.5.10 a patch is now available to allow users to create local sourcing rules through the "Generate Sourcing Rules and ASLs from Blanket Agreements" concurrent program. After applying Patch 4923689, customers would have to add the concurrent program "Generate Sourcing Rules and ASLs from Blanket Agreements" to a Request Group that they deem suitable for users to be able to access it.

Defaulting Sourcing Information

For requisitions, if you define a purchase agreement or quotation as the source document for your item, and define and assign sourcing rules, Purchasing provides the following sourcing information for your requisition line: Buyer, Supplier, Site, Contact, Phone, Supplier Item Number, Document Type (Blanket, Contract, or Quotation) Source Document, Source Line Number, and RFQ Required (Yes or No). Oracle Purchasing also defaults the price depending on your pricing configuration. You can later review the sourcing information in the AutoCreate Documents window before placing the requisition line onto
a purchase order.
Sourcing information defaults on a requisition from existing documents in the following order of precedence:

  1.  Local blanket purchase agreement
  2.  Global blanket purchase agreement
  3.  Local contract purchase agreement
  4.  Global contract purchase agreement
  5.  Quotation
For standard purchase orders, if you define a global agreement or quotation as the source document for the item, and define and assign sourcing rules, Oracle Purchasing provides sourcing information for the purchase order line. Examples of sourcing information are: Contract, Document Type, document Number and Line, and Supplier Quotation number. Oracle Purchasing also defaults the price from the source document.
Sourcing information defaults on a purchase order from existing documents in the following order of precedence:
  1. Local blanket purchase agreement
  2. Global blanket purchase agreement
  3. Quotation
A requisition with a quotation, contract purchase agreement, or global agreement as a source document becomes a standard purchase order. A requisition with a blanket purchase agreement as a source document becomes a release.
Purchasing defaults sourcing information from the purchase agreement or quotation except under the following conditions:
  • The document is not approved.
  • The purchase agreement is frozen or cancelled, or the blanket purchase agreement line is cancelled.
  • The document is not active.
  • You have copied sourcing information back to the requisition from the Supplier Item Catalog.
Sourcing by Item or Item Category
In the Approved Supplier List and Sourcing Rule windows, you source at an item or commodity level. That is, you provide sourcing information for a particular item at the item level, or for a category of items at the commodity level.
For inventory items, if no sourcing rule is provided at the item level in the Sourcing Rule/Bill of Distribution Assignments window, Purchasing automatically defaults the supplier or supplier site from the category–level sourcing rule if there is one.

The same is true of supplier statuses. If you debar a supplier for a specific commodity (category) in an Approved Supplier List entry, the supplier is prevented from supplying all items within that commodity. (Note: If you approve a supplier for a commodity, the item–specific status for the supplier still takes precedence.)

Sourcing Globally or Locally
In the Approved Supplier List and Sourcing Rule windows, you also choose whether to exercise the sourcing information at a global or local level. A sourcing rule assigned at the global level in the Sourcing Rule / Bill of Distribution Assignments window is valid for all operating units. A global ASL entry in the Approved Supplier List window is valid for all inventory organizations in an operating unit. A local sourcing rule or ASL entry is valid only for the organization that you were in or that you chose when creating the sourcing rule or ASL entry. Local entries take precedence over global ones.

For example, if you have a global sourcing rule that says to use Supplier A for an item for all organizations in your company, and a local sourcing rule for the same item that says to use the local Supplier Z only for your organization, Purchasing defaults Supplier Z on requisitions or purchase orders created in your organization. Local entries are the default in the Approved Supplier List window.

Defining Allocation Percentages
When creating sourcing rules in the Sourcing Rule window, you must define allocation percentages. Master Scheduling/MRP uses these allocation percentages when creating planned orders, which Purchasing imports as requisitions through Requisition Import. In a group of requisitions imported from Master Scheduling/MRP, the requisitions show the percentage allocation you define. In other words, at the end of a planning period, a group of orders to those suppliers approximately equals the percentage split you defined. However, when you create an individual requisition in Purchasing, Purchasing sources to the supplier with the highest allocated percentage. The Approved Supplier List (ASL) entry for that supplier is then referenced in order to pick up source document information (from a purchase agreement or quotation), if source documents exist. If a percentage allocation is the same for some suppliers, and you have ranked the suppliers in the Sourcing Rule window, Purchasing sources to the one with the highest rank.

Specifying Planning Constraints
The Supplier–Item Attributes window lets you optionally specify the capacity of individual supplier sites to supply specific items. Supply Chain Planning allocates planned orders taking these capacity constraints into account. For example, you define and assign a sourcing rule that says an item can come from either of two suppliers this year. In the sourcing rule, you also rank the suppliers so that Planning prefers Supplier 1 over Supplier 2. However, if the capacity of Supplier 1 in the Planning Constraints tabbed region of the Supplier–Item Attributes window includes a four–day lead time, but there is a need–by date of one day, Supply Chain Planning  automatically defaults Supplier 2 onto planned orders if Supplier 2 has
a lead time of less than one day. (If no suppliers can meet your demand, Supply Chain Planning uses the top–ranked supplier.)

In addition to lead time, you can define receiving schedules, minimum order quantities and fixed lot multiples, capacity per day, and tolerance fences. These planning constraints apply to planned orders only.

Automatic Sourcing with Centralized Procurement
Centralized procurement enables you to extend automatic sourcing to global agreements negotiated by other business units. Automatic sourcing setup is the same but sourcing will be extended to look at global agreements matching the supplier and supplier site in other business units (operating units). This extended automatic sourcing will always evaluate purchase agreements in your operating unit first, then global agreements, and finally quotations.

Automatic Sourcing with Oracle Services Procurement Oracle Services Procurement extends automatic sourcing by always
attempting to find a source document with a matching commodity and job title. This is done regardless of the setting of the PO: Automatic Document Sourcing profile or commodity entries in the Approved Supplier List.

Setting Up Automatic Sourcing

Use the Sourcing Rules windows to default a supplier and optionally a supplier site on your requisition or purchase order line. Use the Approved Supplier List or the PO: Automatic Document Sourcing profile if you also want to default source document information from a purchase agreement or quotation on your requisition or purchase order line for an item–supplier combination.

By defining and assigning sourcing rules, Purchasing actively defaults the appropriate supplier onto your document as soon as you enter an item or commodity.
To default the supplier, site, and source document information:
1. Set the profile option PO: Automatic Document Sourcing.
Setting this profile option to Yes means that Purchasing automatically searches for the most current purchase agreement or
quotation for an item–supplier combination, and defaults the information from this document onto a newly created document line. This method is useful if you do not want to maintain the most current source documents in the Approved Supplier List, particularly if you receive these documents regularly from your suppliers through the Purchasing Documents Open Interface. If you set this profile option to Yes, you do not have to specify source documents in the Approved Supplier List.
Note that if an item on a requisition is associated with both a purchase agreement, a global agreement, and a quotation,
Purchasing uses the purchase agreement, then the global agreement, and then the quotation even if the global agreement or quotation were created more recently.

Setting this profile option to No means that Purchasing defaults sourcing information onto a newly created requisition or purchase order line only from those documents you have specified in the Approved Supplier List. This method is useful if you prefer to maintain and update the Approved Supplier List with documents that you choose.
Note: If Oracle Services Procurement is implemented, for services lines the automatic sourcing logic always acts as though this profile is set to Yes. No automatic sourcing is performed for fixed price services.

2. If you set the profile option in the previous step to No , create a source document (a purchase agreement or quotation) and then tie the document to an Approved Supplier List entry.
If you set the profile option in the previous step to Yes, you do not have to perform this step, although you can if you want to. Purchasing still uses the source documents in the Approved Supplier List if they are the most current, and uses documents outside the Approved Supplier List if they are not.
Note: When Use Approved Supplier is checked for an item in the Master Items window, you cannot approve the source document until the supplier is in the Approved Supplier List. Therefore, if Use Approved Supplier is checked for an item, create the Approved Supplier List entry and source document in the following order:
– Create an Approved Supplier List entry (this is the  approved supplier you are enforcing for the item).
– Create and save a source document.
– If the PO: Automatic Document Sourcing profile is No, return to the Approved Supplier List window and tie the
source document to the supplier.

3. Define and assign sourcing rules as described in To default just the supplier and the supplier site below
To default just the supplier and the supplier site
1. Make sure you have satisfied the prerequisites for defining and assigning sourcing rules:

  • Define items.
  • Create suppliers and supplier sites in the Suppliers window.
  • Set the profile options MRP: Sourcing Rule Category Set and MRP: Default Sourcing Assignment Set.
2. Use the Sourcing Rule window to define sourcing rules.
Note: Some of the fields in the Sourcing Rule window may already be completed for you if your supplier sends you catalog information electronically.

3. Use the Sourcing Rule/Bill of Distribution Assignments window to assign your sourcing rules to particular items or organizations.
Attention: When you enter an Assignment Set name in the Sourcing Rule/Bill of Distribution Assignments window, note
that Purchasing can use only one assignment set—the one that is specified in the profile option MRP: Default Sourcing
Assignment Set. (Note that the User level for the profile option takes precedence.)

Although creating and assigning a sourcing rule in the Sourcing Rule windows is all you need to do to default a supplier and
supplier site onto your documents, you can still also create approved suppliers in the Approved Supplier List window. For
example, if you checked Use Approved Supplier in the Master Items window when defining an item, you must define the supplier in the Approved Supplier List window.

If you want to verify the sourcing rule, create a requisition for the item to verify that the Supplier and Site default. If the sourcing rule is local, make sure the Organization field on the requisition is the organization in which the sourcing rule was created.

Approved Supplier List

All procurement organizations maintain lists that associate the items and services they buy with the companies who supply them, either formally or informally. Data stored in a controlled, global repository containing relevant details about each ship–from/ship–to/item relationship, is known as an Approved Supplier List (ASL). This repository includes information about all suppliers with business statuses including Approved, Debarred, or New.


Use the Approved Supplier List and Supplier–Item Attributes windows to specify blanket purchase agreements, contract purchase agreements, or quotations as source documents for a particular item and supplier or particular item category (commodity) and supplier. Purchasing automatically defaults this source document information, such as the Buyer, supplier Contact, and Supplier Item Number, for the item or commodity onto the requisition line. Standard purchase orders get source document information from global agreements and quotations. Requisitions get source document information from blanket purchase agreements, contract purchase agreements, or quotations.

Note: Purchasing can also search for the most current source documents for you, without your setting up the Approved Supplier List, if you set the profile option PO: Automatic Document Sourcing to Yes.

ASL Business Needs

Using Oracle Purchasing Approved Supplier List, you can:
  • Set approval/certification status at the appropriate level for your business. For example, approve a supplier for a given commodity (e.g. ’Office Supplies’) for expense purchases while approving a specific supplier/site for each production item.
  • Approve suppliers (they perform their own manufacturing), distributors (they represent manufacturers), and manufacturers (they manufacture items marketed and sold by distributors).
  • Define global or local ASL entries. All organizations should be able to specify their own attributes (information about the supplier/item relationship) even if the supplier/item status is defined as a global record. This enables individual ship–to–organizations to determine, for example, whether they are ready to perform supplier scheduling, their purchasing unit of measure, their default item price, etc.
  • Link the primary supplier item number with your internal item number. This designated item will default to Purchase Order and Requisition lines.
  • Specify a Review By date indicating a proactive, planned review of the business with a longstanding supplier partner.
  • Review ASL information in a flexible inquiry format.
  • Define your own approval statuses and associate them with specific business rules.
  • Control procurement activity by preventing purchase order approval or supplier schedule confirmation for certain supplier/item combinations.
  • Control whether Sourcing Rules must be comprised of approved suppliers.
  • Define reference information, including planning constraints such as lead time, for the supplier/item combination.

More @ http://www.oracleug.com/ebs-modules/ascp/supplier-capacity

Defining Approved Supplier Statuses

You can create any number of Approved Supplier Statuses to describe the condition of the Approved Supplier, ranging from fully Approved (the supplier has demonstrated the ability to satisfy rigorous quality, cost, and delivery requirements over a sustained period) to Debarred (no business is allowed with this supplier for a particular item or commodity), or New if you have never placed a purchase order with the supplier.

Note: If you debar a supplier for a specific commodity (category) in the Approved Supplier List, the supplier is
prevented from supplying all items within that commodity.However, if you approve a supplier for a commodity, the item–specific status for the supplier still takes precedence.

Each Approved Supplier Status can have business rules applied to manage the characteristics of the status. You can prevent or allow certain business rules for each status, change the name of a status, or create a status of your own. For example, the default status of Approved allows all the default business rules: PO Approval, Sourcing, Schedule Confirmation, and Manufacturer Linking. But you could change the Approved status to prevent one of the Business Rules.

Likewise, you can create your own status with your own combination of Business Rules. In the Status field in the Approved Supplier List window, Purchasing lets you choose among these supplier statuses. Defining your own supplier statuses in this window is optional.

Defining ASL (Supplier and Item/Commodity Combination)


1. Navigate to the Approved Supplier List window.

2. In the Organizations window that appears, choose the ship–to organization for which you want to define Approved Supplier List (ASL) entries.

3. Choose one of the following options to which you want to assign a supplier:
  • Item – Assigns a supplier to a particular item.
  • Commodity – Assigns a supplier to a group of items belonging to a category (or commodity). Note: If you have defined your item in the item master with the Must Use Approved Vendor flag set to Yes, Purchasing will use the item level ASL when both item and commodity ASLs exist. If the flag is set to No, both commodity and item ASLs would be considered.
4. Select an Item or Commodity.

5. Choose a Business from the following:
  • Direct (Supplier): Company sells their products directly to you If you choose Direct, choose the supplier Name and optionally,the Site.
Attention: The supplier Name and Site, if you specify one, must match the sourcing rule Supplier and Site to default the
supplier information or source document information successfully.
  • Manufacturer: Company manufactures and sells through distributorsIf you choose Manufacturer, choose the Manufacturer Name.
  • Distributor: Company sells products made by manufacturers If you choose Distributor, choose the distributor Name and optionally, the Site. You must associate the Distributor with a Manufacturer, meaning you must define a Manufacturer before you define its Distributor.
6. Choose the supplier’s approval Status.
Use one of the default Statuses provided, or choose a status of your own if you defined other statuses in the Approved Supplier List Statuses window.
If you debar a supplier for a specific commodity, the supplier is prevented from supplying all items within that commodity.
However, if you approve a supplier for a commodity, the item–specific status for the supplier still takes precedence.

7. Optionally choose the supplier item number.
For Suppliers and Distributors, this supplier item number defaults to your purchase order and requisition lines, and is used to
validate the source documents.

8. Optionally choose a Review By date.
You can use this date to determine when a proactive business review will be performed for the supplier.

9. Choose the Record Details tabbed region.

10. Choose one of the following in Global:
  • Yes – This ASL entry is valid for all inventory organizations in your operating unit.
  • No – This ASL entry is local—that is, valid only for the organization you chose in the Organizations window when you first navigated to the Approved Supplier List window.
Note: If you have two ASL entries for the same item or commodity—one Global entry that applies to all organizations in
your company and one local entry that applies only to your organization—the local entry takes precedence

Defining the Supplier/Item Attributes

Use the Supplier–Item Attributes window to specify additional information for the Approved Supplier List entry, including source document, Supplier Scheduling, and planning constraint information.


To define the supplier and commodity/item attributes
1. Navigate to the Supplier–Item Attributes window by choosing the Attributes button in the Approved Supplier List window.
Additional Information: The Create Local button creates a copy of an existing global Approved Supplier List entry and
makes it local to your organization. The Create Local button is not available if you are already creating a local entry or if a
local entry for the item (in this or the Approved Supplier List window) already exists.

2. Choose the Purchasing UOM.

3. Choose the Release generation Method from the following options:
• Automatic Release/Review: automatically generate releases, but require a separate step for approval.
• Automatic Release: automatically generate approved releases.
You cannot choose this option if purchase order encumbrance is on.
• Release Using AutoCreate: use the AutoCreate window to create releases.

4. Enter a Price Update Tolerance only if you are importing price/sales catalog information through the Purchasing Documents Open Interface.
The Price Update Tolerance specifies the maximum percentage increase allowed to a price for this item/supplier combination
when the supplier sends updated price/sales catalog information through the Purchasing Documents Open Interface. This field affects only blanket purchase agreements and catalog quotations imported through the Purchasing Documents Open Interface.

5. Optionally choose the Country of Origin.
The Country of Origin is the country in which an item is manufactured. You can choose a Country of Origin if you specified
a supplier Site in the Approved Supplier List window. The Country of Origin is defaulted onto purchase orders for this
item/supplier combination. However, you can change or enter the Country of Origin on the purchase order or later on the receipt.

6. Choose one of the following attribute groupings from the tabbed region:
  • Source Documents: lets you associate specific quotations or purchase agreements with the supplier/item combination.
  • Supplier Scheduling: lets you associate Supplier Scheduling information with the supplier/item combination. You can choose this option if you specified an item and a supplier site.
  • Capacity Constraints: lets you specify capacity constraints for the supplier/item combination. You can choose this option if you specified an item and a supplier site.
  • Inventory: if vendor managed inventory or consigned inventory are enabled, this region lets you specify inventory control information for the supplier/item combination. You can choose this option if you specified an item and a supplier site.
Source Documents
Note: Setting the profile option PO: Automatic Document Sourcing to Yes enables Purchasing to default source documents automatically if you prefer that rather than specifying source documents here.

1. Enter a unique Seq (Sequence) Number.
If you enter more than one source document, Oracle Purchasing uses a purchase agreement over a quotation, even if the quotation was created more recently. If there are multiple purchase agreements or quotations, Oracle Purchasing uses the one that was created most recently.

2. Select a Document Type from the following:
• Blanket
• Contract
• Quotation
A requisition with a quotation or a contract purchase agreement as a source document becomes a standard purchase order. A requisition with a blanket purchase agreement as a source document becomes a release.
If you are creating a Blanket as a source document for Oracle Supplier Scheduling, make sure the Supply Agreement option is selected for the blanket purchase agreement in the Terms and Conditions window. 
Supplier Scheduling can communicate releases against a blanket purchase agreement only when this option is selected.

3. Choose a Document Number.
If Purchasing does not let you enter a particular document number, it may be because the document is frozen, canceled, or not approved, or the agreement line is canceled. A quotation must be active.

4. Choose a Line Number.
The Status and Effective Dates, if any, are displayed.
If this document is a global agreement the Global check box will be checked.

5. Save your work

Automatic Offsets in Oracle Purchasing

Receipt Accruals
The default Account Generator configuration in Oracle Purchasing builds a charge, budget, accrual, and variance account for each purchase order, release, and requisition distribution based on the distribution’s Expense, or Inventory, destination type. Oracle Purchasing always builds these accounts using the Account Generator; you cannot disable this feature.

To populate the Accrual account for distributions with an Expense destination type, the Account Generator locates the Expense AP Accrual Account that you specify in Define Purchasing Options as part of your application setup and copies it into the Accrual Account in your document. The Account Generator then overlays the balancing segment of the AP Accrual Account with the balancing segment of the charge account so that your transactions always balance by fund.

Defining Purchase Order Receipt Accruals
You can create balanced offsets for receipt accrual accounts in Oracle Purchasing by customizing the default configuration of the Account Generator to overlay the balancing segment of the AP Accrual Account with the balancing segment of the charge account so that your transactions always balance by balancing segment.

To build Purchase Order Receipt Accrual Accounts:
1. Use the same Chart of Accounts you used to build the purchase order charge accounts by balancing segment, substituting the receipt accrual liability account for the expense account. The Account Generator function is called from the Purchase Orders window to automatically create the receipt accrual liability accounts by balancing segment on each purchase order distribution.
Attention: Use the same balancing segment for the charge account and the receipt accrual account so the receipt transactions will balance by balancing segment.

2. Customize your Account Generator process

IR ISO across Operating unit

Business requirement:
Internal requisition needs to be created in Inv1 in OU1(Destination organization) and the material needs to be procured from Inv1 in OU2(Sourcing Organization).

Setups
1.    Define Location Loc1 and attach Inv1 to it.
      Define Location Loc2 and attach Inv2 to it.

2.    Create a new customer Internal Customer and create sites in both the Operating unit.
Go to OU2 OM responsibility and create a bill to. Attach the Loc1 and organization Inv1 in Internal Tab


Go to OU1 OM responsibility and create a bill to. Attach the same Loc1 and organization Inv1 in Internal Tab


3.    Follow the other setups and processes as defined @
http://www.oracleug.com/user-guide/purchasing-overview/internal-requisitions

Purchase Order Receiving Controls

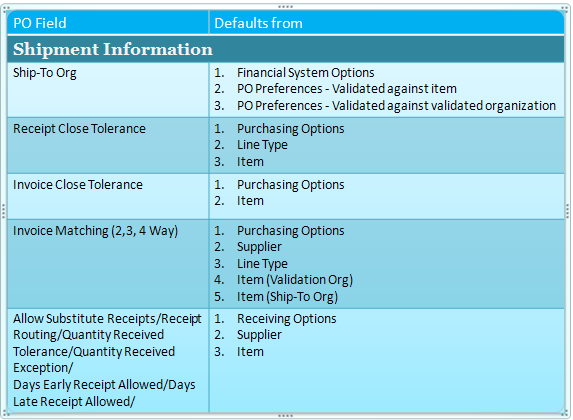
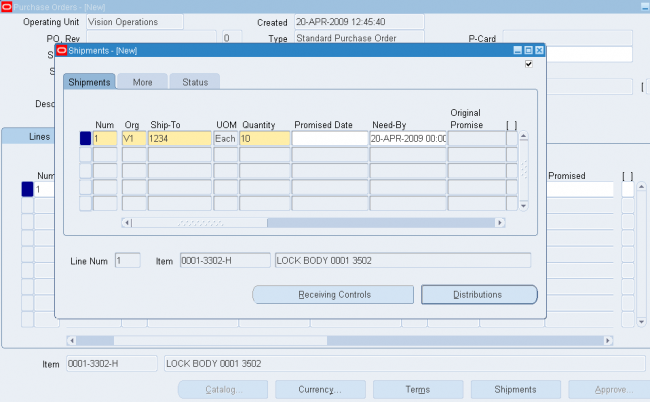
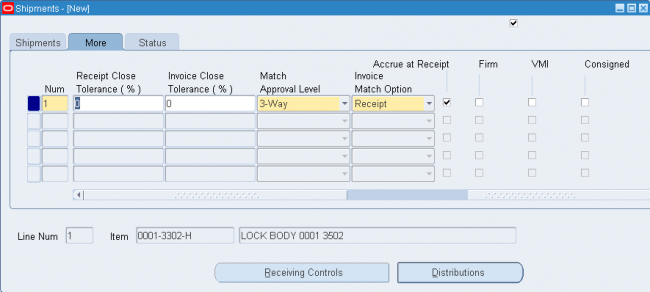
Use the Receiving Controls window to enter receiving control information for purchase orders and releases. Note that controls you enter here apply to specific purchase orders/releases and override the receiving controls you enter in the Receiving Options window. See: Receiving Controls, Options, and Profiles.

To enter purchase order receiving controls:
Navigate to the Receiving Controls window by clicking Receiving Controls in the Shipments window for purchase orders and in the Releases window for releases.

1. Enter the maximum acceptable number of Days Early and Days Late for receipts.

2. Enter the Action for receipt date control. This field determines how Purchasing handles receipts that are earlier or later than the allowed number of days selected above. Choose one of the following options:
None - Receipts may exceed the allowed days early or late.
Reject - Purchasing does not permit receipts outside the selected number of days early or late.
Warning - Purchasing displays a warning message but permits receipts outside the selected number of days early or late.
Purchasing displays the Last Accept Date, which is the last date when the shipment can be received. This is the promised date plus the number of days late allowed.

3. Enter the maximum acceptable over-receipt Tolerance percent.
Enter the Action for Overreceipt Quantity control. This field determines how Purchasing handles receipts that exceed the quantity received tolerance. Choose one of the following options:
None - Receipts may exceed the selected tolerance.
Reject - Purchasing does not permit receipts that exceed the selected tolerance.
Warning - Purchasing displays a warning message but permits receipts that exceed the selected tolerance.

4. Select Allow Substitute Receipts to indicate that receivers can receive substitute items in place of ordered items. You must define substitute items before you can receive them. See: Defining Item Relationships

5. Enter the default Receipt Routing that you assign goods: Direct Delivery, Inspection Required, or Standard Receipt. You can override this routing during receipt by changing the destination type, if the RCV: Allow Routing Override user profile option is enabled. See: Profile Options in Purchasing.

The Receipt Routing can be set at 5 places:
1) While Creating the Purchase Orders. At shipment level.
2) Item Definition Level.
3) At the Supplier Definition level.
4) Shipping Networks During Inventory Setup.
5) At the Organizational Level. Receipt Options.

Every level overrides the following ones, therefore the Purchase Order level is the highest level and Organization level is the lowest one.

The Receipt Routing Information Provided while Creating the Purchase Order Takes precedence than the other two ways.

There is also a Profile Option :- RCV: Allow Routing Override whose value namely Yes or No indicates whether the receiving routing assigned during requisition or purchase order entry can be overridden at receipt time. This profile is updatable at the site, application, and responsibility, levels.

6. Enter the Enforce Ship To location option to determine whether the receiving location must be the same as the ship-to location. Choose one of the following options:
None - The receiving location may differ from the ship-to location.
Reject - Purchasing does not permit receipts when the receiving location differs from the ship-to location.
Warning - Purchasing displays a warning message but permits receipts when the receiving location differs from the ship-to location.
Select the OK button to apply your entries and return to the original window.

Multiple Distribution of a single shipment

The destination type in receipt form can either be inventory , expense or shopfloor
If a single PO shipment has two differnt distributions then the desitnation type is auto populated as Multiple.
We dont receive the shipment line with type as multiple but we receive the differnt lines associates with that multiple destination type

Procurement Workflows


Purchasing uses Oracle Workflow technology to handle requisition and purchase order approvals, automatic creation of purchase orders and releases, purchase order changes (specifically, any additional approvals those changes require), notifications, and receipt confirmation. Workflow is an underlying technology that automates these procurement activities. Workflow comes with a graphical user interface that enables you to modify
these procurement workflow processes to suit your business needs. Purchasing comes with the following workflows:

1. PO Create Documents workflow for automatically creating purchase orders and releases.

2.1 PO Account Generator workflow for automatically generating accrual, budget, charge, and variance accounts on purchase orders and releases.
2.2 PO Requisition Account Generator workflow for automatically generating accrual, budget, charge, and variance accounts on requisitions.

3.1 PO Requisition Approval workflow for approving requisitions.
3.2 PO Approval workflow for approving purchase orders.

4.1 Change Order workflow for controlling which changes to purchase orders require a manual reapproval and which are automatically reapproved; the change order workflow is really a group of workflow processes contained in the PO Approval workflow.

5.1 PO Confirm Receipts workflow for sending receipt notifications to requesters or buyers notifying them that they should have received their order.
5.2 PO Send Notifications for Purchasing Documents workflow for looking for documents that are incomplete, rejected, or in need of reapproval, and sending notifications to the appropriate people of the document's status.
5.3 PO Catalog Price Tolerance Exceeded Notifications workflow for sending a notification to the buyer when the price/sales catalog information sent through the Purchasing Documents Open Interface includes price increases that exceed a price tolerance that you set.

6.1 Procurement Processes workflow
for guiding you through procurement processes by launching the appropriate windows in Purchasing.
6.2 PO Approval Error workflow for troubleshooting errors that occur when using the PO Approval workflow.

Workflow Processes for Approving Change Orders


Whenever you make a change to a document that causes its status to change to Requires Reapproval, that document is routed through the change order workflow. The Change Order workflow uses the same reapproval rules already defined in Purchasing.

With the change order workflow, Purchasing lets you define what changes to purchase orders or releases-for example, to amounts, suppliers, or dates-require manual reapproval and which are automatically reapproved. If you modify the change order workflow then you can allow certain changes to bypass full (manual) reapproval. All reapproved documents, either fully or automatically reapproved, result in the document revision number's being incremented.

All of the workflow processes and functions relating to change orders can be found within the PO Approval workflow.
The change order workflow begins when all of the following is true:

  1. Changes to a purchase order cause its Status to change to 'Requires Reapproval.'
  2. The document revision number of the purchase order increases.
  3. You select Submit for Approval (and then choose OK) in the Approve.

Purchase Document Change Order


In Previous versions of Oracle Applications, including Release 11.0.3 and all of the 11.5.x Releases, there does not exist a user friendly method for controlling if modified Purchasing Documents (Change Orders) needed full reapproval or not. For example, if the business rules at a company are that if a Purchase Order has a total amount change that is within 5% of the original price, they would not require complete reapproval of the Purchase Order, and once that change is made and the document resubmitted, it should be automatically set back to Approved status.

NOTE:  A prerequisite to using these Tolerances is that the Archive method must be set to Archive on Approve.  This is setup via the Document Types page and the navigation from the Purchasing responsibility is Setup > Purchasing > Document Types.   


This activity removes the Reminder Notification issued when the PO/Release was first created,  rejected or modified after it had been approved.

Change Order Reapproval Rules in Release 12

In Previous versions of Oracle Applications, including Release 11.0.3 and all of the 11.5.x Releases, there does not exist a user friendly method for controlling if modified Purchasing Documents (Change Orders) needed full reapproval or not. For example, if the business rules at a company are that if a Purchase Order has a total amount change that is within 5% of the original price, they would not require complete reapproval of the Purchase Order, and once that change is made and the document resubmitted, it should be automatically set back to Approved status.

NOTE:  A prerequisite to using these Tolerances is that the Archive method must be set to Archive on Approve.  This is setup via the Document Types page and the navigation from the Purchasing responsibility is Setup > Purchasing > Document Types.  

Below Flow Document displays the business flow : 
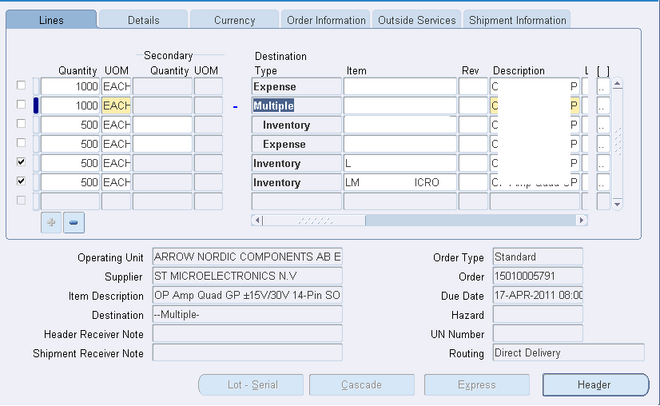
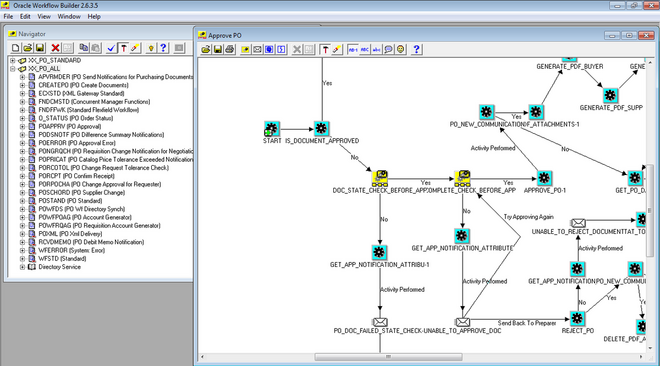
In previous versions, some fields (workflow attributes) existed in the PO Approval Workflow file that would allow a Workflow Administrator and a functional person to work together to setup tolerances.

An example (and other attributes exist for this as well, this is just one example) of what this looks like in Release 11.5.10 is with the attribute named "Change Order Header Purchase Order Total Tolerance" with description "If the purchase order total is changed less than the tolerance percentage, the document will be automatically reapproved.":

By adjusting the value of the Value field, that tolerance would be used for evaluating if the Purchase Order needed to be fully reapproved or if the Purchase Order needed to be routed through the complete approval process again.

In Release 12, a new web form has been introduced to make setting these tolerances much easier to use. This new feature is helpful because :

    1) It provides a more user friendly User Interface for setting these attributes

    2) It is Available within the Purchasing responsibility so that it is no longer required to engage someone that has access to the Workflow Builder Program (a client side software program).

    3) The attributes that control the reapproval are now operating unit specific (this was previously not the case in the prior versions).

    4) The Change Order Tolerances Page is split into 3 sections for :

    -Auto-Approval Tolerances for Releases
    -Auto-Approval Tolerances for Agreements
    -Auto-Approval Tolerances for Orders


Example
Looking at the above screenshot in the Orders section, the following example can help explain how the fields in this page work.

1) Settings:
-PO Amount is set to 10.  
-Line Amount is set to 10
-Line Quantity is set to 10

2) Lets assume a PO has been created that has two lines.  Line 1 has a quantity of 30 and a price of 100 per each quantity.  Line 2 has a quanity of 20 and a price of 400 per each quantity.   This means the Line 1 Amount = 3000 and the Line 2 Amount = 8000.   The PO Amount = 11000.

3) Now the user changes Line 1 by changing the Quantity from 30 to 31.  She then changes Line 2 and changes the Quantity from 20 to 21.   Since both of these changes at the Line Level are less than 10%  (the line 1 change is approximately 3.33% increase and the line 2 change is a 5% increase) these changes are below the Tolerances that are setup.   The PO Amount change is a change from 11000 to 11500.  This change is also less than 10% (approximately a 4.5% increase).   Since all of these changes are below 10% and within tolerance, the PO will not be required for full reapproval.  This means that if the approver does not have approval authority they will be able to approve the PO without the PO being forwarded to their next approver.  If any of the changes above were above the 10% tolerance then full reapproval would be required.

Returns & Debit Memo


Purchasing allows you to perform returns to suppliers and returns to customers in the Receiving Returns window. Use the Receiving Returns window to return delivered items to receiving and to return received or delivered externally sourced items to the supplier if the purchase order has
neither been cancelled nor final closed. If the Quality module is installed, you can enter quality information.


Use the Receiving Returns window to return items back to a customer. For example, a
customer returns to your company a part that does not work properly. You receive and fix the part, then return the part to the customer.

  • You cannot enter returns for internal shipments.
  • RMAs cannot be returned to the customer if the material has been delivered to Inventory.
  • You can return to the supplier or customer unordered receipts that have not been matched

To return items to receiving, enter the return quantity in the Receiving Returns window. If you originally performed a direct receipt, you must specify a Return To receiving location. Otherwise, Purchasing routes all returned items to the receiving location from which you delivered them. For Inventory (but not Expense or Shop Floor) deliveries, you can update the Return From subinventory. You can also optionally specify additional return information such as Reason Code and RMA number (the number your supplier issues to you to track your return to the supplier).

To return items to the supplier or customer, enter the return quantity in the Receiving Returns window. Purchasing provides the source supplier or customer for the items.
For Inventory (but not Expense or Shop Floor) deliveries, you can update the Return From subinventory. You can also optionally specify additional return information such as Reason Code and RMA number (the number your supplier issues to you to track your return to the supplier). When you return items to the supplier or customer, Purchasing creates both a Return To Receiving and a Return To Supplier transaction.

Purchasing also reopens the associated purchase order for the return quantity by reducing the original receipt quantity. For customer returns, if you return the item back to the customer, Purchasing updates the RMA to reflect the returned quantity.

You can automatically generate debit memos for Return To Supplier transactions once an invoice has been created. When you create the return make sure the Create Debit Memo option is selected. To enable this functionality, enable the supplier site as a Pay Site (or indicate an Alternate Pay Site) and select Create Debit Memo from RTS Transaction in the Supplier Sites window

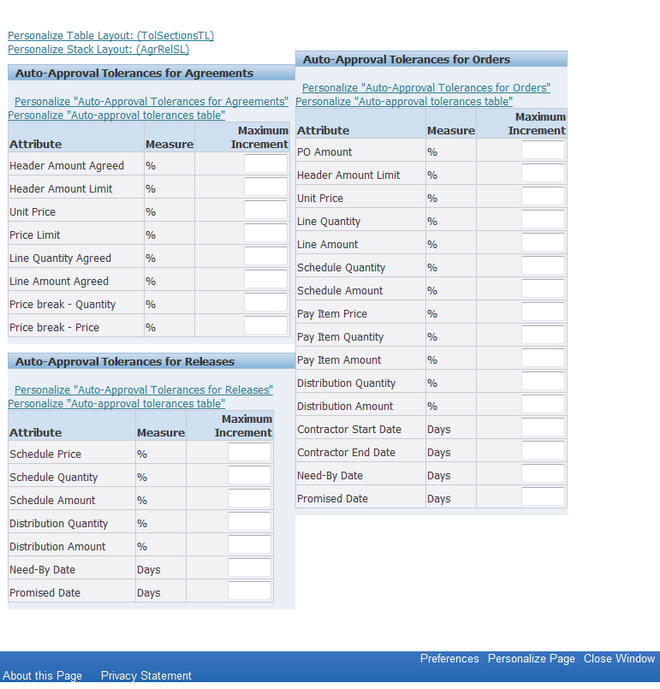
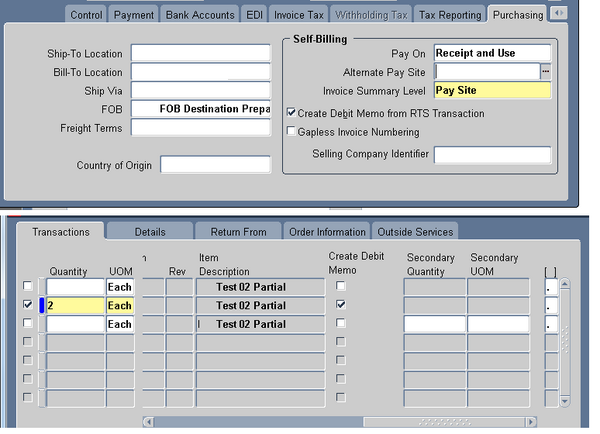
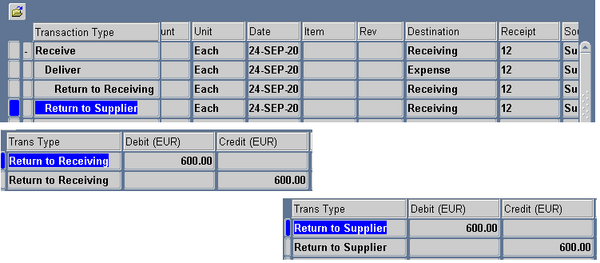
To To auto create debit memo from RTS, enable the supplier site as a Pay Site (or indicate an Alternate Pay Site) and select Create Debit Memo from RTS Transaction in the Supplier Sites window.When you create the return, make sure the Create Debit Memo Option is selected in the Returns window. Once you enable this functionality, a debit memo is created for each return line you enter in the Returns
window.

  • The debit memo number contains the original receipt number. Self-Biiling Invoice numbering affects debit memos. 
  • The debit memo is generated by the system with the number (PO receipt number – Sequence). The description of the debit memo is always ‘’System Generated by 'Return to Supplier' Transaction’’. You don’t need to run any program (standard/Interface) for this process.
  • The debit memo is dated with the return transaction date. If this date does not fall within an open period in Oracle Payables, the date defaults to the first open date available in Payables.
  • The payment schedule on the debit memo is based on the purchase order payment terms (in the Terms and Conditions window) and the invoice terms defined in Payables.
  • The debit memo is calculated by multiplying the returned quantity by the purchase order item unit price. If the purchase order is in a foreign currency, and you perform invoice matching to receipts, Purchasing uses the currency conversion rate at the time of receipt to calculate the unit price.
  • The debit memo does not include tax and freight charges. 
  • If the unit of measure (UOM) on the return in the Returns window differs from the purchase order UOM, Purchasing restates the return quantity on the debit memo in terms of the purchase order UOM
  • If an invoice has not yet been created for the receiving transaction or if Payment on Receipt already accounted for the return using the Aging Period functionality, a debit memo will not be created. Whenever a debit memo cannot be created, you will receive a notification in the Notifications Summary window.

PO, Supplier and Inventory Item

Select pha.segment1 "PO_NUMBER",pla.line_num,plla.shipment_num, pv.segment1 "Oracle_Supplier_number", msib.segment1 "item_number",pla.item_revision, pla.item_description, NULL as "Delivery_date", NULL as "Blank Column", pla.unit_price, pha.rate,plla.Quantity_received,plla.Quantity_rejected, (pla.unit_price*pla.Quantity) as "Line_Amount", NULL as "ITEM_COST", NULL as "Amount", pla.VENDOR_PRODUCT_NUM from apps. PO_HEADERS_ALL pha, apps. PO_VENDORS pv, apps. PO_VENDOR_SITES_ALL pvsa, apps. PO_LINES_ALL pla, apps. MTL_SYSTEM_ITEMS_B msib, apps. PO_LINE_LOCATIONS_ALL plla where pha.org_id='xxxx' AND pha.org_id=pvsa.org_id AND pv.vendor_id=pha.vendor_id AND pvsa.vendor_id=pv.vendor_id AND pha.po_header_id=pla.po_header_id(+) --AND pha.po_header_id=plla.po_header_id AND plla.po_line_id(+)=pla.po_line_id --AND msib.organization_id='xxxx' AND pla.item_id=msib.inventory_item_id(+) Order by pha.segment1