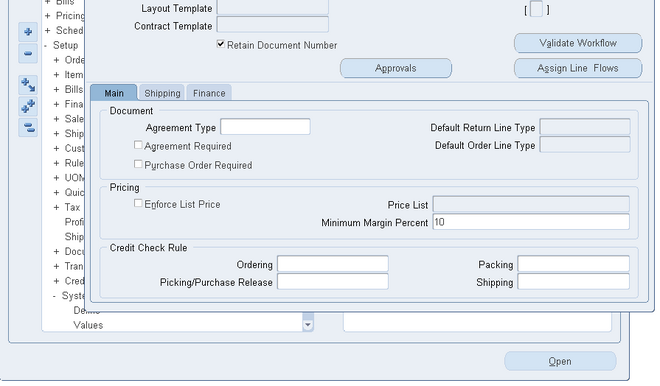
Order Management

The Oracle Order Management Suite enables you to capture orders from multiple channels, price orders, check product availability, schedule fulfillment, plan shipments, ship deliveries, and track shipments. The complete order to cash cycle can be depicted in the below figure.


If you couldn’t understand anything out of the above figure then don’t waste time and go ahead with the rest of the topic.

We‘ll learn the complete order to cash cycle in 6 different chapters
1. Introduction
2. Customer
3. Order Entry
4. Order Processing
5. Advance Pricing
6. Payment
 

Introduction to OM

The Oracle Order Management Suite consists of:

  1. Oracle Order Management
  2. Oracle Shipping Execution
  3. Basic Pricing

Order Management implementation involves several phases, including setting up other integrated applications, which include Oracle General Ledger, Oracle Receivables, and Oracle Inventory. Some setup steps are optional, depending on whether you have the integrating applications installed and whether you use the associated feature. For example, if your business supports drop shipments, you should also set up Oracle Purchasing. If you sell models and kits, set up Oracle Bills of Material and Oracle
Configurator.

1. A detailed process of order to cash cycle is shown below
 

2. Oracle Manufacturing and Supply Chain Applications enable customers to operate using various supply-chain stocking strategies. The term stocking strategy denotes a process that identifies and maintains the optimum level of your bills of material at which you should maintain your inventory, so that your inventory investment is a minimum. For example, in the ship building industry, you would not keep any inventory, whereas you would have to keep inventory in your retail outlets if you were selling shoes.

The amount of time a customer is willing to wait to buy a product (delivery lead-time) is a very important determinant of the supply-chain stocking strategy. As the delivery lead-time decreases, the finished goods inventory moves closer to the consumption point. To a certain extent, product complexity can also be an important determinant of a supply-chain stocking strategy. Below Figure shows the typical position of each of these strategies in a lead-time–product complexity graph.
  • Ship from stock (MTS make to stock) : You have sufficient inventory items in stock and the order is directly fullfilled from inventory. In an MTS environment, you produce your products and stock them in anticipation of customer orders. A good forecasting system is very important to this environment because most of the material and capacity planning is done using forecasts rather than actual demand. Examples include stereo systems and television sets.


  • Make to order: After entering the sales order the schedule and planning process creates a job to fulfill the order. Once the job is completed the on hand of that particular customer ordered item is increased in the inventory and later is shipped to the customer.

    Standard products are designed and published in catalogs. The actual product is built on receipt of the customer order. Customers might be able to choose certain characteristics optionally. An example of this would be machine building. Each customer order may have an associated project to manage the production and delivery schedule.


  • Configure to order(ATO, PTO, CTO):

    Pick-To-Order (PTO)
    Under this strategy, a variety of shippable components are stocked. Customers order “kits” or collections of these parts under a single item number; kits can be either predefined or configured by the customer during the order entry process. The components of the kit are picked and shipped from stock; there is no additional value added after the customer order, other than perhaps packing the components for shipment. A computer system (including the central processing unit, monitor, and printer) is an example of this.

Assemble-To-Order (ATO)
These are also standard products and are often configured by customers. You don’t wait until the order is received to build an ATO product. Subassemblies are manufactured prior to receiving the order and when the order is received, the subassemblies are assembled to make the finished product. Automobiles and computers are examples of this type of production.

Configure to order(CTO)
It includes both the ATO and PTO.Similar to the above processes but here the customer has the facility of configuring the items on the basis of its requirement.


  • Dropship to customer: Drop shipments is a method of fullfilling sales order by selling products without the order taker handling, stocking, or delivering them. The seller buys a product and the supplier ships the product directly to the seller's customer. Drop shipments are done because of the following reasons

    Customer requires an item that is not normally stocked
    Customer requires a large quantity of the item which is not available with you
    It is more economical when the supplier ships directly to the customer

    In drop ship cycle, the seller receives a sales order from the customer and sends a purchase order to the supplier. The supplier ships directly to the customer. The seller receives an invoice from the supplier and sends an invoice to the customer. The seller receives an invoice from the supplier and sends an invoice to the customer.
     

  • Internal Order: When the material required in one organization is available in another org we create an internal requisition and oracle converts that to a SO in the org where the item is available. The complete process is as shown below.

  • Back to Back order: It involves the concept of soft-pegging.


Important setups

Payment terms

Receivables lets you define standard payment terms for your customers to specify the due date and discount date for their open items.
Payment terms can include a discount percent for early payment and you can assign multiple discounts to each payment term line. For example, the payment term ’2% 10, Net 30’ indicates that a customer is allowed a two percent discount if payment is received within 10 days; after 10 days, the entire balance is due within 30 days of the transaction date with no applicable discount.

Prepayment check box if you are defining a prepayment payment term. Receivables feeder systems, such as Oracle Order Management, can optionally implement business processes around prepayment payment terms to indicate that a particular business transaction requires the capture of funds before the delivery of a product or service.

Enter the Date on which payment is due for this installment term (optional). If you do not complete this field, enter a value for either Due Days or both Day of Month and Months Ahead


Default Payment Terms Hierarchy
Receivables use the following hierarchy to determine the default payment term for your transactions, stopping when one is found:
1. Bill–to site
2. Customer Address
3. Customer
4. Transaction Type

Predefined Payment Terms
Receivables provides the following predefined payment terms:
30 NET: The balance of the transaction is due within 30 days.
IMMEDIATE: The balance of the transaction is due immediately (i.e. on the transaction date). You can use this payment term with your chargeback and debit memos.

To define a payment term:
Navigate to the Payment Terms window and Enter the Name of the payment term.

1. Select the Prepayment check box if you are defining a prepayment payment term.
Receivables feeder systems, such as Oracle Order Management, can optionally implement business processes around prepayment payment terms to indicate that a particular business transaction requires the capture of funds before the delivery of a product or service.

2. To associate a credit check with this payment term, check the Credit Check box. Oracle Order Management uses this information to determine when to place an order on hold.
In Oracle Order Management, if the profile for an address does not have credit checking limits defined in a particular currency but the customer does, then the order passes credit check. If the address does not have limits in the currency and neither does the customer, then the order is compared to the customer limit in that currency.

3. If you do not want to let your customers take discounts for partial payments on items associated with this payment term, then uncheck both the Allow Discount on Partial Payments check box as well as the check box for the Discount on Partial Payment system option.

4. Enter the Discount Basis you want Receivables to use when calculating discounts for your invoices. Choose one of the following discount methods:

  • Invoice Amount: Choose this option to calculate the discount amount based on the sum of the tax, freight charges, and line amounts of your invoices.
  • Lines Only: Choose this option to calculate the discount amount based on only the line amounts of your invoices.
  • Lines, Freight Items and Tax: Choose this option to calculate the discount amount based on the amount of line items, freight, and tax of your invoices, but not freight and charges at the invoice header level.
  • Lines and Tax, not Freight Items and Tax: Choose this option to calculate the discount amount based on the line items and their tax amounts, but not the freight items and their tax lines, of your invoices.
5. Enter the Installment Option for items assigned to this payment term. This indicates how Receivables will allocate the freight and tax charged to transactions using this payment term. Choose 'Include tax and freight in first installment' to include all tax and freight charges in the first installment. Choose 'Allocate tax and freight' to distribute tax and freight charges across all installments.

6. Enter the Base Amount for this payment term. The default is 100, but you can change it. The base amount is the denominator for the ratio Receivables uses to determine the amount due for installments of invoices to which you assign this payment term. The sum of the relative amounts for all of the payment schedules that you define for these payment terms must be equal to the value that you specify as a base amount.

If the base amount is different from the relative amount, and you set the Installment Options field for this payment term to 'Allocate tax and freight', Receivables prorates the base amount across the relative amounts of this term's payment schedules based upon the ratio you define. Receivables uses the following equation to determine the original amount due for each installment of invoices to which you assign this payment term:
Amount Due = Relative Amount/Base Amount * Invoice Amount

If you select 'Include tax and freight in first installment' as the Installment Options field value for a payment term, the base amount and the relative amounts that you specify for this term's payment schedules only indicate how the original line amounts of the invoices to which you assign this term are distributed across different installments.

In this case, the original freight and tax amounts are included in the first installment in addition to the line amount allocated by the ratio of the base amount and the relative amount that you specify for the term's first payment schedule. Receivables uses the following equation to determine the original amount due for the first installment of invoices to which you assign this payment term:
Amount Due = (Relative Amount/Base Amount * Base Line Amount) + Base Freight Amount + Base Tax Amount

7. If you want transactions assigned to this payment term to be printed before the due date, enter a number of Print Lead Days. Receivables will print this transaction x number of days before the due date, where x is the number of days you enter here.

8. Enter a range of Effective Dates for this payment term. If you do not enter an end date, this payment term will be active indefinitely.

9.1 Enter a line number for the installment term that you are defining in the 'Seq' field. Enter a higher number for each installment term with a later due date. For example, if you create terms with 50% due in 15 days and 50% in 30 days, enter '1' in this field for the first line and '2' for the second line.

9.2 Enter the Relative Amount for this payment term. This is the numerator of the ratio that Receivables uses to determine the amount due for this installment of these payment terms. The sum of the relative amounts for all of the payment schedules that you define for each payment term must be equal to the base amount for this term.

9.3 Enter the number of Days after the invoice date that payment is due for this installment term (optional). For split payment terms, this number indicates the number of days after the invoice date that an installment is due.

9.4 Enter the Date on which payment is due for this installment term (optional). If you do not complete this field, enter a value for either Due Days or both Day of Month and Months Ahead.

9.5 If you are defining proxima terms, enter the Day of Month that payment is due for this installment term. For example, if payment is due on the fifteenth of each month, enter '15.'

9.6 If you are defining proxima terms and you entered a value for Day of Month, enter the Months Ahead to which this installment term of the proxima terms refer. For example, if you entered '15' for Day of Month and you enter '2' here, an invoice dated in May will have a due date of July 15.

New in R12
If you want to use this payment term for balance forward billing, select an appropriate balance forward billing cycle from the Billing Cycle LOV.
  • Balance Forward Billing.
  • Balance Forward Billing Cycles.
  • Setting Up Balance Forward Billing.
Note: You cannot update the billing cycle, once a balance forward billing payment term is attached to a profile.
Because balance forward bills cannot be split across installments, in the case of a balance forward payment term:
Any value entered in Base Amount defaults to 100.
Installment Options becomes disabled and any data entered before selecting a cycle defaults to Include tax and freight in first installment.
You can populate only one row in the Payment Schedule section and the Sequence Number and Relative Amount values for the row default respectively to 1 and 100.
Date Due becomes disabled. However, you can populate Days, Day of Month, and Months Ahead.
Note: You cannot change existing payment terms from regular payment terms to balance forward billing payment terms and vice versa.

Collectors

Receivables lets you define collectors and assign them to a profile class or to a customer’s credit profile class. When you assign a collector to a profile class, that collector becomes the collector for all customers assigned that profile class. You can modify collector assignments for your customers in the Customers window and for your profile classes in the Customer Profile Classes window.


You can also print collector names and telephone numbers on dunning letters you send to your customers for past due items. Receivables displays active collectors and their descriptions as list of values choices in the Customers, Customer Profile Classes, and Customer Calls windows. Receivables does not display inactive collectors in the list of values for these windows.

Profile:Transaction

The following fields are in the Profile: Transaction, Profile: Document Printing, and Profile: Amounts tabbed regions of the Customer Addresses window. You can access these tabbed regions if you have assigned an active bill–to business purpose to the customer account address.

 
When a new customer is created the profile class DEFAULT is defaulted and can be changed later.

Payment Terms: If you do not have a payment term assigned to the  bill–to site use, the payment term assigned to the customer account or site profile defaults during transaction entry. If you do not assign payment terms to either your customer profile or site use, the payment terms assigned to the transaction type will default during transaction entry. You define payment terms in the Payment Terms window.

Credit Classification: The credit classification that you assigned to this customer. The classification defaults from the assigned profile class, but you can change it.

Customer Profile Lookups
The following table lists customer profile lookup types. You can define lookups for these types in the Receivables Lookups window.


Lookup names display as list of value choices throughout Oracle Applications to help speed data entry and accuracy. Receivables provides many lookups types for you. Some lookup types can be updated to suit your business needs. You cannot update a lookup type if Receivables requires those settings for its own internal use. For example, you cannot update attributes of the ’Tax Classification’ lookup type.

You can create new lookup types and define as many additional lookups as you want in the Receivables Lookups window. For example, you can define additional lookups to the lookup type ’Collector Actions’ to describe your collection actions. Receivables displays these lookups as list of values choices for the Action field in the Call Actions window.

You cannot change lookup name values after you save them. To remove an obsolete lookup you can: disable the code, enter an end date, or change the meaning and description to match a replacement code.


3. Profile:Transaction

The following fields are in the Profile: Transaction, Profile: Document Printing, and Profile: Amounts tabbed regions of the Customer Addresses window. You can access these tabbed regions if you have assigned an active bill–to business purpose to the customer account address.

 
When a new customer is created the profile class DEFAULT is defaulted and can be changed later.

Payment Terms: If you do not have a payment term assigned to the  bill–to site use, the payment term assigned to the customer account or site profile defaults during transaction entry. If you do not assign payment terms to either your customer profile or site use, the payment terms assigned to the transaction type will default during transaction entry. You define payment terms in the Payment Terms window.

Credit Classification: The credit classification that you assigned to this customer. The classification defaults from the assigned profile class, but you can change it.

Customer Profile Lookups
The following table lists customer profile lookup types. You can define lookups for these types in the Receivables Lookups window.


Lookup names display as list of value choices throughout Oracle Applications to help speed data entry and accuracy. Receivables provides many lookups types for you. Some lookup types can be updated to suit your business needs. You cannot update a lookup type if Receivables requires those settings for its own internal use. For example, you cannot update attributes of the ’Tax Classification’ lookup type.

You can create new lookup types and define as many additional lookups as you want in the Receivables Lookups window. For example, you can define additional lookups to the lookup type ’Collector Actions’ to describe your collection actions. Receivables displays these lookups as list of values choices for the Action field in the Call Actions window.

You cannot change lookup name values after you save them. To remove an obsolete lookup you can: disable the code, enter an end date, or change the meaning and description to match a replacement code.


Setup Steps : I - V

The following is a list of each setup step defined in detail.

Step 1
Flexfields

Define key and descriptive flexfields to capture additional information about orders and transactions.
This step is required for Key Flexfields, and optional if you plan on using the functionality surrounding Descriptive Flexfields. Several defaulting values are provided.

Step 2
Multiple Organizations

Define multiple organizations in Oracle Inventory.
This step is optional.

Step 3
Inventory Organizations

Define inventory organizations (warehouses), parameters, subinventories, and picking rules in Oracle Inventory.
You must define at least one item validation organization and at least one organization that acts as an inventory source for orders fulfilled internally. If you plan to drop ship some orders, you must also define at least one logical organization for receiving purposes. Your item validation organization can be the same as your inventory source or your logical receiving organization, but you cannot use one organization for all three purposes. See Step 5 for setting your item validation organization.
This step is required.

Step 4
Profile Options

Define profile options to specify certain implementation parameters, processing options, and system options.
This step is required.

Step 5
Parameters

Set your Order Management Parameters to validate items, enable customer relationships, and operating unit defaults.
This step is required.

Setup Steps : VI - Payment terms, Accounting Rules

Step 6
Invoicing

Define invoicing information, including payment terms, invoicing and accounting rules, Autoaccounting parameters, territories, and invoice sources.
This step is required if you plan on transferring invoicing information to Oracle Receivables. Several defaulting values are provided.

Payment terms
http://www.oracleug.com/user-guide/order-management/payment-terms

Entering Invoices with Rules
Invoicing rules let you determine when to recognize your receivable for invoices that span more than one accounting period. You can assign invoicing rules to invoices that you manually enter or import into Receivables through AutoInvoice.
Receivables provides the following invoicing rules:

  • Bill in Advance: Use this rule to recognize your receivable immediately.
  • Bill in Arrears: Use this rule to recognize the receivable at the end of the revenue recognition schedule.
Accounting rules determine the number of periods and percentage of total revenue to record in each accounting period.

You need to set the invoicing rule to either bill in advance or bills in arrears to setup the accounting rule. If you don’t select any value in the invoicing rule then system won’t allow you to enter the accounting rule and the accounting entries are created automatically once the transaction is completed (11i Only). You need to run revenue recognization program for generating account entries for transactions with invoicing rule and accounting rule.

Notes :
Invoicing and Accounting Rules are not applicable if you are using the Cash Basis method of accounting. If you use the Cash Basis method, AutoInvoice will reject any transaction lines that are associated with invoice or accounting rules.
Accounting Rules
Define accounting rules to create revenue recognition schedules for your invoices. Accounting rules determine the number of periods and percentage of total revenue to record in each accounting period. You can use accounting rules with transactions that you import into Receivables using AutoInvoice and with invoices that you create manually in the transaction windows. You can define an unlimited number of accounting rules.
When you run the Revenue Recognition program for an invoice that is associated with one or more accounting rules, Receivables creates the invoice’s revenue distributions for the period or periods in which the rules fall.

Define an accounting rule:
1. Navigate to the Invoicing and Accounting Rules window. AR -> Set up -> Transactions -> Accounting rule.

Note: Revenue Recognition creates accounting distributions for all periods of status Open, Future, or Not Open. If any period has a status of Closed or Close Pending, then Revenue Recognition creates the distributions in the next Open, Future, or Not Open period.
  • Depending on your business needs, you may require deferred accounting rules, which you can create by selecting the Deferred Revenue check box during rule definition. Deferred accounting rules let you defer revenue to an unearned revenue account until you are ready to specify the revenue recognition schedule.
  • You can assign a default accounting rule to your items in the Master Item window (Invoicing tabbed region) and to your Standard Memo Lines in the Standard Memo Lines window.
2. Enter an accounting rule Type.
Enter ’Accounting, Fixed Duration’ to prorate revenue recognition evenly over a predefined period of time. The revenue recognition schedule is always the same every time you choose this accounting rule. For example, if you have four schedules for your rule with this type, you will recognize twenty–five percent of your revenue at the end of each schedule.

Enter ’Accounting, Variable Duration’ to be able to specify the number of periods over which you want to recognize revenue for invoices to which you assign this rule. You can assign this type of accounting rule to invoices that you manually enter in the Transaction window or import into Receivables using AutoInvoice. The revenue recognition schedule changes for invoices that are assigned this type of accounting rule depending upon the value that you either pass through AutoInvoice or specify when you manually enter an invoice.


3. Enter the Period to use for your accounting rule schedule. You can choose from any of the Period Types you defined, but you can only choose a period type that has overlapping dates if it is an adjusting period. In addition, you can only choose ’Specific Date’ as your period type for accounting rules to which you have assigned a type of ’Accounting, Fixed Duration.’ You can only update this field for the accounting rule ’IMMEDIATE.’

4. If this accounting rule type is ’Accounting, Fixed Duration,’ enter the Number of Periods to use for your accounting rule schedule. For example, if you entered a period of ’Weekly’ and you enter ’3’ here, Receivables creates a rule schedule for three weekly periods.

5. Define your revenue recognition schedule for this accounting rule. Enter the percentages of revenue to recognize within each period of your accounting rule.
If this accounting rule type is ’Accounting, Fixed Duration,’ Receivables displays a rule schedule according to the period and number of periods you entered. Receivables determines the schedule by evenly prorating all the revenue across all periods (you can change this information). The sum of all periods for this type must equal 100 percent.

If this accounting rule type is ’Accounting, Variable Duration,’ you do not need to enter any information. Receivables does not display the default rule schedule for an accounting rule of this type because the number of periods is unknown. However, if you want to recognize a specific revenue percentage in the first period, you can enter that percentage here. In this case, Receivables prorates the remaining revenue percentage across the remaining periods.
Receivables uses the number of periods that you either pass through AutoInvoice or enter manually in the Transaction window to determine the payment schedule of your accounting rule.

We can default invocing rule and accounting rule from OM transaction type.


Assign Invoicing and Accounting Rules
For invoices that you enter manually, you can assign an invoicing rule in the Transactions window. You can assign a default invoicing and accounting rule to your items in the Master Item window (Invoicing tabbed region) and to your Standard Lines in the Standard Memo Lines window.
 
If you are entering an invoice manually, you must enter an invoicing rule on the invoice header or you will not be able to associate accounting rules with the invoice lines. If you enter an invoicing rule and include items or standard memo lines that have associated accounting rules, the accounting rules default for the invoice line. You can change or manually enter the accounting rules for these invoice lines if there has been no activity against the invoice.

Note: You can also assign invoicing rules to items and standard lines, but these will not be used during manual
invoice entry. This is because the invoicing rule assigned at the invoice header will override the invoicing rules defined for the
item or standard line. 

Setup Steps : 12 - 16

Step 12: Order Import Sources
Define sources for importing orders into Order Management.
This step is required if you plan on importing orders or returns into Order Management.

Step 13: Units of Measure
Define the units of measure in which you supply items. This step is required.

Step 14: Item Information
Define item information, including item attribute controls, categories, and statuses.

Step 15: Items
Define the items that you sell, as well as container items. This step is required.

Step 16: Configurations
Define the configurations that you sell.
This step is required if you plan on generating orders or returns for configured
items. Several defaulting values are provided.

Assigning Workflows to Transaction Types

Select appropriate workflows for your order type and line types. Several header and line workflows are seeded. You can perform all standard OM processing including orders, returns, drop ship orders, orders for configured items and orders for assemble to order items using only seeded workflows. You may also define your own workflows if you need additional steps (such as notifications) or additional processes.

The combination of the order type, the line type and the item type determine the workflow that a line will have. For this reason, you define the line workflows from the order type workflow definition window. Press the Assign Line Flows button. Enter the order type. For each combination of line type and item type that you want to use with this order enter a line in the Assign Workflow processes window. The line types are the ones that you defined. The item types are based on the definition of the items in the inventory module and include values such as standard item, kit, and PTO model. If you leave the item type blank the workflow process that you define will be used for all item types.


Setup Step: 17 - Basic Pricing

The Basic Pricing component of Oracle Order Management provides the capability to price orders according to price lists, pricing formulas, or agreements. You can also apply discounts, control the lowest level price that may be given in order to
comply with General Services Administration Agency (GSA) regulations, and apply freight and logistics related charges to orders.

The ordering process leads to:

  • Shipping of goods
  • Invoicing of customer
  • Receipt of cash and reconciling of the bank statement.
In OM the pricing engine prices the items after the order is entered or booked (depending on the pricing setup). Once the order is booked, it proceeds through the workflow process. If it is a shipping item and the quantities are available, the order is processed by SE. During shipping, the freight and special charges can be calculated and the price of the item is adjusted accordingly.

Customer Hierarchy
The customer hierarchy in Basic Pricing enables you to roll up individual customers according to the following structure:
■ The sold-to organization
■ The ship-to organization
■ The bill-to organization
■ Site
■ Customer Class
You can use elements of the customer hierarchy as defaults to control the operation of price lists and modifiers.

Pricing Engine
The pricing engine is the program module called by Order Management that prices the order as orders are entered or order data changed.

The pricing engine works through open APIs to provide the pricing results to the calling application. It consists of a search engine and a calculation engine. From the pricing request, the pricing engine evaluates the appropriate modifiers and price lists, resolve incompatibility issues, retrieves the list price, and calculates the unit selling price and adjustments. The search engine receives pricing information from entities like price lists, modifier, qualifiers, formulas, products and pricing attributes.


Basic Pricing

The Basic Pricing component of Oracle Order Management provides the capability to price orders according to price lists, pricing formulas, or agreements. You can also apply discounts, control the lowest level price that may be given in order to comply with General Services Administration Agency (GSA) regulations, and apply freight and logistics related charges to orders.


In OM the pricing engine prices the items after the order is entered or booked (depending on the pricing setup). Once the order is booked, it proceeds through the workflow process. If it is a shipping item and the quantities are available, the order is processed by SE. During shipping, the freight and special charges can be calculated and the price of the item is adjusted accordingly.

Customer Hierarchy
The customer hierarchy in Basic Pricing enables you to roll up individual customers according to the following structure:
■ The sold-to organization
■ The ship-to organization
■ The bill-to organization
■ Site
■ Customer Class
You can use elements of the customer hierarchy as defaults to control the operation of price lists and modifiers.

Pricing Engine
The pricing engine is the program module called by Order Management that prices the order as orders are entered or order data changed.

The pricing engine works through open APIs to provide the pricing results to the calling application. It consists of a search engine and a calculation engine. From the pricing request, the pricing engine evaluates the appropriate modifiers and price lists, resolve incompatibility issues, retrieves the list price, and calculates the unit selling price and adjustments. The search engine receives pricing information from entities like price lists, modifier, qualifiers, formulas, products and pricing attributes.

Inputs to the Pricing Engine
Pricing qualifiers: Determines who is eligible for a price or modifier list, for example, customer class, customer site, buying group, and sales territory.
Pricing Attribute: Determines what is being priced or modified on a price or modifier list, for example, product group, brand, location, distance, age, volume. Based on the inputs, the pricing engine selects the appropriate price list and adjusts the price by the chosen modifiers.
Modifiers: Determines how the eligible pricing request or pricing request line should be adjusted, for example, discounts, surcharges, coupon issue, item upgrade, other item discount, terms substitution, freight charge, and promotional goods. You can define price lists and modifiers from the most general level to the most specific level, for example, Price List B is for all products and all customers and Price List A is for Product 1 and Customer 1.

Price List

Price List Concept
A Price list is useful for maintaining the prices and other pricing details of products and services.

  • It serves as a repository of items with their related pricing details. You can call up a price list and add/edit/delete related items and item categories.
  • You can also use the price list to define attributes for the products, which will then determine the pricing action.
  • The pricing engine requires that all items, services, models, option class and options should be selected and displayed on price list.
  • Fields such as payment terms, freight terms and freight carrier are available on the price list form. By defining the OM defaulting rules to use these fields from the price list window, you are able to default values directly into the SO based upon which price list has been selected for the order.

Price List Form Details

Price List Currency
For international sales, you can record transactions in different currencies by defining a price list for each currency. After entering the currency for an order or return, you must choose a price list in the same currency.
 
Multi-Currency Conversion Lists
For pricing in different currencies, multi-currency conversion lists enable you to maintain a single price list for multiple currencies. However, this is an Oracle Advanced Pricing feature which is available only if Oracle Advanced Pricing is
fully installed and multi-currency lists are enabled.

Round To Factor
You can define the number of places to the right or left of the decimal point to which the pricing engine rounds prices from price lists and modifiers from modifier lists. If you enter a negative number, you increase the number of characters to the
Note: The pricing engine does select inactive price lists when doing a pricing request. Other applications can call an inactive price list and use relevant information.

right of the decimal point. If you enter a positive number, you affect more columns to the left of the decimal point. If you enter zero, rounding occurs to whole decimals. Rounding factor -3 indicates rounding to the nearest thousands (for example,.1007 rounds to .101). Rounding factor of +2 indicates rounding to the nearest hundred; for example 107 rounds to 100).

Secondary Price List
The pricing engine uses secondary price lists when it cannot determine the price for an item using the price list assigned to an order. Primary and secondary price lists have the same currency.
  1. You can assign the same secondary price list to multiple price lists but you can not assign a secondary price list to a secondary price list.
  2. If the item that you are ordering is not in the primary price list, the pricing engine uses the highest-precedence secondary price list (the secondary price list with the lowest value for the precedence field).
  3. Line-level discounts and modifiers that apply to the primary price list do not apply to the secondary price list.
  4. If an item appears on both the primary and a secondary price list with the same effective dates, the pricing engine uses the primary price list to price the item.
  5. If an item appears on the primary price list but is not active (the effective end date has passed), the pricing engine uses the price on the secondary price list.
Enter the price list line details as given below
1.  Product context is always item.
2.  Depending on the value of Product Attribute, select an item number or an item category for the Product Value.
3.  Select a UOM (unit of measure).
Select Primary UOM if this price list line UOM is the primary pricing unit of measure for the item. Oracle Pricing uses the primary pricing unit of measure and the Oracle Inventory unit of measure conversion information to price an order whose unit of measure does not have a price list line.
Select an Application Method. Use Unit Price for inventory items and either the Unit Price or Percent Price for service items
4. Enter Value and Formula as follows:
■ For inventory items, enter the base list price of the item in Value.
■ For service items, enter a value in the Value field. If Application Method is Unit Price, enter the base list price of the item. If Application Method is Percent Price, enter a percent of another item's price.
■ Enter the name of a previously defined static formula in Static Formula.
If you enter a static formula, you must submit the concurrent program Update Formula Price’s to calculate the value. The result of the calculation changes the value of Value.
5. Enter the starting and ending effectivity dates of this price list line in Start Date and End Date.
The dates should be within the start and end effectivity dates of the price list.
6. Enter a numeric value in Precedence; this is the product precedence. When the pricing engine is trying to locate a price, it uses precedence to resolve conflicts when it selects more than one price list line from a price list.
7. Save your work

Copying a Price List

You can quickly create a new price list by copying an existing price list. Only active price list lines (those with an effective end date later than the current date) can be copied.

Adjusting a Price List
Use this process to adjust the prices for a price list. You can adjust prices for the entire price list or selected items, item category sets, and item categories. You can define your criteria further by selecting the item status or creation date of the items to adjust.
For example, you can specify a category so that only the price list lines for the selected category are adjusted. If you leave any of the fields blank, pricing adjusts the price list regardless of that field. You can adjust the price by either an amount or percent:
■ Percent: Enter a value to adjust list prices by a certain percentage. For example, when adjusting by a percentage, entering 10 raises list prices by 10 percent while -10 lowers list prices by 10 percent.
■ Amount: Enter a value to adjust list prices by a fixed amount. For example, when adjusting by an amount, entering 5 increases list prices by five whole units of currency. Entering -5 decreases list prices by five whole units of currency.

Modifiers


Modifiers determine the adjustments made to the list price. These are dependant on various business factors such as type of adjustment to make, the level at which adjustments are made, how the modifiers are qualified, how they are applied, etc.

Using  modifier lists, you can create groupings of price adjustments, and freight and special charges that you offer and report together to meet various business needs.At the list level, you define criteria that is common to all of the line level modifiers. You can create three modifier list types in oracle pricing
1. Discount List
2. Surcharge List
3. Fright and Special Charges list


■Use modifier lines to define the type of price adjustments, or freight and special charges that the pricing engine applies to pricing requests. You can associate certain line types with each list type. You can use the following line types:
 Discount: Creates a negative price adjustment.
 Surcharge: Creates a positive price adjustment.
 Freight charge: Applies a freight charge.
 Price Break: Applies a variable discount or surcharge price adjustment to a   pricing request based meeting the condition of a break type.Only point price breaks are allowed in basic pricing modifiers. for ex, the following pricing decisions are:
If item quantity = 1-50, then discount=5%

■The table below describes Modifier List Types and if Discounts, Surcharges, or Freight and Special charges are applicable to the List type. A value of
 Yes: indicates that the entity is available for the Modifier List Type.
 No: indicates that the entity is not available for the Modifier List Type.

Create a modifier list
1. In the Main tab, select the modifier Type.

2. Enter a Number and Name for the modifier list; the value does not have to be numeric.
Note: The modifier Name should be unique across all PTEs (Pricing Transaction Entities) otherwise an error occurs. For example, if a modifier named "Corporate" is created in the Order Management PTE, an error message displays if you create a "Corporate" modifier in the Purchasing PTE.

3. The Global box is selected when the Pricing Security Control profile option is set to ON. This means that the modifier list can be used by all operating units for pricing transactions. If Global box is deselected, operating unit field is displayed. If multi-org access is NOT enabled, operating unit defaults from profile MO: Operating Unit. This operating unit field cannot be updated by users. If multi-org access is enabled, operating unit defaults from profile MO: Default Operating Unit.
Users can over-ride this default and select an operating unit that they have access to as defined by MO: Security Profile. The use of this modifier is then only restricted to pricing transactions for this operating unit.

4. Select or clear Automatic:
• If selected, the Automatic box is also selected at the line level, and the pricing engine automatically applies the modifier.
• If cleared, then the modifier must be manually applied.
Note: If you select Automatic for a list, all the lines for this list default to Automatic.

5. Enter Currency. This is an optional field.

6. Enter the Start Date range.
Note: If you do not enter dates (start/end), the list is effective from the creation date and does not become ineffective.

Creating List Level Qualifiers
Modifier list level qualifiers help the pricing engine to determine who is eligible for the modifier lines. If an order is not eligible for a modifier list, it is not eligible for that list's line level modifiers even if the lines have qualifiers for which the order is eligible.

Creating Modifier Lines
Use this process to create modifier lines to define how the price is adjusted. Once you have created and saved a modifier line, you cannot edit or change the Product Attribute Value for the line. To change the Product Attribute Value for a line, you should end date the existing modifier and create a new modifier.

1. Enter the Level.
• Line: The pricing engine determines if the pricing request is eligible for this modifier by validating the request for each line. It applies this modifier at the line level.
• Order: The pricing engine determines if the pricing request is eligible for this modifier by validating the pricing request header. It applies this modifier at the order level but prorates a percentage value to each line.

2. Enter Modifier Type from the following:
• Discount
• Surcharge
• Freight/Special Charges
• Price Break

3. Select or clear Automatic. If you select it, the pricing engine automatically applies this modifier. If you clear it, someone must manually apply it to an order.
Note: If you select Automatic at the modifier list level, Automatic for each line appears as selected but you can change it. You can allow manual application of discounts, surcharges, and freight and special charges line types.

4. Select or clear Override.
If selected, you can manually change how the modifier is applied for each order.

5. The values of Pricing Phase, Incompatibility Group, and Bucket will be dependent on the modifier level chosen.
For Basic Pricing, the Incompatibility Group will always be Level 1 Incompatibility Group, and bucket will be defaulted to 1 for line level modifiers.
Enter discount,surcharge information and freight charge information in appropriate tabs.

Creating Line Level Qualifiers
Modifier line level qualifiers help the pricing engine to determine who is eligible for the modifier lines. If an order is not eligible for a modifier line, it is not eligible for the line level modifiers even if the lines have qualifiers for which the order is eligible.

Once a qualifier is end dated, the group having that end dated qualifier becomes invalid. The modifier having that end dated qualifier will apply only if there is another group of qualifiers that satisfy the conditions and are within the valid date ranges.

Order Header

In Oracle Order Management, the Sales Order window enables you to organize, enter, view, and update order information. Order Management offers line level independence where you can capture regular orders as well as returns using the same window. The Sales Order window offers you a convenient and quick entry point for creating and editing order information as well as viewing summary information from other subsystems such as Shipping, Receivables, and Purchasing, as well as the status of orders.

You can enter header information for a sales order as you receive it, not necessarily in the sequence followed by the window's tabbed regions. The only fields you must enter before proceeding to the lines block are Order Type and Currency in the Main tabbed region in the Sales Orders window

Prerequisites
• Set up your security profile with the operating units that you want access to.
• Set up your order types.
• Set up your salespersons.
• Set up your price lists.
• Set up your discounts.

 Main TAB  Other TAB
Customer & Customer Number
Customer PO Number
Customer  Ship to
Customer  Bill to
Date ordered
Order Type
Price List/Agreement
Sales Person
Currency
Total Price (Tax, Charge)
Payment terms
Freight terms
FOB
Shipping method
Shipping priority
Shipping/packing instruction

Warehouse
Line Set
Payment type(tax handling)

Define header main information
In R12 the Sales Order window allows you to enter orders in any of the Operating Units accessible to you. The Operating Unit field is mandatory on the sales orders window, Headers tab. It is folder enabled and displays your default Operating Unit. If you need to enter orders in operating unit(s) other than the one that is defaulted, you should make the field visible,
so that you can pick the appropriate value.
 
Fields such as Date Ordered will default if there is a default Operating Unit. If there is no default value then all the fields except the Operating Unit will be disabled. Initial defaulting occurs once you specify an Operating Unit and tab out. After specifying other order information, if you change the Operating Unit, a message is displayed indicating that all the fields will be cleared if the Operating Unit is changed. If you have access to multiple Operating Units, and you want to enter an order in an Operating Unit that is not your default, you should pick the appropriate Operating Unit from the list of values before specifying any other information.
 
1.  Customers are visible across all organizations and customer addresses are organization specific. The value of the profile option OM: Sales Order Form: Restrict Customers controls the LOV display for this field. If you use the Find Customer window, the Customer field LOV will always display all customers; the profile option is ignored.

2. Define the Customer Purchase Order Number for the order, or accept the default.
This information is for reference and reporting. You must enter a value here if the order type you specified requires a purchase order number. You can set up a default for a PO number from an Agreement using defaulting rules. Order
Management notifies you if you enter a purchase order number that already exists on another order for the same customer but will not prevent you from continued processing of the order.

If you update or link a Customer PO number to an existing order, you must manually update existing order lines with the
Customer PO number in order to properly invoice the order lines as lines without the PO Number do not get interfaced to Accounts Receivables. However if you have enabled Cascading, the lines get automatically updated.

3. Enter the customer ship to and bill to
 
4. Select an Order Type for the order or accept the defaulted value.
Order type can be used as a data source for defaulting rules and additionally determines both the order and line workflow processes your orders will flow within.
Note: Order Type can be changed even after saving the order header as long as:
1. The Order Number generate is not set to "Gapless."
2. The order is Unbooked.
3. The order doesn't have any lines.

You can check these constraints from Setup->Rules->Processing Constraints

5. Select a Price List for the order. The Price List you select must be an active price list. If a price list is inactivate, the
price list does not appear in the LOV for the Price List field. If you enter an order, then inactivate the price list used in that order, and then requery your order, you will receive an error message box: Validation fails at the field Price List.

If you currently have a defaulting rule setup and enabled to default order currency, and you select a Price List that utilize a base currency other than the defaulted currency, Order Management will always default (over-write) the base currency of the price list to the order currency once a price list is selected, unless you have disabled the seeded defaulting rule for order currency from the price list.

6. Select the Salesperson for the order. By default, the primary salesperson receives 100 percent of the sales credits for an
order. You can apportion sales credits to multiple individuals in the Sales Credit window.

7. Select a currency for the order. Your price list's currency must match the currency you entered for this order.

Buttons
Actions--opens a dialog box to perform one of the actions listed below:
• Add Customer
• Additional Order Information
• Apply Automatic Attachments
• Copy


• Apply Holds
• Release Holds
• Cancel
• Progress Order
• Split Line
• Release Workbench
• Supply to Order Workbench


• Promotion/Pricing Attributes
• Calculate Tax
• Charges
• Price Order
• Price Line
• Sales Credits

• Go To Line
• Horizontal Demand
• Related Items
• View Adjustments
• View Shipping Status
• View Tax Details
• Notification
 

Setup Step: 25 - Defaulting Rules

Defaulting Rules are used to populate values in fields(like order type, price list etc) on forms (SO form) automatically.
Values can be populated from various sourcs like customer's record, item's record, price list, profile option or PL/SQL Code.


An Entity in this context is a group of related attributes that roughly correspond to a table or a form in Order Management. There are entities of Order Header, Order Line, Order Price Adjustment, Line Price Adjustment, and so on.

An Attribute is a field or column that belongs to that entity. Therefore, the ordered unit of measure is an attribute of the Order Line entity. When you query up the Defaulting Setup window for a particular entity, a list of all the attributes for which you can define defaulting rules display. You will not be able to define defaulting rules for descriptive flexfields, since their defaulting is controlled by AOL’s flexfield routines.


Conditions are rules set up that to control when a particular group of default sources will be looked at. Define one or more condition validation templates per entity based on common business rules to meet your business needs. Then you can use them over and over for the attributes of that entity. For example, you might set up a condition template for all return lines, or another one for all internal order lines. The ALWAYS condition is seeded for each entity. When defining a set of Conditions and using them in rules, be sure to place the ALWAYS condition last in the Precedence for Defaulting Conditions.

(In condition template we define condition of the order for which we 'll define the defaulting rule. ALWAYS condtion is the default one but we can define one condtion for return, one condition for internal orders and so on. once we have defined the conditions we set the defaulting rule of each attribute for different conditions. So the defaulting value is a combination of entity, condition template & attribute)

Notes:
The Group Number is an arbitrary number used to control AND and OR conditions. Indicate that rules are to be connected by an AND rule by giving them the same group number. Rules to be connected with OR should be given
different group numbers


On the main Defaulting Setup screen, where all the attributes of the entity are listed, there is a column called Defaulting Sequence. This number determines the order in which attribute defaulting takes place. When attributes have equal sequence numbers, defaulting takes place alphabetically. All the attributes are seeded with a sequence of 50. You can change these sequences, if you need defaulting to happen in some different order. For example, you might define a sourcing rule that says default attribute A on the line from attribute B on the same line. In this case, you need to insure that the Attribute B gets its value before A is defaulted, or the rule will not work as expected.

Defaulting Rules

Defaulting Rules are used to populate values in fields(like order type, price list etc) on forms (SO form) automatically.
Values can be populated from various sourcs like customer's record, item's record, price list, profile option or PL/SQL Code.


An Entity in this context is a group of related attributes that roughly correspond to a table or a form in Order Management. There are entities of Order Header, Order Line, Order Price Adjustment, Line Price Adjustment, and so on.

An Attribute is a field or column that belongs to that entity. Therefore, the ordered unit of measure is an attribute of the Order Line entity. When you query up the Defaulting Setup window for a particular entity, a list of all the attributes for which you can define defaulting rules display. You will not be able to define defaulting rules for descriptive flexfields, since their defaulting is controlled by AOL’s flexfield routines.


Conditions are rules set up that to control when a particular group of default sources will be looked at. Define one or more condition validation templates per entity based on common business rules to meet your business needs. Then you can use them over and over for the attributes of that entity. For example, you might set up a condition template for all return lines, or another one for all internal order lines. The ALWAYS condition is seeded for each entity. When defining a set of Conditions and using them in rules, be sure to place the ALWAYS condition last in the Precedence for Defaulting Conditions.

(In condition template we define condition of the order for which we 'll define the defaulting rule. ALWAYS condtion is the default one but we can define one condtion for return, one condition for internal orders and so on. once we have defined the conditions we set the defaulting rule of each attribute for different conditions. So the defaulting value is a combination of entity, condition template & attribute)

Notes:
The Group Number is an arbitrary number used to control AND and OR conditions. Indicate that rules are to be connected by an AND rule by giving them the same group number. Rules to be connected with OR should be given
different group numbers


On the main Defaulting Setup screen, where all the attributes of the entity are listed, there is a column called Defaulting Sequence. This number determines the order in which attribute defaulting takes place. When attributes have equal sequence numbers, defaulting takes place alphabetically. All the attributes are seeded with a sequence of 50. You can change these sequences, if you need defaulting to happen in some different order. For example, you might define a sourcing rule that says default attribute A on the line from attribute B on the same line. In this case, you need to insure that the Attribute B gets its value before A is defaulted, or the rule will not work as expected.

Setup Step: 27 - Holds

When you prevent further processing on an order through an exception, you are placing a hold on the order.

Order Management enables you to hold an order, return, order line, or return line from continuing to progress through its workflow by utilizing the holds feature. Holds can be applied manually or automatically based on a set of criteria you define, such as a credit check hold.

In release 11i Oracle Order Management, applying and releasing holds can be performed directly from the Sales Order Pad.  You can manually send a notification through Oracle Workflow to specific individuals when an order hold is applied. A concurrent program can automatically release holds based on the Hold Until date. Additionally, you can track and view history information on holds at the order and/or line level.

 
Notes
  • Holds are assigned a Hold Type and are authorized for application and release for specific Responsibilities.
  • You can define holds that are effective only at certain steps of the order or line workflow, as well as, holds that apply regardless of the stage in the order’s flow.   Holds can be defined to be specific for pick, pack, or ship activities.
  • Holds may be designed to be applied automatically, or may be applied manually based on a set criteria you define.
  • Hold Sources


    Hold sources allow you to apply a particular hold to a group of existing orders, returns, or their lines, and to new orders or lines meeting your criteria.  A hold source is the combination of a parameter (i.e. customer, item, order, wh) and hold name that you specify.  Hold sources are valuable when you want to hold all current and future orders for an item, customer, order, warehouse or customer site (bill-to and ship-to locations).  For example, you create a hold source to hold an unreleased item.  Once the item is available, you simply remove the hold source for the item, and all holds on individual order lines are released.  A hold source can:
    •    Hold all existing and new orders, returns, or their lines that meet your hold source criteria.
    •    Hold some existing and new orders, returns, or their lines from the Order Organizer window.
    •    Hold only new orders, returns, or their lines that meet your hold criteria.

    Credit Checking
    You can automatically prevent shipping of products to customers with unacceptable outstanding credit exposure using automatic credit checking. 
    In the Transaction Order Type set-up you may opt to have Credit Checking occur at Sales Order Booking, at Shipping, or both (which you may want if you have long lead times between Booking and Shipping).
    The Credit Checking can be enabled in the following 3 places:
    •    For the specific Payment Term
    •    For the specific Customer
    •    For the specific Transaction Order Type

    You must define Credit Limits for each of your Customers.  You can determine balances to include when calculating total credit exposure, and set total exposure limits for a customer or customer site. 
    These limits may default in with the Profile Class or be manually maintained in the Profile: Amounts alternate region in the Customer Master.
    You must define a Credit Limit which is the total limit at any one time for the Customer, as well as an Order Credit Limit, which is specific to an individual sales order.
    Oracle uses all of these criteria to place sales orders on Credit Check Hold.

     You can control who is authorized to release Credit Check holds when you want to make an exception or when the customer's credit balance is acceptable.
    Also, Oracle maintains a complete audit trail of credit check holds so you can track who applied or removed each hold, the date it was applied or removed, and why.

    Hold Release

    Holds are released automatically when you supply a hold expiration date.  Once the date is reached, the
    Order can proceed along its workflow.  Releasing a hold source release all the orders, returns, and lines to which that hold source applied.

    Note:  You must set up and run Release Expired Holds concurrent program on a nightly basis to take advantage of the expiration date based release of holds.
     

Holds

When you prevent further processing on an order through an exception, you are placing a hold on the order.

Order Management enables you to hold an order, return, order line, or return line from continuing to progress through its workflow by utilizing the holds feature. Holds can be applied manually or automatically based on a set of criteria you define, such as a credit check hold.

System Holds

  • GSA (USA General Services Administration): Automatically stops order lines on which a GSA customer does not receive the lowest price for an item on all price lists.
  • Credit hold: Automatically stops orders exceeding credit limits.
  • Margin Hold: If the system is setup for margin calculation, and orders are enabled for same, any order or order line not meeting a minimum margin percentage is put on hold
  • Export Compliance Hold: Order Management now provides inbuilt adapters to connect to partner International Trade Management applications for providing export screening on order lines. An order line failing the export compliance check would be automatically put on hold
User-defined:
  • Item
  • Customer
  • Customer site
  • Warehouse
  • Combination

In release 11i Oracle Order Management, applying and releasing holds can be performed directly from the Sales Order Pad.  You can manually send a notification through Oracle Workflow to specific individuals when an order hold is applied. A concurrent program can automatically release holds based on the Hold Until date. Additionally, you can track and view history information on holds at the order and/or line level.
 
Notes
  • Holds are assigned a Hold Type and are authorized for application and release for specific Responsibilities.
  • You can define holds that are effective only at certain steps of the order or line workflow, as well as, holds that apply regardless of the stage in the order’s flow.   Holds can be defined to be specific for pick, pack, or ship activities.
  • Holds may be designed to be applied automatically, or may be applied manually based on a set criteria you define.
  • Hold Sources


    Hold sources allow you to apply a particular hold to a group of existing orders, returns, or their lines, and to new orders or lines meeting your criteria.  A hold source is the combination of a parameter (i.e. customer, item, order, wh) and hold name that you specify.  Hold sources are valuable when you want to hold all current and future orders for an item, customer, order, warehouse or customer site (bill-to and ship-to locations).  For example, you create a hold source to hold an unreleased item.  Once the item is available, you simply remove the hold source for the item, and all holds on individual order lines are released.  A hold source can:
    •    Hold all existing and new orders, returns, or their lines that meet your hold source criteria.
    •    Hold some existing and new orders, returns, or their lines from the Order Organizer window.
    •    Hold only new orders, returns, or their lines that meet your hold criteria.

    Credit Checking
    You can automatically prevent shipping of products to customers with unacceptable outstanding credit exposure using automatic credit checking. 
    In the Transaction Order Type set-up you may opt to have Credit Checking occur at Sales Order Booking, at Shipping, or both (which you may want if you have long lead times between Booking and Shipping).
    The Credit Checking can be enabled in the following 3 places:
    •    For the specific Payment Term
    •    For the specific Customer
    •    For the specific Transaction Order Type

    You must define Credit Limits for each of your Customers.  You can determine balances to include when calculating total credit exposure, and set total exposure limits for a customer or customer site. 
    These limits may default in with the Profile Class or be manually maintained in the Profile: Amounts alternate region in the Customer Master.
    You must define a Credit Limit which is the total limit at any one time for the Customer, as well as an Order Credit Limit, which is specific to an individual sales order.
    Oracle uses all of these criteria to place sales orders on Credit Check Hold.

     You can control who is authorized to release Credit Check holds when you want to make an exception or when the customer's credit balance is acceptable.
    Also, Oracle maintains a complete audit trail of credit check holds so you can track who applied or removed each hold, the date it was applied or removed, and why.

    Hold Release

    Holds are released automatically when you supply a hold expiration date.  Once the date is reached, the
    Order can proceed along its workflow.  Releasing a hold source release all the orders, returns, and lines to which that hold source applied.

    Note:  You must set up and run Release Expired Holds concurrent program on a nightly basis to take advantage of the expiration date based release of holds.
     

Shipping Execution

You can manage shipping information such as trips, trip stops, deliveries, delivery lines, containers, and freight costs in the Shipping Transactions form. In addition, you can complete the following shipping tasks:

Pick Release

■ Release eligible delivery lines based on defined picking criteria.
■ Select the Release Sequence Rule to control the order in which picking lines are allocated to inventory.
■ Enter or validate shipped quantities, back ordered quantities, staged quantities, and inventory control information for delivery lines (after pick release).

Trip and Delivery Planning
■ Create a trip or delivery.
■ Assign delivery lines to a delivery or a container.
■ Schedule pick-ups and drop-offs.

Ship Confirm
■ Assign delivery lines to trips and deliveries.
■ Auto-create a trip and close stops.
■ Ship confirm or back order a delivery.


Defining Roles and Users

Shipping Execution provides data access controls called roles that control users’ access to the Actions list and Tools menu in the Shipping Transactions form. Roles are assigned to users using grants that control access to view or edit specific shipping data or actions.
This is useful, for example, if you want to assign a grant to inexperienced users that provides view-only access or assign grants that prevent unwanted actions such as unintentional pick releases across multiple organizations.

First we define roles with different permissions of all the available functions in shipping execution form i.e role1 can have view access to few things and edit to the rest, role2 has different set of view/edit access in the SE form. After that we give grants to different users to the defined roles.


Define Roles
For each role, you can select the following data access controls that control edit and view access to shipping entities such as trips, stops, deliveries, lines/LPNs.
■ Data Access Edit enables you to edit and view the data
■ Data Access View enables you to browse the data
■ Data Access None prevents you from editing and browsing data and performing actions

A role can provide either view-only, edit-only, or a combination of view and edit access depending on the set up of the role. You can create customized roles by defining the access controls you want. During the set-up for each role, you can
quickly enable or disable actions by selecting the Disable or Enable Actions button.

Set up -> Shipping -> Grant & Roles Defination -> Roles


Granting a Role to a User
You can grant a user a role in one organization or all organizations for a period of time. The role is assigned to a user by a grant. The grant is specific to a particular user and defines the role(s) assigned to the user, the organization where the grant is effective, the start date and optionally, an end date

A grant can have one or all inventory organizations. If an organization is not specified, the grant is applicable to all organizations. If the user’s activities span more than one organization, for example, a stock picker who pick releases across multiple organizations (but not all), then separate grants for each organization must be created to associate the user, the user’s role, and effective dates for the grant. Alternately, if you do not select a specific organization, the stock picker can pick across all organizations.

Set up -> Shipping -> Grant & Roles Defination -> User

Pick Release

The pick release process creates move orders which are pre-approved requests for sub inventory transfers to bring material from its source locations in the warehouse (stores/fg sub inventory) to a staging sub inventory.


1. If auto allocate and auto pick confirm both are set to NO then pick release does nothing except creating the move order.

If the auto allocate is set to yes in release rule with the ware house and sub inventory name then pick process also does an allocation/detailing of the item in the pick from sub inventory.

Detailing
is the process by which Oracle Order Picking and Shipping uses the picking rules to determine where to source the material to fulfill a request line (move order line).  The detailing process fills in the move order line details with the actual transactions to be performed. If adequate quantity is not available to detail the move order, this process can be repeated later. If no reservation exists before the detailing process, it also creates the reservation for the material. 

During the process of reservation in scheduling a demand line is created and can be seen in reservation form. At thaat point of time the system only does the reservation with type Inventory and w/o specifying the subinventory and locator. During pick release allocation/detailing the system populates the subinvenory and locator if applicable.

If the auto pick confirm process is set to yes then pick release process also does the transact move order and at the end of pick release process the material moves automatically to the staging sub inventory. In this case the delivery line status in SE changes from ready to release to staged/pick confirmed but if either of the auto allocate/auto pick confirm is set to NO, then the status changes to released to ware house and the user needs to manually transact the move order created by the pick release process.

2. If there is no onhand then the order is back ordered and no move order is created. If there is not sufficient onhand then a move order is created for the available onahand and the delivery line splits in SE form.

3. Pick Slips can be created after the detailing process completes, and the quantity and source can be manually verified at pick confirm. Pick slip report contains the SO (line, item, quantity, ship set), Mover Order, Delivery and Trip numbers. A custmozied bill of lading & packing slip can be generated after this if required.

4. You can run one or more releases and customize release criteria to meet your requirements. You can define:
Release Rules to specify your picking criteria and set the default Release Rule through Shipping Parameters Pick Release tab.
Release Sequence Rules to specify the order in which eligible delivery lines are allocated during pick release.
Pick Slip Grouping Rules to determine how released move order lines are grouped onto pick slips.


Picking Rules
Move orders will use the picking rules set up in Oracle Inventory to locate the  material required to fulfill the move order line. Together with item-sub inventory defaults (required if the staging sub inventory is locator controlled), the picking
rules suggest the staging transfer transaction lines with appropriate source information that will be required to obtain enough material in the staging location for the delivery
. The process where the Picking Engine generates these transaction
line suggestions is called allocating.

When you define an item you choose a picking rule to determine the order in which revisions, lots, subinventories, and locators are picked for sales orders. Oracle Shipping Execution submits requests to Oracle Inventory, which uses the information you enter in the Picking Rules window to generate pick lists for sales orders. If you choose None for any of the criteria fields, Inventory ignores that criterion. For example, if you choose None for Revision, Inventory picks units of an item without regard to revision levels. Oracle Inventory looks at the picking criteria in the order in which they appear in the Picking Rules window. Then, Inventory looks at the options (except for None options) for each criterion in the order in
which they appear beneath each criterion.


Note: If you utilize Oracle Transportation, compatibility constraints can be used in the shipping process up through ship
confirmation. Compatibility Constraints enable you to define a variety of transportation related restrictions related to items (goods for shipment), carriers, modes of transport, facilities, organizations, and customers. Then, these restrictions are used by the application to warn or prevent further order processing if the defined undesirable condition is encountered. For example, you can define an item-carrier compatibility constraint stating that designated carriers cannot transport specific inventory items. When a delivery is created violating the constraint, an error or warning message will be generated. You determine the severity of the constraint violation; whether a warning or error should display.

Staging Locations
The destination sub inventory for a pick wave move order is the staging location into which the picked material should be deposited. Each organization should designate at least one staging sub inventory. Staging sub inventories should be
reservable. Each batch created at pick release will have the same destination staging sub inventory. The default staging sub inventory and locator to be used for all pick wave move orders are specified through Oracle Shipping Execution’s Shipping
Parameters window. This location can be changed at pick release. To model different staging lanes within the staging area, facilities may choose to either create different sub inventories or designate staging lane locators within one staging sub
inventory.

Pick Release from shippng transaction form
All the pick release setups can be done so that users can easily do pick release form shipping transaction form.
once you do a pick cofirm system fires below requests

  • Pick Selection List Generation
  • Pick Slip Report
  • Shipping Exceptions Report

When pick release is done from shipping transaction form, the system picks up the auto –allocate and create delivery set up from shipping parameter. If the Pick Confirmation Required box in the Organization Parameters window is not enabled then the system would also does the auto-transaction.
Notes:
Do not check the Pick Confirmation Required box in the Organization Parameters window.  If you check this box, the Auto Pick Confirm parameter on the shipping tab of the Pick Release form will be set to No.  To change this you would navigate to Setup -> Shipping -> Organization Parameters->'ATP, Pick, and Item-Sourcing tab

Configuring Picking Process

You can determine the number of pick release steps the system will prompt to move material from pick release to ship confirmation. These steps are:

1. Pick Release
2. Move Order Line Allocation (detailing)
3. Move Order Line Pick Confirmation

Pick Release
Oracle Shipping Execution’s Pick Release process creates move orders. One order is created per pick release batch per organization, so if you pick release across multiple organizations, one move order is generated in each facility. One move
order line is generated for each order line included in the picking batch. That move order line includes the item, quantity, the staging location (the destination sub inventory and locator) and a source sub inventory and locator if one was specified
on the sales order line or on the Release Sales Orders window.

For non-reservable items, allocation and pick release run, but suggestions are not created during pick release, and pick confirm will not run for the item. You can print pick slips, but they will not be detailed with subinventory and stock locator to pick from, however they will list the item and quantity to be picked. Auto-allocate should be Yes and Auto-pick-confirm can be set to any.

Detail Line Allocation (Detailing)
To release the move order lines created at Pick Release to the warehouse and to print pick slips, the lines must be allocated. The allocation process for a pick wave move order line also creates a high level (organization level) reservation for the item(s) if no previous reservations exist for them. You can choose to do this immediately after the move order lines are created or to postpone this step until a later point in time. Once the lines are allocated, they have a status of Released to
Warehouse.

The reservation is a soft reservation and from the transact move order form we can back order the move order line and the quantity would be available for reservation again.

 
Postponing the detailing process might be employed by organizations that pick release across multiple warehouses but prefer to enable each warehouse to determine when to release their order lines to the floor. Detailing the order lines immediately after they are created is called auto-detailing. Postponing the detailing process is referred to as manual-detail. You can set up a default detailing mode in the Shipping Parameters window. This default can be overridden at each Pick Release through the Release Sales Orders window.

Pick Confirmation
The move order line details must be transacted (in Inventory) to confirm the material drop-off in staging. Pick confirmation executes the sub inventory transfer that systematically moves the material from its source location in the warehouse to
the staging location. Pick Confirmation automatically transfers the high level reservation to a allocated reservation (including lots, sub inventory and locators) in the staging location.
Inventory updates Shipping Execution with the results of the pick confirm:
■ Pick Confirmed quantity is assigned a status of Staged/Pick Confirmed.
■ Unconfirmed quantity is assigned a status of Backordered.

Pick confirmation follows the allocation and reservation process automatically if both the Auto Allocate and Auto Pick Confirm options are selected in the Release Rules window. Pick Confirm always follows the detailing and reservation process.
If Auto Allocate is not chosen, it is not possible to Auto Pick Confirm.


Release Sequence Rules

You can define release sequence rules to specify the order in which eligible picking lines are allocated to Inventory during pick release. Release sequence rules are given on "release sales order for picking" form and can be defaulted from release rule tab in shipping parameter or from the release rule it self.


Notes: While its not mandatory to provide the sales order number/delivery/trip while doing the pick release, its always advisible to do so to restrict the number of lines seleceted during pick release. The release sequence rule determines the priority given to selected lines while doing pick release.

You can release the picking lines by:
■ Order number
■ Outstanding Invoice Value
■ Scheduled Date
■ Departure Date
■ Shipment Priority

You can assign a priority level to one or more attributes with 1 being the highest priority and 5 being the lowest. You can also define whether you want the picking lines released in ascending or descending order.

For example, if you select the Ascending button for Order, picking lines are released by ascending order number--Order 1 is released first, then Order 2, Order 3, and so on. If the Descending button is selected, the picking lines are released by
descending Order number from highest to lowest--Order 4 is released first, then Order 3, Order 2, and Order 1.

Pick Slip Grouping Rules

You can create grouping rules to organize how picking lines for released sales orders are grouped on to pick slips. For example, if you select Delivery as a grouping criteria, all picking lines for the same delivery are grouped together on a pick slip. If there are multiple deliveries, multiple pick slips are created.
You can also define your grouping criteria further by selecting additional grouping attributes. For example, if you select Delivery and Carrier as grouping criteria, picking lines for the same delivery and carrier are grouped together on a pick slip.

Documents

There are few document related setups which are of prime importance in order management. We would learn all of them in this chapter.

Before going into the details first have a look at
Document Sequence
Document category
Assign document sequence to category
in setup step XI of OM

http://www.oracleug.com/user-guide/order-management/setup-steps-xi-document-sequences

Shipping Document Sets

You can group related shipping documents and other reports in a set that can be printed at pick release or ship confirm. You can include a variety of shipping documents in a set such as a Bill of Lading and Packing Slip Report and determine the print sequence.

Shipping Execution provides three pre-defined (seeded) document sets:
■ All Pick Release documents: You can set the default Pick Release Document Set in the Pick Release tab of the Shipping Parameters window.
■ Ship Confirm documents: You can set the default in the Document Set field of the ship confirm window.
■ Pack Slip only (at ship confirm): You can set the default in the Document Set field of the ship confirm window.


Shipping document sets are used to run and print a standard/customized report at the end of picking/shipping. Steps of the processes are given below
1. Decide the report needs to be run after the pick release/shipment. If required then develop a customized report.
2. Create a new document set and select the appropriate usage – Ship confirm/Pick Release
3. Assign the reports in the documents with the correct sequence
4. Assign the document set in Shipping parameter in pick release /shipping transaction tab.


Reports

There are 5 reports that are mostly used in picking and shipping process.
1. Pick slip report – Generated after the end of pick release.
This is a standard report and is attached to a document set. The document set given in pick release tab of the shipping parameter gives the name of the customized report (if any) which runs automatically after pick release.

2. Bill of lading :
Bill of Lading and or Packing Slip for a delivery can be generated as part of a document set that can be run at the completion of ship confirmation, or the documents can be created individually from the document request menu. The
documents should also be generated automatically when you click Generate BOL and Create Packing List. A Delivery must meet the following prerequisites in order for a Bill of Lading to be created.

3. Packing Report:
 You can create a Packing Slip at any point in the shipping process providing a delivery has been created and a delivery line has been assigned to the delivery.

4. Excise Invoice(India Only):
As per the Excise rules, a document called 'Excise Invoice'  has to accompany the consignments to the customer. This
documents shows the details about the Excise duty levied;  like the Base Value, Applicable Abatement if any,Assessable
Value,Basic excise Duty, Education Cess, Secondary and  Higher Education cess, etc. at item level and as an  aggregated sum at the bottom of document. It also gives the excise chapter ID for each item and the Excise Duty rate applicable for that Chapter ID. The base value can be either the manufacturing cost of the goods or Maximum Retail Price as prescribed by Excise Rules, depending upon  the nature of goods sold.

5. Commercial Invoice:
Apart from the Excise Invoice, another document  called 'Commercial Invoice' also accompanies the  consignment. This document shows the commercial details of  the sale like Basic Price, Discounts/Mark-ups if any,  VAT/CST as applicable, Transport and Handling Charges, etc.  In short, the commercial terms as agreed between the Seller  and the Buyer. These values are shown at item level as well  as the aggregated sum at the end of the document. The sum  value of this document is taken for calculating the levies  like Octroi and for payments to the seller by the buyer.


Ship Confirm

Ship confirm is the process of confirming that items have shipped. When you ship confirm a delivery, Shipping Execution confirms that the delivery lines associated with the delivery have shipped.

You use the Confirm Delivery window to manually select or deselect ship confirm options. The options in the Confirm Delivery window provide flexibility for automating many tasks associated with processing deliveries with many delivery lines. For example, when the Ship Entered Quantities, Unspecified Quantities Ship option is selected at ship confirm, the shipped amounts are automatically processed so that each delivery line with a missing shipped quantity value is recorded as fully shipped. This saves you from manually entering each item as fully shipped.

Once you do SHIP CONFIRM. Then four concurrent program will run in the background .
1. INTERFACE TRIP Stop
The “Interface Trip Stop” process is executed either real time or later as a concurrent request.  Typically, the process accomplishes three main objectives:
i. Deducts on-hand quantity and debits Cost of Goods Sold.
ii. Progresses the order line to “Shipped” status so that it can progress to the next workflow activity.
iii. Progresses the shipment line to an “Interfaced” status and sets the trip to “In-Transit” or “Closed” depending on whether you elected to close the trip.

2. Packing Slip Report
3. Bill of Lading
4. Commercial Invoice

If you dont defer interface (i.e. defer interface is not enabled in ship confirm form) then ITS runs after the ship confirm and it does the above 4 activites but if you enable defer interface then ITS wont be automatically fired after ship confirm and the sales order line remains in picked status. After ITS run the SO line status changes to shipped and after workflow back ground completes it goes to Fullfill and finally to AR interface


Ship Confirm A Delivery

Ship Confirm is the process of recording that items have shipped. When you  ship confirm a delivery, Shipping Execution confirms that the delivery lines  associated with the delivery have shipped.

The prerequisites are
  • Delivery lines must be released.
  • Delivery must be open.
  • At least one delivery line must be assigned to the delivery.

To ship confirm a delivery
Navigate to the Query Manager window, and find the delivery.The delivery displays in the Shipping Transactions window.
From the Actions menu, select Ship Confirm to display the Confirm Delivery window.

1. In the Ship Options region, select one of the following ship confirm options:

   -Ship Entered Quantities, Unspecified Quantities Ship: Ship confirms the quantity of items specified in the Shipped Quantity field and treats blank     values as full quantity (shipped quantity = requested quantity). For example, if the Requested Quantity is 10 and the Shipped Quantity field is blank (no values entered), the full quantity (10) is shipped and displays in the Shipped Quantity field.
   -Ship Entered Quantities, Unspecified Quantities Backorder: Ship confirms the quantity of items specified in the Shipped Quantity field and treats blank quantities as full backorders (backorder quantity = requested quantity). For example, if the Requested Quantity is 10 and the Shipped Quantity field is blank (no values), the full quantity (10) is backordered and displays in the Backordered Quantity field.
   -Ship Entered Quantities, Unspecified Quantities Stage: Leaves the unspecified delivery line quantity as staged and removes it from the delivery. For example, if the Requested Quantity is 10 and the Shipped Quantity field is blank (no values), the full quantity (10) remains in the Stage Quantity field and the line is no longer associated with a delivery.
    Note: If a non-zero Stage Quantity exists on a line, it is split from the line and unassigned from the delivery. If the Create Delivery for Staged Quantities is enabled, all staged delivery lines are grouped together in a new delivery.
   -Ship Entered Quantities, Unspecified Quantities Cycle Count: Ship confirms the quantity of items specified in the Shipped Quantity field, treats blank quantities as full backorders (backorder quantity = requested quantity), and transfers the backorder reservation to cycle counting. For example, if the Requested Quantity is 10 and the Shipped Quantity field is blank (no values), the full quantity (10) is backordered and transferred to cycle
    counting. You can also transfer delivery quantities to cycle count prior to
    ship confirm by using the Shipping Transactions form, Cycle Count action.
   -Ship All: Ship confirms the entire quantity regardless of what was entered in the Shipped Quantity field (shipped quantity = requested quantity). For example, if the Requested Quantity is 10 and the Shipped Quantity field is
    5, the full requested quantity is shipped (10) and displays in the Shipped  Quantity field.
   -Backorder All: Backorders the entire quantity irrespective of what was entered (shipped quantity = 0, backorder quantity = requested quantity).
   -Cycle Count All: Backorders the entire quantity irrespective of what was entered (shipped quantity = 0, backorder quantity = requested quantity)and transfers the backorder reservation to cycle counting. You can also
    transfer delivery quantities to cycle count prior to ship confirm by using the Shipping Transactions form, Cycle Count action.

2. Enable the Create Delivery for Staged Quantities box (default setting), if you want all staged delivery lines grouped together in a new delivery. If you do not want to create a trip for the delivery, choose the Go button to ship
confirm and save your work.

3. In the Auto-create Trip Options region, select or update the ship method and the actual departure date. This allows you to specify the stop departure date which also updates Inventory. The simplest way to ship confirm one or more deliveries is to enable the Set Delivery in-Transit and Close Trip fields in the Confirm Delivery window:
Set Delivery In-transit: Creates a trip and stops for the delivery. Closes  the first stop of the delivery, but leaves second stop open. Sets status of delivery to In-transit and initiates Order Management (OM) and Inventory interfaces.
Close Trip: Creates a trip and stops for the delivery. Closes trip, all stops, and the delivery.
You can enter a future Actual Departure Date. If Allow Future Ship Date in the Shipping Parameters form, Shipping Transactions tabbed region, is cleared, do not do so as you receive an error. If Allow Future Ship Date is selected, you
recieve a warning and the Inventory Interface concurrent process does not process the transaction until the actual departure date.
Enable the Create Bill of Lading box if you want to create a Bill of Lading.This generates a Bill of Lading number and prints it if it is part of a document set.
Choose one of the following
   -If you disable the Defer Interface box and run Ship Confirm, inventory gets decremented and the order line is updated with the shipped quantity.
   -If you enable the Defer Interface box and run Ship Confirm, you need to run the Interface Trip Stop-SRS concurrent request to update the Inventory and the Order Line status. When the Defer Interface box is enabled, a request is not automatically submitted to interface the trip stops.

4.  Select the document set you want printed for the delivery and choose the OK  button.  A trip and related stops are created for the delivery.  Save your work.

Ship Confirm Rule

You define Ship Confirm Rules within the Ship Confirm Rules window.
To define a Ship Confirm Rule:
1. Navigate to the Ship Confirm Rules window.
   Shipping -> Set up -> Ship Confirm Rules
2. Enter a unique rule name in the Ship Confirm Rule field & Optionally, select an Effective date.

3. Within the Ship Options region, select one of the following options from the
Action list of values:
■ Ship Entered Quantities: To ship the quantities entered
■ Ship All: To ship all
■ Backorder All: To backorder all
■ Cycle Count All: To cycle count all

4. The Ship Options region also enables you to determine the action to perform with Unspecified Quantities. Select one of the following options:
■ Ship
■ Backorder
■ Stage
■ Cycle Count

5. Determine whether you want to Create Delivery for Staged Quantities.
If this option is selected, the system will create deliveries for delivery lines that are staged but not yet assigned to a delivery, and subsequently perform the other operations defined by this Ship Confirm Rule. If this option is not selected, delivery lines not assigned to deliveries will not be considered for ship confirm using this rule.

6. Within the Trip Options region, select a Ship Method using the list of values.

7. The remaining options within the Trip Options region also require attention.
These options include the following:
■ Set Delivery In-Transit
■ Close Trip
■ Defer Interface
■ Create Bill of Lading

8. Optionally, select a Document Set that will print with the shipment.


Shipment Transit Times

Within the Inter-Org Shipping Methods window, you can specify the Ship Method, Intransit Times, Load Weight and the Volume Capacity for any movement between two location types.


Freight Costs

You can define allowable freight costs and suggested amounts for shipments. These amounts are applied at ship confirm or once a delivery line is planned(Action LOV in transaction form). You can add multiple freight costs to a shipment from the list of allowable freight cost types that you define.

You can also define multiple freight costs for a specific freight cost type. For example, if you want to track different types of insurance, you can create different insurance costs under the insurance freight cost type such as liability insurance or shipping insurance.

When you add freight costs at ship confirmation for a foreign currency order, you can use either your functional currency or the order's foreign currency. If you use your functional currency, the freight charges are converted to the order currency
through Oracle Receivables.

If you want to pass freight costs entered in the Shipping Transactions form to Oracle Order Management for invoicing, then you have to set up a pricing modifier.

Navigation : Setup -> Shipping -> Fright carriers, Cost type -> Fright Cost types


Overview of Trips

A trip is an instance of a specific freight carrier departing from a particular location containing deliveries.

1. A trip is carrier specific and contains at least two stops such as a stop to pick up goods and another stop to drop off goods, and may include intermediate stops. Trip stops are displayed in sequence on the Stops tab within the Shipping Transactions form once you have queried your trip. The Stop sequence will not re-sequence if a stop is removed. For example, if you have two stops, each with an arrival and departure date and time, and you remove one, the remaining stops will stay in the same sequence as they were originally.

2. A trip can contain more than one delivery.

3. Trips can be created automatically or manually.


4. You can perform the following tasks with trips:
■ Create a trip
■ Plan a trip
■ Unplan a trip
■ Assign freight costs to a trip
■ Print a document set for a trip
■ Calculate weight and volume for a trip stop
■ Ship confirm a trip

Creating a Trip

You can create trips automatically or manually.


Automatic

Trips are required for all deliveries and can be created automatically as part of Ship Confirmation transparent to the user for those not interested. If your shipping process does not require advanced planning, you may prefer to automatically create
trips:
■ Auto-creating a trip for a delivery: You can find the delivery you want to ship, and auto-create a trip and related trip stops.
■ Auto-creating a trip for containers and lines: You can find the lines and containers you want to ship and auto-create a trip which creates a trip, related deliveries, and trip stops.

Manual
You can manually create a trip and later assign delivery lines or find the delivery lines and create a trip. For example, for a regular trip scheduled to depart every Friday, you can manually set up a trip ahead of time and then assign delivery lines.
When you manually create a trip, you can manually assign stops, deliveries, and delivery lines to that trip.


To manually create trip, navigate to shipping transaction query manager form and enter the Trip Name, vechile org code and ship method.
Once the trip is saved the stops tab in the form gets enabled and stops can be enter over there.


Firming a Trip
Once deliveries and delivery lines have been assigned to a trip, you can set the status of the trip to one of the following:
■ Firm Routing: Prevents trip stops from being added, or removed for the selected trip.
Firm Routing and Contents: Prevents trip stops from being added, or removed for the selected trip and prevents contents from being added or removed. If the trip status is Firm Routing, you can still update trip details, delivery, and
delivery line information. For example, you can add delivery lines and make changes to the delivery. However, to add or remove trip stops, you first must set the status of the trip to Unfirmed before making the changes.

When you firm a trip, Shipping Execution performs the following:
■ Validates that the sequence numbers between the deliveries of the trip are unique for containers within the deliveries
■ Validates that the weight, volume, and fill percentage do not exceed their maximum number of containers in the delivery
■ Validates that the minimum fill percentage is met
■ Validates the planned arrival date and planned departure trip dates are not in the past
■ Validates pick-up and drop-off dates and times with the Transportation Calendar for the shipper, carrier, and receiver

Unfirming a Trip
When a trip is in Firm Routing or Firm Routing and Contents status, you cannot add, remove, or re sequence trip stops unless you first Unfirm the trip. When the trip is in Not Firm status, you can remove or rescreen existing trip stops or add new stops.
After the changes are done, the trip can be Firmed to prevent the trip stop settings from being changed. However, if you leave the trip Not Firm, the existing trip stops can be removed or new trip stops can be added.
When you unfirm a trip, Shipping Execution:
■ Sets the status of all deliveries in the trip to Open.
■ Sets the status of the trip to Open

Assigning Freight Costs to a Trip
You can assign freight costs to a specific trip, override the suggested freight costs, or update existing freight costs. For example, if you wanted to add additional costs to a particular vehicle that is used in the trip to deliver goods. A freight cost can also be assigned to a delivery, a stop, a delivery leg, a delivery detail, or a container.


Printing a Document Set for a Trip
You can print a group of shipping documents and other reports in a set. These document sets can include pick release documents, all shipping documents, and pack slip information.

To print a document set for a trip:
1. Navigate to the Query Manager window, and find the trip.
2. From the Actions menu, select Print Document Set, or if you have added a Print Document Set button, click it.

Managing Packing/Containers/LPNs

In the Shipping Transactions form, you can create and manage containers (LPNs) at any point in the shipping process. If you are using the Auto-packing feature, containers can be automatically packed using the container-item relationships set
up in the Container-Item Relationships window.
You can create containers without assigning them to a delivery. This is useful if you want to create multiple containers of the same type then pack them with unassigned delivery lines.

(Note: LPN is an acronym for License Plate Number. A packing container has a license plate number for unit identification and reporting capability, so containers are also called LPNs in Oracle Shipping Execution.)

Customer Items can be associated with containers within Oracle Inventory. This association is used when packing the Customer Item into a container in Oracle Shipping Execution. When the Customer Item is packed, the container associated with the Customer Item in Oracle Inventory is used as the default container.

You can pack multiple containers with multiple lines using one of the following packing methods:
■ Auto-packing
■ Manual packing
■ Packing Workbench        

  •       Equal packing: splits the delivery lines equally between the selected LPNs.You cannot use this method with delivery lines of serial controlled items.
  •         Sequential packing: fully packs one container at a time to its capacity (weight, volume, or quantity) before packing the next selected container.
1. Auto-packing Delivery Lines into Containers
Auto-packing provides a convenient and quick way of automatically packing  delivery lines into containers (LPNs). The delivery lines are packed into LPNs based on the container-item relationship set up in Oracle Shipping Execution or in Oracle
Inventory (defined as a customer item) and the setting of the Shipping parameter Percent Fill Basis must be set to Quantity. The container-item relationship defines the container that is used for packing the delivery lines. If Percent Fill Basis is set to Quantity, then auto-pack will look at Container-Load Relationships set up for the item and the Detail Container.
If multiple container-item relationships exist for the same item, the Preferred setting in the Container-Item Relationships window indicates the default container-item relationship used for that item.
Auto-packing can also be performed for those items in Oracle Inventory that are defined as Customer Items.

Using the Auto-pack Master Option
■ If you select Auto-pack, then only the detail LPNs are created and packed.
■ If you select Auto-pack Master, the delivery lines are packed into the detail container, and the detail containers are packed into the parent/master container in one action:
For example, a delivery line with a quantity of 12 of Item A has a container-load relationship set up so that 6 of Item A fits into Container A and 2 of Container A fits into Container B (the percent fill basis is set to quantity). If you run Auto-pack Master, the line is split into 2 lines of 6, the first line is packed into the first container, the second line is packed into the second container, and the two detail LPNs (2 Container As) are packed into Container B.
■ The Auto-pack Master option is available from the Actions menu in the Lines/LPNs tab in the Shipping Transactions form. It is also available at the delivery level
1. Container type setups are done in inventory -> Setups ->Item ->Container

2. Crate a container Item in item master.

3. Shipping > Setup > Container Load Details > Organizations > [OK]

4. Auto pack it


2. Manual packing Delivery Lines into Containers
It involves two steps i. Creating an LPN
                             ii. Assign LPN to lines/deliveries


3. Packing Work Bench Lines into Containers

Internal Orders

Transfer the material from M2(Seller(om)) to M1(Buyer/Customer/Destination(po))

1. Item Setup
Navigate to Inventory -> Items -> Master Items
a.     Apply the 'Purchased Item' template
b.    Internal Ordered  Internal Orders Enabled
c.    Assignment in both orgs

2. Cost Set up (M2)
a.  Navigate to Inventory -> Costs -> Item Costs
Cost Element : Material
Sub-Element : Material
Basis : Item
Rate or Amount : 23
Cost Type : Pending

b.  Inventory -> Costs -> Standard Cost Update -> Update Costs
Run the standard cost update and verify that a new line is added at item cost with frozen cost.

3. Shipping Network Setup
Verify setup for inter organization Shipping Network between M2 and M1
- Navigate to Inventory -> Setup -> Organizations -> Shipping Networks
Transfer Type : Intransit
FOB : Receipt
Receipt Routing : Direct
Internal Order Required : checked

4. Define Inter-Location Transit Times (optional for testflow)
- Go to Inventory -> Setup -> Organizations -> Inter-Location Transit Times
- Go to View -> Find and enter
Origin Type : Location
Origin : M2- Boston
Destination Type : Location
Destination : M1- Seattle
- Enter the Ship Method and Intransit Time such as :
Ship Method : Airborne
Intransit Time : 5
Default Method  : check

5. Org M1 needs to defined as a customer
a. Create a location which can be used as the ship to location for customer M1 and enter this in ship to
b. No Sales Credit in sales person.

6. Verify the transaction type and order source (this is already done in Vision environment)
a. Order Type : New_Internal_ordertype
       The internal sales order in OM will be created with this order type
Order Source : Internal
       The internal sales order will be imported into OM with this order source
New_Internal_ordertype should have Shipping source type as internal.

b. A new document category is attached with the above order type. Attach a document sequence to it.

c. Navigate to Purchasing -> Setup -> Organizations -> Purchasing Options (M2)
- Click on the Internal Requisitions tab
- Notice the Order Type and Order Source setup

Process Steps


details @ http://www.oracleug.com/user-guide/purchasing-overview/internal-requisitions
1. Enter Requisition in Oracle Purchasing of M2(buying/destination). Sourcing Rules may set source type attribute to Inventory, or manually choose Inventory source type.

2. Approve the Internal Requisition.

3. Run the Create Internal Sales Order concurrent program in Purchasing to load the Order Import tables. This can also be scheduled as part of your set up to run periodically to meet business needs.

4. Run Order Import with Order Source = Internal in OM to create the Internal Order. Be sure to run Order Import using a responsibility that corresponds to the operating unit in which the internal order needs to be created. It is possible to create an internal order in an operating unit different from that of the internal requisition. This can also be scheduled as part of your set up to run periodically to meet business needs.

5. After Order Import completes successfully, book, pick and ship the internal  order.

6. Receive against the Internal Requisition.


Drop shipments

Drop shipments is a method of fullfilling sales order by selling products without the order taker handling, stocking, or delivering them. The seller buys a product and the supplier ships the product directly to the seller's customer. Drop shipments are done because of the following reasons

Customer requires an item that is not normally stocked
Customer requires a large quantity of the item which is not available with you
It is more economical when the supplier ships directly to the customer

In drop ship cycle, the seller receives a sales order from the customer and sends a purchase order to the supplier. The supplier ships directly to the customer. The seller receives an invoice from the supplier and sends an invoice to the customer. The seller receives an invoice from the supplier and sends an invoice to the customer.

 Required Set UP

Warehouse
Consider establishing a logical warehouse to receive drop shipments. This will isolate the costs of drop shipped items from items you physically stock. Order Management does not require you to use a special shipping org for drop shipments, but you can choose to do so. In that case, define the logical warehouse as a shipping org, and enable the items you want to be drop shipped in that warehouse.

Order Type/Line Type
Define line type/order types for your drop shipment orders that have a workflow containing the Create Supply activity.

Defaulting Rules
Define defaulting rules, based on conditions that make sense to your business process, for the source type attribute of the Order Line. If you want a line to be drop shipped, make the source type equal to External. In addition, if you defined a special warehouse for drop shipped items, you might want to create a defaulting rule to default that shipping org to your order line.

Notes
Always enter the deliver to location.

Process Steps

1. Enter and book an order.
Defaulting Rules may set source type attribute to External, or you can manually choose External source type.

The Purchase Release concurrent program or workflow in Order Management creates rows in the Requisition Import tables in Purchasing. Then Purchasing's Requisition Import process creates the requisitions. Drop Shipments are marked with the Source Type of External in Order Management and Supplier in Purchasing.

2. Run Requisition Import in Purchasing to create the requisition.

3. Approve the requisition to generate the Purchase Order.

4. Create a PO or autocreate a Blanket PO release from the approved requisition. A drop ship order can be changed or canceled in Order Management after it has been sent to Oracle Purchasing but before receipt. However, the changes are not automatically communicated to Purchasing. A report, Sales Order/Purchase Order Discrepancy Report, shows what orders have changed. These changes need to be manually updated in Purchasing and then communicated to the
vendor.

When the vendor ships product to your customer, you may receive an ASN, or even an invoice, to indicate shipment to the customer. The receipt triggers automatic receipt of the line in Purchasing. If the vendor does not send ASN, receipt can be entered manually (passive receiving). Inbound and outbound material transactions are automatically created for accounting purposes. Order Management workflow proceeds to next step, typically invoicing of the end customer.

Scheduling and Booking

Scheduling is a means of communicating the balance between customer demand and a company’s ability to fulfill an order from current inventory and supply sources.  Order scheduling is managed differently from company to company – and Oracle Order Scheduling supports a variety of scheduling environments.

The scheduling feature of Oracle Order Management (OM) enables you to determine when items will be available to promise to a customer(ATP), schedule the shipment or arrival of order lines based on this availability(Schedule), and reserve on-hand
inventory to sales order lines(reservation) SO
, the features that are provided under the umbrella term of scheduling are:
■ Calculating Available-to-Promise (ATP)
■ Scheduling ( Populate dates - ship and arrival schedule dates)
Create demand (Makes demand visible to planning)
■ Reserving (Reserves the line items if the due date is within the reservation time fence)
Sets the ship from
Calculates the delivery  lead  time based  on as  ship  method (if you have set up a shipping network)

Scheduling is an action performed on an order line or a group of lines. The action performs the following:

  • Determines the source (warehouse) for the order line. If the warehouse is entered on the line, either manually or using defaulting rules, the scheduling action uses the requested warehouse and the other scheduling results are based on it. If the warehouse is blank, the scheduling action determines the best warehouse based on the sourcing rules. This functionality includes ATO models.
  • Determines the schedule ship date, the schedule arrival date, the delivery lead time and the shipping method.
  • Makes the line visible to the planning applications and consumes supply for the item. When a line is successfully scheduled the VISIBLE_DEMAND_FLAG is set to Yes.
  • If the reservation time fence is set and the schedule ship date is within the  reservation time fence, automatically reserves the line.
Scheduling Process
Sales order line would be scheduled for both the ATP as well non-ATP items based on the availability of the item. When scheduling is not performed during sales order entry (either manually or automatically), then as part of standard functionality, scheduling will be done by the workflow process.

Scheduling is done by the workflow process associated with the order line (OEOL). For example: Considering the Line Flow – Generic work flow Once the order is Booked, the work flow completes the Booking activity and proceed to the next stage i.e. Scheduling. This is when Scheduling is performed.
Open the process ‘Line Flow - Generic’ in the Workflow Builder. The ‘Line Flow - Generic’ process looks as below
  

Order will wait at “Wait for Booking” till booking action is performed. The work flow will progress to next stage.
- Double click on the 'Schedule - Line' sub process in 'Line Flow - Generic' process. Double clicking opens 'Schedule - Line' sub process which looks as below

Once the line is scheduled, SCHEDULE_SHIP_DATE is populated into the OE_ORDER_LINES_ALL.
The SCHEDULE_SHIP_DATE should be a value between the REQUEST_DATE and the LATEST_ACCEPTABLE_DATE.

Scheduling sets the VISIBLE_DEMAND_FLAG, SCHEDULE_STATUS_CODE as soon as the lines are scheduled. The two columns are independent and are not based on the setups
 
Scheduling by Ship or Arrival Date
The request date may be either the requested ship date or the requested arrival date depending on the request date type of the customer. If the customer's request dates are requested arrival dates, the scheduling action calls MRP's scheduling API with the requested arrival date. The API returns the first date on or after the requested arrival date that the items could arrive at the customer location, and enters that date into the scheduled arrival date field for the line(s). The schedule ship date is calculated by subtracting the delivery lead time (number of days for items to reach the customer once they ship) from the schedule arrival date. If the shipping network has not been defined for this combination of locations, the delivery lead time will be considered zero days and the schedule ship date and schedule arrival date will be the same.

If you enter a schedule ship date on the order line before performing the schedule action, the system will attempt to schedule on that date when the schedule action occurs. If it cannot, the schedule action fails.

You can define for each customer the delivery window in days that they will accept by entering the latest schedule limit on the customer window. When you enter an order line, the latest acceptable date is calculated by adding the latest schedule limit to the request date. When the scheduling action occurs, the schedule date will only be returned if it is between the requested date and the latest acceptable date. If it is not within this range, the scheduling action fails. For example, suppose that you have a customer who only accepts orders that ship within 5 days of the request date. You would enter 5 in the latest schedule limit fields on the Order Management tab of the customer window. When you enter an order line, if the request date is September 10, the latest acceptable date would be September 15. When the scheduling action occurs, if the schedule date returned is not in the date range of September 10 through September 15, the schedule request fails.

You can control whether OM schedules lines on hold by using the profile option OM: Schedule lines on Hold. If an order or line is on hold and this profile option is No, then the scheduling action fails.
 

Defining Item Types

The User Item Type item attribute is a QuickCode you use when you define an item. You can use the types provided by Oracle Inventory or create your own.

Setup Steps
1. Navigate to the Item Type QuickCodes window. The User access level is selected indicating you can add or modify  QuickCodes without restriction.

2. Enter a unique alphanumeric code describing the item type. You can define a maximum of 250 QuickCodes for a single QuickCode type.
You cannot change the values in this field after saving them. To remove an obsolete QuickCode you can either disable the code, enter an end date, or change the meaning and description to match a replacement code.

3. Enter the meaning of the item type. Inventory uses this value in the list of values for the User Item Type item attribute in the Items window.


System Parameters

Following options are available in new system parameter setup
1. Allow Multiple Payments
2. Item validation org - In OM we create orders in Operating unit level so in order to get the organization attriutes like Sales account and TAX code we use an item validation org.
3. Default Order Type

Show Discount Details On Invoice
This parameter determines whether the discount details are passed to Oracle Receivables for printing on an invoice. Default value is No. If you set this parameter to No, then Extended Amounts will includes discounts.

In Order Management, you have the option to send items and prices to Receivables net of any price adjustments or to send the list price and then send separate adjustment lines for each discount. This is controlled by the system parameter Show Discount Details on Invoice. If you choose to show discounts, they are sent as regular invoice lines to Receivables with a negative price, and are accounted for like the item to which they belong. The Description field for the discount lines is the name of the discount. This feature provides visibility to discounts for printing on invoices, but does not provide separate accounting for discounts.

Shipping set up

Here we 'll discuss all the required setups for shipping exceution.

Global Parameters

Global General parameters enable you to define miscellaneous parameters and unit of measure (UOM) defaults for all of your organizations.


1. Select the Enforce Ship Method check box to enforce that a ship method (carrier) is entered and recorded for each shipment. This is recommended if your business practices require a record of the ship method/carrier for each shipment.
Selected: During order processing, if a ship method has not been entered, then an error message is displayed at ship confirm and you are prevented from ship confirming until a ship method is entered. You can enter the ship method in the Confirm Delivery window, the Delivery tab of the Shipping Transactions form, or the Sales Order window.
Cleared: The ship method is not enforced at ship confirm and an error message is not displayed. For example, if your organization uses the same ship method (carrier) for all shipments, you may not want to enforce the selection of a ship method.

2.
  Allow Future Ship Date.
Selected: You can enter a future date as the Actual Departure Date while ship confirming the delivery
Cleared: you should not enter a future date as the Actual Departure Date while ship confirming the delivery because you receive an error

3. Select the Defer Interface check box if you want to defer shipping interfaces from initiating updates to the Oracle Order Management and Oracle Inventory interface tables.
Selected: You must manually run the interface to update the interface tables. For example, if you defer the Inventory Interface, the inventory tables are not updated until you manually run the Inventory Interface in the Shipping Interfaces window.
Cleared: The interfaces are run automatically at ship confirmation.

4. Select Consolidate Backordered Lines if you want to consolidate a line that was split and subsequently backordered. The line will be automatically consolidated with other backordered lines that it was part of originally.

5. Within the Global UOM Defaults region,
The Weight Class default controls:
  • Default weight UOM in deliveries, stops and containers for their respective weights
  • Default handling UOMs for facilities
  • Default weight UOM in Carrier/Carrier Services Rating/Mode Limits tab
The Volume Class default controls:
  • Default volume UOM in deliveries, stops and containers for their respective volumes
  • Default handling UOMs for facilities
  • Default volume UOM in Carrier/Carrier Services Rating/Mode Limits tab

Create Delivery

A delivery consists of set delivery lines that are scheduled to be shipped to a customer's ship-to location on a specific date and time. In a delivery, you can include items from different sales orders as well as back orders. You can either manually or automatically group delivery lines to create a delivery. If a delivery is autocreated, the delivery lines are grouped together by the mandatory default criteria, ship-from location and ship-to location. However, additional grouping criteria can be included.

1.1 In operating unit level we can control the auto create delivery in shipping parameter.

1.2. Deliveries can be automatically created during the process of pick release by enabling autocreate delivery in pick release form.

1.3. we can manually create the delivery number in shipping transaction form.

2.1 Delivery parameters enable you to define how to group delivery lines for a delivery. The mandatory default attributes are Ship From Location and Ship To Location; however, you can select additional optional grouping parameters that include:
  • Customer
  • Freight Terms
  • FOB Code
  • Intermediate Ship To location
  • Ship Method
The delivery attributes determine how delivery lines are grouped into deliveries when auto-creating deliveries. For example, if the grouping attribute Customer is selected, the delivery lines are grouped into deliveries by customer: for example, deliveries for Customer A are grouped into Delivery A, deliveries for Customer B are grouped into Delivery B.

You can select more than one grouping attribute to refine your grouping criteria further: for example, if you select Customer and Ship Method as grouping criteria, delivery lines with the same customer and carrier criteria are grouped into deliveries.
If each optional grouping attribute is checked, the delivery's corresponding field cannot be updated if delivery lines are assigned to the delivery. This ensures that the delivery lines' grouping criteria is not broken by a different attribute value: for example, if someone tries to select a different ship method.

If each optional grouping attribute is unchecked, its field in the delivery record can be updated until the ship confirm stage.
For example, if you want to change the Ship Method in the delivery and do not need to enforce it as a grouping attribute, you can unselect Ship Method. Do not change these options if you have deliveries that are not ship confirmed.

Optionally, select a Autocreate Delivery Criteria if you enabled the Autocreate Delivery option on the Pick Release tab.
  • Select Within An Order to autocreate deliveries whose lines all belong to the same sales order and match on the Delivery Grouping Attributes.
  • Select Across Orders to autocreate deliveries across orders. All selected delivery lines that match on the Delivery Grouping Attributes are eligible to appear on one delivery.
Select an Appending Limit.
The Appending Limit enables you to indicate the point at which you want to stop the system from adding lines to a delivery (the point that ends the ability to merge deliveries). You must set the Appending Limit to a value other than Do Not Append in order to use the Append Deliveries option within Release Rules and the Process Deliveries SRS.

The Appending Limits include:
  • Do Not Append
  • Start of Staging
  • End of Staging
  • Start of Packing (Oracle WMS enabled organizations only)
  • Start of Shipping (Oracle WMS enabled organizations only)
     

Setup Step: 17 - Price List

The pricing engine requires that all items, services, models, option class and options should be selected and displayed on price list.

Fields such as payment terms, freight terms and freight carrier are available on the price list form. By defining the OM defaulting rules to use these fields from the price list window, you are able to default values directly into the SO based upon which price list has been selected for the order.


Price List Currency
For international sales, you can record transactions in different currencies by defining a price list for each currency. After entering the currency for an order or return, you must choose a price list in the same currency.
 
Multi-Currency Conversion Lists
For pricing in different currencies, multi-currency conversion lists enable you to maintain a single price list for multiple currencies. However, this is an Oracle Advanced Pricing feature which is available only if Oracle Advanced Pricing is
fully installed and multi-currency lists are enabled.

Round To Factor
You can define the number of places to the right or left of the decimal point to which the pricing engine rounds prices from price lists and modifiers from modifier lists. If you enter a negative number, you increase the number of characters to the
Note: The pricing engine does select inactive price lists when doing a pricing request. Other applications can call an inactive price list and use relevant information.

right of the decimal point. If you enter a positive number, you affect more columns to the left of the decimal point. If you enter zero, rounding occurs to whole decimals. Rounding factor -3 indicates rounding to the nearest thousands (for example,.1007 rounds to .101). Rounding factor of +2 indicates rounding to the nearest hundred; for example 107 rounds to 100).

Secondary Price List
The pricing engine uses secondary price lists when it cannot determine the price for an item using the price list assigned to an order. Primary and secondary price lists have the same currency.

  1. You can assign the same secondary price list to multiple price lists but you can not assign a secondary price list to a secondary price list.
  2. If the item that you are ordering is not in the primary price list, the pricing engine uses the highest-precedence secondary price list (the secondary price list with the lowest value for the precedence field).
  3. Line-level discounts and modifiers that apply to the primary price list do not apply to the secondary price list.
  4. If an item appears on both the primary and a secondary price list with the same effective dates, the pricing engine uses the primary price list to price the item.
  5. If an item appears on the primary price list but is not active (the effective end date has passed), the pricing engine uses the price on the secondary price list.
Enter the price list line details as given below
1.  Product context is always item.
2.  Depending on the value of Product Attribute, select an item number or an item category for the Product Value.
3.  Select a UOM (unit of measure).
Select Primary UOM if this price list line UOM is the primary pricing unit of measure for the item. Oracle Pricing uses the primary pricing unit of measure and the Oracle Inventory unit of measure conversion information to price an order whose unit of measure does not have a price list line.
Select an Application Method. Use Unit Price for inventory items and either the Unit Price or Percent Price for service items
4. Enter Value and Formula as follows:
■ For inventory items, enter the base list price of the item in Value.
■ For service items, enter a value in the Value field. If Application Method is Unit Price, enter the base list price of the item. If Application Method is Percent Price, enter a percent of another item's price.
■ Enter the name of a previously defined static formula in Static Formula.
If you enter a static formula, you must submit the concurrent program Update Formula Price’s to calculate the value. The result of the calculation changes the value of Value.
5. Enter the starting and ending effectivity dates of this price list line in Start Date and End Date.
The dates should be within the start and end effectivity dates of the price list.
6. Enter a numeric value in Precedence; this is the product precedence. When the pricing engine is trying to locate a price, it uses precedence to resolve conflicts when it selects more than one price list line from a price list.
7. Save your work

Copying a Price List

You can quickly create a new price list by copying an existing price list. Only active price list lines (those with an effective end date later than the current date) can be copied.

Adjusting a Price List
Use this process to adjust the prices for a price list. You can adjust prices for the entire price list or selected items, item category sets, and item categories. You can define your criteria further by selecting the item status or creation date of the items to adjust.
For example, you can specify a category so that only the price list lines for the selected category are adjusted. If you leave any of the fields blank, pricing adjusts the price list regardless of that field. You can adjust the price by either an amount or percent:
■ Percent: Enter a value to adjust list prices by a certain percentage. For example, when adjusting by a percentage, entering 10 raises list prices by 10 percent while -10 lowers list prices by 10 percent.
■ Amount: Enter a value to adjust list prices by a fixed amount. For example, when adjusting by an amount, entering 5 increases list prices by five whole units of currency. Entering -5 decreases list prices by five whole units of currency.

Price List

The pricing engine requires that all items, services, models, option class and options should be selected and displayed on price list.

Fields such as payment terms, freight terms and freight carrier are available on the price list form. By defining the OM defaulting rules to use these fields from the price list window, you are able to default values directly into the SO based upon which price list has been selected for the order.


Price List Currency
For international sales, you can record transactions in different currencies by defining a price list for each currency. After entering the currency for an order or return, you must choose a price list in the same currency.
 
Multi-Currency Conversion Lists
For pricing in different currencies, multi-currency conversion lists enable you to maintain a single price list for multiple currencies. However, this is an Oracle Advanced Pricing feature which is available only if Oracle Advanced Pricing is
fully installed and multi-currency lists are enabled.

Round To Factor
You can define the number of places to the right or left of the decimal point to which the pricing engine rounds prices from price lists and modifiers from modifier lists. If you enter a negative number, you increase the number of characters to the
Note: The pricing engine does select inactive price lists when doing a pricing request. Other applications can call an inactive price list and use relevant information.

right of the decimal point. If you enter a positive number, you affect more columns to the left of the decimal point. If you enter zero, rounding occurs to whole decimals. Rounding factor -3 indicates rounding to the nearest thousands (for example,.1007 rounds to .101). Rounding factor of +2 indicates rounding to the nearest hundred; for example 107 rounds to 100).

Secondary Price List
The pricing engine uses secondary price lists when it cannot determine the price for an item using the price list assigned to an order. Primary and secondary price lists have the same currency.

  1. You can assign the same secondary price list to multiple price lists but you can not assign a secondary price list to a secondary price list.
  2. If the item that you are ordering is not in the primary price list, the pricing engine uses the highest-precedence secondary price list (the secondary price list with the lowest value for the precedence field).
  3. Line-level discounts and modifiers that apply to the primary price list do not apply to the secondary price list.
  4. If an item appears on both the primary and a secondary price list with the same effective dates, the pricing engine uses the primary price list to price the item.
  5. If an item appears on the primary price list but is not active (the effective end date has passed), the pricing engine uses the price on the secondary price list.
Enter the price list line details as given below
1.  Product context is always item.
2.  Depending on the value of Product Attribute, select an item number or an item category for the Product Value.
3.  Select a UOM (unit of measure).
Select Primary UOM if this price list line UOM is the primary pricing unit of measure for the item. Oracle Pricing uses the primary pricing unit of measure and the Oracle Inventory unit of measure conversion information to price an order whose unit of measure does not have a price list line.
Select an Application Method. Use Unit Price for inventory items and either the Unit Price or Percent Price for service items
4. Enter Value and Formula as follows:
■ For inventory items, enter the base list price of the item in Value.
■ For service items, enter a value in the Value field. If Application Method is Unit Price, enter the base list price of the item. If Application Method is Percent Price, enter a percent of another item's price.
■ Enter the name of a previously defined static formula in Static Formula.
If you enter a static formula, you must submit the concurrent program Update Formula Price’s to calculate the value. The result of the calculation changes the value of Value.
5. Enter the starting and ending effectivity dates of this price list line in Start Date and End Date.
The dates should be within the start and end effectivity dates of the price list.
6. Enter a numeric value in Precedence; this is the product precedence. When the pricing engine is trying to locate a price, it uses precedence to resolve conflicts when it selects more than one price list line from a price list.
7. Save your work

Copying a Price List

You can quickly create a new price list by copying an existing price list. Only active price list lines (those with an effective end date later than the current date) can be copied.

Adjusting a Price List
Use this process to adjust the prices for a price list. You can adjust prices for the entire price list or selected items, item category sets, and item categories. You can define your criteria further by selecting the item status or creation date of the items to adjust.
For example, you can specify a category so that only the price list lines for the selected category are adjusted. If you leave any of the fields blank, pricing adjusts the price list regardless of that field. You can adjust the price by either an amount or percent:
■ Percent: Enter a value to adjust list prices by a certain percentage. For example, when adjusting by a percentage, entering 10 raises list prices by 10 percent while -10 lowers list prices by 10 percent.
■ Amount: Enter a value to adjust list prices by a fixed amount. For example, when adjusting by an amount, entering 5 increases list prices by five whole units of currency. Entering -5 decreases list prices by five whole units of currency.

Pricing Agreements

Oracle Order Management enables you to establish agreements with your customers that let you define the prices, payment terms and freight terms that you negotiated in the agreement.

When pricing, the pricing engine ignores qualifiers attached to a price list associated with an agreement if the agreement is chosen at the time of order entry. The pricing engine, will however, still check for product and pricing attributes in the price list associated with the agreement.

Agreement


1. In the Agreement tab, enter an Agreement Name. Use a naming convention that is consistent and meaningful.  Consider using separate naming conventions for Standard Agreements versus Pricing Agreements.

2. Enter an Agreement Number. A consistent, meaningful naming convention should be considered and business practices established. This field is optional.
Enter a Revision number. The Revision number defaults to 1 at setup time. Additional versions of the same agreement can be maintained by updating the revision number for each new revision.

3. If you want this Agreement to be used only for a particular customer and their related customers, enter the customer name in Customer. The customer number displays in Cust Number.
Alternatively, you can enter the Customer number in Cust Number field and the customer's name will default to Customer field.
If you want this agreement to be available for any customer, leave the Customer and Cust Number fields blank.

4. Select an Agreement Type to classify agreements by type for reporting or control purposes.

Pricing
Select an Agreement price list type from the Price List Type field. Once a Pricing Agreement has been saved, you cannot update or change the value for Price List Type. Select from:


Pricing Agreements using Standard Price List
  • Agreements using Standard Price List cannot have any agreement lines
  • Price list and price list lines can only be viewed and maintained through the Price List Setup window
  • A Standard Price List can be used with any number of Standard Agreements or to price orders which are not associated with a specific agreement
  • You cannot create revisions for price list lines
  • The Agreement Number is not automatically created as a qualifier for the associated price list

Pricing Agreements using Agreement Price List
  • Pricing Agreements must have at least one agreement line
  • Pricing Agreements can only be viewed and maintained through the Pricing Agreement Setup window
  • Pricing Agreements must be associated with an Agreement price list
  • An Agreement Price List can be used with any number of pricing agreements but cannot be used to price an order which is not associated with a pricing agreement
  • Revisions can be created on pricing agreement lines through the Pricing Agreement Setup window
  • Price list will always have the Agreement Number as a qualifier (and hence can only be used when the pricing agreement is specified on the Order Line)
Note: If you select Standard Price List, the price list must be an existing price list, and additional fields within this window will default from the standard price list selected. You can update the defaulted fields in the Agreements window, and the values will be used as defaulting sources for any orders using these agreements.
Note: If you select Agreement Price List, you can create or make changes to price list lines, and you can enter values for:
  1. Description
  2. Currency
  3. Rounding Factor
  4. Freight Carrier
  5. Freight Terms
  6. Comments
Payment
1. Select the Payment Terms.
2. Enter the Bill To name in Invoice To.
3. Enter the Bill To Address.
4. Enter the Bill To contact in Invoice Contact.
5. In the Rules region, enter a default Accounting Rule.
6. Enter an Invoicing rule.

Agreement Price List
If you have selected price list type as "Agreement Price List" in pricing tab then in the line level you can add item to the price list:

1. Enter a Customer Item number. Customer item is a pricing attribute.
When you enter a customer item, pricing creates one pricing attribute and one product attribute for the agreement line for the customer item and its corresponding internal inventory item.
2. Enter a customer Address and Address Category.
3. Enter an inventory item number in Product Value.
Note: You cannot enter an item category in Product Value. If you entered a customer item which is associated with more that one inventory item, you must select the correct inventory item for the agreement line.
4. Enter a UOM (unit of measure).
5. Select Unit Price for the Application Method.
6. Enter base price in Value.
7. Enter the effective Start/End Dates.
8. Select Price List Line in Line Type.
9. Select Primary UOM if this price list line unit of measure is the primary pricing unit of measure for the item.
Order Management uses the primary pricing unit of measure and the Oracle Inventory unit of measure conversion information to price an order whose unit of measure does not have a price list line.
For example, a price list has two price list lines for item A11111, one with unit of measure EA—the primary UOM—and one for boxes. When the pricing engine receives an order in unit of measure CS, it accesses the unit of measure conversion tables to convert CS to EA.
10. Select a Line Type:
• Price List Line
• Price Break Header: This option enables you to set up a price breaks, and is only available if Agreement Price List has been selected as the Price List Type.
11. Select Unit Price as the Application Method..
12. Enter the base price in Value.
13. Enter the effective Start and End Dates.
Defining Price Breaks for an Agreement Price List

You can create price breaks or "bracket pricing" for Agreement price lists to define prices that vary depending on the quantity ordered. For example, if a customer buys 10 items the price is $20 per item, but if the customer buys more, then they get a lower per unit price.
Note: If you define a price break for an item category, all the items within the category are eligible for the price break.


In Basic Pricing, you can use Point Break as the Price Break Type. This calculates the price based on the price break bracket in which the total quantity falls.
For example, if you ordered 14 units of Item A11111, the total quantity falls into the Price Break 2 bracket where the unit price is $19. So the price for all units is the price defined for Price Break 2. The total price is calculated as follows:
Total price = 14 * $19 each = $266

To define price breaks:
1. Complete the Agreement header information as outlined in the preceding section.
Note: You can create price breaks only for Agreement price lists using the Pricing Agreements window. You cannot create price breaks in the Price List window.
2. In the Pricing tab of the agreement, ensure the Price List Type is Agreement Price List. You can only set up price breaks for an Agreement Price List.
3. For the agreement line, complete the values (where required) for Customer Item, Address, Address Category, Product Value, Product Description, and UOM, Primary UOM, the Line Type.
4. Select Price Break Header as the Line Type.
The Price Break Type is Point which means the pricing engine charges each unit of volume at the price of the break within which the total falls.
5. Select Unit Price as the Application Method.
6. Enter the Break UOM.
7. Enter the effective Start and End Dates.

Revising an Existing Agreement

To make minor changes to an existing agreement such as changing the payment terms, you can simply update the existing agreement and save your changes.
However, if significant changes are required and you want to track versions of your changes, you can create a new revision. When a revision is created, a new version of the original agreement is created. This is useful for tracking and managing multiple
versions of the same agreement. You must determine when changes warrant a new agreement version, and then you can
manually create a new revision with a new revision number. It is helpful to use a logical numbering sequence such as 1, 2, and 3 to number your revisions. Once the new agreement revision is created, you can update the agreement header information.

Note: You must end the current revision before creating a new revision. An agreement can have multiple revisions but the effective dates cannot overlap. Only one revision can be effective for a given range of effective dates.


Pricing Formula

Formulas are mathematical expressions that the pricing engine uses to determine the list prices of items and the discounts that apply to those items. You can use them to:

  • Create a price from a computation as an alternative to entering prices in a price list.
  • Calculate a price adjustment. For example, you can instruct the pricing engine to calculate a discount by attaching a formula to a discount line.
You can set up and maintain formulas based on one or more of the following formula component types:

List price: The price of the item in a specific price list to which you have attached a formula. List Price and Price List Line are supported Formula types for Advanced Pricing.

Price list line: The price of the item in a specific line number of a specific price list.

Pricing attribute: The absolute value of a pricing attribute (such as thickness or height) of an item. Pricing attributes are characteristics of products and services that you can use to determine the price of a product or service. Distance, age of a related product, customer class, product family group, and level of service are examples of pricing attributes. You can specify one or more pricing attributes and assign them to a product or service. At order entry time, the pricing engine evaluates the attributes you have specified during formula setup to calculate the price.
You can define as many attributes as you need to meet your pricing business needs. For example, you may use the formula 1*2 to calculate the price of a glass item. Step 1 is a pricing attribute for thickness and step 2 is the list price to calculate the price of a glass item; if 100 is the base price of the glass item and 0.3 is the value of the thickness attribute of the glass then the pricing engine evaluates the formula as 0.3*100 which is 30.

Numeric constant: A numeric value.

Factor List: You can also relate multiple factor conditions. For example, if the base pricing attribute for glass thickness is between 0.1 and 0.3 mm AND the length of the glass is between 0.5 and 2 m, apply the factor of 3 OR if the base pricing attribute for glass thickness is between 0.4 and 0.8 mm AND the length of the glass is between 0.5 and 2 m, apply the factor of 5.

Creating a Pricing Formula
You can set up and update formulas and formula lines in the Pricing Formulas window. A formula is a valid mathematical expression used to determine the list prices of items and the discounts applied to those items. The formula lines provide details about each part of the formula.
Note: The concurrent program Build Formula Package should be run after setting up or changing a formula to improve performance. This program can be accessed from the Tools menu within the Formulas  Setup window.
The formula can contain any of the following:
• Parentheses: ()
• Mathematical operators: +, -, /, and *
• Built-in functions: NVL, SQRT, and MOD

• Operands: Operands are step numbers about which you provide more detail. You can use as many step numbers as you need, up to the limit of the field. You can repeat a step number in a formula, for example, 1+2*2..
Note: An operand is not a numeric constant. To use a numeric constant in a formula, you can:
• Create a step number in the formula expression.
• Assign the numeric constant to the step number in a formula line.

For example, the valid formula (1+2*SQRT(3)) / 4 contains:
• 1, 2, 3, and 4 as operands
• +, *, and / as mathematical operators
• SQRT as a built-in function
• Parentheses to group the operands and operators
For each step number, create a formula line. In the previous formula example, four formula lines are created since the formula has four step numbers. When Oracle Pricing calculates a formula, it does not use the face value of the step
number. It refers to the formula line and evaluates it to obtain the value of the operand.

Attach Items to the pricing formula
Link your formula to a price list by putting the formula name in the static formula field on the list line that has the item numbers that are to get their prices derived from the formula (don't enter a price, let the processing program calculate the price value)


You must run the update formula prices after entering your formula name in the static formula field on the price list. This concurrent request will use your formula to calculate the price that will populate the list line's value field. Link a formula to a freight and special charge modifier. With basic pricing you are restricted to three formula types, Numeric Constant, Pricing Attribute and Factor list. Basic Pricing uses the seeded pricing context which has up to 100 pricing attributes.


Usage of price formula

Requirement : To make price as (price of one item in price list + least price of the item for which price is being caluclated) * 10

Step 1
Define the formula as shown below to satisfy the above requirement.


Step 2
Attach the newly created formula to the item in the price list.

Fulfillment Activity

The fulfillment activity acts as a synchronization point for all lines on the order that are in a fulfillment set. The lines in the fulfillment set will wait at the fulfillment activity until all the lines in the set have reached the activity. Lines that are not in a fulfillment set simply pass through the activity.

Once the Fulfillment activity completes, a Background Workflow Process processes the order line(s) to the Invoice Interface activity. The invoice interface activity places the information from the sales order line into the Receivables Interface tables. When the information is written to the tables, the invoice interface activity is complete, and the line proceeds to the close line activity. However, note that the invoice is not actually generated until the Autoinvoice program in Receivables has been run. The invoice will then be viewable in the Sales Order window.

Overview
To fulfill an order line in Oracle Order Management means to satisfy the requirements for completion. Order Management provides the functionality required to recognize fulfillment of an order line, and to cause some order lines to wait until other related order lines have been fulfilled before processing can continue.
Order Management's fulfillment functionality provides a simple way to synchronize line workflows for multiple order lines. It allows you to prevent invoicing of lines within a fulfillment set until all lines are ready for invoicing. Seeded workflow
processes and activities can be used to provide baseline functionality for sales order, drop ship and return lines. The functionality is also designed to allow you the flexibility to define other activities as fulfillment methods so that you can model your unique business processes.

Order Management allows you to group lines into a fulfillment set and to establish a gate activity in your workflow process. Lines in a fulfillment set will wait until all lines in the set have been fulfilled to proceed through the gate. This gate is known as the fulfillment activity. The fulfillment feature is primarily designed to allow the grouping of related lines and to keep any lines in the group from being invoiced until all lines have been fulfilled. You may find additional uses for the fulfillment functionality in your business.

How It Works
The fulfillment activity is a seeded workflow activity named FULFILL. This activity is the synchronization point between the lines of a fulfillment set. There are two activities which are considered fulfillment method activities (workflow attribute) in seeded Order Management workflows.
• For a standard shippable line the fulfillment method activity is the shipping activity.
• For a return line the fulfillment method activity is the receiving activity.

You may define any activity as the fulfillment method activity in a workflow process.
The fulfillment activity must be between the fulfillment method activity and the invoice interface activity in the respective workflows. When a line workflow reaches the fulfillment activity, the activity checks to see if the fulfillment method activity (for example, shipping or receiving) completed successfully.
If the line completed successfully, the fulfilled quantity for the order line will be updated with the shipped or received quantity, and the order line fulfilled Order Management Processes 5-5 flag is set to Yes. The fulfillment process then performs a check to verify if the line is part of a fulfillment set:
• If the line is not part of a fulfillment set, then the order line completes the Fulfillment activity and continues with the next activity within its order line workflow process.
• If the line is part of a fulfillment set, the fulfillment process performs an additional check to verify if remaining lines within the set have been fulfilled:

If any lines within the set are not fulfilled, the order line will wait at the fulfillment activity.
If all lines within the set are fulfilled, the order line completes the fulfillment activity for all the lines within the fulfillment set.

 
Setup
No setup is required to use the fulfillment functionality with the seeded workflows. If you create your own workflows, include the fulfillment activity before invoicing in each process. This will provide two benefits: Update the fulfilled quantity for the lines and enable you to use fulfillment sets.

Special Orders

Following are some special kind of sales orders used in business and needs special attention

Return Materials Authorization

Oracle Order Management provides Return Materials Authorization (RMA) functionality within the Sales Orders window, where you can enter both standard and return order lines within the same order.

An order can have a mix of outbound (standard) and inbound (return) lines, as restricted by the order type definition. 
A return line is indicated by Line Type Category of return negative and highlighted item quantity and negative line total.


Return Line types can include flows like


Creating RMAs
There are three ways to create RMA's within Order Management.
  • First, identify a sales order to be returned and query the order lines. After you have selected the sales order or order lines, use the Copy function in the Actions list to generate the return order or line by specifying an RMA line type.
  • Second, reference a sales order, invoice, PO number or serial number of an item directly in the Return Reference field within the Line Items tab of the Sales Orders window.
  • Lastly, for return without originating sales order line, manually enter return line information and choose the appropriate return line type in the Sales Orders window.
Workflow
Order Management comes with seeded Oracle Workflow processes. Review the seeded flows, activities and notifications to determine if the seeded data can meet your business needs. To successfully enter an RMA in OM, you can use the Generic - Order Flow Return with Approval and Line Flow - Return for Credit only.
With services, OM will use only the seeded "Return for Credit Only" workflow for returning service items when product items are returned

Transaction Types
Both order and line transaction types need to be setup in order to process an RMA.Credit order types have an order type category Return. An order with a Mixed order type category can contain both standard and return lines. Line level workflow processes are assigned based on the order type, line type, and item type combination. When you setup a return order type or mixed order type, you have the option to set a default return line type, so that the user doesn't have to manually choose the line type unless they want it to be different.

Master Items
You can create a return line only if an item is Returnable. Therefore, a standard, finished good item should be defined in Oracle Inventory with appropriately set attributes. The best way to create your items is to copy them from the Finished Good seeded template and set additional attributes as needed in the Master Item window

Return Reason Codes
You can set up your own reason codes in the Receivables QuickCodes window. Navigate to the Order Management responsibility and select the menu: Setup > Quickcodes > Receivables. The Oracle Receivables Lookup window will appear. Query the CREDIT_MEMO_REASON code from the query manager (Flashlight icon). View the existing codes or add a new code. These codes appear in the Return Reason list of values.

 
Freight and Special Charges for Returns
When setting up freight or special charges, you can specify if the charge is returnable, meaning the charge may be refunded. When you create a return line from an original order line, you should copy the refundable invoiced charges. You can also setup special charges to be applied specifically to returns, like restocking fees, return handling, damage etc. You can set this through an attribute called Refundable Flag (Include on Returns field) within the Pricing Modifier setup

Process Flow

There are two ways in which to create an RMA in Oracle:

  • Create a New Return which will create the RMA from scratch.
  • Copy an original order into an order with an RMA Order Type.
Normal business is delivered with four different RMA Order Types, each with a different Order Cycle:

RMA with Credit is used when the customer is going to be returning a physical product and will also be receiving a credit in Accounts Receivable as a result of the return.
These types of returns are for:
  • Defective Product
  • Customer does not like the product
  • Product does not meet the customer’s expectations

RMA no Credit is used when the customer is receiving authorization to return the product but will not be receiving a credit as a result of the return.
  • These returns would be for:
  • Evaluation Orders
  • Samples
  • Other orders where the customer was not originally charged for the product.

RMA Credit Only is used when the customer will be receiving a credit, but the physical return of the product is not required.
  • These credits are generally used by software companies when the customer destroys the CD or disk and erases the software from their machine, but no physical thing to return.

RMA with Credit and Approval is used in the same manner as an RMA with Credit but this order cycle includes an approval process that requires someone to approve the RMA before it is booked. In order for an order/return or order/return line approval workflow to work correctly the profile option OM: Notification Approver must have a value.


This section will guide you through a basic flow for a Return for Credit with Receipt, from entry to generating a credit memo, including:

1. Create an RMA having a single line whose originating transaction is unknown
while entering an RMA in the Returns tab, the user will need to enter the Line Type as a return (i.e. Return for Credit with Receipt of Goods) and enter a Return Reason. A Return Reason is required to be entered (i.e. Product Discontinued). Since we did not reference a sales order, we are entering a single line RMA where the originating transaction is unknown.
If you receive the returns partially, and if the Calculate Price Flag is set to Y (Calculate Price) or P (Partial Price), then freight charges get applied automatically on the partially received lines. However if the Calculate Price Flag is set to N, then
the freight charges do not get applied on the partially received lines.

2. Book the RMA

3. Receive the RMA using the Receipts window of Oracle Purchasing
4. Check the on-hand quantity of the item in Inventory to verify that correct quantity was received

5. Fulfill RMA line

The fulfillment activity acts as a synchronization point for all lines on the order that are in a fulfillment set. The lines in the fulfillment set will wait at the fulfillment activity until all the lines in the set have reached the activity. Lines that are not in a fulfillment set simply pass through the activity automatically. The user will not have to perform anything during this step. The eligible lines will automatically be put into a fulfillment set.

6. Generate a Credit Memo
The Workflow process of the return line(s) will be on the Invoice Interface activity, once the Fulfillment activity completes. The invoice interface activity places the information from the return line into the Receivables Interface tables. Once the information is written to the tables, the invoice interface activity is complete, and the line proceeds to the close line activity.
However, note that the credit memo is not actually generated until the Autoinvoice program in Receivables has been run. The credit memo will then be viewable in the Sales Orders window.

To run the Autoinvoice program, the user needs to change responsibilities to Receivables and navigate to the Interfaces window. Select the Autoinvoice Master program and run the program for your RMA # and specify the invoice source as the one associated with the line type of the RMA line. The Autoinvoice Master program will generate the Autoinvoice Import program which 5-50 Oracle Order Management Implementation Manual generates the credit memo. These programs can be setup to run automatically in the background. Just set the programs as 'Deferred.'


7. View the Credit Memo in Order Management
View the credit memo in Order Management. To view the credit memo in Order Management, the user need to change responsibilities to Order Management > Orders, Returns > Order Organizer window. Query your RMA # in the Order
Organizer. Once the RMA is queried, open the RMA order, click Actions and choose Additional Order Information. Once the Additional Order Information window has opened, click on the Receivables tab to view the credit memo. This window will show your the credit memo number and amount.


8. Check the Shipped and Fulfilled quantity on the RMA line
From the above step, navigate in the Sales Orders window to the Line Items tab for the RMA. Scroll to view the Shipped Quantity field. To access the Fulfilled Quantity field, the user needs to use the folder technology to add the field to the sales orders window. To add the field, click on the Warehouse field in the Shipping Tab of the Line Items window. Next, select the Folder menu at the top of the window, select Show Field and choose the Quantity Fulfilled field from the list. The field will populate in the window. The Shipped Quantity means the received quantity for return lines and the Fulfilled Quantity means the delivered quantity for the return lines.

Blanket Sales Agreements

Blanket Sales Agreements are used when you have specific characteristics releated to a purchasing agreement between a customer and a supplier. These characteristics include the date range of the agreement, the items included, the price of the items, the quantity of each item that the parties committed to, as well as other attributes, like freight or payment terms.

Once a Blanket Sales Agreement is entered for a customer, multiple releases (shipments) against the Blanket Sales Agreement are processed over a period of time within Order Management. The order is fulfilled and billed according to the terms of the Blanket Sales Agreement. Tracking information will also be accumulated for Blanket Sales Agreements, such as, Blanket Sales Agreements quantity fulfilled, and dollar value fulfilled of released lines. This information is used to view status of orders executed against a Blanket Sales Agreement.

Credit Management

The ultimate goal of Credit Management processes is to minimize the financial risk that your organization assumes as a result of day-to-day operations.
1. Credit functionality checks the credit and applies or removes the hold automatically based on exposure availability. This credit limit is set at Bill To level.

2.
 Credit check functionality can work at any of the following stages –

  • Order Entry
  • Picking
  • Packing
  • Shipping
3. Order Management’s credit checking feature is the process by which orders are validated and released against your credit checking business rules. Using credit rules(credit check rule and credit usage rule), credit profiles and system parameters Order Management credit checking verifies that your customer has a sufficient credit availability with your organization to allow orders to be processed and shipped in advance of payment.

4. Business can give proper approvals to users and responsibilities to remove credit check holds manually.
Please note credit check functionality for automatic applying and releasing hold will not work in case the hold is removed manually. 
Order Management enables you to perform credit checks on customer orders or order lines, and automatically hold orders or lines that violate your credit setup.

Credit Checking Components
Depending upon your business practices, you may not want to perform credit check for all orders, but rather only those orders that could pose a credit risk. Orders that could be exempted from credit check can be:
1. Orders of a given type. For example, you may want to exclude staff sales or internal sales orders from credit checks. Credit checking rules are assigned to order types. While setting up order types, if the credit check rule fields are left blank, this would automatically exclude orders of that type from credit check.

2. Orders for a given customer. For example, a manufacturer may wish to exclude all orders from its largest customer from credit check. With Order Management and Oracle Receivables, excluding a specific customer from a credit check can
be achieved by disabling the Credit Check flag for this customer in the individual customer profile.
Orders for a given class of customer. For example, a manufacturer may wish to exclude all orders from internal customers from credit check. You can group all your internal customers into one Customer Profile Class, and then set up credit
checking rules to exclude that profile class of customer. With Order Management and Oracle Receivables, while setting up a customer profile class, you can disable the Credit Check flag. Customers that have this customer profile class assigned to them would then be excluded from credit check.
Orders for a given customer billing address. For example, a manufacturer may wish to exclude orders that will be invoiced to one of its’ largest customer corporate headquarters from the credit check process. With Order Management and Oracle Receivables, the individual bill-to sites can have a different transaction profile from the parent customer. While setting up the bill-to site profile, enabling the Credit Check flag determines whether orders billed to that address will be credit checked.

3. Order lines with a given payment term
. For example, order lines with a cash on delivery payment term can be excluded from the credit checking process. With Order Management and Oracle Receivables, the payment terms also have a Credit Check flag. Disabling this flag will automatically exclude order lines with that payment term from the credit evaluation. Only those lines that have Manual payment terms with credit checking turned on are compared against the credit limits.
Order lines that are paid via Commitments. These lines are in effect prepaid, so you do not need to credit check them.
Orders with payment type = Credit Card. These orders will have credit card authorization in place of credit checking.


The Credit Check process can be performed for orders or order lines, and the determination on whether credit checking is performed is based upon all of the following:
  • The credit check rule definition and the order type of which the definition is attached
  • Enabled credit profiles - customer
  • Order or line payment terms
Credit Checking will only occur for an order or line when all three levels enable credit checking. If one level disregards credit checking, credit checking does not  occur for the order or line.

Credit Exposure
When you perform credit checking in Order Management, you determine what type of exposure to use when determining credit worthiness. Order Management enables you to perform credit checking against real time transactional data or
current exposure amounts stored in exposure summary tables.
■ Real time transactional data is all related transactions which are summarized at the point credit checking is invoked.
■ Current (pre-calculated) exposure amounts can be either:
  • Real time transactional data summarized at a specific point in time or
  •  Exposure amounts imported using the Credit Exposure Import concurrent program.
When defining your Credit Check rules, you specify the type of exposure to utilize when performing credit checking.
Deactivating Credit Checking
There are three ways to deactivate Credit Checking on an order:
  • Use an order type that does not have an assigned credit rule.
  • Define the Customer Profile so that the Credit Check check box is not checked.
  • Use payment terms for which the Credit Check check box is not checked.
Deactivating Credit Checking does not automatically release orders previously on credit hold. However, the next time you attempt to Book, Pick Release or Purchase Release (for drop shipments), Pack, or Ship Confirm an order which utilizes a Order Management Transaction type that enables credit checking to occur at the specified order points, or you perform an order change that trigger credit checking in the Sales Orders window, Order Management will releases the credit check hold if the order or line meets the requirements for successful credit check

Defining Release Rules

You can create default pick release rules that are applied at pick release in the Release Sales Orders window. Each rule can be set up with its own set of unique pick release parameters depending on the pick release criteria required.
When pick release is run, the pick release is performed based on the parameters set up in the selected pick release rule. For example, you can create a specific rule that pick releases only backordered lines.

Note: Although you can also enter the pick release criteria at pick release time without creating a rule, creating a rule is more efficient if you frequently run the same pick release. Also, note that it is required when releasing using SRS or when using the Auto Pick Pack and Ship features.

Usage of price agreement

Price agreement can be used while entering a SO and in that case price list, payment terms, fright terms

Order Line

 You can enter, view, and update sales orders using the Sales Orders window. You can also enter returns using the Sales Orders window. You can order standard items, both shippable and non-shippable, and configurations using this window. You can also adjust pricing, assign sales credits, record payment information, attach notes, schedule shipments, query item availability, and make reservations, including selection of subinventories.

You can enter information in the Sales Orders window as you receive it. Order Management validates individual fields as they are entered. When you book an order, Order Management validates to ensure that all required fields have values, that
configurations are complete, and so on. After an order has been booked, it becomes eligible for the next step in its workflow.

For orders that you intend to source externally (drop shipments), you can use all aspects of standard sales order functionality. The source type at order entry determines whether an order will be fulfilled from inventory or by an external supplie

Sales Order Line Items Main Tab


1. Line Number and Ordered Item are on the fixed region within the Sales Order Line Main tab, and these fields cannot be hidden using Oracle Folder functionality. If you cursor is positioned on either of these two fields and you attempt to perform any Folder operation (such as Show Field) you will receive a error message informing you that no additional fields are available for display

Line number field automatically defaults to 1.1 if this is the first line entered on the order.
This field is for display purposes and cannot be updated.
Order Lines Numbers are displayed in the Sales Order window as a line quintuplet:
Line Number, Shipment Number, Option Number, Component Number, Service Number. For example, if order line number appears as 1.1.2.3.1:
Line Number -1
Shipment Number -1
Option Number - 2
Component Number -3
Service Number-1
Note: You may choose to display additional fields within the Sales Order Header Main window by enabling the fields for display within a custom folder. For example, you can choose to display the Line number & shipment number fields.

2. Select the item for this order line. The List of Values for this field is controlled by the value of the hidden field, Item Identifier Type. Select or enter a value for either:

  • Ordered Item (the item number); item description displays.
  • Item Description and Type; Ordered Item displays : You can search for item descriptions by entering the search criteria into the field and tabbing out of the field to start the search. The search is not sensitive to case.
You can search on different types of item descriptions. To search:
• for internal item descriptions, within the Item Identifier Type field, select INT or Internal Item;
• for customer item descriptions, within the Item Identifier Type field, select CUST
Notes
 
I. For orders, the list of values displays descriptions of active items; for returns, the list of values displays descriptions of active and inactive items.
II. Order Management validates the item against inventory items you define in the warehouse (organization) specified by the Order Management parameterItem Validation Organization. You can only choose items that have the Customer
Orders Enabled item attribute set to Yes.
III. If you have setup customer or generic cross-references for these items, you can also enter the order line using the
cross-reference.
IV. If you intend to source this line externally, you must also ensure that the item you select has the Purchasable item attribute indicated. This attribute enables an item to be ordered on a purchase order.

3. Define the item's order quantity for this line. The quantity field appears on all tabbed regions even though it is in the scrollable region.

4. Select the Unit of Measure.
You can enter only predefined units of measure in the same class as the item's primary unit of measure. Provided the secondary unit of measure has been enabled for the item in Inventory, you can define a dual UOM for the item. The units of measure for models and kits are restricted to the item's primary unit of measure.

5. Unit Selling Price: Unit Selling Price is derived from the selected price list, and may contain a rounded value. The value of the unit selling price is affected by the current value of the profile option QP: Selling Price Rounding Options

6. Enter, select, or accept the default for the Request Date field.
Note: The Request Date field is populated with the current system date and time. If a line is deleted from the order, and a new item is entered, the Request Date field will continue to display the original system date and time stamp

7. Select the Schedule Ship Date from the calendar.

8. Status: This field displays the current status of the order line, and can only be updated via a system action

HOLD /ATO Check BOX
1. On Hold ATO check box
2. Cascaded Hold ATO check box
3. ATO check box: The field is non updateable. If the check box is selected, the order line contains an ATO item.

Other fields


1. Select or accept the default for Line Type.
2. Qty Cancelled: this field will display a value only if an order line's quantity was changed as a result of a cancellation.
3. Qty Shipped: this field will display a value only if an order line has been shipped, either partially or completely.
4. Reason: This field is non updateable except when adding to, or reducing, the  existing order line quantity. Values entered in this field are only visible at the time of entry; once a successful save has been completed, the value of the Reason field displayed is NULL; Order Management does not display the current value for this field since you can perform multiple updates to an order line that require you to enter a reason. You can view Reason values entered within the Additional Line Information window, available via the Action button.
5. Comments: This field is non updateable, except when enabled by the system. Values entered in this field are only visible at the time of entry; once a successful save has been completed, Comments field values are displayed within the
Additional Line Information window, available via Action button.

6. Select the Salesperson, if not defaulted.
7. Order Source, The value for this field is determined by the creating application when a sales order is created. This field is non updateable, and valid values are:
• Internal
• External
8. Order Source Reference: If you create an order within the Sales Order window, or create an order where order_source_id=0, the system will generate a value for Order Source Reference. The value generated is the source table name, concatenated within the order_header_id. This value is stored in the source table (OE_ORDER_HEADERS_ALL) within the column ORIG_SYS_DOCUMENT_REF. If you have copied an order, the order lines for the copy to order will display
COPY.
9. Order Source Line Reference: If you create an order line within the Sales Order window, or create an order where order_source_id=0, the system will generate a value for Order Source Line Reference. The value generated is the source table name, concatenated within the line_id. This value is stored in the source table (OE_ORDER_LINES_ALL) within the column ORIG_SYS_DOCUMENT_REF. If you have copied an order, the order lines for the copy to order will display the
source order number.
10. Select the Tax Code, if not defaulted. You are only able to select a Tax code if the profile option EBTax: Allow Override of Tax Code is set to Yes.

Changing Order Price

When an item is ordered the price engine picks the value from price list and applys appropriate modifiers to it. While entering the order if the user thinks the price is not correct and needs to be modified then he/she can go to the price list, modify it and  reprice the line(Sales order line -> Actions ->Price line) or directly modify the line price.

Modifying Order Pricing
Use this process to modify order pricing.
Note:  Before changing the selling price, Pricing verifies

  • The profile option:  OM: Discounting Privilege.
  • Enforce List Price on the transaction order type.
Navigate to:    Orders, Returns > Order Organizer > Order header > Order line >  Select the Actions button and choose View Adjustments
In the Adjustments tabbed region
  1. Select the list of values to view the unapplied manual adjustments for the line.
  2. Select an adjustment and choose Apply.
  3. Requery the order to see the new selling price.
  4. To remove an already applied adjustment, delete the adjustment and choose Apply.
  5. If an adjustment has Override Allowed set, enter either the new adjustment rate, the amount reduced, or a new price and choose Apply.
Note:  Manual discounts are not subject to incompatibility checking.

Repricing a lineg
If you modify a price list or discount after applying either to an item or the order, use Price Line in the Line items tabbed region to update the order lines.

From the Line items tabbed region, choose the Actions button > Select Price Line.  The system recalculates and displays the item’s new selling and extended prices based on current list price and automatic discount information.

Note:  If you have applied a manual Order-or line level discount to an order and subsequently redefine the discount, you must remove it from the order, the re-apply it.

OM Split Line

Order Management allow you to split order lines to meet customer needs.  Until the product is shipped, the customer can request to change the shipping address or date for part of the order line.  To meet such requests, split the order line into multiple shipments.  These are referred to as user initiated splits.

Select the order line to be split. Choose the Actions button from the Sales Orders window and select Split Line.
The Split Line window displays with one record with the Request Date, Ship to and Warehouse defaulted from the original line.
•    Enter the quantity.
•    Create new records as per your split requirement.
•    Choose the Split button to confirm the split.
Note:  Splitting is the only way in which you can create multiple shipments for a given order line.
When you click OK to close the window, the new shipment lines are created and can be seen in the Sales Order form.  If you split line 1.1 into 2 shipments, you will end up with lines 1.1 and 1.2.

Configurations
Split only at the top-level line in a configuration, i.e. you can split only a model line and not at the option or class level.  Split only a kit line and not at the included item level.  When a model or kit line is split, Order Management splits each item beneath the model proportionately. 

When a configuration or kit is shipped out of proportion, the system creates remnant sets.  Lines in a remnant sets are treated as standalone lines by shipping and fulfillment.  Remnant sets can arise only out of system initiated splits. 

System initiated splits
Order Management splits order and return lines into multiple shipments when they are partially processed.  Such system initiated splits occurs as follows:
When Order Lines are partially processed at:
Ship Confirmation – When the shipping department finds that stock on hand is less than the ordered quantity, you can ship the available quantity and Order Management will split the line so that the customer can be billed for what was shipped.
Purchase Release Receipt – When a Drop-Ship Line is partially received, Order Management splits the line so that a customer can be invoiced for what was already shipped.
When Return Lines are partially processed at:
    Return Receipt – When the customer returns partial quantity on a return, the system splits the return line so that customers can be issued credit for what was returned. 

For both user and system initiated splits, Order Management retains all of the original line information including attachments, discounts, flow status, sales credits, reservations, taxes, and holds.

Line & Fullfillment Set

Order Management supports Ship Sets, Arrival Sets, and Fulfillment Sets


Ship Sets are a group of order lines that the user would like to ship together.  Attributes that have to be identical across all lines in a ship set are shipping warehouse, schedule date, shipment priority,  shipment method and ship-to location.
  • Group order lines to ship together in ship sets.  Ship sets can be assigned on an individual order line or group of lines on an order.  Assign a single ship set to all the lines in an order to support customers that do not allow partial shipments.  Or assign a ship set to only one line in an order with multiple quantities to ensure that the order line is not released until the full quantity is available.
  • If a single order line is defined as a ship set, Order Management waits until the entire order quantity is available to ship before releasing that line for picking.  If an order line is defined as a ship set for a configured product, the system waits until all items ordered in each configuration are available before releasing the line for picking. 

Arrival Sets are a group of order lines that the user would like to arrive together.  Attributes that have to be identical across all lines in a ship set are ship-to location and requested arrival date.

Fulfillment Sets are a group of lines that get fulfilled together.  Items that are not shippable can be in fulfillment sets with shippable items, and then will not be fulfilled (and therefore invoiced) until the shippable items are fulfilled. 

Order Management seeded workflows are designed so order lines are eligible to be Invoice Interfaced once they have completed the fulfillment workflow activity. The fulfillment concept, along with the use of fulfillment sets, enables you to group lines together for invoicing purposes. Typically, for shippable lines, shipping completes fulfillment. For non-shippable lines, booking completes fulfillment. If you want to hold up invoicing of a non-shippable line until an associated shippable line is shipped, put those lines together into a fulfillment set. None of the lines in the set progress past fulfillment to invoicing until all lines in the set are fulfilled.

A line can belong to either a ship set or an arrival set, but can belong to multiple fulfillment sets.


New/Add to exisiting SET
To add a set or to create new group, right click on the line and navigate to Set > New/Add to set

You can also perform the following actions to Sets:
  • Add to set
  • Remove from set
  • Move set
     
Automatic Sets
In the Customer Site, Order Management tab:
Set the Customer and Site attributes to automatically place order lines into ship sets or into arrival sets. 
Lines In  Ship Sets
Lines In  Arrival Sets

Now on the Sales Order form, when you enter a new Order
the system will automatically place the ordered items in a Set and assign a numeric value to the Set.

Item Onhand

Total On hand - Sum of unreserved and reserved items in inventory.
Available to transact - Sum of unreserved and soft reserved items in inventory(items against which reservation and scheduling is done but pick confirm not)
Available to transact - Only unreserved quantity

Relationship Total On hand >= Available to transact >= Available to reserve


For the item CM11062
Total Quantity 9582
Available to Transact 9579
Available to Reservable 9574
The difference between available to reserve and available to transact exists because some of the items might be present in a subinventory which is not reservable like stockfloor, from where transactions can be done.
 We 'll put a new SO line of qty 50 and 'll verify the quantities after scheduling
Available to transact and avialbe to reserve is reduced by 50 quantity.
Total Quantity 9582
Available to Transact 9529
Available to Reservable 9524

Back to Back Orders

Often customers order products that you do not typically stock but that you do not manufacture either. You may want to purchase that item specifically for this order, have the supplier ship it to you, and then combine it with other items you may have purchased or stocked to create one shipment to the customer. This is a common scenario for Wholesale Distributors who use the S3, or Sell-Source-Ship business model as well as for other demand channels. We call this process back-to-back orders or procure-to-order.

Supply-to-order items are either standard items or models that have the assemble-to-order item attribute turned on. It is this attribute that launches the ATO workflows that deliver this feature. PTO models by definition cannot be supply-to-order, since turning on the assemble-to-order attribute would make them an ATO model. But you can fulfill the shippable options of a PTO model with back-to-back orders by checking the assemble-to-order item attribute of those components.

Setup

To setup Back-to-Back Orders in Oracle Order Management:
1.  Use the Inventory Master Items window to define the items that you wish to supply to order. The following item attributes must be specified:

  1. Item must be marked as Customer Orderable on the Order Management tab and
  2. Item must be marked as Purchasable on the Purchasing tab.
  3. Item must be marked as Assemble-to-Order on the Order Management tab.
    Note: The Assemble-to-Order attribute is actually called Replenish to Order in the database. The same flag also controls Procure-to-Order.
  4. Item must be marked as Build in WIP on the WIP tab.
  5. Item must either have the make/buy flag on the General Planning tab set to Buy, or else have a sourcing rule saying that it is to be sourced from a vendor.

2.  If you define a Sourcing Rule for your Supply-to-Order items, then the sourcing rule must be of type Buy From. Also, you may only define one single sourcing rule for your item, or this process will not work.

You must add this sourcing rule to the assignment set which is specified as the MRP default assignment set in the MRP: Default Sourcing Assignment Set profile option.

Note: You may not have a combination of Buy From and Make sourcing rules or more than one sourcing rule in the assignment set for the same item. If you do that, Auto Create Requisition errors out and puts details about the problem in the log file.

Notes

The only difference between B2B item (Creates req) & standard ATO item (creates JOB) is that the B2B itm's make/buy flag on the General Planning tab set to Buy

Process flow of B2B
Sales Order Process
1. Enter the item on the Sales Order line.
When the line is Booked/Scheduled, the Create Supply subprocess of the workflow will put the lines through the Buy ATO Item flow which contains the autocreate purchase requisition activity. AutoCreate Requisition can be run as a concurrent program or can be initiated for an individual order by using the Progress Order action on the sales order if it is in status Create Supply Line – Eligible. As stated above, AutoCreate Requisition takes information from the Sales Order line and loads the Requisition Import interface tables.

2. Requisition Import must be run to create the purchase requisition tied to the sales order line. This can be done by manually submitting the Requisition Import concurrent program, or you can schedule it to run automatically. Requisitions created by this process all have an interface source type of CTO so you can identify and segregate these requisitions as needed. There are also message dictionary entries for CTO Note to Receiver that can be populated with custom text. The requisition column Note to Buyer is populated by the AutoCreate Requisition process with a message Supply for sales order: <order number> that indicates the order number of the line. Add additional custom text to the note by editing the
message dictionary for CTO Note to Buyer.

Sales Order Line Status
The following line statuses help you track where the line is in the process:
PO Req Requested
PO Req Created
PO Created
PO Received

If you want to see the Requisition number or Purchase Order number created by your Sales Order line, you must go to the Reservations Details window to find that information.

Purchasing Process
Once the purchase requisition is created and identified as CTO, the regular purchasing process takes place:
1. A Purchase Order is created and approved and sent to the necessary supplier, or a release of a previously created Sales Agreement is used.
2. Once the PO or release is received, the items are recorded in inventory and a reservation is automatically made to the sales order line.
Note: View the Note to Buyer at any point in this process to find out what sales order generated this PO or release.
3.
The sales order can now be pick released, shipped and invoiced just like other stocked items.

Reservations
A key in making this functionality work for you is how the inventory reservation is handled. This happens automatically, and can be traced from the sales order window by using  Tools->Scheduling->Reservation Details as well as by directly using When Req Import processes, the purchase requisition is reserved to the sales order line.

View the Inventory Reservations window supply tab to see the reservation linked to a requisition, and the requisition number and line number. When the requisition becomes a PO or a Sales Agreement release, the reservation moves with it. The Reservations window, supply tab, then shows the reservation is linked to a PO or a Sales Agreement, and you will see the PO number or the PO and release number, as well as the line number.

When the PO is received into inventory, the reservation is automatically transferred into Inventory, and it now looks like any other reservation from a sales order to on-hand stock. Just as in the regular ATO process, if you manually reserve the sales order line to inventory the Create Supply workflow step will not do anything, and the line will progress to Awaiting Shipping without flowing through the requisition process.

Changes or Cancellations
What happens if you need to make changes to the sales order line that is in the back-to-back process? What if the order line is cancelled? What if you need to make changes to the PO or the requisition?

If the sales order line is cancelled or the quantity is reduced, then the reservation is reduced and a notification is automatically sent to the buyer explaining that there is now a PO outstanding for a higher quantity than what is needed for the sales order. The buyer can then decide whether to cancel the PO line, or to buy the product anyway and put it into inventory.

If the schedule date on the sales order line is changed, again a notification is sent to the buyer, who can then decide to either change the date on the PO or cancel it or do nothing. If the buyer decides to cancel the PO, then a new requisition will be created the next time AutoCreate Requisition is run.

If the PO is cancelled or a partial quantity is cancelled, then the reservation is cancelled or reduced appropriately. The next time AutoCreate Requisition is run, it will create another requisition for the unreserved amount on the sales order.

Invoicing

Invoicing in Oracle Order Management is the process by which data from Orders and Returns is communicated to Oracle Receivables to create invoices, credit memos and credits on account, recognize revenue and manage sales credits.

Invoicing Integration has been implemented as a workflow activity in Order Management. When it executes, it transfers fulfilled item information including quantities, selling prices, payment terms, and transaction dates to Oracle Receivables, which processes invoices for customers and accounts for revenue. Additionally, you can process credit memos and credits on accounts created from returns using this process. Upon completion of the Invoicing workflow activity, you must submit AutoInvoice from Oracle Receivables to import the invoice and credit data into Oracle Receivables. The Invoicing Integration workflow activity can be part of the Order Header workflow, if you want the entire order to interface to Receivables at the same time, or part of the Order Line workflow, which will interface each line or set of lines as they become eligible.

Discounts

In Order Management, you have the option to send items and prices to Receivables net of any price adjustments or to send the list price and then send separate adjustment lines for each discount. This is controlled by the system parameter Show Discount Details on Invoice. If you choose to show discounts, they are sent as regular invoice lines to Receivables with a negative price, and are accounted for like the item to which they belong. The Description field for the discount lines is the name of the discount.

This feature provides visibility to discounts for printing on invoices, but does not provide separate accounting for discounts.

Freight and Other Charges
In Order Management, all freight and special charges such as insurance, handling, and export charges are passed individually to Oracle Receivables as invoice header level charges.  (For Modifieres to appear in the invoice the 'Print on Invoice' check box should be enabled in the modifier)There is no grouping done by the Invoicing Activity. However, Oracle Receivables will consolidate all the freight charge lines into one line for accounting and printing on the invoice. Order Management passes the details to Receivables to support differing charge accounting and printing in the future, once Receivables supports such functionality.

Freight charges are applied at the header level. However if the customer uses line level invoicing, sometimes a part of the freight charge at the header level used to get invoiced. Moreover, if the freight charge used to get updated, this difference was not passed to invoice interface. Now with enhancements to the functionality, the amount difference is populated in the invoice interface tables. This indicates that a charge has to be credited and the invoicing takes place for the correct amount.

Over and Under Shipments
Overshipments are invoiced based on the setting of the Overshipment Invoice Basis system parameter and also corresponding attributes on the Customer and bill-to site. Values for this attribute are Ordered or Shipped. If this value is Ordered, the ordered quantity is invoiced, even if a larger amount was actually shipped. If this value is Shipped, the actual shipped quantity up to the Overshipment Tolerance limit is used for billing. Undershipments are always invoiced as the amount shipped. Please note that you must set over and under shipment tolerances to be able to overship or automatically close a line on an undershipment. You can set site-level shipping tolerances via a profile option. You can also specify exceptions for a customer, bill-to site, item or customer/item combination using the Customer Standard form, Master Items form, and an Order Management form for customer/item.

Invoice Level Processing
Oracle Order Management supports invoice processing at 2 levels:
1. Order Header level Invoicing
The Order Level Invoice Interface workflow activity is part of the Order Header workflow process. It will interface data from the entire order or return to Oracle Receivables at the same time.

2. Order Line level Invoicing
The Order Line level Invoice Interface workflow activity is part of the Order Line workflow process. It will interface data from each line or set of lines as to Oracle Receivables as they become eligible for interface.
Note: Grouping of orders or order lines for invoicing or credit memos is dependent upon the mandatory Grouping Rules and optional Grouping Rules you setup in Oracle Receivables. There is no grouping done by the Order Management Invoice Interface Workflow activity.

Processing Constraints

Processing constraints are rules that control who can change what and when they can change it. Processing constraints can prevent certain changes, but can also be set up to perform actions based on those changes. They can define actions that can result from these changes, such as requiring a reason for the change, triggering an action in Audit Trail or Versioning, or raising an Integration Event.

Navigate to the Define Processing Constraints window (Setup -> Rules -> Security -> Processing Constraints)
Query Application for Oracle Order Management and Entity for the entity for which you want the processing constraint, for example, Order Header or Order Line. Move to Constraints. In the top area of the region, enter each constraint in a line.

1. In Operation, select the operation that you want to constrain.

2. Select an Attribute to constraint, based upon the operation selected.
• If you select the value UPDATE for the Operation field and you do not select an Attribute value, the constraint allows no update to any field of the entity, by any user.

3. In User Action, select one of the following:

  • Not Allowed: You cannot perform the constrained operation
  • Require Reason and History: You can perform the operation only if you enter a reason. Use this with Operation CANCEL, Operation UPDATE if the constrained attribute is Ordered Quantity only, and for recording Audit Trail history when requiring a reason for an attribute change
  • Requires History: You can perform the operation and will not be prompted to enter a Reason. You still have the option to enter both a Reason and Comment, and if you do so, the information is recorded. Use the value for enabling Audit Trail  history to be recorded without a reason for an attribute change.
     

4. Select a value for the System Changes field. The value selected in this field determines if system changes are allowed, despite the constraint. Choose from:

  • Always: System changes allowed
  • Never after Insert: System changes allowed if the entry has not been saved to the database

5. Select a value for the User Changes Field. Choose from:

  • Never: The user is always constrained
  • Never after Insert: The user is constrained after the entry is saved to the database

6. The Enabled field indicates whether the current constraint is active. This allows constraints to be temporarily disabled if necessary.

7. System check box - If a Constraint has the System check box selected, you cannot update the constraint definition.
 

Move to the Conditions tab. Enter a constraining condition for the selected constraint. The selected constraint is determined by the previous cursor position prior to moving to the Conditions tab region.

1. In the Group Number field, enter a numeric value according to the following principles:
• For conditions that should together evaluate to TRUE (AND conditions), enter the same group number. The constraint applies if the entity in question meets all of the conditions defined.
• For conditions that should together evaluate to OR (OR conditions), enter a different number for each record. The constraint applies if the entity in question meets any one of the conditions defined.

2. In Scope, if the record set applies to multiple records, indicate the scope of evaluation of the record set for this condition. An example of a record set that applies to multiple records is the record set of all of the lines of a sales order. Select one of the following:
Any: The condition is satisfied if one of the records meets it, for example, the condition is satisfied if one of the sales order lines is booked
All: The condition is satisfied if all of the records meet it, for example, the condition is satisfied if all of the sales order lines are booked

3. In Validation Entity, enter the entity for which the condition is validated. You can enter the same entity as the constraint (at the top of the Constraints region) or you can enter an entity related to the constraint. For example, if the constraint is against Order Header, Validation Entity can be Order Line.

4. In Record Set, select the record set that corresponds to the entities to which the constraints process should apply the condition. For example, if you enter the order line record set Line, the condition is evaluated against the order line in question. If you enter the order line record set Order, the condition is evaluated against any or all (depending on the scope) lines of the order in question.
If Validation Entity is different from Entity (at the top of the form), you can only select record sets based on the primary key of the validation entity.

5. Select the Not check box (the negative condition modifier) to direct the constraints processing to evaluate the NOT condition of Validation Template. For example, if you expect to select Validation Template Booked, selecting NOT creates the condition of not booked for the constraint.

In Validation, select a validation template. This item specifies the condition being evaluated

6. Enabled - The Enabled field indicates whether the current constraint is active. This allows constraints to be temporarily disabled if necessary.

7. System check box:
• If a Constraint has the seeded check box selected, and the constraint condition check box is also selected, you cannot update the constraint condition.
• If a Constraint has the seeded check box selected, and the constraint condition check box is not selected, you can update the constraint condition.

8. In User Message, enter the trailing portion of the error message that the constraint processing should display when the user violates the constraint. For example, if the constraint was to not allow an update of the item field on the order line if the line has been previously booked, constraints processing displays
the error message You are not allowed to update the item; the item is booked.

Move to the Applicable To tab and specify who the constraint applies to.
Select one of the following:
All responsibilities: The constraint applies to all responsibilities.
Authorized responsibilities: The constraint applies to all responsibilities except ones that you specify. Specify the excepted responsibilities in the untitled lines below your selection.
Constrained responsibilities: The constraint applies to the responsibilities that you specify. Specify the excepted responsibilities in the untitled lines below your selection.
 

Calculating Available to Promise (ATP)

Oracle Order Management enables you to advise your customers when items will be available based on current on-hand inventory plus the expected incoming supply and outgoing demand.

Calculating ATP requires as input the item, the order quantity, the order quantity unit of measure and the request date. In general the user will enter the item and order quantity on every order line. The request date and order quantity unit of measure may be defaulted or manually entered. ATP may be calculated for a single line, a group of lines, or a complete order. The results for a single line are displayed in a single column in a small window. The results for multi-line ATP are displayed in a table
 
 
  • Warehouse: Either the warehouse on the order line or, if the warehouse on the order line was blank, the best warehouse as selected by the sourcing rules.
  • Request Date Qty: The quantity that is available on the requested date
  • Available: The order quantity, if ATP was successful. The available quantity, whichwill be less than the order quantity, if ATP was not successful.
  • On-hand Qty: The quantity that is currently in the warehouse.
  • Qty Reservable: The on-hand quantity minus the quantity that is already reserved to other sources of demand.
  • Request Date: The date on the order line.
  • Available date: The date that the ordered quantity will be available. It could be the request date if the order quantity is available on the request date, or it might be a future date when the order quantity will be available
  • Error Message: Any error that occurred in calculating ATP. For example, if the Check ATP flag for the item is not selected then this field will display ATP not applicable.
  • Substitute Item: If the requested item is not available and the requested quantity for a defined substitute is available, the substitute item will be displayed. An additional tab, showing the availability of the substitute item, is also displayed.displayed for single items. A multi-line window displays availability information for sets and models.
Clicking the Global Availability button located at the bottom of the Availability window opens the ATP window that has the list of warehouses where the item is enabled. You can select the warehouses for which you want to see the availability, and
the system will return the availability in all the selected warehouses.
ATP is calculated automatically during scheduling, and may be calculated manually by clicking Availability on the Line Items tab of the Sales Order window. There are several steps required for ATP calculations.

1. Ensure items and options you wish to perform ATP inquires against have the following items attributes properly set:
Check ATP
ATP Components

This includes ATP flag within a Bills of Materials.

2. Ensure that ATP rules have been defined and set. You can define ATP Rules and assign them as defaults at the organization, subinventory, or item level.

3. Define your item Sourcing Rules and any Assignment sets you wish to use. You can define Sourcing Rules within Oracle Supply Chain Planning, Sourcing Rules window. If you do not have Oracle Supply Chain Planning fully installed, you cannot define Sourcing Rules. You may, however, define simple sourcing information at either the item level and the organization levels.

4. Define the Organizations and Application Instance Ids you will wish to collect source ATP data entities from. ATP Inquiries are performed against a common data store within an application instance.

5. Optionally, determine if you wish to enable item substitutions.
If you are using ASCP, supply/demand is set up at the plan level.Global Order Promising will only use the infinite time fence
specified on the ATP rule.

If you are using ASCP, supply/demand is set up at the plan level. Global Order Promising will only use the infinite time fence specified on the ATP rule.

If you are not using ASCP, ATP rules must be defined to determine the sources of supply and demand which are included in the calculation. The ATP rules must be associated with items and/or inventory organizations. Also, the data collection program must be run. There is a requirement for ATP calculations to be very fast; some customer service representatives will need to give this information to customers on the phone. However, considering all the possible sources of supply and demand for an ATP calculation can be very complex. Therefore, a concurrent process known as data collection must be run to summarize the supply and demand picture. This program is part of the Oracle Advanced Planning and Scheduling application. The ATP calculation is then performed on the summary tables. For details about setting up ATP rules and running the data collection program, see the setup section of this document.

Alternative Ways to Schedule

The scheduling action can be invoked in multiple ways.

  1. You can schedule from the sales order window by having autoschedule turned on,
  2. You can schedule a line by manually choosing to schedule using the context menu or the tools menu.
  3. You can schedule using a workflow activity either immediately or in deferred mode.
If the scheduling action fails in the workflow then the line is moved to scheduling eligible activity. You can then use the Schedule Orders concurrent program to schedule the lines with exceptions.

Autoschedule

The sales order line is scheduled when it is saved. If either the Autoschedule check box on the order transaction type is checked or the OM: Autoschedule profile option is Yes, the sales order will be opened in Autoschedule mode.

You can turn Autoschedule on or off from the sales order window by going to the Tools menu. Note that if autoschedule
is turned on the availability window is automatically displayed when the sales order window is opened. You can close the availability window, but the lines will still be autoscheduled unless the autoschedule check box on the tools menu is unchecked.

Manual
You can access the scheduling sub menu either by selecting schedule from the list of activities on the tools menu or by placing your cursor on a line and pressing the right mouse button. Selecting schedule from these menus will trigger the scheduling action. If the action is selected from the order header tab, all the lines on the order will be scheduled. If the action is selected from the lines tab, it applies only to the line or group of lines selected.

If the profile option MSC_OM_IMPORT_PRESCHEDULED is set to Yes, then you will be able to schedule ATO items on weekends as well. However if you require the scheduling to be done only on valid working days, set this profile option to No.

Workflow
The seeded scheduling workflow activity should be used in the workflow process for your order lines.
In the Line Flow - Generic seeded flow, the schedule activity is a synchronous activity immediately after booking
. With this type of process, scheduling will occur immediately after booking. Scheduling errors will be seen by the person who is booking the order.
If the scheduling activity is deferred it will occur after the workflow background process runs and any error messages will be available in the process messages window. Only lines waiting at the Schedule-Eligible workflow activity are selected. The default is no value entered. Note that the lines may or may not be scheduled and still could be waiting at the activity.

Manual Scheduling Sub-Process
In Release 12, a new scheduling sub-process named Schedule-Line, Manual is provided to handle cases where you may want to control scheduling manually after the order is booked. If the new sub-process is used in the line workflow, then after booking the order, lines are blocked at the Schedule-Eligible activity. You can progress the Schedule-Eligible activity from Sales Orders window or use the Schedule Orders concurrent program to schedule the lines.

A new generic line workflow is not provided with this new sub-process. If you require to use this sub-process you can copy and customize the generic line workflow and replace the new sub-process in place of the existing Schedule – Line sub-process.

Schedule Orders Concurrent Program
The Schedule Orders Concurrent Program functionality has been enhanced in the current release. This program selects all lines that have failed workflow scheduling, and attempts to schedule them. These lines are waiting at the schedule-eligible activity. The user can select orders based on the order number and other parameters.

In addition, lines that have never been scheduled can now be scheduled using the Schedule Orders concurrent program. This is useful for high-volume orders, where a batch of imported orders in Booked status can be mass scheduled. Please note that lines that have not been booked are not scheduled.

Also the enhancements to the Schedule Orders concurrent program enable you to reschedule lines in case there is a change in supply dates or even unschedule lines if they have been scheduled previously. You have two re-scheduling options: Re-Schedule and Re-scheduling with Request Date. You can query scheduled lines and perform a reschedule. You can move schedules in and out based on the item's availability, and if orders or delivery schedules from suppliers are changed or cancelled, then the allocated product can be rescheduled to meet other demands earlier or later. You can query and sort scheduled lines, and assign either a new Schedule Ship Date (this can be Schedule Ship Date or Schedule Arrival date; depending on the Order Date Type value) or Warehouse (location) when re-scheduling a line.
  • For each line of the order that fails workflow scheduling, messages will be stored in the Process Messages table and also printed in the logfile.
  • If scheduling was successful, the scheduling workflow activity will complete with a result of COMPLETE so that the line can progress to the next activity.
  • If scheduling was not successful, the workflow activity will complete with the result of INCOMPLETE. The line can then be scheduled manually by progressing the order from the sales order window (press the Action button and select Progress Order) or automatically in the next run of the scheduling concurrent program. Submit the scheduling concurrent program by navigating to (N) Orders, Returns > Schedule Order

Scheduling Across Orders
Scheduling Across Orders provides the ability to view scheduling attributes of multiple lines across orders, and to perform any scheduling action from a single window. From the Scheduling tab on the Find window of the Order Organizer, you can query lines based on a variety of parameters, such as:
  • Item
  • Warehouse
  • Request Date
  • Reservation Status (Reserved or Unreserved)
  • Scheduling Status (Scheduled or Unscheduled)
  • Shipping Status (Picked, Unpicked, or Backordered)
  • Order Status
  • Customer
  • Shipment Priority
  • Schedule Date Ranges
  • Request Date Ranges
After performing an intelligent query to display a group of lines, you will see a new window, Scheduling Organizer. From the Scheduling Organizer, you can perform scheduling actions on lines across orders, that is, you can Schedule, Unschedule, Reserve, Unreserve and perform ATP inquiry.

Access to the scheduling tab is controlled by the Profile Option OM: Scheduling Role. Those with the role of CSR Only do not have access to the Scheduling tab, but they have the same functionality available in previous releases. Those with the role of Scheduler Only are allowed access to the Scheduling tab, but not to other tabs (Order Information, Line Information, Advanced, and Holds Information). Those with the role of both CSR and Scheduler have access to all tabs in the Find window of the Order Organizer.

Additionally, the role determines whether some actions are available. For instance, those with the role of Scheduler only will not be allowed to open the Sales Order window from the Scheduling Organizer.

Scheduling Across Orders is useful in a variety of business scenarios:
• Availability and/or scarce inventory: Who has the reserved items? Which customers have scheduled lines? Which customers have unscheduled lines? If desired, you can take supply away from lower priority customers, and give it to higher priority customers within Scheduling Across Orders.
• Customer service: View all the lines for a customer. Which lines need to be scheduled or reserved?
• Scheduling: Query all lines that are scheduled to ship on a specific date, and push out the schedule date for those lines as required. Or query any lines where Override ATP is flagged, and decide how to provide supply.
• Revenue impact: Query up all lines for an item, and display gross margin. Using Folders, move gross margin to be one of the first three columns on the Scheduling Organizer. Then sort based on gross margin. Reserve the lines with the higher gross margins, and pick by prior reservation. By doing so, you can impact bottom line for a month, quarter, and so on.

Scheduling Sets

For scheduling functions other than Override ATP, Order Management may perform the function on only one line or on that line and a group of related lines. Scheduling treats the following groups as scheduling sets. For these line groups, the scheduling activity occurs on all the lines of a set.

• Assemble to Order (ATO) Models
• Ship Model Complete (SMC) Pick to Order (PTO) Models
• Line Sets
• Ship Sets
• Arrival Sets
Scheduling processes the lines of the set together and applies the rules required to honor the set. If lines are in a ship set they will be scheduled from the same warehouse and will have the same requested ship date and ship to. They may not have the same Shipping Method. For instance, in a PTO model or a ship set you might ship a fragile part using one Shipping Method, and a heavy part using another Shipping Method. User created ship sets, ATO models and SMC PTO models are all ship sets.

All lines in a user created arrival set will have the same arrival date and ship to organization. Lines assigned to an Arrival Set within an order will be scheduled with the same requested arrival date and ship to.

Automatic Line Set Assignment

Oracle Order Management enhances Line Set (Ship/Arrival) functionality with seeded defaulting rules minimizing the need for user action thus reducing error and keystrokes.

Features include

  • Allow defaulting header level Line Set (Ship/Arrival) from Order Transaction Types
  • Customer
Invoice To
Ship To

Defaulting Rules Setup
Previously, there were hard coded defaulting rules such as Ship To, Line Set, Invoice To, Line Set, or Customer.Line Set (Sold to), depending on which lines were automatically included in Ship or Arrival Sets.

  • The hard coded defaulting rules have been converted to seeded defaulting rules using defaulting framework to provide flexibility in changing the sequence of the rules to be used.
  • Added defaulting rule for Order Type.Line Set
  • A facility has been provided to define a defaulting rule for Ship Set or Arrival Set based on the Transaction type.

Note: Defaulted Set at the header level will only affect the new lines that are being created and will not have any impact on existing lines.

Ship Set or Arrival Set For Each Line
Oracle Order Management has increased the choice to their customers of header level Ship/Arrival Set functionality. The profile, "OM: Assign new set for each line," provides two alternatives:
Many businesses do not wish to create multiple shipments for a single order.The default is set to "No," creating a single Ship/Arrival Set per order. As an example, if the header level choice is Ship, all successfully scheduled lines are assigned to one Ship Set when created. If one line fails scheduling, none of the lines are assigned to a Ship Set.

It is important for other businesses that a single line ship complete and multiple shipments are allowed per order. By setting the profile to "Yes," the system creates a unique Ship/Arrival Set for each line in an order as long as the line can be scheduled.
 
Option 1 provides functionality for businesses that prefer to group all lines of an order into one Ship Set or Arrival Set.

  • Setting the profile to "No" with header level set to "Ship" creates one Ship Set per order, scheduling all of the lines to ship together from the same warehouse to the same Ship To with the same Scheduled Ship Date, potentially saving on freight costs.
  • Setting the profile to "No" with header level set to "Arrival" creates one Arrival Set per order, scheduling all of the lines to arrive together at the same Ship To with the same Scheduled Arrival Date providing a high level of customer service through scheduling to deliver all lines of the order at the same time to the same place.


Option 2 creates an additional use of Ship/Arrival Sets by creating a unique set for eachline of an order.

  • Setting the profile to "Yes" with header level set to "Ship" creates a unique Ship Set for each line of the order. Creating line level Ship Sets enforces that the full quantity ordered is scheduled to ship at the same time. Thus assisting in customer satisfaction through shipping full quantity every time an item is ordered. It also allows flexibility in that each line is independent. Consider an order with two lines, 1) Item A, quantity 500 2) Item B, quantity 200. At the time of scheduling, Item A has full quantity of 500 available to be ordered while Item B only has quantity 50 available. With separate Ship Sets, Item A, quantity 500 proceeds to Pick Release and Ship Confirm while Line 2, Item B will not progress. The customer is happy as full quantity 500 of Line 1, Item A is shipped immediately instead of waiting for the complete quantity of Line, 2 Item B to ship on the same date.
  • Similarly, setting the profile to "Yes" with header level set to "Arrival" creates a unique Arrival Set for each line of the order. Creating line level Arrival sets enforces that the full quantity ordered is scheduled to arrive. Thus assisting in customer satisfaction through shipping full quantity every time an item is ordered. It also allows flexibility in that each line is independent. Consider the same order with two lines, 1) Item A, quantity 500 2) Item B, quantity 200. At the time of scheduling, Item A has full quantity of 500 available to be ordered while Item B only has quantity 50 available. With separate Arrival Sets, Item A, quantity 500 proceeds to Pick Release and Ship Confirm while Line 2, Item B will not progress. The customer is happy as full quantity 500 of Line 1, Item A arrives together instead of waiting for the complete quantity of Line, 2 Item B to arrive on the same date.
Changing Scheduled Lines
Order Management has many features to help manage scheduled lines when the lines are changed. When a scheduled line is changed, the system reschedules the line. For example, if you change the ordered quantity or the warehouse, the system reschedules based on this new information.

When a new line is inserted into a scheduling group (such as a ship set or a configuration) that is scheduled the system will first try to schedule the new line with the same attributes as the other lines in the scheduling group. If that fails, then it checks the value of the profile option Auto Push Group Date. If the value is No, the line is inserted but not scheduled. If the value is Yes, the system tries to reschedule the whole set. If rescheduling the whole set fails, the line is inserted but not scheduled. Exception: If the line is part of an ATO configuration or a ship model complete PTO configuration, and scheduling the group of lines together fails, then the line will not be inserted. When you cancel a line that has been  scheduled or reserved, the system unschedules the lines and removes the reservations. If a scheduled line is partially canceled, the system cancels scheduling information in this order:
  •  

Credit Check Rule

Credit Checking Rules within Order Management enable you to determine credit worthiness of orders when performing credit checking, and provide you with various options in determining your customer's credit exposure.

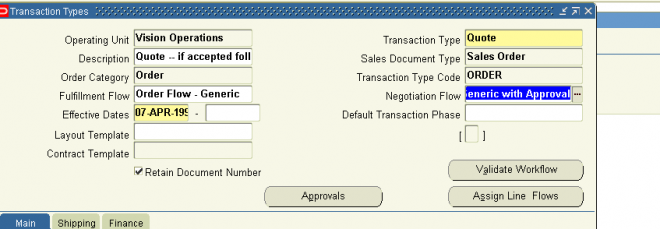
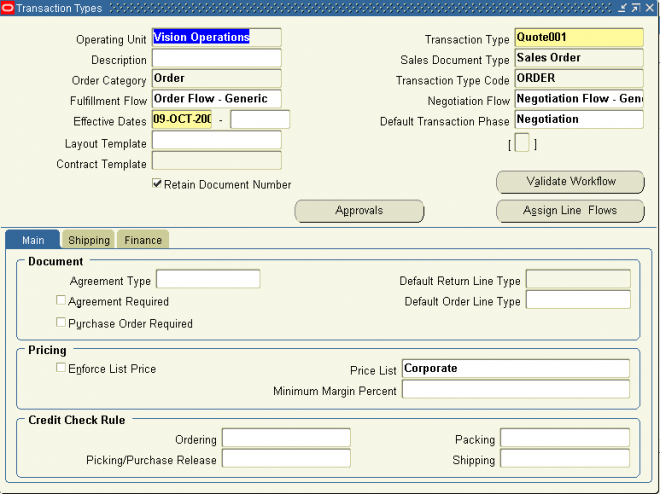
Credit Check Rules are attached to Order Management Transaction Types. Within the Transaction Type window, credit check rules are assigned to pre-specified workflow events that trigger the credit checking process. For example, you might
want to perform a high-level credit check before booking, but you may want to apply more specific controls before shipping the product to your customer.

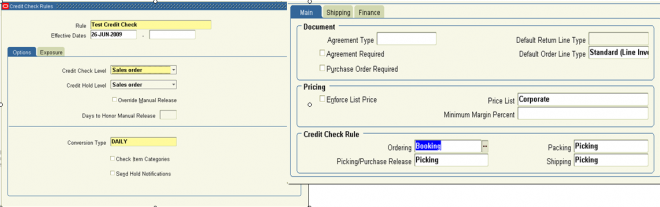
In Order Management, separate credit checking rules can be assigned for use at the time of booking, pick release and purchase release (for drop shipments), packing, or shipping within corresponding order or line workflow processes. You can also choose to perform credit checking at multiple points within an order or line workflow processes by selecting credit check rules for a combination of booking, pick release and purchase release (from drop shipments), packing, or shipping.

Options
The Credit Check process can be performed at sales order header or sales order line level. Additionally, the payment terms used for orders and order lines must be enabled for credit checking to occur.

Credit Check Level
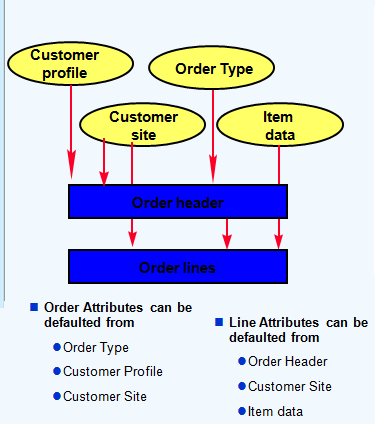
1. Order Header Level:
Order Level credit check uses exclusively header level information ignoring different bill-to sites detailed at line level. Order level credit check uses the credit profile attached to the customer Bill-to site defined at order (header) level. Credit checking will use order totals and will evaluate credit exposure against the credit profile attached at header level, and holds are always applied at header level.

2. Order Line Level: Line level credit check uses data at the sales order line level. If you have sales order lines that are attached to different Bill To sites and if you want to use the specific credit profiles attached to those Bill To Sites, you should use Sales Order Lines level credit check.

Additionally, you could use line level credit check when you have defined customer relationships in your system and you actively use them in Order Management. In this situation, you are able to create a sales order whose lines could be attached to different bill-to sites owned by different customers.

Hold Level
You can choose to place credit holds for orders or lines that fail credit check validations at either the sales order or sales order line if you use order line level credit checking. Credit checking holds are automatically placed based upon your credit rule definition, and you can automatically release order or order line credit holds when a customer’s credit exposure has been reduced to a point that enables credit checking validation to pass successfully. You automatically release credit holds by scheduling the Credit Check Processor concurrent program to run at specific intervals.

Override Manual Release (check box)
In previous releases of Oracle Order Management, you had the ability to manually release order or line credit check holds that were placed by credit check process. However, no additional credit checking of manually released credit holds occurred. You can now specify whether or not you wish to enable additional credit checking if an order or line credit check hold was released manually. The Override Manual Release check box, used in conjunction with Days to Honor Manual Release field, enables you to define the duration (number of days) you will forego additional credit checking if an order or line credit check hold is released manually.

Your Order Management Transactions Type definitions will control whether or not additional credit check processing can occur for manually released holds (credit check rules entered for booking, pick release and purchase release (for drop shipments), packing, or shipping within your transaction type  efinitions).

Credit Checking Rule Days to Honor Manual Release
This field, in conjunction with the Override Manual Release check box, enables you to define the duration (number of days) manually released holds will be honored and not overridden by additional credit checking processes.
For example, suppose you have defined a credit check rule in which you have enabled the Override Manual Release check box, with a value of 15 within the Days to Honor Manual Release field. Assume that this credit check rule is assigned to the transaction type as a credit check rule for booking and shipping. If you manually release an order or line from credit check hold after booking, and if you ship the order or order line within 15 days, Order Management will not enable credit checking to occur again. However, if you ship after Day 15, then Order Management will enable the credit checking process to be invoked again.

Conversion Type
Conversion types for credit check rules enable you to model a fixed exchange rate between currencies or use an average exchange rate. When performing credit checking, the credit limit currency does not necessarily have to be the same as the functional currency. Conversion types are limited to the values you define within the Oracle General Ledger Conversion Rate Types window.
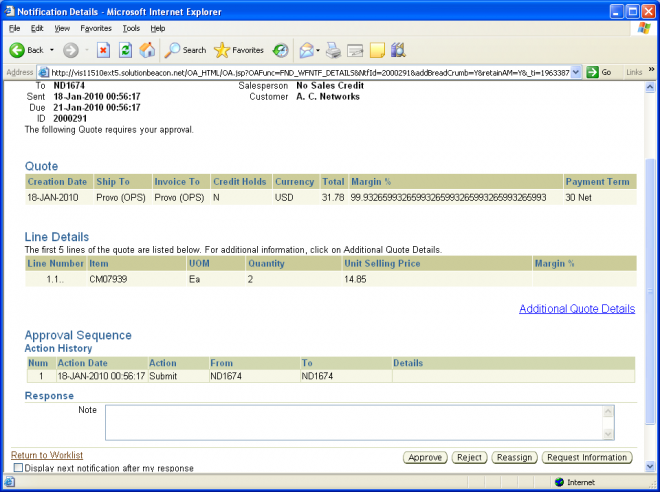
Notifications
You can choose to send notifications whenever a sales order or order lines fails credit check. The notification is sent to the person who created the order.
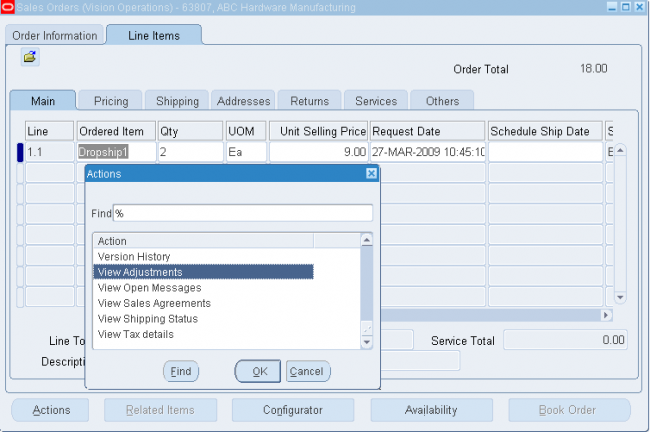
Exposure
You can choose how you wish to validate credit worthiness during credit checking by determining the exposure method used.
Previous versions of credit checking calculated customer exposure accessing underlying transactional tables. When a credit check request was executed, underlying transaction tables were summed to generate customer balance information.

In order to improve performance, Oracle Order Management has incorporated an additional option, the use of pre-calculated exposure. Using this option, credit checking will validate exposure against balance information stored in a summary table. The summary table is updated as often as your business practices require, and updates to the table are performed by submitting a concurrent program. This program accesses both Oracle Receivables and Order Management transactional Overview of Credit Checking tables, and should be scheduled to run periodically, based on your specific business needs.

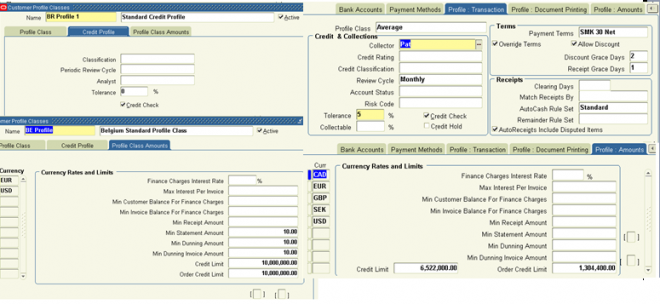
Credit Checking Rule Values to include within exposure calculation Your credit checking rule definition can include or exclude the following credit related details when calculating credit exposure:

  • open receivables balances
  • uninvoiced order balances
  • freight and special charges
  • taxes
  • payments at risk
  • Credit Checking Rule
Exposure
1. You must activate either the Include Open Receivables Balance check box or the Include Uninvoiced Orders check box in your credit check rule. You can activate both, but you cannot toggle both off.
2. If you checked Include Open Receivables Balance, enter a value to indicate the range of dates for open receivables that you want to include in this credit check rule.
Negative Number: Includes past due, current, and future open receivables up to X days beyond the current date.
Positive Number: Includes open receivables with invoice dates X days earlier than the current date.
No Value: Includes all open receivables.
3. Indicate whether to include uninvoiced orders in this credit check rule.
You must activate either the Include Open Receivables Balance check box or the Include Uninvoiced Orders check box in your credit check rule. You can activate both, but you cannot toggle both off.
4. If you checked Include Uninvoiced Orders, enter the number of scheduled shipping horizon days for uninvoiced orders to include in your total credit exposure.
For example, if you enter 45, your total exposure includes only uninvoiced orders scheduled to ship within 45 days of the current date. Orders scheduled to ship after 45 days are not included.
5. If you include uninvoiced orders in your credit check rule:
  • Indicate whether to include orders currently on hold.
  • Indicate whether to include tax on uninvoiced orders.
  •  
    Credit checking calculations on open receivables always include tax amounts and are not affected by the Include Tax option. If the performance of credit checking requires improvement you can toggle off this option.
6. If you include open accounts receivables balance in your credit check rule, indicate whether to include payments at risk when calculating a customer's outstanding balance.
      Receipts at risk are remitted receipts that have not been cleared, or discounted (factored) receipts that have not been risk eliminated. If the performance of credit checking requires improvement you can toggle off this option.
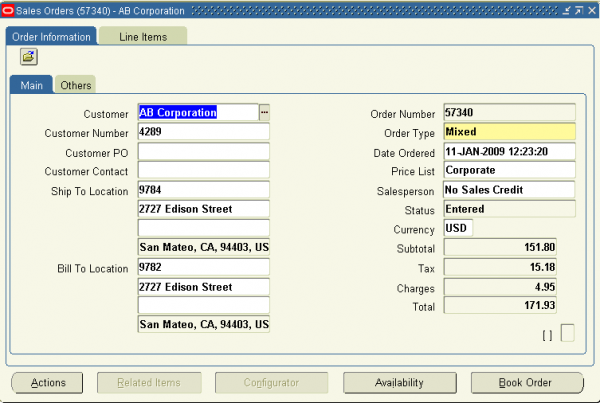
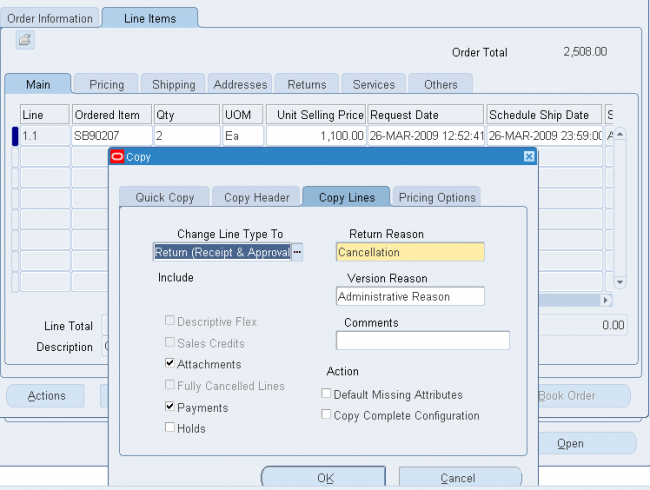
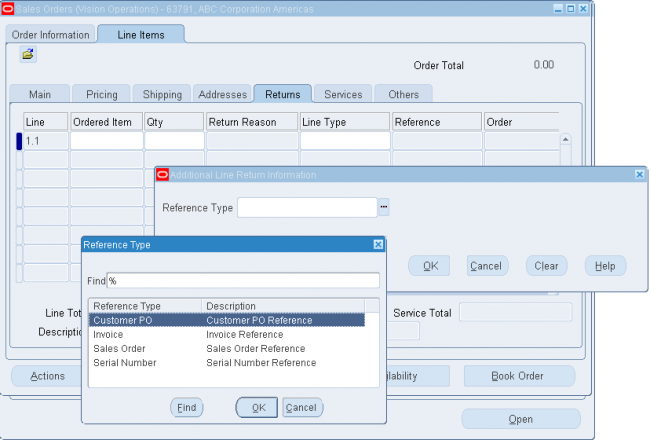
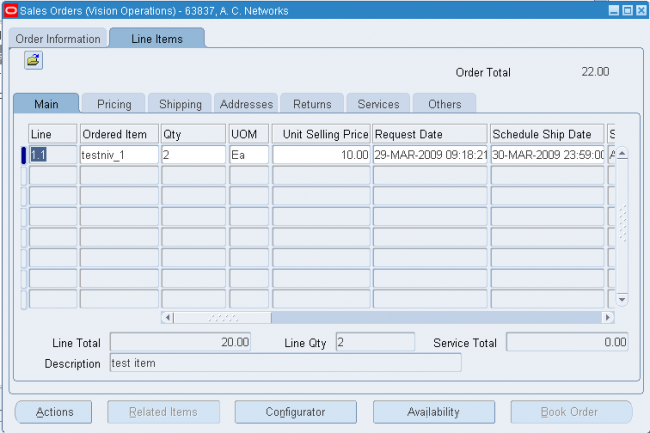
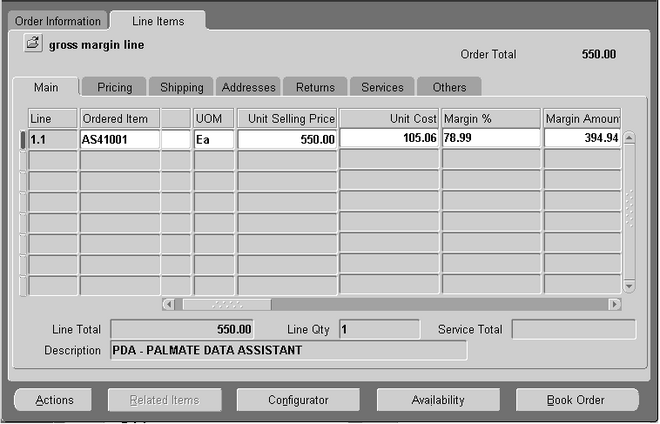
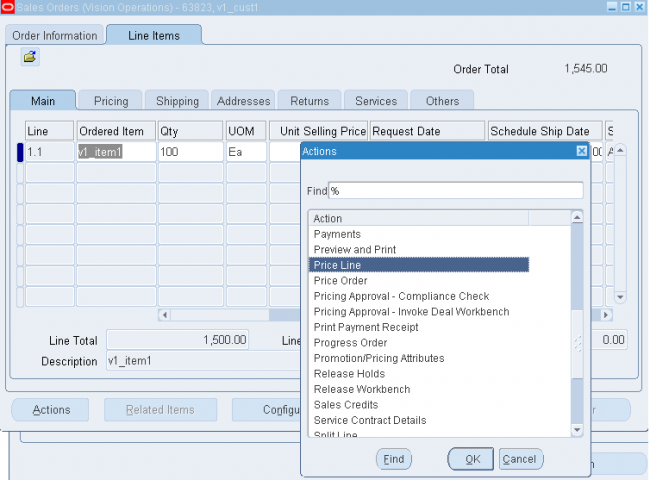
Credit Profiles

Credit profiles define the maximum financial risk you are willing to withstand on your regular operations. The Credit Check check box in the credit region of the Standard Customer window (for the customer master record) must be enabled in
order to perform credit check. You can define the credit profile information at the following levels:


Customer and Customer Site:

This profile defines your credit policies for individual customers or customer sites. You can accept the default credit policies from a Customer Profile Class, or you can customize credit limits to fit the particular customer.
You can implement credit policy changes by modifying a Profile Class and cascading the changes to individual Customer Profiles. Check current limitations for multi-currency credit check set up.

Organization:
This type of Credit Profile is used to define an organization's (operating unit) credit policy for credit control and credit checking. It is used as a default when customer/customer site credit profile is missing.
Organization Default provides a higher level in the customer profile hierarchy (customer site - customer - organization default), and the fulfilled credit profile at operating unit level enforces credit checking for any customer which does not
have credit limits defined at the customer or site level.

Item Category: Item Category Credit Profiles enables you to define credit information by Order Management Item Category. Item Category credit profile is completely independent from customer credit profiles. Item-category credit check will place a credit hold for transaction amounts over pre-defined category credit limits.
Item Category credit profiles can be used to model credit limits such as service line for insurance coverage which can prevent you from shipping materials that exceed a pre-defined monetary limit.

There is an embedded hierarchy provided by credit checking routines for establishing credit information between the following entities:

  1. Customer Site
  2. Customer
  3. Organization Default

When customer site and customer credit profiles do not exist, the Organization Default credit profile is used, if it exists.

Credit Profile Types
Customer: Enables you to define credit limits by currency for Customers.

Customer Site: Enables you to define credit limits by currency for Customer Sites.

Operating Unit Default: Enables you to set credit limits and terms, by currency, within a given operating unit.
Operating Unit Default Credit Profiles enable you to effectively enforce a formal credit checking process for all order transactions/currencies from any customer, provided you define an Operating Unit Default Credit Profile for each currency you process order transactions for. For example, if a transaction is entered and no credit limits exist at the customer or customer site levels for the specified order currency, the Operating Unit Default Credit Profile for the transaction/currency entered will be used to determine credit availability.

Item Category: Enables you to set order credit limits, by currency, for one or more Item Categories. This type of profiles enables you to specify limits for the maximum amount on each order for an item category irrespective of a customer or site.
Unlike the Operating Unit Default Credit Profile that defines credit limits for specific operating units, Item Category Credit Profiles are applicable across operating units. Item Category profiles are global credit profiles and are transaction currency based: the credit limits defined for an item category are for individual transactions (orders) only. There is no overall system credit limit for a category.

Item Categories enable you to set order credit limits/profiles for one or more item category (applicable for all customers). For example, an Item Category Credit Profile can specify that the maximum order value cannot exceed $10,000 USD for any order lines that contain an item associated with the Item Category Computers. This is extremely useful if your business practice requires item-based insurance coverage.

Note: The Operating Unit Credit Profile is used as the default profile for all customers that do not have an individual credit profile either at customer or site level.
Note: Only categories associated with the default category set for the Order Management functional area are supported.

Defining Credit Profiles
Organization Credit Profiles are a set of criteria that define an operating unit’s credit policy for credit control and order credit checking. Credit Profiles include the credit limit and pertinent data needed to determine total credit exposure for orders undergoing credit checking.

The Credit Profile window enables users to create and maintain credit information for Operating Units and Item Categories.
Operating Unit Default Credit Profiles can assist in further defining your credit policies by providing global defaults if no other information is present during credit checking.

To create a new credit profile, users must specify what type of credit profile to create, and depending on the credit profile type chosen, appropriate fields within the window become updateable or non-updateable.

  • You cannot define Credit Profiles for Customer or Customer Site by directly navigating to the Credit Profile window.
  • Credit Profiles for Customer and Customer Sites are initially defined when entering credit information in the Credit section of the Profile-Transactions tab of the Customer and Customer Site windows.
  • You must then assign a Credit Usage Rule to your Customer or Customer Site if you want to enable multi currency credit check.

Container setups and process

Setups
1. Create containers
 Items -> Master Items

Coose the Inventory Organization

Under Main tab,
Primary UOM: Each, Item Status: active

Under Pysical Attributes
Weight UOM: Pounds, UnitWeight: 1, Voulme UOM: Cubic Foot, UnitWeight: 1, Container Flag: Checked, Container Type: Choose a value from the LOV,
Internal Volume: 2, Maximum Load Weight: 2, Minimum Fill Percent: 50

under Order Management tab
Shippable flag: Checked

Assign it to the inv organization.

2. Define a Ship-Container Load Relationship
 OM Responsibility: Shipping -> Setup -> Container Load Details

Container Item, Load Item, Maximum Quantiyt, Preferred Flag

Process Flow
1. Creating LPNs On the shipping transaction form
Actions: Select Create LPNs and Click on Go button
In the LPN form enter Inventory Organization short name, Name Prefix, Base Number and Click on Ok.
Check the LPNs names created and Close the form.

2.1 Manual Packing Delivery
Select Order line 1
Actions: Select Pack option and Click on Go button
Select the created container from the LOV.
On the shipping transactions form, for the line 1, click on Details button

Check values for Line, Delivery, Parent LPN, Master LPN.

Parent LPN should be the one you selected above and Master LPN could be Null or the same value as above

Click on Done button

2.2 Auto-pack Delivery 2
 Select Order line 2
Actions: Select Auto-Pack option and Click on Go button
Click on Details button
Check values for Line, Delivery, Parent LPN & Master LPN.
Parent LPN should be the one genreated by the system  and Master LPN could be Null or the same value as above
Click on Done button

2.3 Full Manual Packing Delivery line 3
Select Order line 3
Select (using CTRL-Click) couple of small LPNs not assigned yet
Actions: Packing Workbench
Click on Go button

Under LPNs tab check pack column for all selected lines
Check Available Capacity

Change to Lines tab
Check Pack column only for line of delivery 3.

Packing mode : Choose Full option
Check Item Total values at the left of the screen
Click on Pack button

Actions: Select Packing workbench again and Click on Go
 
Under LPNs tab Select each of the LPNs selected above

Check the Context section under same tab, for each one of the LPNs, it should be also one line under content. Check Item Name and Quantity
 

Setup: Transaction type

Select the transaction type informations as shown in below form

 
1. See Transaction Types @ http://www.oracleug.com/user-guide/order-management/setup-step-22-transaction-types
for generic setup instructions. Note that when the transaction type contains both a fulfilment and negotiation phase there are some additional implementation considerations associated with set up. These impact when and how document numbers are
generated by document sequencing.
On the transaction type set up form there is a check box for retain Document Number. When an order type is created two categories are created. Depending upon the value of Retain Document Number the following steps need to be taken.

2. If you want to keep the document number from the quote when the transaction moves to fulfilment, use the category appended with "TTXXX-Quote" when creating and assigning document sequencing.

3. If you need to generate a new document number for the transaction in the fulfilment phase, two document sequences need to be set up:
  • One for fulfilment, using the category with no appending text "TTXXX"
  • One for the category appended with "-Quote".
If this is not set up correctly then the document will not transition to fulfilment because the document cannot be assigned a Sales Order Number.
NOTE: Retain Document Number check box applies only to transaction types with Sales Document Type of Sales Order. Sales Agreements have only one document number, Sales Agreement Number, associated with the transaction irrespective of whether agreement is in negotiation or fulfillment phase.

4. Then optionally assign a default transaction phase. The transaction phase defaults to either Negotiation or Fulfillment based on Order Management defaulting rules when the quick sales or standard sales order form is opened. The transaction phase always defaults to Negotiation independent of the defaulting rules when the form is opened through the Quotes menu option. If the transaction phase defaults to Negotiation, only the transaction types that also have a negotiation workflow associated with it are displayed.
In the absence of a default, the fulfillment phase is automatically populated by the system.
Note: The transaction phase can be changed up to the point of saving the transaction or before lines are entered. Once the transaction is saved or lines are entered, the transaction phase cannot be changed and the transaction phase field is non-updatable.

You can set the transaction phase directly on the sales document; the transaction phase determines where in the workflow the ransaction starts. Using a single transaction type you can choose to begin the transaction process in either phase if both fulfillment and negotiation workflow assignments exist on that transaction type.

Note: While Sales Orders lines are assigned a line type through which the transaction is processed, quotes and SAs do not use line types and follow a header flow only.
Transaction type designed for use with Sales documents For example in addition to header and line block data:
SA uses the following settings on the transaction types:
Document numbering
Flow assignments
Layout and contract templates.
Transaction phase
Quotes use:
Retain document number
Header flow assignment
Transaction phase
5-6 Oracle Order Management Implementation Manual
Layout and contract templates.

Workflows in Quotes

Quotes and Sales Agreements leverage the flexibility of Workflow to manage the quote life cycle. There are two phases for workflow: Negotiation and Fulfillment. Workflow flexibility allows you to tailor your Negotiation and Fulfillment phases to your specific processes. You can choose one of the following generic seeded header-level negotiation flows, these flows can be associated to transaction types for both Sales Orders and Sales Agreements. Both can be converted to an order. Quotes can be converted to sales orders in either the Entered or Booked status (if the booking activity is synchronous). The seeded workflows are as follows:
  • Negotiation Flow - Simple:This workflow does not require any approvals nor customer acceptance. However the quote can either expire or get lost if it does not progress to being converted to an order.
  • Negotiation Flow—Generic: Simple negotiation flow, without approval. Prepares quote document, get customer final acceptance, convert quote to the Sales Order.
  • Negotiation Flow—Generic with Approval: Flow with Approval. Prepare quote document, get management approval, get customer final acceptance, and convert the quote to an order.
In support of a quote the following Status types are predefined:
  • Draft
  • Pending Internal Approval
  • Lost
  • Pending Customer Acceptance
  • Draft Submitted
  • Internal Approved
  • Customer Accepted
  • Offer Expired - This status does not apply to Sales Agreements.
  • Draft - Customer Accepted
  • Draft - Customer Rejected
Seeded workflow that incorporates Internal Approval and customer acceptance After a quote has been put together, it can be submitted for approval. The relevant documents can be routed to various people in the organization, including people from Sales, Business Practice, Legal, or Finance, for review.
 
The list of approvers is defined at the Transaction Type level. The document must be approved by each participant in the list before the transaction is eligible to move forward in the workflow. If the approver fails to respond within the time limit, the system will re-send the notification. If the approver again fails to respond, the system will either send the notification to the next approver (if the current approver is not the last approver), or reject the notification based on the system parameter setup.
 
The Approver List can be accessed two ways:
  • From the Transaction Type setup window: (N) > Orders, Returns > Setup > Transaction Type > Define. Select the Approvals button to bring up the Approver List.
  • Navigate directly to the window: (N) > Orders, Returns > Setup > Transaction Type > Approvals.
If an approver is deleted from the list the notifications still need to be processed.
If an approver is added to the list and any transaction is pending approval they will receive a notification. The user will receive a notification and must approve or reject.

Complete business flow

1. Create and Submit the draft
Create an quote by entering the customer details, transaction type, currency and line level details.
Save it and submit the draft.
The status of the quote changes from Draft to Pending for internal Approval.


2. Approve the Quote

The Quote needs to be approved by all the persons in the approval list of the transaction type.
Once approved the status of the quote changes from
Pending for internal Approval to Pending Customer Acceptance.

 
3. Customer Acceptance
Do the customer acceptance and the quote 'll be converted to sales order with status Entered.


Retroactive Billing

Retroactive Billing allows you to change billing amounts retroactively in the event of a price renegotiation. Retroactive Billing is a common business process in some industries, especially the automotive industry, whereby a customer requests changes to the amounts charged on already invoiced orders and receives credits or additional invoices. Order Management provides a query to identify order lines that have previously been invoiced that may be subject to such retrobilling, a simple approval mechanism, and then the automatic generation of credit memos (and occasionally invoices).

Periodically, the price of an item on a sales agreement or purchase order will be changed, for example, a commodity will sharply increase or decrease in price. The customer will issue an amendment to the sales agreement or purchase order. If the price
change is retroactive, shipment quantities are identified that occurred during the retroactive billing period, and the additional charges or credits are calculated and sent to the customer for billing.

Setup
To set up retroactive billing:
1.

Create a new Credit Memo Reason Code to use for retrobilling. This is optional, but recommended because it allows you to query the credit lines and credits in Receivables using the reason code. Navigate to the Oracle Receivables Lookups window.
Order Management > Setup > QuickCodes > Receivables.
 

2.

Create an order type for retrobill orders. Navigate to the OM Transaction Types window.
Order Management > Setup > Transaction Types > Define.
Create an order type to use for Retrobilling. Set up the transaction type as follows:
  •  Mixed order category
  •  No credit check rules specified
  •  Bill-only line type for the default order line type
  •  Credit-only line type for the default return line type
  •  This order type should not have scheduling turned on because these orders should not be visible as demand to the planning systems.
3.
Set the OM Parameters. Navigate to the OM System Parameters values window.
Order Management > Setup > System Parameters > Values.
Enter the operating unit in the Operating Unit field.
Select Retrobilling Parameters from the Category field.
  • Set the default retrobilling order type to the transaction type you created.
  • Set Enable Retrobilling to Yes.
  • If you created a default reason code, choose it.
Save the parameters. You can override the order type and reason code for individual runs of Retrobilling. This step determines the defaults Retrobilling uses. Then enable Retrobilling, set the default order type, and set the default reason code.

4. Create any necessary folders for the Sales Order window. The fields on the Sales Orders form that support retrobilling are seeded as Hidden. You must create folders to display the retrobilling fields. Create folders with the attributes visible, and then assign those folders to the responsibilities who will perform retrobilling.

5. Add Retrobilling Organizer to the menu. Add the Retrobilling Organizer menu item to the responsibilities that will do Retrobilling. This menu item is seeded, but is not active for any responsibility until you assign it. If you have installed Oracle Release Management, this menu item is seeded as granted, so you do not need to perform this step.

Change Management

This chapter covers the following topics:

  • Processing Constraints
  • Versioning
  • Audit Trail
  • Open Interface Considerations
Processing Constraints
Processing Constraints enable you to control changes to sales documents in Oracle Order Management.
  • Processing constraints are rules that control who can change what and when they can change it.  Who can make changes based on responsibility. A constraint (rule) may apply to all responsibilities, to only a list of constrained responsibilities or to all except a list of authorized responsibilities.
  • Processing constraints can prevent certain changes, but can also be set up to perform actions based on those changes. They can define actions that can result from these changes, such as requiring a reason for the change, triggering an action in Audit Trail or Versioning, or raising an Integration Event.
  • More than just what can be updated. The following operations can be controlled: Create, update, delete, cancel, and split all at the entity level. For example, given a set of conditions you may not want to allow a user to create a new order line. You can also control the update operation down to the attribute level. For example, given a set of conditions, you could choose to allow update to the warehouse field of an order line but not to the price list field.
  • Changes based on a group of conditions. The conditions must be collectively true for the constraint to fire or prevent the changes. The conditions may be based on either the state of a workflow activity (where the entity is in the flow) or a value in a table. A condition may also be based on a custom API, which means that you can call your own PL/SQL code to evaluate the condition.
    Multiple conditions can be combined using either AND logic (all the conditions must be true) or OR logic (at least one of the conditions must be true.) A custom message can display when an attempt is made to violate a constraint.
Examples:
  1. No one can change the customer purchase order at the line level; your company requires that one sales order can relate to only one customer purchase order.
  2. No one can add a line to an order after any of the lines on the order have been invoice interfaced.
  3. A reason is required to cancel an order line after it has been booked.
  4. Only the Customer Service Manager can change the discount percentage on an order line after the line has been shipped.
  5. Require all return orders, identified by order type = Return, to be shipped to a central returns processing facility.
Defining Processing Constraints
Navigate to the Processing Constraints window. Order Management > Setup > Rules > Security > Processing Constraints.
Note that the window is divided into several regions. The top region has fields for the Application and the Entity. Any one of the OM entities are the valid values for the entity field. This is used for querying—you cannot create new entities. When you query an entity you will see all the constraints defined against that entity.

1. Constraints
The Constraints region is where most of the details of a processing constraint are defined. The region enables you to view the seeded constraints, view, or update the constraints that were created for your company. You can create new constraints, but you cannot change the seeded constraints with the system check box marked.

1.1. Operation Field
The Operation field can have the values of Create, Update, and Delete for any of the entities, Cancel for Order Header and Order Line entities only, and Split for the Order Line Entity only.

1.2. Attribute Field
The Attribute field can only be used if the operation selected is UPDATE. You may enter a value here, and the constraint will only apply to that field. For instance you may define a constraint that affects only the warehouse field on the order line. If the Attribute field is left blank the constraint will be in effect for all the attributes of the entity. For instance, you may define a constraint which prevents updates to any of the fields of an order line. Please note that only when constrainable attributes are updated, processing constraints execute. All attributes are not constrainable, therefore processing constraints will not execute for such attributes, even though the operation selected is UPDATE.

1.3 Action Field
The Action field allows you to select the action to be taken if the constraining conditions are met.
Note: There is no unique Require Reason action; it must be used in conjunction with Versioning or Audit.
Actions of Require Reason and Require Reasons and Require History for audit history are supported only for the UPDATE operation. Constraints are evaluated in the following order (Only one constraint may take effect for a change):

Actions that Require Reason take precedence over actions that do not.

Example
Assume that both versioning and audit constraints apply to update of price list. Only version is captured as it takes precedence and audit history is not available for this update. However, if audit constraint is on a different attribute like update of payment term and you change the payment term and price list, both version and audit history are captured.

1.4 Applies To Field
The Applies To field is used to define whether the constraint is applicable in the Negotiation or Fulfillment transaction phase. If the field is blank, then it is applicable to both phases.

1.5 System Changes Field
Use the System Changes field to indicate if system changes are allowed even if the constraining conditions are met. The system changes here refer to an attribute initially getting a default value or being re-defaulted when a source attribute changes. This is applicable only for attribute or field level UPDATE operations. The possible values are:
• Never after Insert: System changes are allowed to this field only if the entity has not yet been saved to the database. This is the default value.
• Always: System changes are always allowed on the attribute

1.6 User Changes Field
Use the User Changes field to indicate when the user performing the operation is constrained. This is applicable only for attribute or field level UPDATE operations. The possible values are:
• Never after Insert: You can change this field only if the entity has not yet been saved to the database. This is the default value.
• Always: You can never enter a value for this attribute, even if the entity (for example an order) is being created for the first time.

1.7 System Field
The System Field indicates if a constraint included with the OM system is user updateable. System constraints help prevent data integrity problems and cannot be updated. Any operation, field, action, or list of responsibilities attached to these
constraints cannot be modified. However, additional validation conditions can be included as long as they do not have the same group number.

1.8 Enabled Field
The Enabled field indicates whether the current Condition is active. This allows conditions to be temporarily disabled if necessary. Note that if all conditions are disabled and the constraint itself is not disabled, the constraint always applies for that change. Care must be taken to ensure that the disabling of conditions does not introduce problems in the business flow.

Order Import

Order Import is Order Management’s open interface for entering, changing or canceling orders and returns. Use Order Import to bring in orders from external systems, legacy systems, EDI, or from internal systems such as internal orders
created by Oracle Purchasing to fulfill internal requisitions.


Order Import has been implemented as a set of interface tables that must be loaded with the order or return data, and a set of APIs to process that data. A concurrent program is provided which calls the APIs to initiate processing of the data. In
addition, Order Import provides forms that allow you to query orders from the interface tables, make corrections or changes to that data, and re-initiate the import process. Orders that fail to be imported are retained in the tables, and can be
queried and corrected using the forms. Messages are provided to give you details of why the order did not import.
Order Import calls base Order Management APIs (specifically, Process Order API) to validate and insert or update.

Validation
Order Import does not contain its own validation routines for the data. Instead, it calls the Process Orders API, which is the same API used to validate and insert orders if you are keying them through the Sales Order window. This design makes
for better maintainability, as any enhancements or bug fixes done to Process Orders will immediately affect importing orders too. The Process Orders API uses Processing Constraints to evaluate whether a requested change can be made to an
order. Order Import, because it uses Process Order API, evaluates all Processing Constraints, and any constraint violations are captured and can be reviewed using the Correction Forms and the Messaging Window. Order Import has a feature that
allows you to run in validate only mode, to pre-screen the orders in a batch and correct all the errors before you run the import. If an order has any errors, then the entire order will be retained in the import tables. Importing is an all-or-nothing
process per order.

Correction Forms
Order Management has a set of forms you can use to review and correct data that is in the Order Import tables. They are called the Order Import Correction forms. They are accessible from the OM Menu under the Order Import menu item. They
consist of a find screen followed by a series of forms where you can view and correct data.
  • There are forms to display order headers, order lines, sales credits, price adjustments, return lot/serial numbers, payments, new customer and address records, pricing attributes, and the actions table.
  • The forms have buttons to enable you to re-validate or re-import data that you have selected.
  • Most fields do not have any validation or list of values within the window, so if you key over a field to correct it, you won’t know if it is good until you either validate or re-import.
  • If you decide an order or line is in the import tables in error, you can set the Reject_Flag to Y on the Status Tab to indicate that you don’t want to continue processing it. The order or line will be deleted in the next run of Order Import.This can be useful if an order it too difficult to correct via the forms.
  • This allows you to fix it in the feeder system and re-import it, or it can be used to purge off orders that may have resulted from duplicate runs of your feeder systems.
  •  
Importing Customer Information
Order Import can enter a new customer account with minimal data at the sold-to level on the order header. You can enter a new customer account at the ship-to, bill-to level or deliver_to at the order header or order line. An add customer
interface table accommodates this: when the table is loaded it indicates the intention is to create a new customer account the required fields are populated for the new account. Order Import then creates a new customer account and, if all required data is present and valid in the interface tables, a party. You can associate the new customer account with an existing party by providing the party (organization or person) number in the interface tables. If that column is left null, Order Import creates the party as well as the customer account. The new customer is assigned to the Default customer profile class, which specifies various financial and credit checking information.

Booking Orders via Order Import
Import orders and book them through Order Import. If the order fails booking validation, the order is still imported, but is left in the Entered state. The Messages Window can be used to see why the order failed booking or you can just attempt to Book using the Book button, and then errors will be displayed. There are two ways to indicate that you want the order to be booked. You can load the actions interface table OE_ACTIONS_IFACE_ALL with a value of BOOK_ORDER in the
OPERATION_CODE column to import orders in a booked status, or you can set the booked flag. See the section below on the Actions table for more information.

Changes and Cancellations
Input order changes and cancellations to existing orders via the Order Import open interface tables. There is a column in each of the interface tables called OPERATION_CODE where you put INSERT, UPDATE or DELETE. Null is equivalent to INSERT. If you want to make changes, you must specify an OPERATION_CODE of UPDATE. To cancel a line, use an operation of UPDATE and then make the ordered quantity = 0. To partially cancel, change the ordered quantity to the new quantity you want to remain on the line. To cancel an order in its entirety, use an operation of UPDATE at the header, and then set the CANCEL-FLAG to Y. All order changes and cancellations are subject to the Processing Constraints you defined.

Returns
Import returns just like you import orders, by choosing an order type that supports return line types. You can also import mixed orders – those are orders that have some outbound lines and also some inbound (return) lines. The path that the line
follows is determined by the workflow attached to the line type. You might import returns or return lines from legacy systems, or from other order entry systems you might be running. There is a separate interface table where you can import
anticipated lot/serial numbers – this table is only used for return lines.

Pricing
There are two ways to price orders being imported. You can let the system calculate the price, or you can populate the price fields in the lines interface table with the price you want to charge, and also populate the price-adjustment interface tables with price adjustments that result in that net price. You indicate which you want to use by setting a value in CALCULATE_PRICE_FLAG in the lines interface table. If the calculate price flag is Y, the system will ignore any pricing values loaded into the price fields and will calculate the price using the pricing engine. If the calculate price flag is N, you must populate unit list price, unit net price, and any price adjustments in the interface tables to account for the difference between list and net.

Shipping Tolerances

 
Oracle Order Management provides you with the ability to capture shipping tolerance levels for over and under shipments recorded during ship confirmation. The shipping tolerance feature enables you to define various shipping tolerance
levels for ordered and expected return quantities. Order Management shipping tolerances are used to validate the percentage of the ordered quantity. Once shipping tolerances have been defined, Order Management then automatically
fulfills order lines using the tolerances you defined.

Order Management’s shipping tolerances feature captures the following:
■ Over and under shipments and returns percentages at the system, customer,site, item, site-item, and customer item levels
■ Different tolerances for ordered and returned quantities
■ Defaulted tolerances from various sources based on your defaulting rules
■ Automatic fulfillment of total shipped quantities for order lines within the under tolerance limit
■ Tolerances levels that enable you to over ship at the time of ship confirmation

Over Shipments
When Oracle Shipping Execution attempts to over ship an order, Order Management processes the order based on the shipping tolerances you define. In order to perform an over shipment, Order Management:
■ Determines if the ship quantity is within the defined over shipment tolerance levels you defined by setting the OM: Overshipment Tolerance profile option or setting your shipment tolerances in Order Management.
■ Notifies the appropriate personnel when an over shipment is above the set shipping tolerance.
■ Issues the material for any unpicked or unreserved quantity.

Over Shipments Report
Oracle Shipping Execution provides the Over Shipments Report for displaying shipping tolerances. This report displays shipping tolerance information based on 
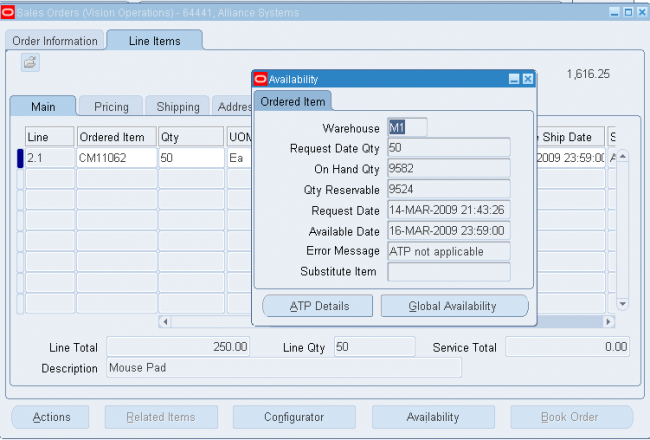
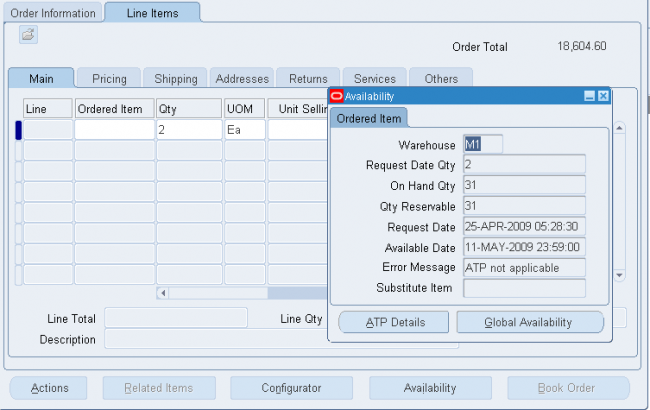
the customer, site, item, warehouse, ship date, and order type.

Under Shipments

When Oracle Shipping Execution attempts to under ship an order, Order Management processes the order based on the shipping tolerances you define. In order to perform an under shipment, you must:
■ Ship confirm the quantity at the time of closing the delivery
■ Determine if the total quantity shipped is within the under shipment tolerances you defined. Any remaining shipment allocations are removed Under Shipment tolerances greater than 100% are treated as the equivalent of a 100% tolerance; to close order lines a shipment of a non-zero quantity is required, even if the under shipment tolerance is set to 100%.

Defining Shipping Tolerances
Defining shipping tolerances are based on your customers and items or your customer site and item tolerances.

Prerequisites
■ Set up your customer and customer site tolerances in the Customer window
■ Set up your tolerances for items in the Master Items window

To define shipping tolerances for orders or returns
1. Navigate to the Setup Tolerance window. Order Management > Setup > Shipping Tolerances
2. Select the Customer name for the shipping tolerance.
3. Select the customer Address for the shipping tolerance.
4. Select the Item Number for the shipping tolerance.
5. Enter the Over Shipment Tolerance percentage.
The over shipment tolerance percentage determines the amount of the shipment you can exceed at the time of ship confirmation.
6. Enter the Under Shipment Tolerance percentage.
The under shipment tolerance percentage determines the minimums amount of the shipment at the time of ship confirmation. If you enter more than 100, the shipping process will use 100.
7. Enter the Over Return Tolerance percentage for return receipts. The over return tolerance percentage determines the amount of the return you can accept above.
8. Enter the Under Return Tolerance percentage for return receipts. The under return tolerance percentage determines the amount of the return you can accept below.

Shipping Exceptions

During the shipping and transportation of goods, unforeseen shipping exceptions can occur that conflict with the actual requirements of the shipper, transportation carrier, or customer.

If these exceptions are not handled promptly or properly, it could result in reduced customer satisfaction and loss of business and revenue for a company. Tracking exceptions can also be helpful to identify and correct defects in the business process. The seeded exceptions are logged automatically against delivery lines, LPNs, deliveries, and trip stops when specific change management events occur.
The change management events are shown in the descriptions below:

Change Orders in Oracle Shipping Execution

In the course of business, Customer Sales Representatives (CSR) enter sales order changes in Oracle Order Management (OM) or Oracle Project Contracts. Changes are required when customers ask to change quantity or shipping information, reschedule or cancel a sales order. The OM Change Management in Shipping design improves the synchronization of delivery lines and reservations with the order lines when they are changed.

Prior to the Order Management Change Management design, changes to pickable orders were allowed as long as the orders were not booked or interfaced with Oracle Shipping Execution. However, once the orders were interfaced into Shipping
and Pick Released, changes to the sales orders were limited. The objective of the Line Change Management design is to allow most of the sales order changes up until the delivery lines are Staged or Ship Confirmed. Only changes entered after the sales order lines are booked and interfaced with Shipping Execution are validated by the change logic in Shipping Execution. Order Attribute changes propagate in Shipping Execution based on the Shipping Execution change logic.

The following table lists sales order line changes resulting from Order Management updates. The change category letters correspond to Shipping Execution change logic as follows:

  • ■ A: Change in Quantity
  • ■ B: Change Organization, Inventory and Unschedule
  • ■ C: Change in Schedule Date
  • ■ D: Change in Ship Sets or Arrival Sets
  • ■ E: Change in Delivery Grouping Attributes
Change Logic
Before changes are considered, all line imports and line splits must be processed. The WSH_INTERFACE holds, in any order, the 3 types of entries from Order Management interface API call:
■ Requests to Import lines and create matching deliveries (I - Import)
■ Split existing delivery lines (S - Split)
■ Order Management changes request to Update Shipping Attributes (U - Update)
Shipping scans all entries through WSH_INTERFACE to process Order Management entries in the proper order. The Shipping change validation logic is initiated for interface lines where the action flag value is set to U for Update.
When a change is requested, the attribute change category is evaluated to determine what type of validation and action is needed to successfully update the Shipping attributes.

Order and Delivery Status Mapping
The following table shows the correlation between Sales Orders in Order Management and the related Shipping Deliveries status. Changes to sales order lines not interfaced from Order Management to Shipping are not restricted by Shipping. For sales order lines interfaced from Order Management to Shipping, changes are allowed based on attributes updates if the deliveries are not closed. No changes are allowed for Confirmed or Shipped deliveries if the interface between Shipping and Order Management has not run to update the sales orders. 
 
 
OM-WSH Interface to Import Attribute Changes
Order Management initiates a change by passing updated sales order data to Shipping and setting the Interface Action flag to the Update value. Shipping processes all interface data by:
■ Importing order lines to create delivery line details for newly inserted records. (I)
■ Processing Split request for existing delivery lines. (S)
■ Shipping change validation determines what attributes have been changed. (U)
Based on the attributes changed, distinct validations are applied to propagate the order changes to Shipping delivery lines.

Shipping Attribute Change Validation Logic
The change validation logic is initiated for WSH_INTERFACE.Update_Shipping_Attributes lines where the Action Flag is set to U. The distinct attribute changes that need validation are classified in the following categories:
■ Change in Quantity
■ Change Organization, Inventory, and Unschedule
■ Change in Schedule Date
■ Change in Ship Sets or Arrival Sets
■ Change in Delivery Grouping Attributes
Changes to other attributes are propagated if the delivery status is not Shipped or Staged/Pick Confirmed.
Existing and new inventory reservations are managed by Shipping as detailed in the following section.

Inventory Reservations Logic
The Inventory reservation logic was redesigned so shipped quantities can always be matched with existing reservations during Inventory interface after Ship-confirmation. The reservations tables are part of the Oracle Inventory product.
Inventory internal Applications Program Interfaces (APIs) are used to create, update, or cancel reservations stored in the Inventory tables. These APIs are called by Order Management and Shipping code to manage reservations and reservation
splitting.
Reservation management by Order Management and Shipping:
■ When an order is booked, the Order Management code creates reservations by calling Inventory APIs.
■ After the order lines are interfaced in Shipping, existing Inventory reservations are managed in Shipping by calling Inventory APIs.
■ Order Management does not update reservations with changes after booking.
Instead, Shipping updates, creates, or deletes reservations for changes originated in Order Management.
■ Overpicked quantities do not have existing reservations when orders are interfaced. Shipping creates additional reservations so all picked inventory items can be tied to the reservation.

Delivery Line Split
When an interfaced order line is split, Order Management requests a delivery line split by setting the OM-WSH interface API action flag to S for Split. As Shipping splits a delivery line, it also synchronizes the Inventory reservation and splits and the move order line. Split is allowed for delivery lines not ship confirmed.
■ Delivery lines Released to Warehouse are reset to Ready to Release and their move order lines are canceled
■ Reservations are split
■ Both proportional and non-proportional splits retain and split original serial numbers

Setups
There are no mandatory setups to enable the Change Management functionality. Order Management provides constraints that can be customized during implementation. These constraints are used to prevent sales order changes after the
associated delivery lines have been pick confirmed in Shipping. If you choose to remove these constraints, it is recommended that you implement a two-step shipping process (Confirm/Close Delivery then Ship Confirm) or to
always make sure the deliveries are ship confirmed as soon they are loaded or picked up by the carrier. If the system is not accurately updated in real-time, changes may be allowed after the deliveries are far-gone.

OM Constraints

Order Management provides constraints at pick confirm for users who physically ship deliveries before confirming them in the system. Without these constraints, this process can allow changes between the time items are shipped and the ship confirmation update in the system.

By default these constraints are active to disable order line changes after pick confirm step. Once the delivery lines have been pick confirmed/staged in Shipping Execution, Order Management users are not allowed to change, cancel or split order
lines.

Some users require changing order lines after the delivery is pick confirmed/staged and until the ship confirmation stage. The system supports flexibility of removing some or all the Order Management- Shipping constraints.

Changing Defaults
To access the Order Management constraints window follow these steps:
1. Navigate to the Processing Constraints window. N: Setup > Rules > Security > Processing Constraints.
2. In the Application field, query Oracle Order Management.
3. In the Entity field, query Order Line.

List of OM Constraints at Pick Confirm
The Order Management constraints control the following types of Order Line changes once deliveries are ship confirmed:
■ Update order line
■ Cancel order line
■ Delete order line
■ Split order line
In turn, Order Line update is controlled for 22 different shipping attributes as shown in the following table:


Exception Messages
The following messages have been created to provide feedback to Order Management users when an order line change is rejected.
Update Not Allowed
Message: The update is not allowed because the source line is under WMS control.
This message is returned if the update cannot be executed because the source line is under Oracle Warehouse Management (WMS) control.

Update Cannot Split Quantities
Message: The source line cannot be split because quantity conversion has an error.
This message is returned if the update is rejected because the source line cannot be split due to a quantity conversion issue. This exception happens when the result of a split would create a null or negative quantity.

Attribute Update Not Allowed
Message: The update requested cannot be executed now because the source line has at least one delivery line that is in a confirmed delivery or has been shipped.
This message is returned when the update cannot be executed because the source order line is only partially eligible for a change. The order line is associated at least with a confirmed delivery line or has already been shipped. For a change to be
allowed all delivery lines, related to the source order line, must be eligible for the change.

Invalid Source Code
Message: The Source code 'Source_code_name_string' is not recognized. This message is returned when a delivery line update was rejected because it was requested by a product other than Order Management. The source code allowed is
restricted to 'OE'. Other products cannot request Shipping changes.

Invalid Packing Condition Caused by Shipment Attribute Change
Message: One or more shipment attributes have been changed for delivery line &DETAIL. Please manually unassign the delivery line from container &CONTAINER_ID.
This packing exception message is returned when Order Management has changed at least one non-enforced Shipment attribute for a delivery line packed in an LPN (container.)
The update was executed but may require an additional manual step to unassign the delivery line from the LPN. The message provides the delivery line detail and the LPN ID to manually unassign the delivery line from it.
 

Versioning

Versioning is a method to capture changes and updates made to a transaction. Versioning is currently available for sales orders, quotes and Blanket Sales agreements. There is support for both manual versioning as well as automatic versioning.

Versioning includes the following:

  • Version Control: Capture of changes and updates made to Sales Orders, Quotes and Blanket Sales Agreements. This feature offers:
  1. Version generation
  2. Validation of version number
  3. Version history maintenance and comparison
  4. Searching prior versions
  5. Reasons and comments for versioning
  6. Tracking Clause versions in Blanket Sales Agreements
  7. API’s and Order Import: Versioning support for sales transactions created or updated from multiple modes
  •  Versions can be created, managed, viewed and compared, providing comprehensive information about a given transaction
  • Assists during the negotiation phase of a sales transaction by maintaining a history of the transaction cycle
Note: Price Lists and Modifiers are not versioned on a Blanket Sales Agreement.

Version Generation
Versioning is manual by default. If you want to enable automatic versioning, you must set up the appropriate processing constraints. For example, you can use validation templates to drive versioning by transaction type as a condition. By
using the processing constraints and workflow activity, you can determine when to increment the version and which statuses are available to version. For example, you can increment a version only when specific attributes of the transaction are changed/updated. You can increment the version number Versioning whenever there is a change in order quantity, payment terms, price list, required date, or other attributes.
You can link versioning control to workflow activities statuses. Version generation functionality includes:
■ Manual / Automatic option
■ Version number as a whole number and as separate field, following the document number
■ Update manually at any time, provided the setup allows amendment in a specific status
■ Option to retain the document number during the transition to a Sales Order
■ Specify the required conditions for automatic versioning

Version History
Version history maintenance is useful for reference and comparison. This is particularly true of quotes and Blanket Sale Agreements (BSAs) with a negotiation phase where the transaction document changes a number of times before it is approved. This may occur with complex products that are frequently redesigned to meet customer requirements, or with a loyal customer who negotiates for a long time for the best price with the promise of higher order quantities over an  extended period of time.
Versioning maintains the history of previous versions, when the active version is changed. However, one can use the previous versions as templates for creating new sales order, quotes or blanket sale agreements at any time with the copy feature. Version history maintenance and comparison enables:
■ Maintenance of transaction history of previous versions
■ Ability to amend the current version of the transaction
■ Tracking changes over a period of time and view those changes
■ Comparison of changes made to transactions across versions
■ Copy any version of a Quote to a Sales Order

Audit Trail

Audit Trail records and tracks updates to specified order attributes as they occur. Reports of comprehensive audit trail updates of Oracle Order Management are generated using Processing Constraints, Lookups, a system parameter, and the Audit Trail Consolidator concurrent program. Current Processing Constraints functionality enables you to specify exactly what business functions, by entity you wish to control when performing order modifications. You can define new processing constraints that specify when, and for what attributes of an order, audit trail updates are recorded. The Order Management system parameter Audit Trail must be enabled to use this feature.

Process Flow
Oracle Order Management gives businesses the flexibility to audit as much or as little of their order process as they require. Each business can decide what order attributes are so critical that an audit needs to be maintained and then set up the
processing constraints accordingly. Once the constraints are defined, users can enter and change orders as they always have. If a change is made to an attribute that has been defined as requiring a reason to change it, then the user is prompted to select a reason code from a user-defined list.
Finally, queries can be run or reports produced to show what actual changes have been made to auditable attributes, who made the changes and when.

Versioning  V/S Audit Trial

  1. Versioning works in conjunction with audit trail only when the transaction enters the fulfillment phase, not during the negotiation phase.
  2. Version control applies to all sales documents including Sales Orders, Quotes and Blanket Sales Agreements but audit trail is ONLY applicable to Sales Orders.
  3. Versioning can be manual or automatic.
  4. Audit trail captures changes within a version but version control captures changes that increment a version. The audit trail may track all sales order changes that may not necessarily constitute revising the sales order to a new version. You cannot track a single change with both Versioning and Audit Trail. The user must decide what method they wish to use to track the change history.
  5. Version Control records the entire business object, allowing users to view the changes to the document real time and online. Whereas, Audit Trail records a single change in order to capture who made the change and what the change was.
  6. Version control can compare against previous versions where audit trail cannot.
Example
Business requirement is that whenever the currency code is changed in sales order header an audit trial needs to be generated.
1. Setups
  • Enable audit trial in system parameters.
  • Set up Processing Constraints to indicate which attributes on the order you want to have audit trail recorded for currency change.
 
2. Process
  • Change the currency of the sales order.
  • Run the request Audit History Consolidator with correct parameters
  • Verify the record in audit history window
Setups
1. Set the OM System Parameter Audit Trail.
Navigate to Order Management > Setup > System Parameters > Values.
Select your Operating Unit.
Select Generic Parameters from the list of values.
For the Audit Trail Parameter, select from the list of values: "Enable when Order is Booked," "Enable when Order is Entered," or "Disabled."

2. Set up Processing Constraints to indicate which attributes on the order you want to have audit trail recorded for
Create some new Validation Templates if you have specific conditions to control whether or not to record audit information.

3. Add "View Audit History" menu option to the Order Management menu for those responsibilities that need to be able to view the new Audit History forms - this menu option will be created through seed data.

4. Schedule the Consolidator program (Audit History Consolidator) to run periodically to make audit information available to query and report.

Approvals

This window is used to setup the list of the approvers (used for Quotes and BSA), which could be associated to the transaction type and/or transaction phase. 

You can define a different set of approvers for different transaction types and the transaction phase combinations. E.g. we have defined two transaction types, "Standard A" and "Standard B." You can use one set of approvers for Negotiation and "Standard A" transaction type and another setup of approvers for Negotiation a "Standard B" transaction type.

Note: Currently, the approval activity is only seeded in the Negotiation phase. For the Fulfillment phase, approval related activities have been seeded in the OM Standard WF item type. You can use this to create an approval subflow.

Notes : A role can be any employee of the organization

When the next approver in the chain of approvers is notified that a document requires review and approval/rejection, the approver can either:
  • View a summary or abstract from the workflow (WF) e-mail notification, including: Quote or BSA number, Description, Customer name, Forwarded from, Requester, Total Amount
  • View the entire sales document as it would appear for printing, including all products/services, pricing/discounts, and all other terms from the PDF link on the workflow notification
  • You can view the summary information from the notification, and view the entire sales document from an attachment on the WF notification.
  • Approval Recipient(s)
With this approach you can send notifications to a different set of recipients based on the setup in the Order Management Approval setup window. This gives more flexibility for setting up different hierarchical lists for different transaction phases and transaction type combinations.

Complete Approval Flow
1. Select the Negotiation Flow as Negotiation Flow - Generic with Approval.
 
2. Create the quote and progress it. The status changes from Draft to Pending Internal Approval.

3. Go to WF Notifications and approve the quote.

Cancellations in Order Management

Example

3 different sales orders are shipped with 2 differnt delivery ids.
The default grouping rule contains only the required attributes. When we run autoinvice for all these SOs the system 'll create only one Invoice.

Check the reference number in invoice Header.

I/C AP & AR Invoice from SO

Select a.order_number Sales_Order, d.trx_number IC_AR_INVOICE, e.INVOICE_NUM IC_AP_INVOICE, g.segment1 PO_NUMBER,
b.ordered_item, b.invoice_interface_status_code,
b.invoiced_quantity, b.flow_status_code

From apps. oe_order_headers_all a,
     apps. oe_order_lines_all b,
     apps. HR_ALL_ORGANIZATION_UNITS c,
     apps. RA_CUSTOMER_TRX_ALL d,
     apps. AP_INVOICES_ALL e,
     apps. OE_DROP_SHIP_SOURCES f,
     apps. PO_HEADERS_ALL g

Where
b.header_id = a.header_id
AND f.LINE_ID = b.line_id
AND d.org_id=c.organization_id
AND a.order_number='10090178' //SO number
AND c.name LIKE 'XXX%UK%' //Operating unit
AND d.ct_reference= to_char(a.order_number)
AND e.INVOICE_NUM = d.trx_number
AND f.po_header_id=g.po_header_id
 

Internal Approval for Quotes & Sales Agreements

Quotes and Sales Agreements leverage the flexibility of Workflow to manage the quote life cycle. There are two phases for workflow: Negotiation and Fulfillment. Workflow flexibility allows you to tailor your Negotiation and Fulfillment phases to your specific processes. You can choose one of the following generic seeded header-level negotiation flows, these flows can be associated to transaction types for both Sales Orders and Sales Agreements. Both can be converted to an order. Quotes can be converted to sales orders in either the Entered or Booked status (if the booking activity is  synchronous). The seeded workflows are as follows:

• Negotiation Flow - Simple:This workflow does not require any approvals nor customer acceptance. However the quote can either expire or get lost if it does not progress to being converted to an order.
• Negotiation Flow—Generic: Simple negotiation flow, without approval. Prepares quote document, get customer final acceptance, convert quote to the Sales Order.
• Negotiation Flow—Generic with Approval: Flow with Approval. Prepare quote document, get management approval, get customer final acceptance, and convert the quote to an order.

In support of a quote the following Status types are predefined:
Draft,  Pending Internal Approval
Lost,   Pending Customer Acceptance
Draft Submitted,  Internal Approved
Customer Accepted,
Offer Expired - This status does not apply to Sales Agreements.
Draft - Customer Accepted, Draft - Customer Rejected

After a quote has been put together, it can be submitted for approval. The relevant documents can be routed to various people in the organization, including people from Sales, Business Practice, Legal, or Finance, for review.
The list of approvers is defined at the Transaction Type level. The document must be approved by each participant in the list before the transaction is eligible to move forward in the workflow. If the approver fails to respond within the time limit, the system will re-send the notification. If the approver again fails to respond, the system will either send the notification to the next approver (if the current approver is not the last approver), or reject the notification based on the system parameter setup.


The Approver List can be accessed two ways:
1. From the Transaction Type setup window: (N) > Orders, Returns > Setup > Transaction Type > Define. Select the Approvals button to bring up the Approver List.

2. Navigate directly to the window: (N) > Orders, Returns > Setup > Transaction Type > Approvals.

If an approver is deleted from the list the notifications still need to be processed.

If an approver is added to the list and any transaction is pending approval they will receive a notification.

The user will receive a notification and must approve or reject.

Gross Margin Set Up


1. Navigate to the Order Management Parameters window. The default for Calculate Margin is No. To use margin, you must enable Calculate Margin control. Choose whether to do the calculation based on Price or Cost. Save your work.
 
2. Decide if you want to hold orders that do not meet minimum margin percentages. If you do, decide which order types you want to do this for. Go to the Order Management Transaction Type window and query up each Order Type record and enter the minimum margin percentage. Save each record.

3. Determine which responsibilities do NOT need to be able to see Gross Margin information in the Sales Orders window and the Pricing & Availability window.
Using the System Administrator responsibility, navigate to Applications > Responsibility, define or query up a responsibility with "Orders, Returns Main Menu" attached, and exclude the View Margin function from those responsibilities.

4. Create a folder for the Sales Orders window, Order Information tab, Other sub-tab to display both or either Margin Amount and Order Margin %, and a folder for the Line Items tab to display any or all of the Cost, Margin Amount and Margin % fields on the Main sub-tab or the Pricing sub-tab. Assign that folder to be the default folder for those responsibilities who can see margin.

Create a folder for the Pricing & Availability window Pricing tab to display any or all of the Cost, Margin Amount and Margin % fields and assign that folder for those responsibilities who are allowed to see margin.

Gross Margin Procedures

To view Gross Margin while entering orders:

1. Navigate to the Sales Orders window.

2. Enter order header information.

3. Enter line information. As each line is priced, the cost is obtained and the margin is calculated. The cost and/or margin information will be displayed.


4. While entering the order, you can go back to the Order Information tab, Other sub-tab, to check the order margin.
Note: You can see gross margin for the following types of outbound lines -service lines, standard lines (both process or discrete), and ATO items - for which costing is enabled.


5. When you finish entering the order, you can also view the order level margin by going back to the Order Information tab, Others sub-tab.

6. Book the order. If there is a minimum margin set up for this Order Type and the order has an overall margin percentage below the minimum, the order will be placed on hold. You will get a message saying a Gross Margin hold is being applied.
Note: When the order margin is displayed on the order header, if one or more non-return lines have been excluded from the calculation because its cost is null, then a message displays: 'Order margin has been calculated excluding one or more lines.'
Note: The entire order is held if the order margin is less than the minimum margin for the order type. This will be determined at booking time. The calculation of order margin will exclude return lines and also any lines with null cost. If order changes occur that result in the order margin meeting or exceeding the minimum margin for the order type, then the hold is automatically released.

The margin hold may be released manually by authorized users. If it has been manually released, then it is not applied again automatically. This order level hold, holds up return lines if the outbound lines cause the order to go on margin hold. Processing of ATO and PTO models, which are not used in the margin calculation, will also be affected if the order goes on margin hold.

Also, it is possible that an order with some shipped lines may go on margin hold, if for example a line is added to the order later. In this case, the hold may hold the invoicing of lines that have been shipped.

Item Orderability

Discount Information

Invoice Interface activity interfaces price adjustment information to Oracle Receivables. You have an option to print detail discount information.

You need to set profile option OM: Show Discount Details on Invoice to YES to print detail discount information on the invoice. The discount information gets printed on a separate invoice lines from the order information. The product line and the associated discount lines roll into the same revenue account.

Discount lines in the invoices include:

  • Discount Name: Displayed in the description field
  • Discount Amount: Displayed in negative quantity
For example, suppose you had an order line with the following example data and the profile option OM: Show Discount Details on Invoice is set to YES.
• Description = Item A
• Quantity = 2
• Unit Price = 100
• DiscountName1 = 10%
• DiscountName2 = 15%

The table below lists example order line details and what will be displayed on a Oracle Receivable invoice for the data listed above


Now, suppose the profile option OM: Show Discount Details on Invoice is set to NO. No detail information relating to discounts will be displayed on the Oracle Receivables invoice, but you will be able to view the Amount Paid per invoice Line. The table above lists example order line details and what will be displayed on a Oracle Receivable
invoice for the example data listed above.

Physical Attribute Group


Following are the Physical item attributes and their possible values. You set these attributes when defining or updating items :

Weight Unit of Measure
Enter a weight unit of measure.

Unit Weight
Enter the weight for one unit of the item in the Weight Unit of Measure.

Volume Unit of Measure
Enter a volume unit of measure.

Unit Volume
Enter the volume for one unit of the item in the Volume Unit of Measure.

Container
Select Container to identify items that are containers used for shipping sales orders.

Vehicle
Select Vehicle to identify items that are vehicles used for shipping sales orders.

Container Type
For items identified as containers, enter the container type.

Internal Volume
Enter the internal volume of the container or vehicle in the same UOM as the Unit.

Volume.
This attribute is used by shipping to calculate container capacity restrictions.

Maximum Load Weight
Enter the maximum load weight of the container or vehicle in the same UOM as the Unit Weight.

Minimum Fill Percentage
Enter the minimum fill percentage under which the container or vehicle should be used.

Dimension Unit of Measure
Dimension unit of measure for an item.

Dimension Length
Item length.

Dimension Width
Item width.

Dimension Height
Item height.

Collateral Item
Indicate whether the item is collateral. When you register collateral as a promotion in Oracle Sales and Marketing, you can link it to the item you define here. Then you can use Oracle Sales and Marketing to include this collateral item in a fulfillment request for a contact or a mass mailing. Oracle Sales and Marketing displays a list of valid collateral when creating a fulfillment request or mass mailing, based on the items you define with this flag.

Event
Indicate whether the item created is an Event item.

Equipment
Indicate whether this is an Equipment item, used in Oracle Warehouse Management.

Electronic Format
Indicate whether this item exists only in electronic format and not physical. This attribute is used in Oracle Marketing.

Downloadable
Indicate whether this item is downloadable. This attribute is used in Oracle Marketing.

OM Indivisible
Indicate whether this item can be ordered in fractions. This attribute support indivisible units of measure.

B2B Work Flow