Oracle iExpenses
With Oracle Internet Expenses,
- Employees can enter and submit expense reports using a standard Web browser or a Web-enabled mobile device.
- Oracle Workflow automatically routes expense reports for approval and enforces reimbursement policies.
- Oracle Internet Expenses integrates with Oracle Payables to provide quick processing of expense reports for payment.
This chapter provides an overview of the features and processes in Oracle Internet Expenses.
Expenses-related Workflows:
There are five workflows related to Internet Expenses:
Expenses, Credit Cards, Expenses Analysis, Expense Receipts, and Expense Holds.
- Expenses Workflow manages the notifications between managers, accounts payable, and users related to reviewing and approving expense reports.
- Credit Cards Workflow manages the notifications related to the processing and management of credit card transactions.
- Expenses Analysis Workflow sends notifications when proxy reporting access is granted.
- Expense Receipts Workflow manages the notifications related to submitting receipts and missing and overdue receipts.
- Expense Holds Workflow manages the notifications related to placing and releasing holds on expense reports.
Manager Approvals:
Internet Expenses works together with Oracle Approvals Management (AME) and Oracle Workflow to automatically route expense approvals and notifications to cost center owners, cost center business managers, project managers or award managers. Approval notifications provide managers with all information with which to make informed decisions, including the reimbursable amount displayed in the approver's currency and expense lines that were split and charged to their own cost centers.
Use Oracle Approvals Management to build routing rules for expense reports based on header or lines information. Use the Expenses Workflow to manage the routing of notifications to and from managers, auditors, and users.
Integration with Other Applications:
Internet Expenses works together with other applications to provide a full array of services devoted to managing and streamlining
every aspect of the expense report process. These include:
- Oracle Payables. Use Payables to create expense report invoices and to manage the processing of credit card and procurement card transactions.
- Oracle Projects. Internet Expenses integrates with Oracle Projects to enable users to add project-related information on expense reports.
- Oracle Grants Accounting. Oracle Grants Accounting extends the functionality of Oracle Projects and integrates with Internet Expenses to enable users to enter award information on their expense reports and collect reimbursement from the award that sponsored the activity.
- Oracle Approvals Management. Use Oracle Approvals Management to build routing rules for expense report approvals.
- Oracle Application Framework. Oracle Application Framework lets you personalize the display of Internet Expenses without modifying the underlying code.
Expense Report Process
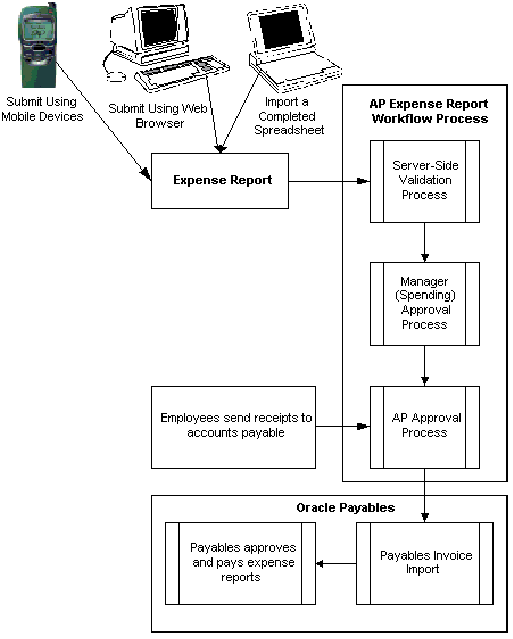
The below diagram demonstrates the complete process flow of expense reports from creation to payment.
Creating Expense Reports
Employees can create expense reports in these ways:
- Online using their computers and a standard Web browser.
- Online using Web-enabled mobile devices.
- Offline using Microsoft Excel spreadsheets from a configured template.
Employees must have the Internet Expenses responsibility to create an expense report. If you implement the credit card functionality, employees can include credit card transactions in their expense reports
Sending Receipts to Accounts Payable
After an employee submits an expense report, Internet Expenses displays a confirmation page with instructions for the employee. For example, you may want to inform the employee that a notification will be sent when the report is approved by management and at that time all original receipts must be sent to the accounts payable department. Most companies require original receipts for verification before reimbursing employees for business expenses.
Expense Report Workflow Process
When an employee submits an expense report for approval, the Expense Report workflow process begins. The Expense Report workflow is used to obtain manager and Payables approvals on expense reports. The Manager (Spending) Approval process
routes expense reports to managers for approval. When an expense report receives approval, the workflow transitions to the AP Approval process. If a manager rejects the report, the workflow transitions to the Rejection process.
The AP Approval process first determines whether an expense report requires the approval of the accounts payable department. If approval from the accounts payable department is not required, the process automatically approves the expense report. If the report requires approval from the accounts payable department, the process waits until it receives a response from that department before continuing. Once the workflow process is complete, the expense report in the Payables Expense Reports window has a number of restrictions on user interaction.
Converting Expense Reports into Invoices
Oracle Payables pays invoices only, so before an approved expense report can be paid, it must be converted into an invoice. The Oracle Expense Report Export converts expense reports created in Internet Expenses into invoices in Oracle Payables. An
expense report can be processed by the Expense Report Export program only if it receives approval from both the approval manager and the accounts payable department during the Expense Report workflow process.
Reimbursing Expense Reports
After the Expense Report Export program creates invoices for expense reports, you can create payments for the invoices using the same method as for other invoices.
iExpense Setup
1.1 Define expense report templates in AP setup.
1.2 Define policy schedules as required in i expense setups
2.1 Create user and add approvers
2.2 Enter the signing limit for the approver
3.1 Add an auditor in iexpsense setup – Audit – Maintain Audit List
3.2 Add the operating unit in the context tab
3.3 Check the audit tab – rules assignment, The OU name should be visible
3.4 Add the rule assignment
Updating Oracle Internet Expenses Messages
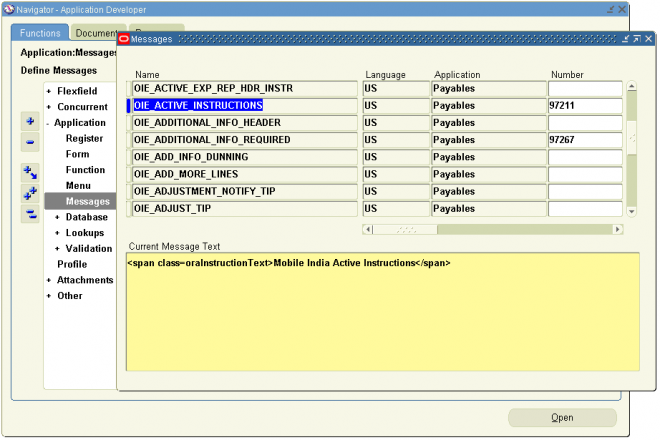
Use the Messages window in the Oracle Application Object Library to edit Internet Expenses messages. You can update any of the Internet Expenses messages either to add content or to make the content more specific to your business. For example, you might change the instructions in a window to use terminology that is unique within your company or modify the content of an error message to provide additional information. All Internet Expenses messages use either the prefix AP_WEB or OIE
in the message name.
This section contains instructions for updating these messages:
- OIE_ACTIVE_INSTRUCTIONS. Message text for the Active Expense Reports page.
- OIE_INVOICE_DESC. Description message for credit card transactions.
Adding a Message to the Active Expense Reports Page
You can add your own message text at the header level to the Active Expenses Reports page. The default is no message.
1. Log into Oracle Applications using the Application Developer responsibility.
2. Navigate to the Messages window.
3. Query the message OIE_ACTIVE_INSTRUCTIONS.
4. Add the text of your message in the Message Text field.
5. Save your work.
Changing the Description Message for Credit Card Transactions
If you use credit card programs and set the Payment Due From field in the Card Programs window to Both or Company, invoices will be created in Payables that are due to the credit card issuer. For both remittance and reconciliation purposes, the invoices utilize this message to provide employee’s name and card number.
If you use both pay, the invoice header’s description field displays the content of this message. If you use company pay, the message information is displayed in the description field of the invoice distribution records.
By default the applicable description displays the credit card number and card holder name, followed by the expense report purpose. You can change the order of the description, or you can remove either the credit card number and card holder or the expense report purpose.
1. Log into Oracle Applications using the Application Developer responsibility.
2. Navigate to the Messages window.
Note: If the total number of characters for credit card number, card holder, and description exceeds 240, Internet Expenses truncates the message.
3. Query the message OIE_INVOICE_DESC.
EMP_CARD_NUM represents the credit card number and card holder.
EXP_RPT_PURPOSE represents the expense report purpose.
EMP_FULL_NAME represents the card holder’s full name.
4. The default message is EMP_CARD_NUM - EXP_RPT_PURPOSE.You can choose which descriptions to show in the message and which order they are shown in. For example: Delete EMP_CARD_NUM to remove the credit card number and card holder from the message.
5. Save your work.
Defining Employees
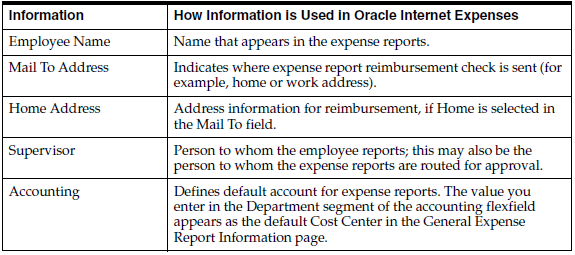
Define employee information for all persons that will use Internet Expenses. You can enter employee information in Oracle HRMS, or, if you do not use Oracle HRMS, in the Enter Person window in Oracle Payables. This table lists the personal information to enter for each employee and how Internet Expenses uses that information.
Note: Users do not need to define an employee’s supervisor in Oracle Human Resources, if the supervisor is specified in the
Approver field on an expense report.
Default PO Expense account
In Human resources Responsibility
Navigate to People -> Enter and Maintain
Query the Person, click on Assignment tab, select Purchase Order Information Tab
Enter the 'Set of Books' and 'Default PO Expense' information
Setting up Contingent Workers
A contingent worker is a worker who does not have a direct employment relationship with your company and is typically a self–employed individual or an agency supplied worker. To use the contingent worker functionality in Internet Expenses,
you must set up your contingent workers and enter their supplier names in Oracle HRMS
To enter supervisory information:
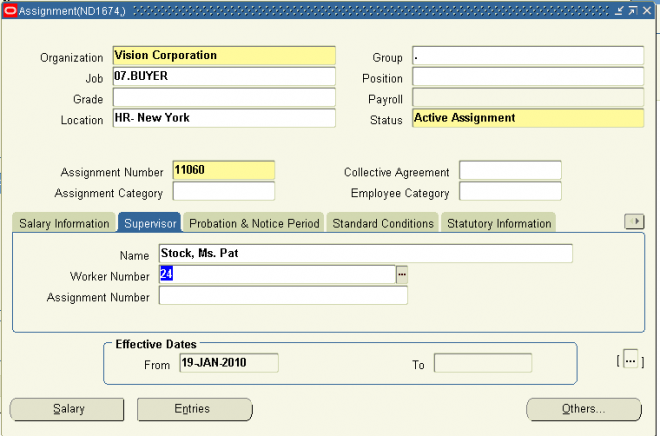
1. Choose the Supervisor tabbed region.
2. Select the name and number of the worker's personal supervisor.
You can select a contingent worker as a supervisor only if the HR: Expand Role of Contingent Worker user profile option is set to Yes.
You can select a supervisor from another Business Group if the HR:Cross Business Group user profile option is set to Yes at your site.
Note: The application does not update this information. Use organization and position hierarchies to show management reporting lines.
2.1 Defining Employees
Define employee information for all persons that will use Internet Expenses. You can enter employee information in Oracle HRMS, or, if you do not use Oracle HRMS, in the Enter Person window in Oracle Payables. This table lists the personal information to enter for each employee and how Internet Expenses uses that information.
Note: Users do not need to define an employee’s supervisor in Oracle Human Resources, if the supervisor is specified in the
Approver field on an expense report.
Default PO Expense account
In Human resources Responsibility
Navigate to People -> Enter and Maintain
Query the Person, click on Assignment tab, select Purchase Order Information Tab
Enter the 'Set of Books' and 'Default PO Expense' information
Setting up Contingent Workers
A contingent worker is a worker who does not have a direct employment relationship with your company and is typically a self–employed individual or an agency supplied worker. To use the contingent worker functionality in Internet Expenses,
you must set up your contingent workers and enter their supplier names in Oracle HRMS
To enter supervisory information:

1. Choose the Supervisor tabbed region.
2. Select the name and number of the worker's personal supervisor.
You can select a contingent worker as a supervisor only if the HR: Expand Role of Contingent Worker user profile option is set to Yes.
You can select a supervisor from another Business Group if the HR:Cross Business Group user profile option is set to Yes at your site.
Note: The application does not update this information. Use organization and position hierarchies to show management reporting lines.
2.1 Defining Employees
Define employee information for all persons that will use Internet Expenses. You can enter employee information in Oracle HRMS, or, if you do not use Oracle HRMS, in the Enter Person window in Oracle Payables. This table lists the personal information to enter for each employee and how Internet Expenses uses that information.
Note: Users do not need to define an employee’s supervisor in Oracle Human Resources, if the supervisor is specified in the
Approver field on an expense report.
Default PO Expense account
In Human resources Responsibility
Navigate to People -> Enter and Maintain
Query the Person, click on Assignment tab, select Purchase Order Information Tab
Enter the 'Set of Books' and 'Default PO Expense' information
Setting up Contingent Workers
A contingent worker is a worker who does not have a direct employment relationship with your company and is typically a self–employed individual or an agency supplied worker. To use the contingent worker functionality in Internet Expenses,
you must set up your contingent workers and enter their supplier names in Oracle HRMS
To enter supervisory information:

1. Choose the Supervisor tabbed region.
2. Select the name and number of the worker's personal supervisor.
You can select a contingent worker as a supervisor only if the HR: Expand Role of Contingent Worker user profile option is set to Yes.
You can select a supervisor from another Business Group if the HR:Cross Business Group user profile option is set to Yes at your site.
Note: The application does not update this information. Use organization and position hierarchies to show management reporting lines.
Defining Employees
Define employee information for all persons that will use Internet Expenses. You can enter employee information in Oracle HRMS, or, if you do not use Oracle HRMS, in the Enter Person window in Oracle Payables. This table lists the personal information to enter for each employee and how Internet Expenses uses that information.
Note: Users do not need to define an employee’s supervisor in Oracle Human Resources, if the supervisor is specified in the
Approver field on an expense report.
Default PO Expense account
In Human resources Responsibility
Navigate to People -> Enter and Maintain
Query the Person, click on Assignment tab, select Purchase Order Information Tab
Enter the 'Set of Books' and 'Default PO Expense' information
Setting up Contingent Workers
A contingent worker is a worker who does not have a direct employment relationship with your company and is typically a self–employed individual or an agency supplied worker. To use the contingent worker functionality in Internet Expenses,
you must set up your contingent workers and enter their supplier names in Oracle HRMS
To enter supervisory information:

1. Choose the Supervisor tabbed region.
2. Select the name and number of the worker's personal supervisor.
You can select a contingent worker as a supervisor only if the HR: Expand Role of Contingent Worker user profile option is set to Yes.
You can select a supervisor from another Business Group if the HR:Cross Business Group user profile option is set to Yes at your site.
Note: The application does not update this information. Use organization and position hierarchies to show management reporting lines.
2.3 Defining and Setting Up Users
You must define your employees as users in order for them to use Internet Expenses. As part of this definition process, you assign the self-service application responsibilities and a securing attribute to each user. You can perform all of these activities in the Users window in System Administration.
To define an employee as a user:
1. Log into Oracle Applications using the System Administrator responsibility.
2. Navigate to the Users window.
3. Enter the name that the employee will use to log in to self-service applications in the User Name field.
4. Define a temporary password for the user in the Password field. When the user logs in for the first time, a prompt will appear to request a password change.
5. Select the name of the employee from the list of values in the Person field.
6. Enter the e-mail address of the employee in the E-Mail field, if you use an e-mail system to send workflow notifications to employees.
7. Establish a password expiration.
8. Save your work.
Assigning Responsibilities to Users
Your installation includes these seeded responsibilities:
■ Internet Expenses. Assign this responsibility to employees who will create and track expense reports. This responsibility is required for Internet Expenses users.
■ Internet Expenses Setup and Administration. Assign this responsibility to employees who will perform setup or administration tasks that apply to Internet Expenses only. This responsibility is required for Internet Expenses users.
■ Internet Expenses Auditor. Assign this responsibility to employees who will perform audits of expense reports.
■ Internet Expenses Audit Manager. Assign this responsibility to employees who manage the auditing of expense reports and the management of expense report auditors in Internet Expenses.
■ Expense Analysis and Reporting. Assign this responsibility to employees who will use the Expenses And Violations Reporting page to run expense analysis reports.
■ Workflow User Web Applications. Assign this responsibility to allow employees to access notifications from the worklist, update user preferences, or define notification routing rules. This responsibility is required only if users view and respond to notifications and related details while logged on to self-service applications.
■ Workflow User Web (New). Assign this responsibility to allow users to view, either in a table or a process diagram, the status of workflow processes generated for expense reports and other documents. Users can also view all notifications generated for the workflow process and a list of those who responded to notifications.
■ Workflow Administrator Web (New). Assign this responsibility to allow workflow administrators access to the views available to the Workflow User Web (New) responsibility, along with administer workflow processes
Assigning Securing Attributes
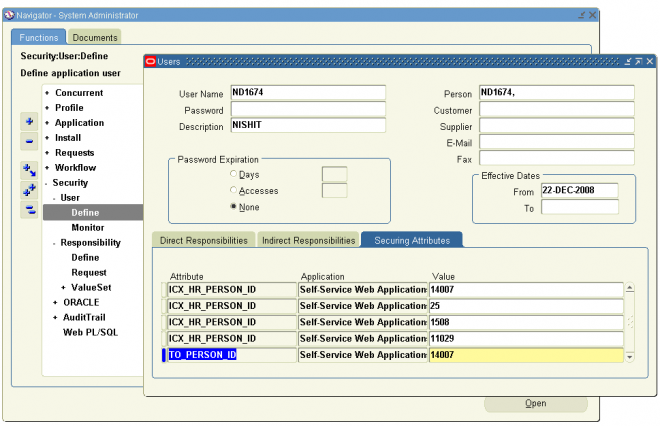
At a minimum, users must have a securing attribute defined for themselves, which either system administrators or employees can make. Employees assign securing attributes in the Expenses Preferences page.
The seeded responsibilities in Internet Expenses by default contain the securing attribute ICX_HR_PERSON_ID which confines user access to the user ID value assigned to the securing attribute. The securing attribute can assign authorized
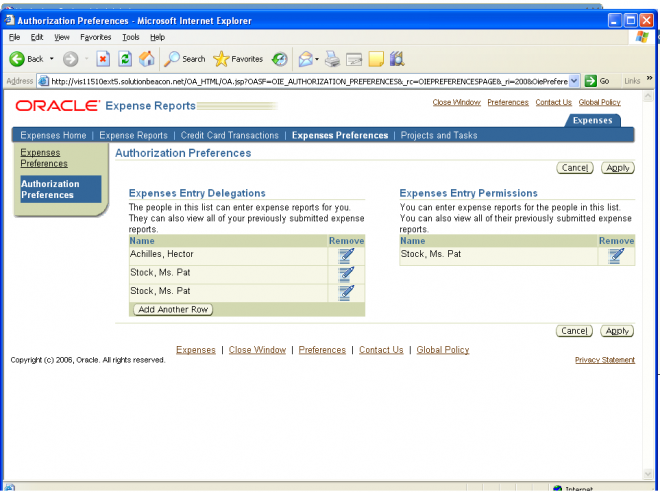
delegates to a user. Authorized Delegates are users who can enter expense reports for another user. For example, managers and other executives may want to give their assistants the ability to enter expense reports for them.
When creating an expense report for someone else, authorized delegates use their own user name and password to access Internet Expenses, and then choose the name of the person that they are creating the expense report for from a pulldown
list. Users can only see the names of the people who have identified them as an authorized delegate.
To assign securing attributes to an Oracle Internet Expenses user:
1. Log into Oracle Applications using the System Administrator responsibility.
2. Navigate to the Users window.
3. Query the user name of an employee that will enter expense reports.
4. In the Securing Attributes tabbed region, enter ICX_HR_PERSON_ID in the Attribute field.
5. In the Value field, enter the Person ID of the employee. If you do not know the employee’s Person ID, select the name of the employee from the list of values. Oracle Applications automatically retrieves the Person ID.
6. Repeat steps 3 and 4 for any persons for whom this employee can enter expense reports.
7. Save your work.
Handling Multiple FND Entries
When a preparer enters an expense report for another employee using the authorized delegate functionality, the system refers to the profile options defined for the FND user of the employee, not the profile option settings of the preparer.
It is recommended for most installations to assign only one FND user per employee.
When an employee is assigned to multiple FND users, Internet Expenses can send workflow notifications to any of these FND users at random. For non- Oracle Projects employees, if an employee is assigned to multiple FND users, Internet Expenses only verifies the profile option settings for the first FND user defined for that employee.
For Oracle Projects employees, if an employee is assigned to multiple FND users, Internet Expenses verifies that all FND users defined for the employee are Projects-enabled (OIE: Enable Projects profile option is set to Yes or Required). If all users are Projects-enabled, then Internet Expenses treats the employee as Projects-enabled. Otherwise, Internet Expenses does not treat the employee as Projects-enabled.
Defining and Setting Up Users
You must define your employees as users in order for them to use Internet Expenses. As part of this definition process, you assign the self-service application responsibilities and a securing attribute to each user. You can perform all of these activities in the Users window in System Administration.
To define an employee as a user:
1. Log into Oracle Applications using the System Administrator responsibility.
2. Navigate to the Users window.
3. Enter the name that the employee will use to log in to self-service applications in the User Name field.
4. Define a temporary password for the user in the Password field. When the user logs in for the first time, a prompt will appear to request a password change.
5. Select the name of the employee from the list of values in the Person field.
6. Enter the e-mail address of the employee in the E-Mail field, if you use an e-mail system to send workflow notifications to employees.
7. Establish a password expiration.
8. Save your work.
Assigning Responsibilities to Users
Your installation includes these seeded responsibilities:
■ Internet Expenses. Assign this responsibility to employees who will create and track expense reports. This responsibility is required for Internet Expenses users.
■ Internet Expenses Setup and Administration. Assign this responsibility to employees who will perform setup or administration tasks that apply to Internet Expenses only. This responsibility is required for Internet Expenses users.
■ Internet Expenses Auditor. Assign this responsibility to employees who will perform audits of expense reports.
■ Internet Expenses Audit Manager. Assign this responsibility to employees who manage the auditing of expense reports and the management of expense report auditors in Internet Expenses.
■ Expense Analysis and Reporting. Assign this responsibility to employees who will use the Expenses And Violations Reporting page to run expense analysis reports.
■ Workflow User Web Applications. Assign this responsibility to allow employees to access notifications from the worklist, update user preferences, or define notification routing rules. This responsibility is required only if users view and respond to notifications and related details while logged on to self-service applications.
■ Workflow User Web (New). Assign this responsibility to allow users to view, either in a table or a process diagram, the status of workflow processes generated for expense reports and other documents. Users can also view all notifications generated for the workflow process and a list of those who responded to notifications.
■ Workflow Administrator Web (New). Assign this responsibility to allow workflow administrators access to the views available to the Workflow User Web (New) responsibility, along with administer workflow processes
Assigning Securing Attributes

At a minimum, users must have a securing attribute defined for themselves, which either system administrators or employees can make. Employees assign securing attributes in the Expenses Preferences page.
The seeded responsibilities in Internet Expenses by default contain the securing attribute ICX_HR_PERSON_ID which confines user access to the user ID value assigned to the securing attribute. The securing attribute can assign authorized
delegates to a user. Authorized Delegates are users who can enter expense reports for another user. For example, managers and other executives may want to give their assistants the ability to enter expense reports for them.
When creating an expense report for someone else, authorized delegates use their own user name and password to access Internet Expenses, and then choose the name of the person that they are creating the expense report for from a pulldown
list. Users can only see the names of the people who have identified them as an authorized delegate.
To assign securing attributes to an Oracle Internet Expenses user:
1. Log into Oracle Applications using the System Administrator responsibility.
2. Navigate to the Users window.
3. Query the user name of an employee that will enter expense reports.
4. In the Securing Attributes tabbed region, enter ICX_HR_PERSON_ID in the Attribute field.
5. In the Value field, enter the Person ID of the employee. If you do not know the employee’s Person ID, select the name of the employee from the list of values. Oracle Applications automatically retrieves the Person ID.
6. Repeat steps 3 and 4 for any persons for whom this employee can enter expense reports.
7. Save your work.

Handling Multiple FND Entries
When a preparer enters an expense report for another employee using the authorized delegate functionality, the system refers to the profile options defined for the FND user of the employee, not the profile option settings of the preparer.
It is recommended for most installations to assign only one FND user per employee.
When an employee is assigned to multiple FND users, Internet Expenses can send workflow notifications to any of these FND users at random. For non- Oracle Projects employees, if an employee is assigned to multiple FND users, Internet Expenses only verifies the profile option settings for the first FND user defined for that employee.
For Oracle Projects employees, if an employee is assigned to multiple FND users, Internet Expenses verifies that all FND users defined for the employee are Projects-enabled (OIE: Enable Projects profile option is set to Yes or Required). If all users are Projects-enabled, then Internet Expenses treats the employee as Projects-enabled. Otherwise, Internet Expenses does not treat the employee as Projects-enabled.
2.3 Defining and Setting Up Users
You must define your employees as users in order for them to use Internet Expenses. As part of this definition process, you assign the self-service application responsibilities and a securing attribute to each user. You can perform all of these activities in the Users window in System Administration.
To define an employee as a user:
1. Log into Oracle Applications using the System Administrator responsibility.
2. Navigate to the Users window.
3. Enter the name that the employee will use to log in to self-service applications in the User Name field.
4. Define a temporary password for the user in the Password field. When the user logs in for the first time, a prompt will appear to request a password change.
5. Select the name of the employee from the list of values in the Person field.
6. Enter the e-mail address of the employee in the E-Mail field, if you use an e-mail system to send workflow notifications to employees.
7. Establish a password expiration.
8. Save your work.
Assigning Responsibilities to Users
Your installation includes these seeded responsibilities:
■ Internet Expenses. Assign this responsibility to employees who will create and track expense reports. This responsibility is required for Internet Expenses users.
■ Internet Expenses Setup and Administration. Assign this responsibility to employees who will perform setup or administration tasks that apply to Internet Expenses only. This responsibility is required for Internet Expenses users.
■ Internet Expenses Auditor. Assign this responsibility to employees who will perform audits of expense reports.
■ Internet Expenses Audit Manager. Assign this responsibility to employees who manage the auditing of expense reports and the management of expense report auditors in Internet Expenses.
■ Expense Analysis and Reporting. Assign this responsibility to employees who will use the Expenses And Violations Reporting page to run expense analysis reports.
■ Workflow User Web Applications. Assign this responsibility to allow employees to access notifications from the worklist, update user preferences, or define notification routing rules. This responsibility is required only if users view and respond to notifications and related details while logged on to self-service applications.
■ Workflow User Web (New). Assign this responsibility to allow users to view, either in a table or a process diagram, the status of workflow processes generated for expense reports and other documents. Users can also view all notifications generated for the workflow process and a list of those who responded to notifications.
■ Workflow Administrator Web (New). Assign this responsibility to allow workflow administrators access to the views available to the Workflow User Web (New) responsibility, along with administer workflow processes
Assigning Securing Attributes

At a minimum, users must have a securing attribute defined for themselves, which either system administrators or employees can make. Employees assign securing attributes in the Expenses Preferences page.
The seeded responsibilities in Internet Expenses by default contain the securing attribute ICX_HR_PERSON_ID which confines user access to the user ID value assigned to the securing attribute. The securing attribute can assign authorized
delegates to a user. Authorized Delegates are users who can enter expense reports for another user. For example, managers and other executives may want to give their assistants the ability to enter expense reports for them.
When creating an expense report for someone else, authorized delegates use their own user name and password to access Internet Expenses, and then choose the name of the person that they are creating the expense report for from a pulldown
list. Users can only see the names of the people who have identified them as an authorized delegate.
To assign securing attributes to an Oracle Internet Expenses user:
1. Log into Oracle Applications using the System Administrator responsibility.
2. Navigate to the Users window.
3. Query the user name of an employee that will enter expense reports.
4. In the Securing Attributes tabbed region, enter ICX_HR_PERSON_ID in the Attribute field.
5. In the Value field, enter the Person ID of the employee. If you do not know the employee’s Person ID, select the name of the employee from the list of values. Oracle Applications automatically retrieves the Person ID.
6. Repeat steps 3 and 4 for any persons for whom this employee can enter expense reports.
7. Save your work.

Handling Multiple FND Entries
When a preparer enters an expense report for another employee using the authorized delegate functionality, the system refers to the profile options defined for the FND user of the employee, not the profile option settings of the preparer.
It is recommended for most installations to assign only one FND user per employee.
When an employee is assigned to multiple FND users, Internet Expenses can send workflow notifications to any of these FND users at random. For non- Oracle Projects employees, if an employee is assigned to multiple FND users, Internet Expenses only verifies the profile option settings for the first FND user defined for that employee.
For Oracle Projects employees, if an employee is assigned to multiple FND users, Internet Expenses verifies that all FND users defined for the employee are Projects-enabled (OIE: Enable Projects profile option is set to Yes or Required). If all users are Projects-enabled, then Internet Expenses treats the employee as Projects-enabled. Otherwise, Internet Expenses does not treat the employee as Projects-enabled.
Defining and Setting Up Users
You must define your employees as users in order for them to use Internet Expenses. As part of this definition process, you assign the self-service application responsibilities and a securing attribute to each user. You can perform all of these activities in the Users window in System Administration.
To define an employee as a user:
1. Log into Oracle Applications using the System Administrator responsibility.
2. Navigate to the Users window.
3. Enter the name that the employee will use to log in to self-service applications in the User Name field.
4. Define a temporary password for the user in the Password field. When the user logs in for the first time, a prompt will appear to request a password change.
5. Select the name of the employee from the list of values in the Person field.
6. Enter the e-mail address of the employee in the E-Mail field, if you use an e-mail system to send workflow notifications to employees.
7. Establish a password expiration.
8. Save your work.
Assigning Responsibilities to Users
Your installation includes these seeded responsibilities:
■ Internet Expenses. Assign this responsibility to employees who will create and track expense reports. This responsibility is required for Internet Expenses users.
■ Internet Expenses Setup and Administration. Assign this responsibility to employees who will perform setup or administration tasks that apply to Internet Expenses only. This responsibility is required for Internet Expenses users.
■ Internet Expenses Auditor. Assign this responsibility to employees who will perform audits of expense reports.
■ Internet Expenses Audit Manager. Assign this responsibility to employees who manage the auditing of expense reports and the management of expense report auditors in Internet Expenses.
■ Expense Analysis and Reporting. Assign this responsibility to employees who will use the Expenses And Violations Reporting page to run expense analysis reports.
■ Workflow User Web Applications. Assign this responsibility to allow employees to access notifications from the worklist, update user preferences, or define notification routing rules. This responsibility is required only if users view and respond to notifications and related details while logged on to self-service applications.
■ Workflow User Web (New). Assign this responsibility to allow users to view, either in a table or a process diagram, the status of workflow processes generated for expense reports and other documents. Users can also view all notifications generated for the workflow process and a list of those who responded to notifications.
■ Workflow Administrator Web (New). Assign this responsibility to allow workflow administrators access to the views available to the Workflow User Web (New) responsibility, along with administer workflow processes
Assigning Securing Attributes

At a minimum, users must have a securing attribute defined for themselves, which either system administrators or employees can make. Employees assign securing attributes in the Expenses Preferences page.
The seeded responsibilities in Internet Expenses by default contain the securing attribute ICX_HR_PERSON_ID which confines user access to the user ID value assigned to the securing attribute. The securing attribute can assign authorized
delegates to a user. Authorized Delegates are users who can enter expense reports for another user. For example, managers and other executives may want to give their assistants the ability to enter expense reports for them.
When creating an expense report for someone else, authorized delegates use their own user name and password to access Internet Expenses, and then choose the name of the person that they are creating the expense report for from a pulldown
list. Users can only see the names of the people who have identified them as an authorized delegate.
To assign securing attributes to an Oracle Internet Expenses user:
1. Log into Oracle Applications using the System Administrator responsibility.
2. Navigate to the Users window.
3. Query the user name of an employee that will enter expense reports.
4. In the Securing Attributes tabbed region, enter ICX_HR_PERSON_ID in the Attribute field.
5. In the Value field, enter the Person ID of the employee. If you do not know the employee’s Person ID, select the name of the employee from the list of values. Oracle Applications automatically retrieves the Person ID.
6. Repeat steps 3 and 4 for any persons for whom this employee can enter expense reports.
7. Save your work.

Handling Multiple FND Entries
When a preparer enters an expense report for another employee using the authorized delegate functionality, the system refers to the profile options defined for the FND user of the employee, not the profile option settings of the preparer.
It is recommended for most installations to assign only one FND user per employee.
When an employee is assigned to multiple FND users, Internet Expenses can send workflow notifications to any of these FND users at random. For non- Oracle Projects employees, if an employee is assigned to multiple FND users, Internet Expenses only verifies the profile option settings for the first FND user defined for that employee.
For Oracle Projects employees, if an employee is assigned to multiple FND users, Internet Expenses verifies that all FND users defined for the employee are Projects-enabled (OIE: Enable Projects profile option is set to Yes or Required). If all users are Projects-enabled, then Internet Expenses treats the employee as Projects-enabled. Otherwise, Internet Expenses does not treat the employee as Projects-enabled.
3.3 Expense Check Reimbursement Address
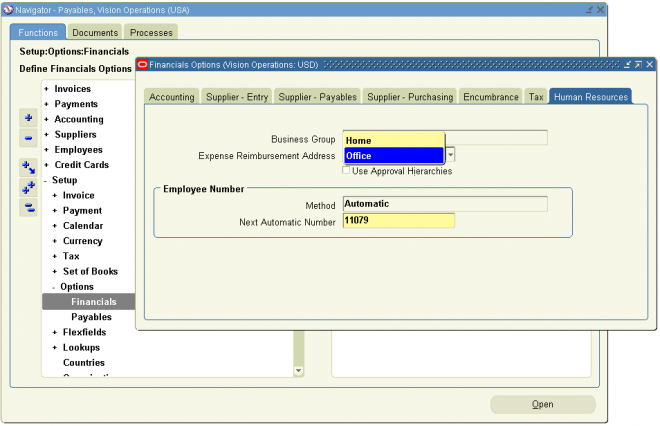
Use the Payables Financials Options window to define the expense report reimbursement check setup. By default, Internet Expenses uses the home or office value defined in the HRMS Mail To setup, if there is one. If not, then Internet Expenses uses the value you define in the Payables Financials Options window.
This setting also provides the value to use to create the supplier site record, if you enable the Automatically Create Employee as Supplier option in the Payables Options window. You can define employee home and office addresses either in the People window, if you have a full install of Oracle Human Resources, or in the Enter Person window in Oracle Payables.
To set the default expense check address:
1. Navigate to the Payables Financials Options window.
2. Choose the Human Resources tabbed region.
3. Select an Expense Reimbursement Address of either Home or Office.
4. Save your work.
Expense Check Reimbursement Address
Use the Payables Financials Options window to define the expense report reimbursement check setup. By default, Internet Expenses uses the home or office value defined in the HRMS Mail To setup, if there is one. If not, then Internet Expenses uses the value you define in the Payables Financials Options window.
This setting also provides the value to use to create the supplier site record, if you enable the Automatically Create Employee as Supplier option in the Payables Options window. You can define employee home and office addresses either in the People window, if you have a full install of Oracle Human Resources, or in the Enter Person window in Oracle Payables.
To set the default expense check address:
1. Navigate to the Payables Financials Options window.
2. Choose the Human Resources tabbed region.
3. Select an Expense Reimbursement Address of either Home or Office.
4. Save your work.
Establishing Multiple Currencies Setup
The currency in which an expense report is paid is known as the reimbursement currency. Internet Expenses users can specify a reimbursement currency that is different from your company functional currency only if:
- Oracle Payables is set up for multiple currencies.
- Reimbursement currency is enabled in the Currencies window.
- OIE: Allow Non-Base Pay profile option is set to Yes.
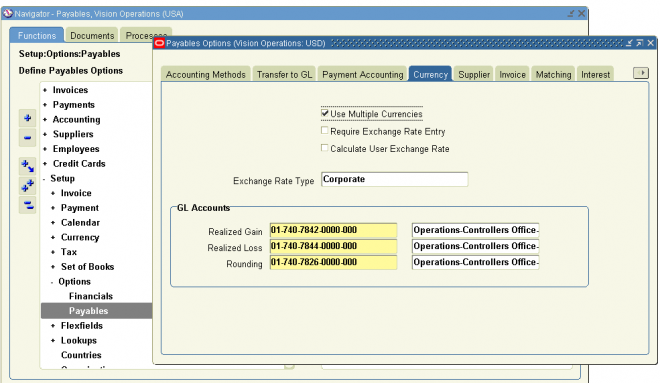
To enable multiple currencies in Payables:1. Navigate to the Payables Options window.
2. Enable the Use Multiple Currencies Payables option.
3. In the Exchange Rate Type field, enter Corporate, Spot, or User-defined, according to your business practice.
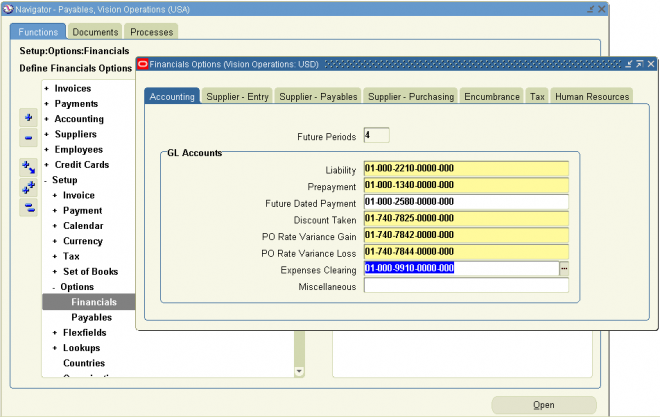
Note: The Expense Clearing Account field is also available in the Card Program window. If you define the Expense Clearing Account field in the Card Program window, the value you define there will take precedence over the value in the Oracle Payables Financial Options window.
Attention: You cannot enter an exchange rate type of User. Since end users cannot enter the exchange rate between the
reimbursement and functional currency on expense reports, this exchange rate type will cause expense reports to fail in workflow.
4. Navigate to the Currencies window.
5. Verify that all currencies your company uses to reimburse employees are enabled.
3.2 Establishing Multiple Currencies Setup
The currency in which an expense report is paid is known as the reimbursement currency. Internet Expenses users can specify a reimbursement currency that is different from your company functional currency only if:
- Oracle Payables is set up for multiple currencies.
- Reimbursement currency is enabled in the Currencies window.
- OIE: Allow Non-Base Pay profile option is set to Yes.
To enable multiple currencies in Payables:1. Navigate to the Payables Options window.
2. Enable the Use Multiple Currencies Payables option.
3. In the Exchange Rate Type field, enter Corporate, Spot, or User-defined, according to your business practice.
Note: The Expense Clearing Account field is also available in the Card Program window. If you define the Expense Clearing Account field in the Card Program window, the value you define there will take precedence over the value in the Oracle Payables Financial Options window.
Attention: You cannot enter an exchange rate type of User. Since end users cannot enter the exchange rate between the
reimbursement and functional currency on expense reports, this exchange rate type will cause expense reports to fail in workflow.
4. Navigate to the Currencies window.
5. Verify that all currencies your company uses to reimburse employees are enabled.
Establishing Multiple Currencies Setup
The currency in which an expense report is paid is known as the reimbursement currency. Internet Expenses users can specify a reimbursement currency that is different from your company functional currency only if:
- Oracle Payables is set up for multiple currencies.
- Reimbursement currency is enabled in the Currencies window.
- OIE: Allow Non-Base Pay profile option is set to Yes.
To enable multiple currencies in Payables:1. Navigate to the Payables Options window.
2. Enable the Use Multiple Currencies Payables option.
3. In the Exchange Rate Type field, enter Corporate, Spot, or User-defined, according to your business practice.
Note: The Expense Clearing Account field is also available in the Card Program window. If you define the Expense Clearing Account field in the Card Program window, the value you define there will take precedence over the value in the Oracle Payables Financial Options window.
Attention: You cannot enter an exchange rate type of User. Since end users cannot enter the exchange rate between the
reimbursement and functional currency on expense reports, this exchange rate type will cause expense reports to fail in workflow.
4. Navigate to the Currencies window.
5. Verify that all currencies your company uses to reimburse employees are enabled.
3.1 Defining Expense Report Templates
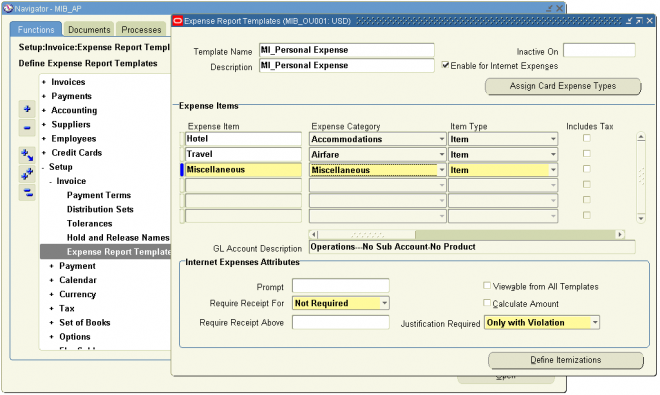
You must define at least one expense report template with the Enable for Internet Expenses Users check box selected. Only expense report templates with this option enabled can be used in Internet Expenses. Use the Oracle Payables Expense Report Templates window to define your expense report templates.
Seeded Expense Report Template
An expense report template called Seeded Personal Expense is a seeded template available with your implementation of Internet Expenses. The purpose of this seeded template is to provide the expense type for personal expenses when you use the Company Pay credit card payment option. Do not delete or modify this seeded expense report template. Any changes to this template will cause problems with expense reports in workflow.
Mapping Credit Card Expense Types
In Oracle Payables, you can assign expense items to card expense types. Card expense types map to the folio_type column of the AP_CREDIT_CARD_TRXNS_ALL table. To illustrate how this functionality works, if a credit card transaction has
a folio_type of Hotel, when a user adds this credit card transaction to an expense report, the expense type with the Card Expense Type of Hotel is defaulted by the system. Users can also override the default expense type.
Project-Related Expense Report Templates
If your employees enter project-related expense reports in Internet Expenses, you must define a project-related expense report template in Oracle Payables. Employees entering project-related expense reports can only use a project-related
expense report template.
To create project-related expense types, you associate an expense item with an Oracle Projects expenditure type in the Projects Expenditure Type field of the Expense Report Templates window. Employees can then associate a project number,
task number, and award number (if applicable) with the project-related expense item when they enter expense reports in Internet Expenses.
Note: Users cannot enter or view project-related information in the Payables Expense Reports window.
Defining Expense Report Templates
You must define at least one expense report template with the Enable for Internet Expenses Users check box selected. Only expense report templates with this option enabled can be used in Internet Expenses. Use the Oracle Payables Expense Report Templates window to define your expense report templates.
Seeded Expense Report Template
An expense report template called Seeded Personal Expense is a seeded template available with your implementation of Internet Expenses. The purpose of this seeded template is to provide the expense type for personal expenses when you use the Company Pay credit card payment option. Do not delete or modify this seeded expense report template. Any changes to this template will cause problems with expense reports in workflow.
Mapping Credit Card Expense Types
In Oracle Payables, you can assign expense items to card expense types. Card expense types map to the folio_type column of the AP_CREDIT_CARD_TRXNS_ALL table. To illustrate how this functionality works, if a credit card transaction has
a folio_type of Hotel, when a user adds this credit card transaction to an expense report, the expense type with the Card Expense Type of Hotel is defaulted by the system. Users can also override the default expense type.
Project-Related Expense Report Templates
If your employees enter project-related expense reports in Internet Expenses, you must define a project-related expense report template in Oracle Payables. Employees entering project-related expense reports can only use a project-related
expense report template.
To create project-related expense types, you associate an expense item with an Oracle Projects expenditure type in the Projects Expenditure Type field of the Expense Report Templates window. Employees can then associate a project number,
task number, and award number (if applicable) with the project-related expense item when they enter expense reports in Internet Expenses.
Note: Users cannot enter or view project-related information in the Payables Expense Reports window.
3.1 Defining Expense Report Templates
You must define at least one expense report template with the Enable for Internet Expenses Users check box selected. Only expense report templates with this option enabled can be used in Internet Expenses. Use the Oracle Payables Expense Report Templates window to define your expense report templates.
Seeded Expense Report Template
An expense report template called Seeded Personal Expense is a seeded template available with your implementation of Internet Expenses. The purpose of this seeded template is to provide the expense type for personal expenses when you use the Company Pay credit card payment option. Do not delete or modify this seeded expense report template. Any changes to this template will cause problems with expense reports in workflow.
Mapping Credit Card Expense Types
In Oracle Payables, you can assign expense items to card expense types. Card expense types map to the folio_type column of the AP_CREDIT_CARD_TRXNS_ALL table. To illustrate how this functionality works, if a credit card transaction has
a folio_type of Hotel, when a user adds this credit card transaction to an expense report, the expense type with the Card Expense Type of Hotel is defaulted by the system. Users can also override the default expense type.
Project-Related Expense Report Templates
If your employees enter project-related expense reports in Internet Expenses, you must define a project-related expense report template in Oracle Payables. Employees entering project-related expense reports can only use a project-related
expense report template.
To create project-related expense types, you associate an expense item with an Oracle Projects expenditure type in the Projects Expenditure Type field of the Expense Report Templates window. Employees can then associate a project number,
task number, and award number (if applicable) with the project-related expense item when they enter expense reports in Internet Expenses.
Note: Users cannot enter or view project-related information in the Payables Expense Reports window.
2.2 Entering Employees as Suppliers
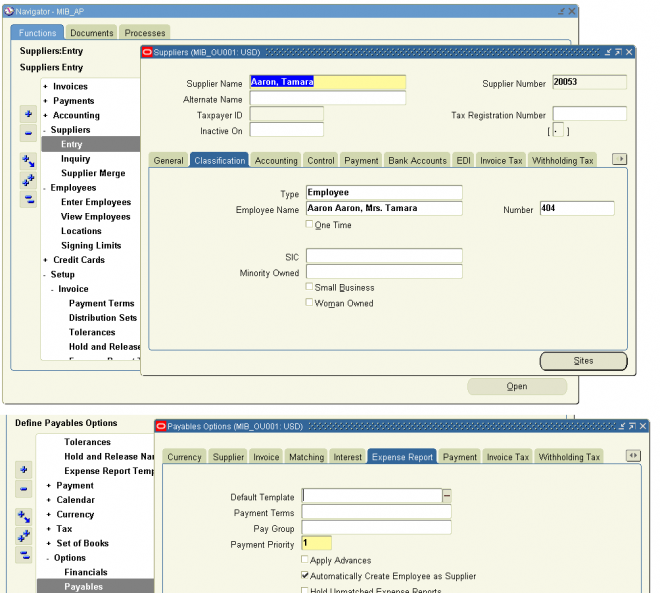
Before an expense report can be paid, an invoice must be created for it in Oracle Payables. The Expense Report Import program automatically generates invoices for expense reports created in Internet Expenses, but employees who submit them must be defined as suppliers in Payables.
To ensure that employees are defined as suppliers, enable the Create Employee as Supplier option in the Payables Options window. If you enable this option, Payables automatically enters employees as suppliers during the Expense Report Import program.
To automatically create employees as suppliers in Oracle Payables:
1. Navigate to the Payables Options window.
2. Choose the Expense Report tabbed region.
3. Check the Automatically Create Employee as Supplier box.
4. Save your work.
Note: If you do not enable this option in Payables, you must manually enter employees as suppliers in the Payables Suppliers
window before submitting Expense Report Import.
Default Reimbursement Currency Behavior
During expenses entry, Internet Expenses determines the default reimbursement currency to use for an employee in this way:
■ Look for the value (Home or Office) in the Mail To field of the Office Details region of the HR People window. If a supplier site record exists for the value, then use the supplier site Payment Currency value as the default reimbursement currency.
Note: Users cannot enter or view project-related information in the Payables Expense Reports window.
■ If the Mail To field does not contain a value, or if a supplier site record does not exist, use the supplier Payment Currency value as the default reimbursement currency.
■ If neither the supplier site nor the supplier record contain a Payment Currency value, use the functional currency of the operating unit in which the employee is entering the expense report. The operating unit is determined by the Internet
Expenses responsibility and the setting for the MO: Operating Unit profile option).
Entering Employees as Suppliers
Before an expense report can be paid, an invoice must be created for it in Oracle Payables. The Expense Report Import program automatically generates invoices for expense reports created in Internet Expenses, but employees who submit them must be defined as suppliers in Payables.
To ensure that employees are defined as suppliers, enable the Create Employee as Supplier option in the Payables Options window. If you enable this option, Payables automatically enters employees as suppliers during the Expense Report Import program.
To automatically create employees as suppliers in Oracle Payables:
1. Navigate to the Payables Options window.
2. Choose the Expense Report tabbed region.
3. Check the Automatically Create Employee as Supplier box.
4. Save your work.
Note: If you do not enable this option in Payables, you must manually enter employees as suppliers in the Payables Suppliers
window before submitting Expense Report Import.
Default Reimbursement Currency Behavior
During expenses entry, Internet Expenses determines the default reimbursement currency to use for an employee in this way:
■ Look for the value (Home or Office) in the Mail To field of the Office Details region of the HR People window. If a supplier site record exists for the value, then use the supplier site Payment Currency value as the default reimbursement currency.
Note: Users cannot enter or view project-related information in the Payables Expense Reports window.
■ If the Mail To field does not contain a value, or if a supplier site record does not exist, use the supplier Payment Currency value as the default reimbursement currency.
■ If neither the supplier site nor the supplier record contain a Payment Currency value, use the functional currency of the operating unit in which the employee is entering the expense report. The operating unit is determined by the Internet
Expenses responsibility and the setting for the MO: Operating Unit profile option).
Internet Expenses Setup and Administration
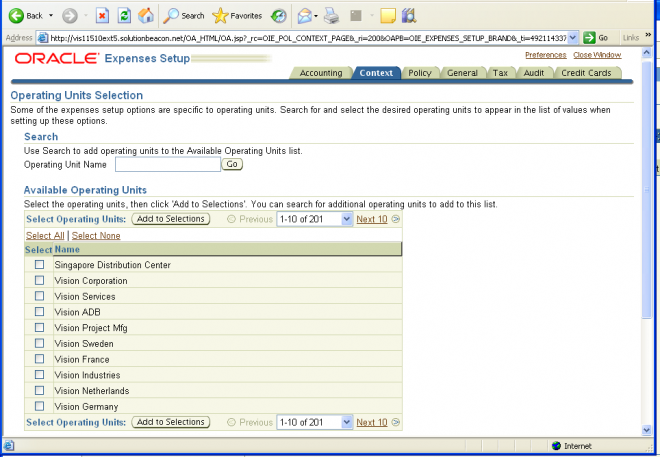
Internet Expenses Setup provides the administrator with the self-service pages necessary to manage the setup of Internet Expenses. To use Internet Expenses Setup, you must have access to the Internet Expenses Setup and Administration
responsibility.
Internet Expenses Setup is organized into the following areas. Each area is represented by a tabbed region:
■ Accounting
■ Context
■ Policy
■ General
■ Tax
■ Audit
■ Credit Cards
Approve exponse report
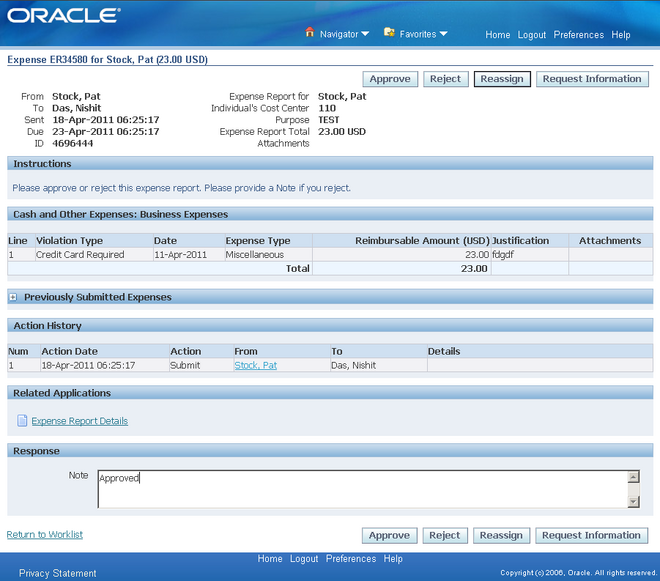
Once an employee submits the expense report the approver associated with the expense reports gets a notification for the same. The approver can approve, reject or request more information. Only approved expense requests are transferred in to oracle payable as invoices.
Approval in iExpesen is controlled by the below profile options :
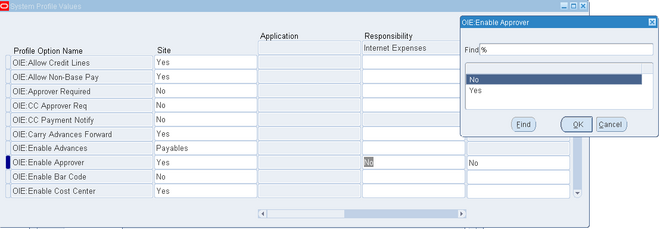
OIE: Enable Approver
The OIE: Enable Approver profile option enables the Approver field in Internet Expenses. When this profile option is set to Yes, the Approver field is available for users to specify a different employee to approve their expense report. When this profile option is set to No, the Approver field is hidden.
OIE: Approver Required
The OIE: Approver Required profile option indicates whether users must designate an approver for their expense reports. If you set the OIE: Approver Required profile option to Yes, Internet Expenses requires that users always enter an approver. If you set this profile option to Yes with Default, the employee's supervisor, as defined in
Oracle HRMS, defaults in the Approver field.
Note: If you set the OIE: Approver Required profile option to Yes or Yes with Default, do not set the OIE: Enable Approver profile option to No. If you do, the Approver field does not appear on the General Information page but users will receive an error message that the field is required.
Enter Expense Report
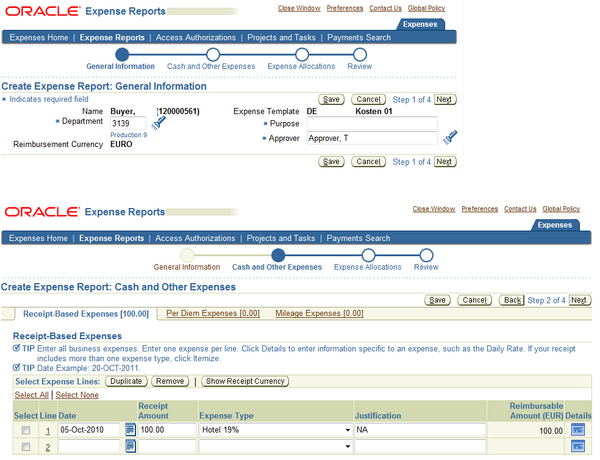
To create an expense report the user id should be associated with an oracle HR employee. The department flows from the expense account in HR employee. If more than expense templates are defined for the operating unit then system allows you to select the name of the expense template.
The approver is controlled by profile option ‘OIE:Approver Required’. The available values are
