Basics of SQL

", $content); // center content ads $arr[2] = $block . $arr[2]; $content = implode("

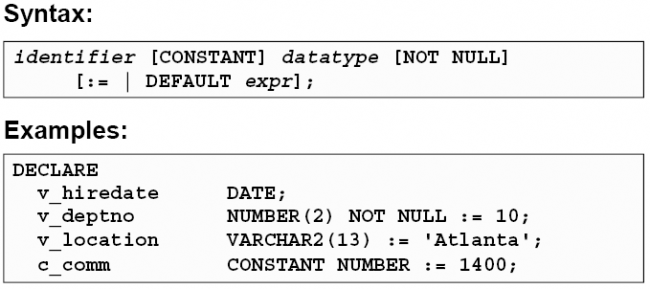
", $arr); print $arr['content']; ?> PL/SQL is a procedural language that Oracle developed as an extension to standard SQL to provide a way to execute procedural logic on the database.

SQL, SQL*Plus, PL/SQL: What's the Difference?
This question has bedeviled many people new to Oracle. There are several products with the letters "SQL" in the title, and these three, SQL*Plus, SQL, and PL/SQL, are often used together. Because of this, it's easy to become confused as to which product is doing the work and where the work is being done. This section briefly describes each of these three products.

SQL
SQL stands for Structured Query Language. This has become the lingua franca of database access languages. It has been adopted by the International Standards Organization (ISO) and has also been adopted by the American National Standards Institute (ANSI). When you code statements such as SELECT, INSERT, UPDATE, and DELETE, SQL is the language you are using. It is a declarative language and is always executed on the database server. Often you will find yourself coding SQL statements in a development tool, such as PowerBuilder or Visual Basic, but at runtime those statements are sent to the server for execution.

PL/SQL

PL/SQL is Oracle's Procedural Language extension to SQL. It, too, usually runs on the database server, but some Oracle products such as Developer/2000 also contain a PL/SQL engine that resides on the client. Thus, you can run your PL/SQL code on either the client or the server depending on which is more appropriate for the task at hand. Unlike SQL, PL/SQL is procedural, not declarative. This means that your code specifies exactly how things get done. As in SQL, however, you need some way to send your PL/SQL code up to the server for execution. PL/SQL also enables you to embed SQL statements within its procedural code. This tight-knit relationship between PL/SQL, SQL, and SQL*Plus is the cause for some of the confusion between the products.

SQL*Plus
SQL*Plus is an interactive program that allows you to type in and execute SQL statements. It also enables you to type in PL/SQL code and send it to the server to be executed. SQL*Plus is one of the most common front ends used to develop and create stored PL/SQL procedures and functions.

What happens when you run SQL*Plus and type in a SQL statement? Where does the processing take place? What exactly does SQL*Plus do, and what does the database do? If you are in a Windows environment and you have a database server somewhere on the network, the following things happen:
   1. SQL*Plus transmits your SQL query over the network to the database server.
   2. SQL*Plus waits for a reply from the database server.
   3. The database server executes the query and transmits the results back to SQL*Plus.
   4. SQL*Plus displays the query results on your computer screen.

Even if you're not running in a networked Windows environment, the same things happen. The only difference might be that the database server and SQL*Plus are running on the same physical machine. This would be true, for example, if you were running Personal Oracle on a single PC.

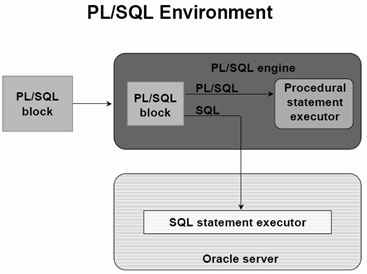
PL/SQL is executed in much the same manner. Type a PL/SQL block into SQL*Plus, and it is transmitted to the database server for execution. If there are any SQL statements in the PL/SQL code, they are sent to the server's SQL engine for execution, and the results are returned back to the PL/SQL program.

System Functions

NVL
The NVL() function is available in Oracle, and not in MySQL or SQL Server. This function is used to replace NULL value with another value. It is similar to the IFNULL Function in MySQL and the ISNULL Function in SQL Server.
The syntax for the NVL function is:
    NVL( string1, replace_with ) string1 is the string to test for a null value.
                                           replace_with is the value returned if string1 is null.

    NVL( column1, replace_with )
Example #1:
    select NVL(supplier_city, 'n/a')
    from suppliers;
The SQL statement above would return 'n/a' if the supplier_city field contained a null value. Otherwise, it would return the supplier_city value.

Example #2:
    select supplier_id,
    NVL(supplier_desc, supplier_name)
    from suppliers;
This SQL statement would return the supplier_name field if the supplier_desc contained a null value. Otherwise, it would return the supplier_desc.

The decode() Function

The decode() function works on the same principle as the if-then-else statement does in many common programming languages, including PL/SQL. You can pass a variable number of values into the call to the decode() function, which will appear in the column clause of your select statement. Your first item will always be the name of the column you want to decode. Next, you identify the first specific value Oracle should look for in that column. After that, you pass in the substitute you want Oracle to return if the first specific value is encountered. From there, you can then define as many specific value-substitute pairs as you would like. Once all value-substitute pairs have been defined, you can optionally specify a default value that Oracle will return if the column value doesn't match a specified value. Take a look at the following code block to get a better idea of how this works:

SELECT decode(column_name,
              value1, substitute1,
              value2, substitute2,
              ... ,
              return_default)
FROM ... ;

 
Example:
Select
decode(AUTHORIZATION_STATUS,
       'APPROVED', 'APPRED',
       'IN PROCESS', 'JUST STARTED',
       'Others')
From PO_HEADERS_ALL

SYSDATE
In Oracle/PLSQL, the sysdate function returns the current system date and time on your local database.
The syntax for the sysdate function is:    sysdate

Example #1:
Select SYSDATE FROM DUAL;
OUTPUT: 3/3/2009 2:22:27 AM

Example #2:
Select TRUNC(SYSDATE) FROM DUAL;
OUTPUT: 3/3/2009

Example #3:

Select TO_CHAR(SYSDATE,'DD-MM-YYYY') FROM DUAL;
OUTPUT: 03-03-2009

Example #4:
select sysdate into v_date from dual;
OUTPUT: The variable called v_date will now contain the current date and time value.

Example #5:

You could also use the sysdate function in any SQL statement. For example:
    select supplier_id, sysdate
    from suppliers
    where supplier_id > 5000;

Arithmetic Functions
Other functions are designed to perform specialized mathematical functions, such as those used in scientific applications such as sine and logarithms. These operations are commonly referred to as arithmetic or number operations. The functions falling into this category are listed next. These functions are not all that is available in Oracle, but rather they are the most commonly used ones that will likely appear on OCP Exam 1:abs(x) Obtains the absolute value for a number. For example, the absolute value of -1 is 1, whereas the absolute value of 6 is 6.

round(x,y) Rounds x to the decimal precision of y. If y is negative, it rounds to the precision of y places to the left of the decimal point. For example, round(134.345,1) = 134.3, round(134.345,0) = 134, round(134.345,-1) = 130. This can also be used on DATE columns.

ceil(x) Similar to executing round on an integer (for example, round(x,0)), except ceil always rounds up. For example, ceil(1.4) = 2. Note that rounding up on negative numbers produces a value closer to zero (for example, ceil(-1.6) = -1, not -2).

floor(x) Similar to ceil, except floor always rounds down. For example, floor(1.6) = 1. Note that rounding down on negative numbers produces a value further away from zero (for example, floor (-1.6) = -2, not -1).

mod(x,y) The modulus of x, defined in long division as the integer remainder when x is divided by y until no further whole number can be produced. For example, mod(10,3) = 1, and mod(10,2) = 0.

Sign(x) Displays an integer value corresponding to the sign of x: 1 if x is positive, - 1 if x is negative.
 
sqrt(x) The square root of x.
  
trunc(x,y)
Truncates x to the decimal precision of y. If y is negative, it truncates to y number of places to the left of the decimal point. This can also be used on DATE columns.

vsize(x) The storage size in bytes for value x.

Text Functions
Several functions in Oracle manipulate text strings. These functions are similar in concept to nvl() and decode() in that they can perform a change on a piece of data, but the functions in this family can change only VARCHAR2 and CHAR data. Here are some examples:   
lpad(x,y[,z]) and rpad(x,y[,z]) Return data in string or column x padded on the left or right side, respectively, to width y. The optional value z indicates the character(s) that lpad() or rpad() use to pad the column data. If no character z is specified, a space is used.
     
lower(x), upper(x), and initcap(x) Return data in string or column x in lowercase or uppercase characters, respectively, or change the initial letter in the data from column x to a capital letter.
     
length(x)
Returns the number of characters in string or column x.
      
substr(x,y[,z]) Returns a substring of string or column x, starting at the character in position number y to the end, which is optionally defined by the character appearing in position z of the string. For example, substr('ABCDEFG',3,4) returns CDEF.
    
instr(x,y)
Determines whether a substring y given can be found in string x. For example, instr('CORPORATE FLOOR','OR') returns 2.

The trim() Function A single-row function called trim() behaves like a combination of ltrim() and rtrim(). The trim() function accepts a string describing the data you would like to trim from a column value using the following syntax: trim([[keyword ]'x' from] column). Here keyword is replaced by leading, trailing, or both, or it's omitted. Also, x is replaced with the character to be trimmed, or it's omitted. If x is omitted, Oracle assumes it must trim whitespace. Finally, column is the name of the column in the table to be trimmed. Note that trim() only removes trailing or leading instances of the character specified. If that character appears somewhere in the string, trim() will not remove it.

Conversion Functions
Conversion functions are designed to convert data from one datatype format to another. These functions do not actually modify the stored data in the table itself; they just return the converted values to the SQL*Plus session. Figure 2-1 displays how information can get converted from one datatype to another using various functions. Several different conversion functions are available in the Oracle database, as listed here:

to_char(x) Converts the value x to a character or converts a date to a character string using formatting conventions (see "Date-Formatting Conventions" subtopic below).

to_number(x) Converts nonnumeric value x to a number.

to_date(x[,y]) Converts the nondate value x to a date using the format specified by y.

to_multi_byte(x) Converts the single-byte character string x to multibyte characters according to national language standards.

to_single_byte(x)
Converts the multibyte character string x to single-byte characters according to national language standards.

chartorowid(x) Converts the string of characters x into an Oracle ROWID.

rowidtochar(x) Converts the ROWID value into the string of characters x of VARCHAR2 datatype.

hextoraw(x) Converts the hexadecimal (base-16) value x into a raw (binary) format.

rawtohex(x) Converts the raw (binary) value x into a hexadecimal (base-16) format.

convert(x[,y[,z]]) Executes a conversion of alphanumeric string x from the current character set (optionally specified as z) to the one specified by y.

translate(x,y,z) Executes a simple value conversion for character or numeric string x into something else based on the conversion factors y and z.

Create TABLE

The CREATE TABLE statement allows you to create and define a table.

The basic syntax for a CREATE TABLE statement is:

    CREATE TABLE table_name
    ( column1 datatype null/not null,
      column2 datatype PRIMARY KEY,
      column3 datatype PRIMARY KEY,
      ...
    );


Each column must have a datatype. The column should either be defined as "null" or "not null" and if this value is left blank, the database assumes "null" as the default.

Example 1:
CREATE TABLE XX_PO_HEADERS_ALL
(
PO_ID         NUMBER(12) PRIMARY KEY,
PO_NUMBER     NUMBER(12),
SUPPLIER_NAME VARCHAR2(12) NOT NULL,
SUPPLIER_SITE VARCHAR2(12),
SHIP_TO       VARCHAR2(12),
BILL_TO       VARCHAR2(12)
)

Example 2:
CREATE TABLE XX_PO_LINES_ALL
(
PO_ID         NUMBER(12),
LINE_NUMBER   NUMBER(12),
ITEM_NAME     VARCHAR2(12),
QUANTITY      NUMBER(12),
ITEM_PRICE    NUMBER(12),
ITEM_TAX      NUMBER(12),
LINE_PRICE    NUMBER(12),
ORDER_DATE    DATE,
NEED_DATE     VARCHAR2(12),
BILL_TO       VARCHAR2(12)
)

Column Default Values

You can define tables to populate columns with default values as well using the default clause in a create table command. This clause is included as part of the column definition to tell Oracle what the default value for that column should be. When a row is added to the table and no value is defined for the column in the row being added, Oracle populates the column value for that row using the default value for the column. The following code block illustrates this point:

SQL> create table display
  2  (col1 varchar2(10),
  3   col2 number default 0);

Table created.

CREATE a table from another table

You can also create a table from an existing table by copying the existing table's columns.
The basic syntax is:

CREATE TABLE table_name
  AS (SELECT * FROM old_table);

Example1:
CREATE TABLE XX_PO_HEADERS_ALL_COPY
AS (Select * From XX_PO_HEADERS_ALL)

The above statement 'll create a new table that is just an exact copy of XX_PO_HEADERS_ALL.

Example 2:  Copying selected columns from another table
The basic syntax is:
    CREATE TABLE new_table
      AS (SELECT column_1, column2, ... column_n FROM old_table);

Example 3: Copying selected columns from multiple tables
The basic syntax is:
    CREATE TABLE new_table
      AS (SELECT column_1, column2, ... column_n
              FROM old_table_1, old_table_2, ... old_table_n);

It is important to note that when creating a table in this way, the new table will be populated with the records from the existing table (based on the SELECT Statement). If you want to create a blank table then use a condition which is always false in the where clause of the select statement.

Creating Temporary Tables

Most of the time, when you create a table in Oracle, the records that eventually populate that table will live inside your database forever (or at least until someone removes them). However, there might be situations where you want records in a table to live inside the database only for a short while. In this case, you can create temporary tables in Oracle, where the data placed into the tables persists for only the duration of the user session, or for the length of your current transaction.

A temporary table is created using the create global temporary table command. Why does a temporary table have to be global? So that the temporary table's definition can be made available to every user on the system. However, the contents of a temporary table are visible only to the user session that added information to the temporary table, even though everyone can see the definition. Temporary tables are a relatively new feature in Oracle, and Oracle hasn't had enough time yet to implement "local" temporary tables (that is, temporary tables that are only available to the user who owns them). Look for this functionality in later database releases. The appropriate create global temporary table command is shown in the following code block:

Create global temporary table XXX_PO_HEADERS_ALL as
Select *
From PO_HEADERS_ALL
Where 10=11

The purpose of writing the where clause is to make the temporary table blank. If we dont put the where clause the temporary table would contain all the rows of XXX_PO_HEADERS_ALL


DDL statements

Data definition language (DDL) refers to the subgroup of SQL statements that create, alter, or drop database objects.

This sub-category of SQL statements is of particular interest to database architects or database administrators who must define an original database design and who must respond to requirements and extend a database design. It is also of interest to database application developers, because there are times when the easiest way to meet an application requirement is to extend an existing database object definition.

In general DDL statements begin with one of the following keywords: CREATE, ALTER, or DROP. Examples of DDL statements for creating database objects include: CREATE TABLE, CREATE TRIGGER, CREATE PROCEDURE, and CREATE SEQUENCE. These statements generally contain multiple clauses used to define the characteristics and behavior of the database object. Examples of DDL statements for altering database objects include: ALTER TABLE, and ALTER PROCEDURE. These statements generally are used to alter a characteristic of a database object.

DDL statements can be executed from a variety of interactive and application interfaces although they are most commonly executed in scripts or from integrated development environments that support database and database object design.

Describing Tables
The best way to think of a table for most Oracle beginners is to envision a spreadsheet containing several records of data. Across the top, try to see a horizontal list of column names that label the values in these columns. Each record listed across the table is called a row. In SQL*Plus, the command describe enables you to obtain a basic listing of characteristics about the table.

SQL> DESCRIBE po_headers_all
Name                       Type           Nullable Default                                                                                                Comments
-------------------------- -------------- -------- ---------------------------
PO_HEADER_ID               NUMBER                                                                                                                                 
AGENT_ID                   NUMBER(9)                                                                                                                              
TYPE_LOOKUP_CODE           VARCHAR2(25)                                                                                                                           
LAST_UPDATE_DATE           DATE                                                                                                                                   
LAST_UPDATED_BY            NUMBER                                                                                                                                 
SEGMENT1                   VARCHAR2(20)   R2(1)

Commenting Objects
You can also add comments to a table or column using the comment command. This is useful especially for large databases where you want others to understand some specific bits of information about a table, such as the type of information stored in the table. An example of using this command to add comments to a table appears in the following block:

SQL> comment on table employee is
  2  'This is a table containing employees';
Comment created.


You can see how to use the comment command for adding comments on table columns in the following code block:

SQL> comment on column employee.empid is
  2  'unique text identifier for employees';
Comment created.


Tip    
Comment information on tables is stored in an object called USER_TAB_COMMENTS, whereas comment information for columns is stored in a different database object, called USER_COL_COMMENTS. These objects are part of the Oracle data dictionary. You'll find out more about the Oracle data dictionary later in the book.

DROP TABLE

The DROP TABLE statement allows you to remove a table from the database.
The basic syntax for the DROP TABLE statement is:
    DROP TABLE table_name;

For example:  DROP TABLE XX_supplier;

This would drop table called XX_supplier.
Sometimes objects are associated with a table that exists in a database along with the table. These objects may include indexes, constraints, and triggers. If the table is dropped, Oracle automatically drops any index, trigger, or constraint associated with the table as well. Here are two other factors to be aware of with respect to dropping tables:

  1. You cannot roll back a drop table command.
  2. To drop a table, the table must be part of your own schema, or you must have the drop any table privilege granted to you.
Truncating Tables
Let's move on to discuss how you can remove all data from a table quickly using a special option available in Oracle. In this situation, the DBA or developer may use the truncate table statement. This statement is a part of the data definition language (DDL) of Oracle, much like the create table statement and completely unlike the delete statement. Truncating a table removes all row data from a table quickly, while leaving the definition of the table intact, including the definition of constraints and any associated database objects such as indexes, constraints, and triggers on the table. The truncate statement is a high-speed data-deletion statement that bypasses the transaction controls available in Oracle for recoverability in data changes. Truncating a table is almost always faster than executing the delete statement without a where clause, but once this operation has been completed, the data cannot be recovered unless you have a backed-up copy of the data. Here's an example:

SQL> truncate table tester;
Table truncated.


ALTER TABLE

The ALTER TABLE statement allows you to rename an existing table. It can also be used to add, modify, or drop a column from an existing table.

Renaming a table
The basic syntax for renaming a table is:
    ALTER TABLE table_name
     RENAME TO new_table_name;


For example:
    ALTER TABLE suppliers
     RENAME TO vendors;
This will rename the suppliers table to vendors.

Adding column(s) to a table
Syntax #1
To add a column to an existing table, the ALTER TABLE syntax is:
    ALTER TABLE table_name
     ADD column_name column-definition;


For example:
    ALTER TABLE supplier
     ADD supplier_name  varchar2(50);

This will add a column called supplier_name to the supplier table.

Syntax #2
To add multiple columns to an existing table, the ALTER TABLE syntax is:
    ALTER TABLE table_name
    ADD (column_1     column-definition,
          column_2     column-definition,
          ...    
          column_n     column_definition );

Drop column(s) in a table
Syntax #1
To drop a column in an existing table, the ALTER TABLE syntax is:
    ALTER TABLE table_name
     DROP COLUMN column_name;
For example:
    ALTER TABLE supplier
     DROP COLUMN supplier_name;

Modifying column(s)(datatypes) in a table

Syntax #1
To modify a column in an existing table, the ALTER TABLE syntax is:
    ALTER TABLE table_name
     MODIFY column_name column_type;


For example:
    ALTER TABLE supplier
     MODIFY supplier_name   varchar2(100)     not null;


This will modify the column called supplier_name to be a data type of varchar2(100) and force the column to not allow null values.

Syntax #2
To modify multiple columns in an existing table, the ALTER TABLE syntax is:
    ALTER TABLE table_name
    MODIFY (     column_1     column_type,
          column_2     column_type,
          ...    
          column_n     column_type );

Rename column(s) in a table
(NEW in Oracle 9i Release 2)
Syntax #1
Starting in Oracle 9i Release 2, you can now rename a column.
To rename a column in an existing table, the ALTER TABLE syntax is:
    ALTER TABLE table_name
     RENAME COLUMN old_name to new_name;


Temporary tables

Global temporary tables
Global temporary tables are distinct within SQL sessions.
The basic syntax is:
    CREATE GLOBAL TEMPORARY TABLE table_name ( ...);

For example:
    CREATE GLOBAL TEMPORARY TABLE supplier
    (     supplier_id     numeric(10)     not null,
        supplier_name     varchar2(50)     not null,
        contact_name     varchar2(50)    
    )            
This would create a global temporary table called supplier .

Local Temporary tables
Local temporary tables are distinct within modules and embedded SQL programs within SQL sessions.
The basic syntax is:
    DECLARE LOCAL TEMPORARY TABLE table_name ( ...);

CREATE OR REPLACE VIEW

Views are queries stored in Oracle that dynamically assemble data into a virtual table. To the person using the view, manipulating the data from the view is just like manipulating the data from a table. In some cases, it is even possible for the user to change data in a view as though the view were a table. Let's now explore the topic of creating, using, and managing views in more detail.

Creating a VIEW

The syntax for creating a VIEW is:
    CREATE VIEW view_name AS
    SELECT columns
    FROM table
    WHERE predicates;
A view will not be created if the base table you specify does not exist. However, you can overcome this restriction by using the force keyword in the create view command. This keyword forces Oracle to create the view anyway. However, the view will be invalid because no underlying table data is available to draw from.

For example:
Create VIEW XX_PO_DETAILS_v AS
Select a.PO_ID, a.PO_NUMBER, b.ITEM_NAME, b.NEED_DATE
From XX_PO_HEADERS_ALL a, XX_PO_LINES_ALL b
Where a.PO_ID=b.PO_ID

This would create a virtual table based on the result set of the select statement. You can now query the view as follows:
    SELECT *
    FROM  XX_PO_DETAILS_vs;

Creating Views That Enforce Constraints
Tables that underlie views often have constraints that limit the data that can be added to those tables. As I said earlier, views cannot add data to the underlying table that would violate the table's constraints. However, you can also define a view to restrict the user's ability to change underlying table data even further, effectively placing a special constraint for data manipulation through the view. This additional constraint says that insert or update statements issued against the view are cannot create rows that the view cannot subsequently select. In other words, if after the change is made, the view will not be able to select the row you changed, the view will not let you make the change. This viewability constraint is configured when the view is defined by adding the with check option to the create view statement. Let's look at an example to clarify my point:

 create or replace view emp_view as
 (select empno, ename, job, deptno
   from emp
   where deptno = 10)
  with check option constraint emp_view_constraint;

Updating a VIEW
You can update a VIEW without dropping it by using the following syntax:
    CREATE OR REPLACE VIEW view_name AS
    SELECT columns
    FROM table
    WHERE predicates;
For example:
    CREATE or REPLACE VIEW sup_orders AS
    SELECT suppliers.supplier_id, orders.quantity, orders.price
    FROM suppliers, orders
    WHERE suppliers.supplier_id = orders.supplier_id
    and suppliers.supplier_name = 'Microsoft';

Dropping a VIEW
The syntax for dropping a VIEW is:
    DROP VIEW view_name;
For example:
    DROP VIEW sup_orders;

Creating Simple Views That Can't Change Underlying Table Data
In some cases, you may find that you want to create views that don't let your users change data in the underlying table. In this case, you can use the with read only clause. This clause will prevent any user of the view from making changes to the base table. Let's say that after reprimanding SCOTT severely for calling him a fool, KING wants to prevent all employees from ever changing data in EMP via the EMP_VIEW again. The following shows how he would do it:

create or replace view emp_view
 as (select * from emp)
 with read only;

Frequently Asked Questions
Question:  Can you update the data in a view?
Answer:  A view is created by joining one or more tables. When you update record(s) in a view, it updates the records in the underlying tables that make up the view. So, yes, you can update the data in a view providing you have the proper privileges to the underlying tables.

Question: Does the view exist if the table is dropped from the database?
Answer: Yes, in Oracle, the view continues to exist even after one of the tables (that the view is based on) is dropped from the database. However, if you try to query the view after the table has been dropped, you will receive a message indicating that the view has errors.If you recreate the table (that you had dropped), the view will again be fine.

SELECT Statement

The SELECT statement is used to query the database and retrieve selected data that match the criteria that you specify.
The SELECT statement has five main clauses to choose from, although, FROM is the only required clause. Each of the clauses have a vast selection of options, parameters, etc. The clauses will be listed below, but each of them will be covered in more detail later in the tutorial.

Here is the format of the SELECT statement:
SELECT [ALL | DISTINCT] column1[,column2]
FROM table1[,table2]
[WHERE "conditions"]
[GROUP BY "column-list"]
[HAVING "conditions]
[ORDER BY "column-list" [ASC | DESC] ]

SELECT column_name(s)
FROM table_name
and

SELECT * FROM table_name


DISTINCT Clause
The DISTINCT clause allows you to remove duplicates from the result set. The DISTINCT clause can only be used with select statements.
The syntax for the DISTINCT clause is:
SELECT DISTINCT columns     FROM tables     WHERE predicates;

Example #1
Let's take a look at a very simple example.
    SELECT DISTINCT city
    FROM suppliers;
This SQL statement would return all unique cities from the suppliers table.

Example #2
The DISTINCT clause can be used with more than one field.
For example:
   SELECT DISTINCT city, state
    FROM suppliers;
This select statement would return each unique city and state combination. In this case, the distinct applies to each field listed after the DISTINCT keyword.

SQL WHERE

The SQL WHERE clause is used to select data conditionally, by adding it to already existing SQL SELECT query. We are going to use the Customers table from the previous chapter, to illustrate the use of the SQL WHERE command.

Syntax
SELECT column_name(s)
FROM table_name
WHERE column_name operator value


With the WHERE clause, the following operators can be used:
Operator     Description
=     Equal
<>     Not equal
>     Greater than
<     Less than
>=     Greater than or equal
<=     Less than or equal
LIKE     Search for a pattern
IN     If you know the exact value you want to return for at least one of the columns
BETWEEN     Between an inclusive range

"AND" Condition
The AND condition allows you to create an SQL statement based on 2 or more conditions being met. It can be used in any valid SQL statement - select, insert, update, or delete.
The syntax for the AND condition is:

    SELECT columns
    FROM tables
    WHERE column1 = 'value1'
    and column2 = 'value2';

The AND condition requires that each condition be must be met for the record to be included in the result set. In this case, column1 has to equal 'value1' and column2 has to equal 'value2'.

"OR" Condition
The OR condition allows you to create an SQL statement where records are returned when any one of the conditions are met. It can be used in any valid SQL statement - select, insert, update, or delete.

The syntax for the OR condition is:
    SELECT columns
    FROM tables
    WHERE column1 = 'value1'
    or column2 = 'value2';
The OR condition requires that any of the conditions be must be met for the record to be included in the result set. In this case, column1 has to equal 'value1' OR column2 has to equal 'value2'.

Combining the "AND" and "OR" Conditions
The AND and OR conditions can be combined in a single SQL statement. It can be used in any valid SQL statement - select, insert, update, or delete. When combining these conditions, it is important to use brackets so that the database knows what order to evaluate each condition.

Example
The first example that we'll take a look at an example that combines the AND and OR conditions.

    SELECT *
    FROM suppliers
    WHERE (city = 'New York' and name = 'IBM')
    or (city = 'Newark');

LIKE Operator
The LIKE operator is used to search for a specified pattern in a column.
SQL LIKE Syntax
SELECT column_name(s)
FROM table_name
WHERE column_name LIKE pattern
The LIKE condition can be used in any valid SQL statement - select, insert, update, or delete.
The patterns that you can choose from are:
    % allows you to match any string of any length (including zero length)
    _ allows you to match on a single character


Examples using % wildcard
The first example that we'll take a look at involves using % in the where clause of a select statement. We are going to try to find all of the suppliers whose name begins with 'Hew'.
SELECT *
FROM suppliers
WHERE supplier_name like 'Hew%';

You can also using the wildcard multiple times within the same string. For example,
SELECT *
FROM suppliers
WHERE supplier_name like '%bob%';

Examples using _ wildcard
Next, let's explain how the _ wildcard works. Remember that the _ is looking for only one character.
For example,
SELECT *
FROM suppliers
WHERE supplier_name like 'Sm_th';

This SQL statement would return all suppliers whose name is 5 characters long, where the first two characters is 'Sm' and the last two characters is 'th'. For example, it could return suppliers whose name is 'Smith', 'Smyth', 'Smath', 'Smeth', etc.

IN Function
The IN operator allows you to specify multiple values in a WHERE clause.
SELECT column_name(s)
FROM table_name
WHERE column_name IN (value1,value2,...)


The following is an SQL statement that uses the IN function:
SELECT *
FROM suppliers
WHERE supplier_name in ( 'IBM', 'Hewlett Packard', 'Microsoft');

This would return all rows where the supplier_name is either IBM, Hewlett Packard, or Microsoft. Because the * is used in the select, all fields from the suppliers table would appear in the result set.
It is equivalent to the following statement:
SELECT *
FROM suppliers
WHERE supplier_name = 'IBM'
OR supplier_name = 'Hewlett Packard'
OR supplier_name = 'Microsoft';
As you can see, using the IN function makes the statement easier to read and more efficient.

BETWEEN
The BETWEEN condition allows you to retrieve values within a range.
The syntax for the BETWEEN condition is:
SELECT columns
FROM tables
WHERE column1 between value1 and value2;

This SQL statement will return the records where column1 is within the range of value1 and value2 (inclusive). The BETWEEN function can be used in any valid SQL statement - select, insert, update, or delete.

The following is an SQL statement that uses the BETWEEN function:
SELECT *
FROM suppliers
WHERE supplier_id between 5000 AND 5010;
This would return all rows where the supplier_id is between 5000 and 5010, inclusive. It is equivalent to the following SQL statement:
SELECT *
FROM suppliers
WHERE supplier_id >= 5000
AND supplier_id <= 5010;

EXISTS Condition
The EXISTS condition is considered "to be met" if the subquery returns at least one row.
The syntax for the EXISTS condition is:
SELECT columns
FROM tables
WHERE EXISTS ( subquery );

The EXISTS condition can be used in any valid SQL statement - select, insert, update, or delete.

Example1:
Let's take a look at a simple example. The following is an SQL statement that uses the EXISTS condition:
SELECT *
FROM suppliers
WHERE EXISTS (select *  from orders where suppliers.supplier_id = orders.supplier_id);

This select statement will return all records from the suppliers table where there is at least one record in the orders table with the same supplier_id.

Example 2: NOT EXISTS
The EXISTS condition can also be combined with the NOT operator.
For example,
SELECT *    FROM suppliers  WHERE not exists (select * from orders Where suppliers.supplier_id = orders.supplier_id);
This will return all records from the suppliers table where there are no records in the orders table for the given supplier_id.

Example 3:  DELETE Statement
The following is an example of a delete statement that utilizes the EXISTS condition:
DELETE FROM suppliers  WHERE EXISTS (select * from orders where suppliers.supplier_id = orders.supplier_id);


GROUP BY

Group functions allow you to perform data operations on several values in a column of data as though the column were one collective group of data. These functions are also called group-by functions because they are often used in a special clause of select statements, called the group by clause.

The syntax for the GROUP BY clause is:
    SELECT column1, column2, ... column_n, aggregate_function (expression)
    FROM tables
    WHERE predicates
    GROUP BY column1, column2, ... column_n;
aggregate_function can be a function such as SUM, COUNT, MIN, or MAX.

Here's a list of the available group functions:

  • avg(x) Averages all x column values returned by the select statement
  • count(x) Counts the number of non-NULL values returned by the select statement for column x
  • max(x) Determines the maximum value in column x for all rows returned by the select statement
  • min(x) Determines the minimum value in column x for all rows returned by the select statement
  • stddev(x) Calculates the standard deviation for all values in column x in all rows returned by the select statement
  • sum(x) Calculates the sum of all values in column x in all rows returned by the select statement
  • Variance(x) Calculates the variance for all values in column x in all rows returned by the select statement

Example using the SUM function
For example, you could also use the SUM function to return the name of the department and the total sales (in the associated department).
SELECT department, SUM(sales) as "Total sales"
FROM order_details
GROUP BY department;

Because you have listed one column in your SELECT statement that is not encapsulated in the SUM function, you must use a GROUP BY clause. The department field must, therefore, be listed in the GROUP BY section.

Example using the COUNT function
For example, you could use the COUNT function to return the name of the department and the number of employees (in the associated department) that make over $25,000 / year.
SELECT department, COUNT(*) as "Number of employees"
FROM employees
WHERE salary > 25000
GROUP BY department;

ROLLUP
This group by operation is used to produce subtotals at any level of aggregation needed. These subtotals then "roll up" into a grand total, according to items listed in the group by expression. The totaling is based on a one-dimensional data hierarchy of grouped information. For example, let's say we wanted to get a payroll breakdown for our company by department and job position. The following code block would give us that information:

SQL> select deptno, job, sum(sal) as salary
  2  from emp
  3  group by rollup(deptno, job);
   DEPTNO JOB          SALARY
--------- --------- ---------
       10 CLERK          1300
       10 MANAGER        2450
       10 PRESIDENT      5000
       10                8750
       20 ANALYST        6000
       20 CLERK          1900
       20 MANAGER        2975
       20               10875
       30 CLERK           950
       30 MANAGER        2850
       30 SALESMAN       5600
       30                9400
                        29025

Notice that NULL values in the output of rollup operations typically mean that the row contains subtotal or grand total information. If you want, you can use the nvl( ) function to substitute a more meaningful value.

cube
cube This is an extension, similar to rollup. The difference is that cube allows you to take a specified set of grouping columns and create subtotals for all possible combinations of them. The cube operation calculates all levels of subtotals on horizontal lines across spreadsheets of output and creates cross-tab summaries on multiple vertical columns in those spreadsheets. The result is a summary that shows subtotals for every combination of columns or expressions in the group by clause, which is also known as n-dimensional cross-tabulation. In the following example, notice how cube not only gives us the payroll breakdown of our company by DEPTNO and JOB, but it also gives us the breakdown of payroll by JOB across all departments:

SQL>  select deptno, job, sum(sal) as salary
  2  from emp
  3  group by cube(deptno, job);
DEPTNO JOB          SALARY
--------- --------- ---------
       10 CLERK          1300
       10 MANAGER        2450
       10 PRESIDENT      5000
       10                8750
       20 ANALYST        6000
       20 CLERK          1900
       20 MANAGER        2975
       20               10875
       30 CLERK           950
       30 MANAGER        2850
       30 SALESMAN       5600
       30                9400
          ANALYST        6000
          CLERK          4150
          MANAGER        8275
          PRESIDENT      5000
          SALESMAN       5600
                        29025

Excluding group Data with having
Once the data is grouped using the group by statement, it is sometimes useful to weed out unwanted data. For example, let's say we want to list the average salary paid to employees in our company, broken down by department and job title. However, for this query, we only care about departments and job titles where the average salary is over $2000. In effect, we want to put a where clause on the group by clause to limit the results we see to departments and job titles where the average salary equals $2001 or higher. This effect can be achieved with the use of a special clause called the having clause, which is associated with group by statements. Take a look at an example of this clause:

SQL> select deptno, job, avg(sal)
  2  from emp
  3  group by deptno, job
  4  having avg(sal) > 2000;
   DEPTNO JOB        AVG(SAL)

---------     ---------           ---------
       10   MANAGER        2450
       10   PRESIDENT      5000
       20   ANALYST        3000
       20   MANAGER        2975
       30   MANAGER        2850

Consider the output of this query for a moment. First, Oracle computes the average for every department and job title in the entire company. Then, the having clause eliminates departments and titles whose constituent employees' average salary is $2000 or less. This selectivity cannot easily be accomplished with an ordinary where clause, because the where clause selects individual rows, whereas this example requires that groups of rows be selected. In this query, you successfully limit output on the group by rows by using the having clause.

HAVING clause

 The SQL HAVING clause is used to restrict conditionally the output of a SQL statement, by a SQL aggregate function used in your SELECT list of columns.
SELECT column1, column2, ... column_n, aggregate_function (expression)
FROM tables
WHERE predicates
GROUP BY column1, column2, ... column_n
HAVING condition1 ... condition_n;


You can't specify criteria in a SQL WHERE clause against a column in the SELECT list for which SQL aggregate function is used. For example the following SQL statement will generate an error:
SELECT Employee, SUM (Hours)
FROM EmployeeHours
WHERE SUM (Hours) > 24
GROUP BY Employee

The SQL HAVING clause is used to do exactly this, to specify a condition for an aggregate function which is used in your query:
SELECT Employee, SUM (Hours)
FROM EmployeeHours
GROUP BY Employee
HAVING SUM (Hours) > 24

ORDER BY

So far, we have seen how to get data out of a table using SELECT and WHERE commands. Often, however, we need to list the output in a particular order. This could be in ascending order, in descending order, or could be based on either numerical value or text value. In such cases, we can use the ORDER BY keyword to achieve our goal.

The syntax for an ORDER BY statement is as follows:

SELECT "column_name"
FROM "table_name"
[WHERE "condition"]
ORDER BY "column_name" [ASC, DESC]


The [] means that the WHERE statement is optional. However, if a WHERE clause exists, it comes before the ORDER BY clause. ASC means that the results will be shown in ascending order, and DESC means that the results will be shown in descending order. If neither is specified, the default is ASC.
It is possible to order by more than one column. In this case, the ORDER BY clause above becomes ORDER BY "column_name1" [ASC, DESC], "column_name2" [ASC, DESC]

DML Statements

Data Manipulation Language (DML) is a family of computer languages used by computer programs database users to retrieve, insert, delete and update data in a database.

Currently the most popular data manipulation language is that of SQL, which is used to retrieve and manipulate data in a Relational database. Other forms of DML are those used by IMS/DLI, CODASYL databases (such as IDMS), and others.

Data manipulation languages were initially only used by computer programs, but (with the advent of SQL) have come to be used by people, as well.

Data Manipulation Language (DML) is used to retrieve, insert and modify database information. These commands will be used by all database users during the routine operation of the database. Let's take a brief look at the basic DML commands:

Data Manipulation Languages have their functional capability organized by the initial word in a statement, which is almost always a verb. In the case of SQL, these verbs are:
    * Select
    * Insert
    * Update
    * Delete

Subqueries

Subquery or Inner query or Nested query is a query in a query. A subquery is usually added in the WHERE Clause of the sql statement. Most of the time, a subquery is used when you know how to search for a value using a SELECT statement, but do not know the exact value.

 select ename, deptno, sal
  2   from emp
  3   where deptno =
  4    ( select deptno
  5      from dept
  6      where loc = 'NEW YORK' );

ENAME         DEPTNO       SAL
----------           ---------     ---------
CLARK             10            2450
KING               10            5000
MILLER            10            1300
Subqueries can be used to obtain values for parent select statements when specific search criteria isn't known. To do so, the where clause in the parent select statement must have a comparison operation where the unknown value being compared is determined by the result of the subquery. The inner subquery executes once, right before the main outer query executes. The subquery returns its results to the main outer query as shown in above example

Notes:
1. Subqueries must appear inside parentheses, or else Oracle will have trouble distinguishing the subquery from the parent query. You should also make sure to place subqueries on the right side of the comparison operator.
2. Subqueries are an alternate way of returning data from multiple tables.
3. Subqueries can be used with the following sql statements along with the comparision operators like =, <, >, >=, <= etc.
     SELECT
     INSERT
     UPDATE
     DELETE


Differnt Usage
IN
You can also use the in comparison, which is similar to the case statement offered in many programming languages, because resolution can be established based on the parent column's equality with any element in the group. Let's take a look at an example:

SQL> select ename, job, sal
  2  from emp
  3  where deptno in
  4   ( select deptno
  5     from dept
  6     where dname in
  7     ('ACCOUNTING', 'SALES'));

EXISTS/NOT EXISTS
Another way of including a subquery in the where clause of a select statement is to use the exists clause. This clause enables you to test for the existence of rows in the results of a subquery, and its logical opposite is not exists. When you specify the exists operation in a where clause, you must include a subquery that satisfies the exists operation. If the subquery returns data, the exists operation returns TRUE, and a record from the parent query will be returned. If not, the exists operation returns FALSE, and no record for the parent query will be returned. Let's look at an example in which we obtain the same listing of employees working in the New York office, only this time, we use the exists operation:

SQL> select e.ename, e.job, e.sal
  2  from emp e
  3  where exists
  4     ( select d.deptno
  5       from dept d
  6       where d.loc = 'NEW YORK'
  7       and d.deptno = e.deptno);

ENAME      JOB              SAL
----------     ---------           ---------
CLARK      MANAGER        2450
KING        PRESIDENT      5000
MILLER      CLERK             1300


Correlated Subquery
A query is called correlated subquery when both the inner query and the outer query are interdependent. For every row processed by the inner query, the outer query is processed as well. The inner query depends on the outer query before it can be processed.
SELECT p.product_name FROM product p
WHERE p.product_id = (SELECT o.product_id FROM order_items o
WHERE o.product_id = p.product_id);


Listing and Writing Different Types of Subqueries
The following list identifies several different types of subqueries you may need to understand and use on the OCP exam:

  •       Single-row subqueries The main query expects the subquery to return only one value.
  •       Multirow subqueries The main query can handle situations where the subquery returns more than one value.
  •       Multiple-column subqueries A subquery that contains more than one column of return data in addition to however many rows are given in the output. These types of subqueries will be discussed later in the chapter.
  •       Inline views A subquery in a from clause used for defining an intermediate result set to query from. These types of subqueries will be discussed later in the chapter.


Single-Row Subqueries

The main query expects the sub query to return only one value.
Check out the following example, which should look familiar:
SQL>  select ename, deptno, sal
  2   from emp
  3   where deptno =
  4    ( select deptno
  5      from dept
  6      where loc = 'NEW YORK' );

ENAME         DEPTNO       SAL
----------         ---------         ---------
CLARK             10            2450
KING               10            5000
MILLER            10            1300

Though the above query results have 3 rows it is a single-row subquery Because, the subquery on the DEPT table to derive the output from EMP returns only one row of data.

Multi row subquery

A multi row subquery   returns one or more rows.  Since it returns multiple values, the query must use the set comparison operators (IN,ALL,ANY).   If you use a multi row subquery with the equals comparison operators, the database will return an error if more than one row is returned.

Exampe:
select last_name from employees where manager_id in
(select employee_id from employees where department_id in
(select department_id from departments where location_id in
(select location_id from locations where country_id='UK')));

with
You can improve the performance of this query by having Oracle9i execute the subquery only once, then simply letting Oracle9i reference it at the appropriate points in the main query. The following code block gives a better logical idea of the work Oracle must perform to give you the result. In it, the bold text represents the common parts of the subquery that are performed only once, and the places where the subquery is referenced:

SQL> with summary as
  2  (select dname, sum(sal) as dept_total
  3   from emp, dept
  4   where emp.deptno = dept.deptno
  5   group by dname)
  6  select dname, dept_total
  7  from summary
  8  where dept_total >
  9  (select sum(dept_total) * 1/3
 10   from summary)
 11  order by dept_total desc;
DNAME                DEPT_TOTAL
-------------------- ----------
RESEARCH                  10875


Multiple-Column Subqueries

Notice that in all the prior examples, regardless of whether one row or multiple rows were returned from the sub query, each of those rows contained only one column's worth of data to compare at the main query level. The main query can be set up to handle multiple columns in each row returned, too. To evaluate how to use multiple-column sub queries, let's consider an example

Select *
From PO_LINES_ALL
Where (PO_HEADER_ID, PO_LINE_ID) IN
(
Select PO_HEADER_ID, PO_LINE_ID
From PO_LINE_LOCATIONS_ALL
WHERE QUANTITY_RECEIVED < QUANTITY/2
AND CLOSED_CODE <> 'CLOSED FOR RECEIVING'
)
The benefit of writing query in above format is that separating the requirements in tables. From PO_LINE_LOCATIONS_ALL we are only taking those data which are relevant for our purpose and our end aim is to view the PO_LINEA_ALL entries corresponding to some required conditions satisfied by entries in PO_LINE_LOCATIONS_ALL.


Inline view : Subqueries in a from Clause

You can also write subqueries that appear in your from clause. Writing subqueries in the from clause of the main query can be a handy way to collect an intermediate set of data that the main query treats as a table for its own query-access purposes. This subquery in the from clause of your main query is called an inline view. You must enclose the query text for the inline view in parentheses and also give a label for the inline view so that columns in it can be referenced later. The subquery can be a select statement that utilizes joins, the group by clause, or the order by clause

Select a.PO_HEADER_ID, a.Segment1, b.unit_price, b.Quantity
From PO_HEADERS_ALL a,
(
Select unit_price, Quantity, po_header_id
From PO_LINES_ALL
) b
Where a.PO_HEADER_ID=b.PO_HEADER_ID

Inline Views and Top-N Queries
Top-N queries use inline views and are handy for displaying a short list of table data, based on "greatest" or "least" criteria. For example, let's say that profits for our company were exceptionally strong this year, and we want a list of the three lowest-paid employees in our company so that we could give them a raise. A top-N query would be useful for this purpose. Take a look at a top-N query that satisfies this business scenario:

SQL> select ename, job, sal, rownum
  2  from (select ename, job, sal from emp
  3        order by sal)
  4  where rownum <=3;
ENAME      JOB             SAL     ROWNUM
----------     ---------         ---------   ---------
SMITH      CLERK           800         1
JAMES      CLERK           950         2
ADAMS      CLERK          1100       3

You need to know two important things about top-N queries for OCP. The first is their use of the inline view to list all data in the table in sorted order. The second is their use of ROWNUM—a virtual column identifying the row number in the table—to determine the top number of rows to return as output. Conversely, if we have to cut salaries based on poor company performance and want to obtain a listing of the highest-paid employees, whose salaries will be cut, we would reverse the sort order inside the inline view, as shown here:

SQL> select ename, job, sal, rownum
  2  from (select ename, job, sal from emp
  3        order by sal desc)
  4  where rownum <=3;
ENAME      JOB             SAL    ROWNUM
---------- --------- --------- ---------
KING       PRESIDENT      5000         1
SCOTT      ANALYST        3000         2
FORD       ANALYST        3000         3


Constraints

Constraints are rules you can define in your Oracle tables to restrict the type of data you can place in the tables.


Two methods exist for defining constraints: the table constraint method and the column constraint method. The constraint is defined as a table constraint if the constraint clause syntax appears after the column and datatype definitions. The constraint is defined as a column constraint if the constraint definition syntax appears as part of an individual column's definition. All constraints can be defined either as table constraints or as column constraints, with two exceptions:
  •       Not NULL constraints can only be defined as column constraints.
  •       Primary keys consisting of two or more columns (known also as composite primary keys) can only be defined as table constraints. However, single-column primary keys can be defined either as column or table constraints.
Primary Key
A constraint of this type identifies the column or columns whose singular or combined values identify uniqueness in the rows of your Oracle table. Every row in the table must have a value specified for the primary key column(s).
SQL> create table employee
(
 empid varchar2(5)  constraint pk_employee_01 primary key,
 lastname varchar2(25),
 firstname varchar2(25),
 salary number(10,4)
);
      //column constraint method
 
Or cab be simplified as
create table employee
(
 empid varchar2(5)  primary key,
 lastname varchar2(25),
 firstname varchar2(25),
 salary number(10,4)
);
      //column constraint method
Each primary key constraint was given a meaningful name when defined. Oracle strongly recommends that you give your constraints meaningful names in this way so that you can easily identify the constraint later
 create table employee
 (
 empid varchar2(5),
 lastname varchar2(25),
 firstname varchar2(25),
 salary number(10,4),
 constraint pk_employee_01  primary key (empid)
);
     //table constraint method

Composite Primary Keys
So that you understand the nature of composite primary keys in Oracle for OCP, the following code block shows how to define a composite primary key:
create table names
(
firstname varchar2(10),
lastname varchar2(10),
constraint pk_names_01 primary key (firstname, lastname)
);

Defining Foreign Key Constraints
To help you understand how to define foreign key constraints, let's think in terms of an example. Let's say we have our own table called DEPARTMENT, which we just created in the last code block. It lists the department number, name, and location for all departments in our own little company. Let's also say that we want to create our EMPLOYEE table with another column, called DEPARTMENT_NUM. Because there is an implied parent-child relationship between these two tables with the shared column, let's make that relationship official by using a foreign key constraint, shown in bold in the following block:
create table employee
(
empid varchar2(5) primary key,
lastname varchar2(25),
firstname varchar2(25),
department_num number(5) references department(department_num) on delete set null,
salary number(10,4)
);
  //references table_name(column_name) on delete set null,

For a foreign-key constraint to be valid, the same column appearing in both tables must have exactly the same datatype. You needn't give the columns the same names, but it's a good idea to do so. The foreign key constraint prevents the DEPARTMENT_NUM column in the EMP table from ever storing a value that can't also be found in the DEPT table. The final clause, on delete set null, is an option relating to the deletion of data from the parent table. If someone attempts to remove a row from the parent table that contains a referenced value from the child table, Oracle sets all corresponding values in the child to NULL. The other option is on delete cascade, where Oracle allows remove all corresponding records from the child table when a referenced record from the parent table is removed.

Unique Key Constraints
Let's say we also want our employee table to store social security or government ID information. The definition of a UNIQUE constraint on the GOVT_ID column prevents anyone from defining a duplicate government ID for any two employees in the table. Take a look at the following example, where the unique constraint definition is shown in bold:

create table employee
(
empid varchar2(5) primary key,
lastname varchar2(25),
firstname varchar2(25),
govt_id number(10) unique,
salary number(10,4),
department_num number(5) references department (department_num),
);


Defining Other Types of Constraints
The last two types of constraints are not NULL and CHECK constraints. By default, Oracle allows columns to contain NULL values. The not NULL constraint prevents the data value defined by any row for the column from being NULL. By default, primary keys are defined to be not NULL. All other columns can contain NULL data, unless you explicitly define the column to be not NULL. CHECK constraints allow Oracle to verify the validity of data being entered on a table against static criteria. For example, you could specify that the SALARY column cannot contain values over $250,000. If someone tries to create an employee row with a salary of $1,000,000 per year, Oracle would return an error message saying that the record data defined for the SALARY column has violated the CHECK constraint for that column. Let's look at a code example where both not NULL and check constraints are defined in bold:

create table employee
(
empid varchar2(5) primary key,
department_num number(5) references department (department_num),
lastname varchar2(25) not null,
firstname varchar2(25) unique,
salary number(10,4) check (salary <=250000),
govt_id number(10) unique
);

Adding Integrity Constraints to Existing Tables

Another constraint-related activity that you may need to do involves adding new constraints to an existing table. This can be easy if there is no data in the table already, but it can be a nightmare if data already exists in the table that doesn't conform to the constraint criteria. The simplest scenario for adding the constraint is to add it to the database before data is inserted. Take a look at the following code block:

SQL> create table employee
  2  (empid varchar2(5),
  3   lastname varchar2(25),
  4   firstname varchar2(25),
  5   salary number(10,4),
  6   department_num number(5),
  7   govt_id number(10));
Table created.
alter table employee
add constraint pk_employee_01 primary key (empid);

alter table employee
add constraint fk_employee_01 foreign key (department_num) references department (department_num);

alter table employee
add constraint ck_employee_01 check (salary <=250000);

alter table employee
add constraint uk_employee_01 unique (govt_id);

alter table employee modify
(lastname not null);

Disabling Constraints
A constraint can be turned on and off. When the constraint is disabled, it will no longer do its job of enforcing rules on the data entered into the table. The following code block demonstrates some sample statements for disabling constraints:
alter table employee
disable primary key;

alter table employee
disable constraint uk_employee_01;

You may experience a problem if you attempt to disable a primary key when existing foreign keys depend on that primary key. This problem is shown in the following situation:

Enabling a Disabled Constraint
When the constraint is later enabled, the rules defined for the constraint are once again enforced, rendering the constraint as effective as it was when it was first added to the table. You can enable a disabled constraint as follows:

alter table department
enable primary key;

alter table employee
enable uk_employee_01;

Removing Constraints
Usually, there is little about a constraint that will interfere with your ability to remove it, so long as you either own the table or have been granted appropriate privileges to do so. When a constraint is dropped, any index associated with that constraint (if there is one) is also dropped. Here is an example:
alter table employee
drop unique (govt_id);

alter table employee
drop primary key cascade;

alter table employee
drop constraint ck_employee_01;

An anomaly can be found when disabling or dropping not NULL constraints. You cannot disable a not NULL constraint, per se—a column either accepts NULL values or it doesn't. Therefore, you must use the alter table modify clause in all situations where the not NULL constraints on a table must be added or removed. Here's an example:

alter table employee
modify (lastname null);

alter table employee
modify (lastname not null);


INSERT Statement

The INSERT statement allows you to insert a single record or multiple records into a table.
The general syntax for an insert statement is insert into tablename (column_list) values (valuesl_list), where tablename is the
name of the table you want to insert data into, column_list is the list of columns for which you will define values on the record being added, and values_list is the list of those values you will define. The datatype of the data you add as values in the values list must correspond to the datatype for the column identified in that same position in the column list.
The syntax for the INSERT statement is:

INSERT INTO table_name
(column-1, column-2, ... column-n) VALUES (value-1, value-2, ... value-n);

Example 1:
INSERT INTO  XX_PO_HEADERS_ALL
(PO_ID, PO_NUMBER, SUPPLIER_NAME) VALUES(6, 10, 'ARCODA')


Example 2:
you may not necessarily need to define explicit columns of the table. You only need to do that when you don't plan to populate every column in the record you are inserting with a value.
insert into employee
values ('02039','WALLA','RAJENDRA',60000,'01-JAN-96','604B');


Example 3:
INSERT INTO suppliers
(supplier_id, supplier_name) SELECT account_no, name FROM customers WHERE city = 'Newark';


Example 4:
The following is an example of how you might insert 3 rows into the suppliers table in Oracle.
INSERT ALL
INTO  XX_PO_HEADERS_ALL(PO_ID, PO_NUMBER, SUPPLIER_NAME) VALUES(4, 10, 'ARCODA')
INTO  XX_PO_HEADERS_ALL(PO_ID, PO_NUMBER, SUPPLIER_NAME) VALUES(5, 10, 'ARCODA')
Select * from dual

UPDATE Statement

Data manipulation on Oracle tables does not end after you add new records to your tables. Often, the rows in a table will need to be changed. In order to make those changes, the update statement can be used.
The UPDATE statement allows you to update a single record or multiple records in a table.
The syntax for the UPDATE statement is:
    UPDATE table
    SET column = expression
    WHERE predicates;

Example #1 - Simple example
Let's take a look at a very simple example.

    UPDATE suppliers
    SET name = 'HP'
    WHERE name = 'IBM';

This statement would update all supplier names in the suppliers table from IBM to HP.

Example #2 - More complex example
You can also perform more complicated updates.
You may wish to update records in one table based on values in another table. Since you can't list more than one table in the UPDATE statement, you can use the EXISTS clause.
For example:
    UPDATE suppliers    
    SET supplier_name =     ( SELECT customers.name
    FROM customers
    WHERE customers.customer_id = suppliers.supplier_id)
    WHERE EXISTS
      ( SELECT customers.name
        FROM customers
        WHERE customers.customer_id = suppliers.supplier_id);
Whenever a supplier_id matched a customer_id value, the supplier_name would be overwritten to the customer name from the customers table.


DELETE Statement

The DELETE statement allows you to delete a single record or multiple records from a table.

The syntax for the DELETE statement is:
    DELETE FROM table
    WHERE predicates;

Example #1 : Simple example
Let's take a look at a simple example:
    DELETE FROM suppliers
    WHERE supplier_name = 'IBM';

This would delete all records from the suppliers table where the supplier_name is IBM. You may wish to check for the number of rows that will be deleted. You can determine the number of rows that will be deleted by running the following SQL statement before performing the delete.

Example #2 : More complex example
You can also perform more complicated deletes.
You may wish to delete records in one table based on values in another table. Since you can't list more than one table in the FROM clause when you are performing a delete, you can use the EXISTS clause.
For example:
    DELETE FROM suppliers
    WHERE EXISTS
      ( select customers.name
         from customers
         where customers.customer_id = suppliers.supplier_id
         and customers.customer_name = 'IBM' );

This would delete all records in the suppliers table where there is a record in the customers table whose name is IBM, and the customer_id is the same as the supplier_id.

Merge into

The merge command syntax is
merge into table1
using table2 on (join_condition)
when matched update set col1 = value
when not matched insert (column_list) values (column_values).

The statement components work in the following way:
1. In the merge into table1 clause, you identify a table into which you would like to update data in an existing row or add new data if the row doesn't already exist as table1.
 
2. In the using table2 clause, you identify a second table from which rows will be drawn in order to determine if the data already exists as table2. This can be a different table or the same table as table1. However, if table2 is the same table as table1, or if the two tables have similar columns, then you must use table aliases to preface all column references with the correct copy of the table. Otherwise, Oracle will return an error stating that your column references are ambiguously defined.
In the on (join_condition) clause, you define the join condition to link the two tables together. If table2 in the using clause is the same table as table1 in the merge into clause, or if the two tables have similar columns, then you must use table aliases or the table.column syntax when referencing columns in the join or filter conditions. Otherwise, Oracle will return an error stating that your column references are ambiguously defined.

3. In the when matched then update set col1 = value clause, you define the column(s) Oracle should update in the first table if a match in the second table is found. If table2 in the using clause is the same table as table1 in the merge into clause, or if the two tables have similar columns, then you must use table aliases or the table.column syntax when referencing columns in the update operation. Otherwise, Oracle will return an error stating that your column references are ambiguously defined.

4. In the when not matched then insert (column_list) values (value_list) clause, you define what Oracle should insert into the first table if a match in the second table is not found. If table2 in the using clause is the same table as table1 in the merge into clause, or if the two tables have similar columns, then you must use table aliases or the table.column syntax to preface all column references in column_list. Otherwise, Oracle will return an error stating that your column references are ambiguously defined.

Example
Consider the following scenario. Say you manage a movie theater that is part of a national chain. Everyday, the corporate headquarters sends out a data feed that you put into your digital billboard over the ticket sales office, listing out all the movies being played at that theater, along with showtimes. The showtime information changes daily for existing movies in the feed.
merge into movies M1
using movies M2 on (M2.movie_name = M1.movie_name and M1.movie_name = 'GONE WITH THE WIND')
when matched then update set M1.showtime = '7:30 PM'
when not matched then insert (M1.movie_name, M1.showtime) values ('GONE WITH THE WIND','7:30 PM');


Transaction Control

One of the great benefits Oracle provides you is the ability to make changes in database using SQL statements and then decide later whether we want to save or discard them. Oracle enables you to execute a series of data-change statements together as one logical unit of work, called a transaction, that's terminated when you decide to save or discard the work. A transaction begins with your first executable SQL statement. Some advantages for offering transaction processing in Oracle include the following:

  • Transactions enable you to ensure read-consistency to the point in time a transaction began for all users in the Oracle database.
  • Transactions enable you to preview changes before making them permanent in Oracle.
  • Transactions enable you to group logically related SQL statements into one logical unit of work.
Transaction processing consists of a set of controls that enable a user issuing an insert, update, or delete statement to declare a beginning to the series of data-change statements he or she will issue. When the user has finished making the changes to the database, the user can save the data to the database by explicitly ending the transaction. Alternatively, if a mistake is made at any point during the transaction, the user can have the database discard the changes made to the database in favor of the way the data existed before the transaction.

The commands that define transactions are as follows:
  1. Set transaction Initiates the beginning of a transaction and sets key features. This command is optional. A transaction will be started automatically when you start SQL*Plus, commit the previous transaction, or roll back the previous transaction.
  2. Commit Ends the current transaction by saving database changes and starts a new transaction.
  3. Rollback Ends the current transaction by discarding database changes and starts a new transaction.
  4. Savepoint Defines breakpoints for the transaction to enable partial rollbacks.
  5. Locks

Set transaction

This command can be used to define the beginning of a transaction. If any change is made to the database after the set transaction command is issued but before the transaction is ended, all changes made will be considered part of that transaction. The set transaction statement is not required, because a transaction begins under the following circumstances:
  • As soon as you log onto Oracle via SQL*Plus and execute the first command
  • Immediately after issuing a rollback or commit statement to end a transaction
  • When the user exits SQL*Plus
  • When the system crashes
  • When a data control language command such as alter database is issued
By default, a transaction will provide both read and write access unless you override this default by issuing set transaction read only. You can set the transaction isolation level with set transaction as well. The set transaction isolation level serializable command specifies serializable transaction isolation mode as defined in SQL92. If a serializable transaction contains data manipulation language (DML) that attempts to update any resource that may have been updated in a transaction uncommitted at the start of the serializable transaction, the DML statement fails. The set transaction isolation level read committed command is the default Oracle transaction behavior. If the transaction contains DML that requires row locks held by another transaction, the DML statement waits until the row locks are released

Commit
The commit statement in transaction processing represents the point in time where the user has made all the changes he or she wants to have logically grouped together, and because no mistakes have been made, the user is ready to save the work. The work keyword is an extraneous word in the commit syntax that is designed for readability.

Issuing a commit statement also implicitly begins a new transaction on the database because it closes the current transaction and starts a new one. By issuing a commit, data changes are made permanent in the database. The previous state of the data is lost. All users can view the data, and all savepoints are erased. It is important also to understand that an implicit commit occurs on the database when a user exits SQL*Plus or issues a data-definition language (DDL) command such as a create table statement, used to create a database object, or an alter table statement, used to alter a database object.

The following is an example:
SQL> COMMIT;
Commit complete.
SQL> COMMIT WORK;
Commit complete.

Rollback
  If you have at any point issued a data-change statement you don't want, you can discard the changes made to the database with the use of the rollback statement. The previous state of the data is restored. Locks on the affected rows are released. After the rollback command is issued, a new transaction is started implicitly by the database session. In addition to rollbacks executed when the rollback statement is issued, implicit rollback statements are conducted when a statement fails for any reason or if the user cancels a statement with the CTRL-C cancel command. The following is an example:

SQL> ROLLBACK;
Rollback complete

Savepoint
In some cases involving long transactions or transactions that involve many data changes, you may not want to scrap all your changes simply because the last statement issued contains unwanted changes. Savepoints are special operations that enable you to divide the work of a transaction into different segments. You can execute rollbacks to the savepoint only, leaving prior changes intact. Savepoints are great for situations where part of the transaction needs to be recovered in an uncommitted transaction. At the point the rollback to savepoint so_far_so_good statement completes in the following code block, only changes made before the savepoint was defined are kept when the commit statement is issued:

UPDATE products
SET quantity = 55
WHERE product# = 59495;
SAVEPOINT so_far_so_good;
//Savepoint created.

UPDATE spanky.products
SET quantity = 504;
ROLLBACK TO SAVEPOINT so_far_so_good;
COMMIT;

Locks
The final aspect of the Oracle database that enables the user to employ transaction processing is the lock, the mechanism by which Oracle prevents data from being changed by more than one user at a time. Several different types of locks are available, each with its own level of scope. Locks available on a database are categorized into table-level locks and row-level locks.

A table-level lock enables only the user holding the lock to change any piece of row data in the table, during which time no other users can make changes anywhere on the table. A table lock can be held in any of several modes: row share (RS), row exclusive (RX), share (S), share row exclusive (SRX), and exclusive (X). The restrictiveness of a table lock's mode determines the modes in which other table locks on the same table can be obtained and held.

A row-level lock gives the user the exclusive ability to change data in one or more rows of the table. However, any row in the table that is not held by the row-level lock can be changed by another user

Tip
An update statement acquires a special row-level lock called a row-exclusive lock, which means that for the period of time the update statement is executing, no other user in the database can view or change the data in the row. The same goes for delete or insert operations. Another update statement—the select for update statement—acquires a more lenient lock called the share row lock. This lock means that for the period of time the update statement is changing the data in the rows of the table, no other user may change that row, but users may look at the data in the row as it changes.


Other Database Objects

Some of the objects that are part of the relational database produced by Oracle and that are used in the functions just mentioned are as follows:

  • Tables, views, and synonyms Used to store and access data. Tables are the basic unit of storage in Oracle. Views logically represent subsets of data from one or more tables. Synonyms provide alternate names for database objects.
  • Indexes and the Oracle RDBMS Used to speed access to data.
  • Sequences Used for generating numbers for various purposes.
  • Triggers and integrity constraints Used to maintain the validity of data entered.
  • Privileges, roles, and profiles Used to manage database access and usage.
  • Packages, procedures, and functions Application PL/SQL code used in the database.

Sequences

A sequence is a database object that generates integers according to rules specified at the time the sequence is created. A sequence automatically generates unique numbers and is sharable between different users in Oracle. Sequences have many purposes in database systems—the most common of which is to generate primary keys automatically. However, nothing binds a sequence to a table's primary key, so in a sense it's also a sharable object

Sequences are created with the create sequence statement
CREATE SEQUENCE
START WITH
INCREMENT BY
MINVALUE
MAXVALUE
CYCLE
ORDER
CACHE

1. Start with n Enables the creator of the sequence to specify the first value generated by the sequence. Once created, the sequence will generate the value specified by start with the first time the sequence's NEXTVAL virtual column is referenced. If no start with value is specified, Oracle defaults to a start value of 1.

2. Increment by n Defines the number by which to increment the sequence every time the NEXTVAL virtual column is referenced. The default for this clause is 1 if it is not explicitly specified. You can set n to be positive for incrementing sequences or negative for decrementing or countdown sequences.

3. Minvalue n Defines the minimum value that can be produced by the sequence. If no minimum value is specified, Oracle will assume the default, nominvalue.

4. Maxvalue n Defines the maximum value that can be produced by the sequence. If no maximum value is desired or specified, Oracle will assume the default, nomaxvalue.

5. Cycle Enables the sequence to recycle values produced when maxvalue or minvalue is reached. If cycling is not desired or not explicitly specified, Oracle will assume the default, nocycle. You cannot specify cycle in conjunction with nomaxvalue or nominvalue. If you want your sequence to cycle, you must specify maxvalue for incrementing sequences or minvalue for decrementing or countdown sequences.

6. Cache n Enables the sequence to cache a specified number of values to improve performance. If caching is not desired or not explicitly specified, Oracle will assume the default, which is to cache 20 values.

7. Order Enables the sequence to assign values in the order in which requests are received by the sequence. If order is not desired or not explicitly specified, Oracle will assume the default, noorder.

Example 1:

CREATE SEQUENCE supplier_seq
    MINVALUE 1
    MAXVALUE 999999999999999999999999999
    START WITH 1
    INCREMENT BY 1
    CACHE 20;

This would create a sequence object called supplier_seq. The first sequence number that it would use is 1 and each subsequent number would increment by 1 (ie: 2,3,4,...}. It will cache up to 20 values for performance.


Example 2:
The below sequence is a dercrment one. It starts with 100 and decreases by 1.
CREATE SEQUENCE XX_Notification_number
START WITH 100
INCREMENT BY -1
MAXVALUE 100
MINVALUE 1
CYCLE
CACHE 20


Referencing Sequences in Data Changes
Sequence-value generation can be incorporated directly into data changes made by insert and update statements. This direct use of sequences in insert and update statements is the most common use for sequences in a database. In the situation where the sequence generates a primary key for all new rows entering the database table, the sequence would likely be referenced directly from the insert statement. Note, however, that this approach sometimes fails when the sequence is referenced by triggers. Therefore, it is best to reference sequences within the user interface or within stored procedures. The following statements illustrate the use of sequences directly in changes made to tables:

INSERT INTO expense(expense_no, empid, amt, submit_date)
VALUES(countdown_20.nextval, 59495, 456.34, '21-NOV-99');

SEQUENCE_NAME.NEXTVAL & SEQUENCE_NAME.CURRVAL
Once the sequence is created, it is referenced using the CURRVAL and NEXTVAL pseudocolumns. The users of the database can view the current value of the sequence by using a select statement. Similarly, the next value in the sequence can be generated with a select statement. Because sequences are not tables—they are only objects that generate integers via the use of virtual columns—the DUAL table acts as the "virtual" table from which the virtual column data is pulled. As stated earlier, values cannot be placed into the sequence; instead, they can only be selected from the sequen

Example 3:
Select XX_Notification_number.NEXTVAL from dual
Select XX_Notification_number.CURRVAL from dual

Alter sequence
The time may come when the sequence of a database will need its rules altered in some way. For example, you may want sequence XX_Notification_number to decrement by a different number. Any parameter of a sequence can be modified by issuing the alter sequence statement. The following is an example:

Alter Sequence sequence_name
//Write new values of the sequence parameters
START WITH 100
INCREMENT BY -1
MAXVALUE 100
MINVALUE 1
CYCLE
CACHE 20


Example 4:
alter sequence XX_Notification_number
increment by -2;

Index

An index can be created in a table to find data more quickly and efficiently. The users cannot see the indexes, they are just used to speed up searches/queries.

Indexes are objects in the database that provide a mapping of all the values in a table column, along with the ROWID(s) for all rows in the table that contain that value for the column. A ROWID is a unique identifier for a row in an Oracle database table. Indexes have multiple uses on the Oracle database. Indexes can be used to ensure uniqueness on a database, and they can also boost performance when you're searching for records in a table. Indexes are used by the Oracle Server to speed up the retrieval of rows by using a pointer. The improvement in performance is gained when the search criteria for data in a table include a reference to the indexed column or columns.

In Oracle, indexes can be created on any column in a table except for columns of the LONG datatype. Especially on large tables, indexes make the difference between an application that drags its heels and an application that runs with efficiency. However, many performance considerations must be weighed before you make the decision to create an index.

Note: Updating a table with indexes takes more time than updating a table without (because the indexes also need an update). So you should only create indexes on columns (and tables) that will be frequently searched against.

B-tree Index Structure

The traditional index in the Oracle database is based on a highly advanced algorithm for sorting data called a B-tree. A B-tree contains data placed in layered, branching order, from top to bottom, resembling an upside-down tree. The midpoint of the entire list is placed at the top of the "tree" and is called the root node. The midpoints of each half of the remaining two lists are placed at the next level, and so on

By using a divide-and-conquer method for structuring and searching for data, the values of a column are only a few hops away on the tree, rather than several thousand sequential reads through the list away. However, traditional indexes work best when many distinct values are in the column or when the column is unique.

The algorithm works as follows:
1. Compare the given value to the value in the halfway point of the list. If the value at hand is greater, discard the lower half of the list. If the value at hand is less, discard the upper half of the list.
2. Repeat step 1 for the remaining part of the list until a value is found or the list exhausted.

Along with the data values of a column, each individual node of an index also stores a piece of information about the column value's row location on disk. This crucial piece of lookup data is called a ROWID. The ROWID for the column value points Oracle directly to the disk location of the table row corresponding to the column value. A ROWID identifies the location of a row in a data block in the datafile on disk. With this information, Oracle can then find all the data associated with the row in the table.

Tip: The ROWID for a table is an address for the row on disk. With the ROWID, Oracle can find the data on disk rapidly.


Bitmap Index Structure
This topic is pretty advanced, so consider yourself forewarned. The other type of index available in Oracle is the bitmap index. Try to conceptualize a bitmap index as being a sophisticated lookup table, having rows that correspond to all unique data values in the column being indexed. Therefore, if the indexed column contains only three distinct values, the bitmap index can be visualized as containing three rows. Each row in a bitmap index contains four columns. The first column contains the unique value for the column being indexed. The next column contains the start ROWID for all rows in the table. The third column in the bitmap index contains the end ROWID for all rows in the table. The last column contains a bitmap pattern, in which every row in the table will have one bit. Therefore, if the table being indexed contains 1,000 rows, this last column of the bitmap index will have 1,000 corresponding bits in this last column of the bitmap index. Each bit in the bitmap index will be set to 0 (off) or 1 (on), depending on whether the corresponding row in the table has that distinct value for the column. In other words, if the value in the indexed column for that row matches this unique value, the bit is set to 1; otherwise, the bit is set to 0. Figure 7-2 displays a pictorial representation of a bitmap index containing three distinct values.


Each row in the table being indexed adds only a bit to the size of the bitmap pattern column for the bitmap index, so growth of the table won't affect the size of the bitmap index too much. However, each distinct value adds another row to the bitmap index, which adds another entire bitmap pattern with one bit for each row in the table. Be careful about adding distinct values to a column with a bitmap index, because these indexes work better when few distinct values are allowed for a column. The classic example of using a bitmap index is where you want to query a table containing employees based on a GENDER column, indicating whether the employee is male or female. This information rarely changes about a person, and only two distinct possibilities, so a traditional B-tree index is not useful in this case. However, this is exactly the condition where a bitmap index would aid performance. Therefore, the bitmap index improves performance in situations where traditional indexes are not useful, and vice versa.

Tip : Up to 32 columns from one table can be included in a single B-tree index on that table, whereas a bitmap index can include a maximum of 30 columns from the table.

CREATE INDEX
You can create a unique B-tree index on a column manually by using the create index name on table (column) statement containing the unique keyword. This process is the manual equivalent of creating a unique or primary key constraint on a table. (Remember, unique indexes are created automatically in support of those constraints.)
Creates an index on a table. Duplicate values are allowed:
CREATE INDEX index_name
ON table_name (column_name)

Creates a unique index on a table. Duplicate values are not allowed:
CREATE UNIQUE INDEX index_name
ON table_name (column_name)

Creating Function-Based Indexes
To create a function-based index in your own schema on your own table, you must have the CREATE INDEX and QUERY REWRITE system privileges. To create the index in another schema or on another schema's table, you must have the CREATE ANY INDEX and GLOBAL QUERY REWRITE privileges. The table owner must also have the EXECUTE object privilege on the functions used in the function-based index.

The function-based index is a new type of index in Oracle that is designed to improve query performance by making it possible to define an index that works when your where clause contains operations on columns. Traditional B-tree indexes won't be used when your where clause contains columns that participate in functions or operations. For example, suppose you have table EMP with four columns: EMPID, LASTNAME, FIRSTNAME, and SALARY. The SALARY column has a B-tree index on it. However, if you issue the select * from EMP where (SALARY*1.08) > 63000 statement, the RDBMS will ignore the index, performing a full table scan instead. Function-based indexes are designed to be used in situations like this one, where your SQL statements contain such operations in their where clauses. The following code block shows a function-based index defined:

SQL> CREATE INDEX ixd_emp_01
  2  ON emp(SAL*1.08);
By using function-based indexes like this one, you can optimize the performance of queries containing function operations on columns in the where clause, like the query shown previously. As long as the function you specify is repeatable, you can create a function-based index around i

DROP Indexes
When an index is no longer needed in the database, the developer can remove it with the drop index command. Once an index is dropped, it will no longer improve performance on searches using the column or columns contained in the index. No mention of that index will appear in the data dictionary any more either. You cannot drop the index that is used for a primary key.

The syntax for the drop index statement is the same, regardless of the type of index being dropped (unique, bitmap, or B-tree). If you want to rework the index in any way, you must first drop the old index and then create the new one. The following is an example:
DROP INDEX employee_last_first_indx_01;

Using Public and Private Synonyms

The objects in Oracle you create are available only in your schema unless you grant access to the objects explicitly to other users. We'll discuss privileges and user access in the next section. However, even when you grant permission to other users for using an object, the boundary created by schema ownership will force other users to prefix the object name with your schema name in order to access your object. For example, SCOTT owns the EMP table. If TURNER wants to access SCOTT's EMP table, he must refer to EMP as SCOTT.EMP. If TURNER doesn't, the following happens:

SELECT * FROM emp WHERE empno = 7844;

So, TURNER can't even see his own employee data—in fact, Oracle tells him that the EMP table doesn't even exist (pretty sneaky, eh?). Yet, as soon as TURNER prefixes the EMP table with its schema owner, SCOTT, a whole world of data opens up for TURNER, as you can see in the following code block:
SELECT empno, ename, sal FROM SCOTT.emp   2  WHERE empno = 7844;

If remembering which user owns which table seems unnecessarily complicated, synonyms can be used on the database for schema transparency. Synonyms are alternative names that can be created as database objects in Oracle to refer to a table or view. You can refer to a table owned by another user using synonyms. Creating a synonym eliminates the need to qualify the object name with the schema and provides you with an alternative name for a table, view, sequence, procedure, or other objects. Synonyms are also used to shorten lengthy object names.

Two types of synonyms exist in Oracle: private synonyms and public synonyms. You can use a private synonym within your own schema to refer to a table or view by an alternative name. Private synonyms are exactly that—they are private to your schema and therefore usable only by you. A private synonym name must be distinct from all other objects owned by the same user.

Think of private synonyms as giving you the ability to develop "pet names" for database objects in Oracle. You can use public synonyms to enable all users in Oracle to access database objects you own without having to prefix the object names with your schema name. This concept of referencing database objects without worrying about the schema the objects are part of is known as schema transparency. Public synonyms are publicly available to all users of Oracle; however, you need special privileges to create public synonyms. We'll talk more about the privilege required for creating public synonyms in the next section. For now, the following code block demonstrates how to create private and public synonyms, respectively:

 create synonym all_my_emps for emp;
Tip     
Synonyms do not give you access to data in a table that you do not already have access to. Only privileges can do that. Synonyms simply enable you to refer to a table without prefixing the schema name to the table reference. When resolving a database table name, Oracle looks first to see whether the table exists in your schema. If Oracle doesn't find the table, Oracle searches for a private synonym. If none is found, Oracle looks for a public synonym.

Drop Synonyms
Synonyms are dropped using the drop synonym command, as shown in the following code block:
Drop synonym emp;


User Access Control

In this chapter, you will learn about and demonstrate knowledge in the following areas of user access and privileges in the Oracle database:

  • Creating users
  • Granting and revoking object privileges
  • Using roles to manage database access
The basic Oracle database security model consists of two parts. The first part consists of password authentication for all users of the Oracle database. Password authentication is available either directly from the Oracle server or from the operating system supporting the Oracle database. When Oracle's own authentication system is used, password information is stored in Oracle in an encrypted format. The second part of the Oracle security model consists of controlling which database objects a user may access, the level of access a user may have to these objects, and whether a user has the authority to place new objects into the Oracle database. At a high level, these controls are referred to as privileges. We'll talk about privileges and database access later in this section.
Create Users

The most basic version of the command for creating users defines only the user we want to create, along with a password, as seen in the following example:

Create User USERNAME identified by PASSWORD;
create user turner identified by ike;

Tip :
The user does not have privileges at this point. The DBA can then grant privileges to the user. The privileges determine the actions that the user can do with the objects in the database. Also, usernames can be up to 30 characters in length and can contain alphanumeric characters as well as the $, #, and _ characters.

System/Object Privileges

Privileges are the right to execute particular SQL statements. Two types of privileges exist in Oracle: object privileges and system privileges. Object privileges regulate access to database objects in Oracle, such as querying or changing data in tables and views, creating foreign key constraints and indexes on tables, executing PL/SQL programs, and a handful of other activities. System privileges govern every other type of activity in Oracle, such as connecting to the database, creating tables, creating sequences, creating views, and much, much more.

Privileges are given to users with the grant command, and they are taken away with the revoke command. The ability to grant privileges to other users in the database rests on users who can administer the privileges. The owner of a database object can administer object privileges related to that object, whereas the DBA administers system privileges

Object privileges
(Grant Privileges on Tables)
You can grant users various privileges to tables. These privileges can be any combination of select, insert, update, delete, references, alter, and index. Below is an explanation of what each privilege means.

The syntax for granting privileges on a table is:
    grant privileges on object to user;

For example, if you wanted to grant select, insert, update, and delete privileges on a table called suppliers to a user name smithj, you would execute the following statement:
    grant select, insert, update, delete on suppliers to smithj;

You can also use the all keyword to indicate that you wish all permissions to be granted. For example:
    grant all on suppliers to smithj;
The keyword all can be use as a consolidated method for granting object privileges related to a table. Note that all in this context is not a privilege; it is merely a specification for all object privileges for a database object

If you wanted to grant select access on your table to all users, you could grant the privileges to the public keyword. For example:
    grant select on suppliers to public;

Revoke Privileges on Tables
Once you have granted privileges, you may need to revoke some or all of these privileges. To do this, you can execute a revoke command. You can revoke any combination of select, insert, update, delete, references, alter, and index.

The syntax for revoking privileges on a table is:
    revoke privileges on object from user;
//  Grant this on this to this
For example, if you wanted to revoke delete privileges on a table called suppliers from a user named anderson, you would execute the following statement:
    revoke delete on suppliers from anderson;

If you wanted to revoke all privileges on a table, you could use the all keyword. For example:
    revoke all on suppliers from anderson;

If you had granted privileges to public (all users) and you wanted to revoke these privileges, you could execute the following statement:
    revoke all on suppliers from public;

System Privileges

Several categories of system privileges relate to each object. Those categories determine the scope of ability that the privilege grantee will have. The classes or categories of system privileges are listed in this section. Note that in the following subtopics, the privilege itself gives the ability to perform the action against your own database objects, and the any keyword refers to the ability to perform the action against any database object of that type in Oracle.

Database Access These privileges control who accesses the database, when he or she can access it, and what he or she can do regarding management of his or her own session. Privileges include create session, alter session, and restricted session. Users These privileges are used to manage users on the Oracle database. Typically, these privileges are reserved for DBAs or security administrators. Privileges include create user, become user, alter user, and drop user.

Tables You already know that tables store data in the Oracle database. These privileges govern which users can create and maintain tables. The privileges include create table, create any table, alter any table, backup any table, drop any table, lock any table, comment any table, select any table, insert any table, update any table, and delete any table. The create table or create any table privilege also enables you to drop the table. The create table privilege also bestows the ability to create indexes on the table and to run the analyze command on the table. To be able to truncate a table, you must have the drop any table privilege granted to you.

Indexes You already know that indexes are used to improve SQL statement performance on tables containing lots of row data. The privileges include create any index, alter any index, and drop any index. You should note that no create index system privilege exists. The create table privilege also enables you to alter and drop indexes that you own and that are associated with the table.

Synonyms A synonym is a database object that enables you to reference another object by a different name. A public synonym means that the synonym is available to every user in the database for the same purpose. The privileges include create synonym, create any synonym, drop any synonym, create public synonym, and drop public synonym. The create synonym privilege also enables you to alter and drop synonyms that you own.

Views You already know that a view is an object containing a SQL statement that behaves like a table in Oracle, except that it stores no data. The privileges include create view, create any view, and drop any view. The create view privilege also enables you to alter and drop views that you own.

Sequences You already know that a sequence is an object in Oracle that generates numbers according to rules you can define. Privileges include create sequence, create any sequence, alter any sequence, drop any sequence, and select any sequence. The create sequence privilege also enables you to drop sequences that you own.

Roles Roles are objects that can be used for simplified privilege management. You create a role, grant privileges to it, and then grant the role to users. Privileges include create role, drop any role, grant any role, and alter any role.
 
Transactions These privileges are for resolving in-doubt distributed transactions being processed on the Oracle database. Privileges include force transaction and force any transaction.

PL/SQL There are many different types of PL/SQL blocks in Oracle. These privileges enable you to create, run, and manage those different types of blocks. Privileges include create procedure, create any procedure, alter any procedure, drop any procedure, and execute any procedure. The create procedure privilege also enables you to alter and drop PL/SQL blocks that you own.

Triggers A trigger is a PL/SQL block in Oracle that executes when a specified DML activity occurs on the table to which the trigger is associated. Privileges include create trigger, create any trigger, alter any trigger, and drop any trigger. The create trigger privilege also enables you to alter and drop triggers that you own.

Examples
grant create session to turner;
// Grant this to this
revoke create session from turner;

// Revoke this from this

Open to the Public
Another aspect of privileges and access to the database involves a special user on the database. This user is called PUBLIC. If a system privilege or object privilege is granted to the PUBLIC user, then every user in the database has that privilege. Typically, it is not advised that the DBA should grant many privileges or roles to PUBLIC, because if a privilege or role ever needs to be revoked, then every stored package, procedure, or function will need to be recompiled. Let's take a look:

GRANT select, update, insert ON emp TO public;

Tip    
Roles can be granted to the PUBLIC user as well. We'll talk more about roles in the next discussion.

Granting Object Privileges All at Once
The keyword all can be use as a consolidated method for granting object privileges related to a table. Note that all in this context is not a privilege; it is merely a specification for all object privileges for a database object. The following code block shows how all is used:
GRANT ALL ON emp TO turner;


Giving Administrative Ability along with Privileges

When another user grants you a privilege, you then have the ability to perform whatever task the privilege enables you to do. However, you usually can't grant the privilege to others, nor can you relinquish the privilege without help of the user who granted the privilege to you. If you want some additional power to administer the privilege granted to you, the user who gave you the privilege must also give you administrative control over that privilege. For example, let's say KING now completely trusts TURNER to manage the creation of tables (a system privilege) and wants to give him access to the EMP table (an object privilege). Therefore, KING tells SCOTT to give TURNER administrative control over both these privileges, as follows:

GRANT CREATE TABLE TO turner WITH ADMIN OPTION;

GRANT SELECT, UPDATE ON turner TO SPANKY WITH GRANT OPTION;
Tip    
The GRANT OPTION is not valid when granting an object privilege to a role.
A system privilege or role can be granted with the ADMIN OPTION. A grantee with this option has several expanded capabilities. The grantee can grant or revoke the system privilege or role to or from any user or other role in the database. However, a user cannot revoke a role from himself. The grantee can further grant the system privilege or role with the ADMIN OPTION. The grantee of a role can alter or drop the role.

Finally, if a role is granted using the with admin option clause, the grantee can alter the role or even remove it. You'll learn more about roles in the next discussion.

You can grant INSERT, UPDATE, or REFERENCES privileges on individual columns in a table.

Cascading Effects

No cascading effects of revoking system privileges from users occur.

when an object privilege is revoked from a grantor of that privilege, all grantees receiving the privilege from the grantor also lose the privilege. However, in cases where the object privilege involves update, insert, or delete, if subsequent grantees have made changes to data using the privilege, the rows already changed don't get magically transformed back the way they were before

Using Roles to Manage Database Access

When your databases has lots of tables, object privileges can become unwieldy and hard to manage. You can simplify the management of privileges with the use of a database object called a role. A role acts in two capacities in the database. First, the role can act as a focal point for grouping the privileges to execute certain tasks. Second, the role can act as a "virtual user" of a database, to which all the object privileges required to execute a certain job function can be granted, such as data entry, manager review, batch processing, and so on


Step 1:
  Design and Crate roles is a process that can happen outside the database. A role mechanism can be used to provide authorization. A single person or a group of people can be granted a role or a group of roles. One role can be granted in turn to other roles. By defining different types of roles, administrators can manage access privileges much more easily. You simply sit down and think to yourself, how many different purposes will users be accessing this application for? Once this step is complete, you can create the different roles required to manage the privileges needed for each job function. Let's say people using the EMP table have two different job roles: those who can query the table and those who can add records to the table. The next step is to create roles that correspond to each activity. This architecture of using roles as a middle layer for granting privileges greatly simplifies administration of user privileges. Let's take a look at how to create the appropriate roles:

Create role role_name;

Step 2 :  Granting Privileges to Roles
The next step is to grant object privileges to roles. You can accomplish this task using the same command as you would use to grant privileges directly to users—the grant command. The following code block demonstrates how to grant privileges to both our roles:

Grant select on emp to rpt_writer;
Revoking privileges from roles works the same way as it does for users. System privileges are granted and revoked with roles in the exact same way they are with users as well.

Step 3: Granting Roles to Users
Once a role is created and privileges are granted to it, the role can then be granted to users. This step is accomplished with the grant command. Let's see an example of how this is done:

Grant rpt_writer to turner;
If a role already granted to a user is later granted another privilege, that additional privilege is available to the user immediately. The same statement can be made for privileges revoked from roles already granted to users, too.

Step 4:  Revoking and Dropping Roles
Finally, a role can be revoked by the role's owner or by a privileged administrative user using the revoke statement, much like revoking privileges:
revoke rpt_writer from turner;

Roles can be deleted from the database using the drop role statement. When a role is dropped, the associated privileges are revoked from the users granted the role. The following code block shows how to eliminate roles from Oracle:
drop role rpt_writer;

Step 5: Modifying Roles if necessary
Let's say that after we create our roles, we realize that changing records in the EMP table is serious business. To create an added safeguard against someone making a change to the EMP table in error, the DATA_CHANGER role can be altered to require a password by using the alter role identified by statement. Anyone wanting to modify data in EMP with the privileges given via the DATA_CHANGER role must first supply a password. Code for altering the role is shown in the following example:

Alter role data_changer
Identified by highly#secure;


Step 6: Defining User Default Roles
Now user TURNER can execute all the privileges given to him via the RPT_WRITER role, and user FORD can do the same with the privileges given from DATA_CHANGER. Or can he? Recall that we specified that DATA_CHANGER requires a password in order for the grantee to utilize its privileges. Let's make a little change to FORD's user ID so that this status will take effect:

alter user ford default role none;

You can use the following keywords in the alter user default role command to define default roles for users: all, all except rolename, and none. Note that users usually cannot issue alter user default role themselves to change their default roles—only a privileged user such as the DBA can do it for them.

Step 7: Enabling the Current Role
FORD knows he is supposed to be able to accomplish this task because he has the DATA_CHANGER role. Then he remembers that this role has a password on it. FORD can use the set role command to enable the DATA_CHANGER role in the following way:

set role data_changer identified by highly#secure;

Now FORD can make the change he needs to make:
SQL> insert into scott.emp (empno, ename, job)
  2  values (1234, 'SMITHERS','MANAGER');
You must already have been granted the roles that you name in the SET ROLE statement. Also, you can disable all roles with the SET ROLE NONE statement.


Table Joins

The typical database contains many tables. Some smaller databases may have only a dozen or so tables, whereas other databases may have hundreds or even thousands. The common factor, however, is that few databases have just one table containing everything you need. Therefore, you usually have to draw data from multiple tables together in a meaningful way. To show data from multiple tables in one query, Oracle allows you to perform table joins.

Here are the two rules you need to remember for table joins. Data from two (or more) tables can be joined, if the same column (under the same or a different name) appears in both tables, and the column is the primary key (or part of that key) in one of the tables. Having a common column in two tables implies a relationship between the two tables. The nature of that relationship is determined by which table uses the column as a primary key. This begs the question, what is a primary key? A primary key is a column in a table used for identifying the uniqueness of each row in a table. The table in which the column appears as a primary key is referred to as the parent table in this relationship (sometimes also called the master table), whereas the column that references the other table in the relationship is often called the child table (sometimes also called the detail table). The common column appearing in the child table is referred to as a foreign key.


Join Syntax
Let's look at an example of a join statement using the Oracle traditional syntax, where we join the contents of the EMP and DEPT tables together to obtain a listing of all employees, along with the names of the departments they work for:

SQL> select e.ename, e.deptno, d.dname
    2  from emp e, dept d
    3  where e.deptno = d.deptno;

ENAME     DEPTNO    DNAME
----------      ---------     --------------
SMITH         20          RESEARCH
ALLEN         30          SALES
WARD         30          SALES
JONES         20          RESEARCH

Note the many important components in this table join. Listing two tables in the from clause clearly indicates that a table join is taking place. Note also that each table name is followed by a letter: E for EMP or D for DEPT. This demonstrates an interesting concept—just as columns can have aliases, so too can tables. The aliases serve an important purpose—they prevent Oracle from getting confused about which table to use when listing the data in the DEPTNO column. Remember, EMP and DEPT both have a column named DEPTNO

You can also avoid ambiguity in table joins by prefixing references to the columns with the table names, but this often requires extra coding. You can also give the column two different names, but then you might forget that the relationship exists between the two tables. It's just better to use aliases! Notice something else, though. Neither the alias nor the full table name needs to be specified for columns appearing in only one table. Take a look at another example:

SQL> select ename, emp.deptno, dname
  2  from emp, dept
  3  where emp.deptno = dept.deptno;

How Many Comparisons Do You Need?
When using Oracle syntax for table joins, a query on data from more than two tables must contain the right number of equality operations to avoid a Cartesian product. To avoid confusion, use this simple rule: If the number of tables to be joined equals N, include at least N-1 equality conditions in the select statement so that each common column is referenced at least once. Similarly, if you are using the ANSI/ISO syntax for table joins, you need to use N-1 join tablename on join_condition clauses for every N tables being joined.

For N joined tables using Oracle or ANSI/ISO syntax for table joins, you need at least N-1 equijoin conditions in the where clause of your select statement or N-1 join tablename on join_condition clauses in order to avoid a Cartesian product, respectively.

Cartesian Products
Notice also that our where clause includes a comparison on DEPTNO linking data in EMP to that of DEPT. Without this link, the output would have included all data from EMP and DEPT, jumbled together in a mess called a Cartesian product. Cartesian products are big, meaningless listings of output that are nearly never what you want. They are formed when you omit a join condition in your SQL statement, which causes Oracle to join all rows in the first table to all rows in the second table. Let's look at a simple example in which we attempt to join two tables, each with three rows, using a select statement with no where clause, resulting in output with nine rows:

SQL> select a.col1, b.col_2
  2  from example_1 a, example_2 b;

     COL1 COL_2
--------- ------------------------------
        1 one
        2 one
        3 one
        1 two
        2 two
        3 two
You must always remember to include join conditions in join queries to avoid Cartesian products. But take note of another important fact. Although we know that where clauses can contain comparison operations other than equality, to avoid Cartesian products, you must always use equality operations in a comparison joining data from two tables. If you want to use another comparison operation, you must first join the information using an equality comparison and then perform the other comparison somewhere else in the where clause. This is why table join operations are also sometimes referred to as equijoins. Take a look at the following example that shows proper construction of a table join, where the information being joined is compared further using a nonequality operation to eliminate the employees from accounting:

SQL> select ename, emp.deptno, dname
  2  from emp, dept
  3  where emp.deptno = dept.deptno
  4  and dept.deptno > 10;


ANSI/ISO Join Syntax (Oracle9i and higher)
In Oracle9i, Oracle introduces strengthened support for ANSI/ISO join syntax. To join the contents of two tables together in a single result according to that syntax, we must include a join tablename on join_condition in our SQL statement. If we wanted to perform the same table join as before using this new syntax, our SQL statement would look like the following:

Select ename, emp.deptno, dname
from emp join dept
on emp.deptno = dept.deptno;

ENAME         DEPTNO    DNAME
----------          ---------      --------------
SMITH             20         RESEARCH
ALLEN             30         SALES
WARD             30         SALES
JONES             20         RESEARCH

Note how different this is from Oracle syntax. First, ANSI/ISO syntax separates join comparisons from all other comparisons by using a special keyword, on, to indicate what the join comparison is. You can still include a where clause in your ANSI/ISO-compliant join query, the only difference is that the where clause will contain only those additional conditions you want to use for filtering your data. You also do not list all your tables being queried in one from clause. Instead, you use the join clause directly after the from clause to identify the table being joined.

Never combine Oracle's join syntax with ANSI/ISO's join syntax! Also, there are no performance differences between Oracle join syntax and ANSI/ISO join syntax.

Cartesian Products: An ANSI/ISO Perspective
In some cases, you might actually want to retrieve a Cartesian product, particularly in financial applications where you have a table of numbers that needs to be cross-multiplied with another table of numbers for statistical analysis purposes. ANSI/ISO makes a provision in its syntax for producing Cartesian products through the use of a cross-join. A cross-join is produced when you use the cross keyword in your ANSI/ISO-compliant join query. Recall from a previous example that we produced a Cartesian product by omitting the where clause when joining two sample tables, each containing three rows, to produce nine rows of output. We can produce this same result in ANSI/ISO SQL by using the cross keyword, as shown here in bold:

Select col1, col_2
from example_1 cross join example_2;

COL1    COL_2
--------- -------------
 1        one
 2        one
 3        one
 1        two
 2        two
 3        two
 1        three

Natural Joins

One additional type of join you need to know about for OCP is the natural join. A natural join is a join between two tables where Oracle joins the tables according to the column(s) in the two tables sharing the same name (naturally!). Natural joins are executed whenever the natural keyword is present. Let's look at an example. Recall our use of the EMP and DEPT tables from our discussion above. Let's take a quick look at the column listings for both tables:

SQL> describe emp
Name                       Null            Type
--------------------------    ---------       ------------
EMPNO                  NOT NULL    NUMBER(4)
ENAME                                    VARCHAR2(10)
JOB                                         VARCHAR2(9)
MGR                                        NUMBER(4)
SQL> describe dept
Name                       Null           Type
--------------------------   ---------       ------------
DEPTNO                 NOT NULL  NUMBER(2)
DNAME                                   VARCHAR2(14)
LOC                                       VARCHAR2(13)

As you can see, DEPTNO is the only column in common between these two tables, and appropriately enough, it has the same name in both tables. This combination of facts makes our join query of EMP and DEPT tables a perfect candidate for a natural join. Take a look and see:
Select ename, deptno, dname
from emp natural join dept;

ENAME         DEPTNO    DNAME
----------          ---------    --------------
SMITH             20         RESEARCH
ALLEN             30         SALES
WARD             30         SALES

Outer Joins
Outer joins extend the capacity of Oracle queries to include handling of situations where you want to see information from tables even when no corresponding records exist in the common column.  The purpose of an outer join is to include non-matching rows, and the outer join returns these missing columns as NULL values.

Left Outer Join
A left outer join will return all the rows that an inner join returns plus one row for each of the other rows in the first table that did not have a match in the second table.

Suppose you want to find all employees and the projects they are currently responsible for. You want to see those employees that are not currently in charge of a project as well. The following query will return a list of all employees whose names are greater than 'S', along with their assigned project numbers.

  SELECT EMPNO, LASTNAME, PROJNO
    FROM CORPDATA.EMPLOYEE LEFT OUTER JOIN CORPDATA.PROJECT
          ON EMPNO = RESPEMP
    WHERE LASTNAME > 'S'

The result of this query contains some employees that do not have a project number. They are listed in the query, but have the null value returned for their project number.
EMPNO     LASTNAME     PROJNO
000020     THOMPSON     PL2100
000100     SPENSER         OP2010
000170     YOSHIMURA     -
000250     SMITH             AD3112

In oracle we can specify(in Oracle 8i or prior vesrion this was the only option as they were not supporting the ANSI syntex) left outer join by putting a (+) sign on the right of the column which can have NULL data corresponding to non-NULL values in the column values from the other table.
example:  select    last_name,   department_name
from   employees e,   departments d
where  
e.department_id(+) = d.department_id;

Right Outer Join
A right outer join will return all the rows that an inner join returns plus one row for each of the other rows in the second table that did not have a match in the first table. It is the same as a left outer join with the tables specified in the opposite order.

The query that was used as the left outer join example could be rewritten as a right outer join as follows:

SQL> -- Earlier version of outer join
SQL> -- select e.ename, e.deptno, d.dname
SQL> -- from dept d, emp e
SQL> -- where d.deptno = e.deptno (+);
SQL>
SQL> -- ANSI/ISO version
SQL> select e.ename, e.deptno, d.dname
SQL> from emp e right outer join dept d
SQL> on d.deptno = e.deptno;


Full Outer Joins
Oracle9i and higher
Oracle9i also makes it possible for you to easily execute a full outer join, including all records from the tables that would have been displayed if you had used both the left outer join or right outer join clauses. Let's take a look at an example:

SQL> select e.ename, e.deptno, d.dname
2 from emp e full outer join dept d
3 on d.deptno = e.deptno;


UNION & INTERSECT

UNION Query
The UNION query allows you to combine the result sets of 2 or more "select" queries.

  • It removes duplicate rows between the various "select" statements.
  • Each SQL statement within the UNION query must have the same number of fields in the result sets with similar data types.
The syntax for a UNION query is:
Select field1, field2, . field_n   from tables
UNION
Select field1, field2, . field_n   from tables;

Example #1

The following is an example of a UNION query:
Select supplier_id from suppliers
UNION
Select supplier_id from orders;
In this example, if a supplier_id appeared in both the suppliers and orders table, it would appear once in your result set. The UNION removes duplicates.

Example #2 - With ORDER BY Clause

The following is a UNION query that uses an ORDER BY clause:
Select supplier_id, supplier_name from suppliers where supplier_id > 2000
UNION
Select company_id, company_name from companies where company_id > 1000
ORDER BY 2;
Since the column names are different between the two "select" statements, it is more advantageous to reference the columns in the ORDER BY clause by their position in the result set. In this example, we've sorted the results by supplier_name / company_name in ascending order, as denoted by the "ORDER BY 2".

UNION ALL Query

The UNION ALL query allows you to combine the result sets of 2 or more "select" queries. It returns all rows (even if the row exists in more than one of the "select" statements).
Each SQL statement within the UNION ALL query must have the same number of fields in the result sets with similar data types.

The syntax for a UNION ALL query is:
Select field1, field2, . field_n from tables
UNION ALL
Select field1, field2, . field_n from tables;

Example #1
The following is an example of a UNION ALL query:
Select supplier_id from suppliers
UNION ALL
Select supplier_id from orders;
If a supplier_id appeared in both the suppliers and orders table, it would appear multiple times in your result set. The UNION ALL does not remove duplicates.

Example #2 - With ORDER BY Clause
The following is a UNION query that uses an ORDER BY clause:
Select supplier_id, supplier_name from suppliers where supplier_id > 2000
UNION ALL
Select company_id, company_name from companies where company_id > 1000
ORDER BY 2;

Since the column names are different between the two "select" statements, it is more advantageous to reference the columns in the ORDER BY clause by their position in the result set. In this example, we've sorted the results by supplier_name / company_name in ascending order, as denoted by the "ORDER BY 2".

INTERSECT Query
The INTERSECT query allows you to return the results of 2 or more "select" queries. However, it only returns the rows selected by all queries. If a record exists in one query and not in the other, it will be omitted from the INTERSECT results.
Each SQL statement within the INTERSECT query must have the same number of fields in the result sets with similar data types.
The syntax for an INTERSECT query is:
Select field1, field2, . field_n from tables
INTERSECT
Select field1, field2, . field_n from tables;


Example #1
The following is an example of an INTERSECT query:
Select supplier_id from suppliers
INTERSECT
Select supplier_id from orders;
In this example, if a supplier_id appeared in both the suppliers and orders table, it would appear in your result set.

Example #2 - With ORDER BY Clause
The following is an INTERSECT query that uses an ORDER BY clause:
Select supplier_id, supplier_name from suppliers where supplier_id > 2000
INTERSECT
Select company_id, company_name from companies where company_id > 1000
ORDER BY 2;

Since the column names are different between the two "select" statements, it is more advantageous to reference the columns in the ORDER BY clause by their position in the result set. In this example, we've sorted the results by supplier_name / company_name in ascending order, as denoted by the "ORDER BY 2".

MINUS Query
The MINUS query returns all rows in the first query that are not returned in the second query.
Each SQL statement within the MINUS query must have the same number of fields in the result sets with similar data types.
The syntax for an MINUS query is:
Select field1, field2, . field_n from tables
MINUS
Select field1, field2, . field_n from tables;

Example #1
The following is an example of an MINUS query:
Select supplier_id from suppliers
MINUS
Select supplier_id from orders;
In this example, the SQL would return all supplier_id values that are in the suppliers table and not in the orders table. What this means is that if a supplier_id value existed in the suppliers table and also existed in the orders table, the supplier_id value would not appear in this result set.

Example #2 - With ORDER BY Clause
The following is an MINUS query that uses an ORDER BY clause:
Select supplier_id, supplier_name from suppliers where supplier_id > 2000
MINUS
Select company_id, company_name from companies where company_id > 1000
ORDER BY 2;

Since the column names are different between the two "select" statements, it is more advantageous to reference the columns in the ORDER BY clause by their position in the result set. In this example, we've sorted the results by supplier_name / company_name in ascending order, as denoted by the "ORDER BY 2".

Basics of PL/SQL

PL/SQL stands for Procedural Language extension of SQL.

PL/SQL is a combination of SQL along with the procedural features of programming languages. It was developed by Oracle Corporation in the early 90’s to enhance the capabilities of SQL.

PL/SQL Environment
PL/SQL is not an Oracle product in its own right; it is a technology used by the Oracle server and by certain Oracle tools. Blocks of PL/SQL are passed to and processed by a PL/SQL engine, which may reside within the tool or within the Oracle server. The engine that is used depends on where the PL/SQL block is being invoked from. When you submit PL/SQL blocks from a Oracle precompiler such as Pro*C or Pro*Cobol program, userexit, iSQL*Plus, or Server Manager, the PL/SQL engine in the Oracle Server processes them. It separates the SQL statements and sends them individually to the SQL statements executor.


A single transfer is required to send the block from the application to the Oracle Server, thus improving performance, especially in a client-server network. PL/SQL code can also be stored in the Oracle Server as subprograms that can be referenced by any number of applications connected to the database. 

Many Oracle tools, including Oracle Developer, have their own PL/SQL engine, which is independent of the engine present in the Oracle Server. The engine filters out SQL statements and sends them individually to the SQL statement executor in the Oracle server. It processes the remaining procedural statements in the procedural statement executor, which is in the PL/SQL engine. The procedural statement executor processes data that is local to the application (that is, data already
inside the client environment, rather than in the database). This reduces the work that is sent to the Oracle server and the number of memory cursors that are required.

Advantages of PL/SQL
These are the advantages of PL/SQL.
Block Structures: PL SQL consists of blocks of code, which can be nested within each other. Each block forms a unit of a task or a logical module. PL/SQL Blocks can be stored in the database and reused.
Procedural Language Capability: PL SQL consists of procedural language constructs such as conditional statements (if else statements) and loops like (FOR loops).
Better Performance: PL SQL engine processes multiple SQL statements simultaneously as a single block, thereby reducing network traffic.
Error Handling: PL/SQL handles errors or exceptions effectively during the execution of a PL/SQL program. Once an exception is caught, specific actions can be taken depending upon the type of the exception or it can be displayed to the user with a message.

Architecture
The PL/SQL language is a robust tool with many options. PL/SQL lets you write code once and deploy it in the database nearest the data. PL/SQL can simplify application development, optimize execution, and improve resource utilization in the database.

The language is a case-insensitive programming language, like SQL. This has led to numerous formatting best practice directions. Rather than repeat those arguments for one style or another, it seems best to recommend you find a style consistent with your organization’s standards and consistently apply it. The PL/SQL code in this book uses uppercase for command words and lowercase for variables, column names, and stored program calls

PL/SQL also supports building SQL statements at run time. Run-time SQL statements are dynamic SQL. You can use two approaches for dynamic SQL: one is Native Dynamic SQL (NDS) and the other is the DBMS_SQL package. The Oracle 11g Database delivers new NDS features and improves execution speed. With this release, you only need to use the DBMS_SQL package when you don’t know the number of columns that your dynamic SQL call requires. Chapter 11 demonstrates dynamic SQL and covers both NDS and the DBMS_SQL package.

PL/SQL Block

PL/SQL is a block-structured language, meaning that programs can be divided into logical blocks. Program units can be named or unnamed blocks. Unnamed blocks are known as anonymous blocks. The PL/SQL coding style differs from that of the C, C++, and Java programming languages. For example, curly braces do not delimit blocks in PL/SQL.

A PL/SQL block consists of up to three sections: declarative (optional), executable (required), and exception handling (optional).
Note: In PL/SQL, an error is called an exception.


Executing Statements

DECLARE v_variable VARCHAR2(5);
BEGIN
SELECT column_name INTO v_variable FROM table_name;
EXCEPTION
WHEN exception_name THEN
...
END;

  • Place a semicolon (;) at the end of a SQL statement or PL/SQL control statement.
  • Section keywords DECLARE, BEGIN, and EXCEPTION are not followed by semicolons. END and all other PL/SQL statements require a semicolon to terminate the statement.
Block Types
A PL/SQL program comprises one or more blocks. These blocks can be entirely separate or nested one within another. The basic units (procedures and functions, also known as subprograms, and anonymous blocks) that make up a PL/SQL program are logical blocks, which can contain any number of nested subblocks. Therefore, one block can represent a small part of another block, which in turn can be part of the whole unit of code.


PL/SQL Placeholders

Placeholders are temporary storage area. Placeholders can be any of Variables, Constants and Records. Oracle defines placeholders to store data temporarily, which are used to manipulate data during the execution of a PL SQL block.

Depending on the kind of data you want to store, you can define placeholders with a name and a datatype. Few of the datatypes used to define placeholders are as given below. Number (n,m) , Char (n) , Varchar2 (n) , Date , Long , Long raw, Raw, Blob, Clob, Nclob, Bfile
Place holders are used for
• Temporary storage of data, • Manipulation of stored values, • Reusability, • Ease of maintenance

Declaring PL/SQL Variable


Handling Variables in PL/SQL
  • Declare and initialize variables in the declaration section.
  • Assign new values to variables in the executable section.
  • Pass values into PL/SQL blocks through parameters.
  • View results through output variables.

Types of PL/SQL Variables
All PL/SQL variables have a data type, which specifies a storage format, constraints, and valid range of values. PL/SQL supports four data type categories—scalar, composite, reference, and LOB (large object)—that you can use for declaring variables, constants, and pointers.

  1. Scalar data types hold a single value. The main data types are those that correspond to column types in Oracle server tables; PL/SQL also supports Boolean variables.
  2. Composite data types, such as records, allow groups of fields to be defined and manipulated in PL/SQL blocks.
  3. Reference data types hold values, called pointers, that designate other program items. Reference data types are not covered in this course.
  4. LOB data types hold values, called locators, that specify the location of large objects (such as graphic images) that are stored out of line. LOB data types are discussed in detail later in this course.

Non-PL/SQL variables include host language variables declared in precompiler programs, screen fields in Forms applications, and iSQL*Plus host variables.
 
Quick Notes - Variable  Declaration
  1. The rules for identifiers are same as for SQL objects.
  2. NOT NULL/CONSTANT may be optionally used
  3. Only one identifier per line is allowed .  
     DECLARE 
        firstname    lastname  CHAR(20)  ; - illegal 
    DECLARE 
        firstname    CHAR(20)  ; -legal 
        lastname    CHAR(20)  ; - legal 
 

Attribute Declaration
PL/SQL objects (such as variables and constants) and database objects (such as columns and tables ) are associated with certain attributes.
%TYPE attribute
DECLARE
  books_printed        NUMBER (6);
  books_sold            books.sold%TYPE ;
  maiden_name        emp.ename%TYPE ;

%ROWTYPE attribute
DECLARE
  dept_row        dept%ROWTYPE ;
 

Assignments

Variables and constants are initialized every time a block or subprogram is entered.
By default, variables are initialized to NULL. So, unless you expressly initialize a variable, its value is undefined, as the following example shows:
DECLARE
count INTEGER;
...
BEGIN
count := count + 1; -- assigns a null to count

The expression on the right of the assignment operator yields NULL because count is null. To avoid unexpected results, never reference a variable before you assign it a value.

You can use assignment statements to assign values to a variable. For example, the following statement assigns a new value to the variable bonus, overwriting its old value:
bonus := salary * 0.15;
The expression following the assignment operator can be arbitrarily complex, but it must yield a datatype that is the same as or convertible to the datatype of the variable.

Boolean Values
Only the values TRUE, FALSE, and NULL can be assigned to a Boolean variable. For example, given the declaration
DECLARE
done BOOLEAN;
the following statements are legal:
BEGIN
done := FALSE;
WHILE NOT done LOOP
...
END LOOP;

When applied to an expression, the relational operators return a Boolean value. So, the following assignment is legal:
done := (count > 500);
Expressions and Comparisons


Database Values
You can use the SELECT statement to have Oracle assign values to a variable. For each item in the select list, there must be a corresponding, type-compatible variable in the INTO list. An example follows:
DECLARE
my_empno emp.empno%TYPE;
my_ename emp.ename%TYPE;
wages NUMBER(7,2);
BEGIN
...
SELECT ename, sal + comm
INTO last_name, wages FROM emp
WHERE empno = emp_id;

However, you cannot select column values into a Boolean variable.

Quick notes -Assignment
1. := (ASSIGNMENT ) whereas = (VALUE EQUALITY)
2. The datatype of the left and right hand side of an assignment must be the same or implicitly convertible to each other.                    
For ex. , N:=‘7’ is legal because number may be implicitly converted to char.
3. Column or table reference are not allowed on either side of an assignment operator( : = ).
                SCOTT.EMP.EMPNO := 1234;
                  location := dept.loc.;    

Above two are incorrect.


Scope and Visibility

References to an identifier are resolved according to its scope and visibility. The scope of an identifier is that region of a program unit (block, subprogram, or package) from which you can reference the identifier. An identifier is visible only in
the regions from which you can reference the identifier using an unqualified name. Below Figure shows the scope and visibility of a variable named x, which is declared in an enclosing block, then redeclared in a sub-block.

Identifiers declared in a PL/SQL block are considered local to that block and global to all its sub-blocks. If a global identifier is redeclared in a sub-block, both identifiers remain in scope. Within the sub-block, however, only the local identifier is visible because you must use a qualified name to reference the global identifier.

Although you cannot declare an identifier twice in the same block, you can declare the same identifier in two different blocks. The two items represented by the identifier are distinct, and any change in one does not affect the other. However, a block cannot reference identifiers declared in other blocks at the same level because those identifiers are neither local nor global to the block.

Control Structures

This chapter shows you how to structure the flow of control through a PL/SQL program. You learn how statements are connected by simple but powerful control structures that have a single entry and exit point. Collectively, these structures can handle any situation. Their proper use leads naturally to a well-structured program.

IF Statements
Often, it is necessary to take alternative actions depending on circumstances. The IF statement lets you execute a sequence of statements conditionally. That is, whether the sequence is executed or not depends on the value of a condition. There are three forms of IF statements: IF-THEN, IF-THEN-ELSE, and IF-THEN-ELSIF.


Iterative Control: LOOP and EXIT Statements

LOOP statements let you execute a sequence of statements multiple times. There are three forms of LOOP statements: LOOP, WHILE-LOOP, and FOR-LOOP.
Examples:
1. LOOP
...
IF credit_rating < 3 THEN
EXIT; -- exit loop immediately
END IF;

END LOOP;
-- control resumes here

2. LOOP
FETCH c1 INTO ...
EXIT WHEN c1%NOTFOUND; -- exit loop if condition is true
...
END LOOP;
CLOSE c1;


Loop Labels
Like PL/SQL blocks, loops can be labeled. The label, an undeclared identifier enclosed by double angle brackets, must appear at the beginning of the LOOP statement, as follows:
<<label_name>>
LOOP
sequence_of_statements
END LOOP;
Optionally, the label name can also appear at the end of the LOOP statement, as the
following example shows:
<<my_loop>>
LOOP
...
END LOOP my_loop;

When you nest labeled loops, you can use ending label names to improve readability.

With either form of EXIT statement, you can complete not only the current loop, but any enclosing loop. Simply label the enclosing loop that you want to complete. Then, use the label in an EXIT statement, as follows:
<<outer>>
LOOP
...
LOOP
...
EXIT outer WHEN ... -- exit both loops
END LOOP;
...
END LOOP outer;

Every enclosing loop up to and including the labeled loop is exited.

WHILE-LOOP

The WHILE-LOOP statement associates a condition with a sequence of statements enclosed by the keywords LOOP and END LOOP, as follows:
Before each iteration of the loop, the condition is evaluated. If the condition is true, the sequence of statements is executed, then control resumes at the top of the loop. If the condition is false or null, the loop is bypassed and control passes to the next statement.

The number of iterations depends on the condition and is unknown until the loop completes. The condition is tested at the top of the loop, so the sequence might execute zero times. In the last example, if the initial value of total is larger than
25000, the condition is false and the loop is bypassed.

FOR-LOOP
Whereas the number of iterations through a WHILE loop is unknown until the loop completes, the number of iterations through a FOR loop is known before the loop is entered. FOR loops iterate over a specified range of integers. (Cursor FOR loops iterate over the result set of a cursor, are discussed in later section) The range is part of an iteration scheme, which is enclosed by the keywords FOR and LOOP. A double dot (..) serves as the range operator. The syntax follows:
 
The range is evaluated when the FOR loop is first entered and is never re-evaluated.
As the next example shows, the sequence of statements is executed once for each integer in the range. After each iteration, the loop counter is incremented.
FOR i IN 1..3 LOOP -- assign the values 1,2,3 to i
sequence_of_statements -- executes three times
END LOOP;

The following example shows that if the lower bound equals the higher bound, the sequence of statements is executed once:
FOR i IN 3..3 LOOP -- assign the value 3 to i
sequence_of_statements -- executes one time
END LOOP;
By default, iteration proceeds upward from the lower bound to the higher bound. However, as the example below shows, if you use the keyword REVERSE, iteration proceeds downward from the higher bound to the lower bound. After each
iteration, the loop counter is decremented.
FOR i IN REVERSE 1..3 LOOP -- assign the values 3,2,1 to i
sequence_of_statements -- executes three times
END LOOP;

Dynamic Ranges
PL/SQL lets you determine the loop range dynamically at run time, as the following example shows:
SELECT COUNT(empno) INTO emp_count FROM emp;
FOR i IN 1..emp_count LOOP
...
END LOOP;
The value of emp_count is unknown at compile time; the SELECT statement returns the value at run time.

Using the EXIT Statement
The EXIT statement allows a FOR loop to complete prematurely. For example, the following loop normally executes ten times, but as soon as the FETCH statement fails to return a row, the loop completes no matter how many times it has executed:
FOR j IN 1..10 LOOP
FETCH c1 INTO emp_rec;
EXIT WHEN c1%NOTFOUND;
...
END LOOP;

Suppose you must exit from a nested FOR loop prematurely. You can complete not only the current loop, but any enclosing loop. Simply label the enclosing loop that you want to complete. Then, use the label in an EXIT statement to specify which
FOR loop to exit, as follows:
<<outer>>
FOR i IN 1..5 LOOP
...
FOR j IN 1..10 LOOP
FETCH c1 INTO emp_rec;
EXIT outer WHEN c1%NOTFOUND; -- exit both FOR loops
...
END LOOP;
END LOOP outer;
-- control passes here

NULL Statement
The NULL statement explicitly specifies inaction; it does nothing other than pass control to the next statement. It can, however, improve readability. In a construct allowing alternative actions, the NULL statement serves as a placeholder. It tells
readers that the associated alternative has not been overlooked, but that indeed no action is necessary. In the following example, the NULL statement shows that no action is taken for unnamed exceptions:
EXCEPTION
WHEN ZERO_DIVIDE THEN
ROLLBACK;
WHEN VALUE_ERROR THEN
INSERT INTO errors VALUES ...
COMMIT;
WHEN OTHERS THEN
NULL;
END;


Each clause in an IF statement must contain at least one executable statement. The NULL statement is executable, so you can use it in clauses that correspond to circumstances in which no action is taken. In the following example, the NULL
statement emphasizes that only top-rated employees get bonuses:
IF rating > 90 THEN
compute_bonus(emp_id);
ELSE
NULL;
END IF;


Also, the NULL statement is a handy way to create stubs when designing applications from the top down. A stub is dummy subprogram that allows you to defer the definition of a procedure or function until you test and debug the main program. In the following example, the NULL statement meets the requirement that at least one statement must appear in the executable part of a subprogram:
PROCEDURE debit_account (acct_id INTEGER, amount REAL) IS
BEGIN
NULL;
END debit_account;

Cursor

A cursor is the Private Memory area which is created by an Oracle server for manipulating the data. 
Two Types of CURSORS
    1.  EXPLICIT : Multiple row SELECT  STATEMENTS
    2.  IMPLICIT
        All INSERT statements
        All UPDATE statements
        All DELETE statements
        Single row SELECT….INTO Statements

Using Explicit Cursors
The set of rows returned by a query can consist of zero, one, or multiple rows, depending on how many rows meet your search criteria. When a query returns multiple rows, you can explicitly declare a cursor to process the rows. Moreover,
you can declare a cursor in the declarative part of any PL/SQL block, subprogram, or package.

You use three commands to control a cursor: OPEN, FETCH, and CLOSE. First, you initialize the cursor with the OPEN statement, which identifies the result set. Then, you use the FETCH statement to retrieve the first row. You can execute FETCH repeatedly until all rows have been retrieved. When the last row has been processed, you release the cursor with the CLOSE statement. You can process several queries in parallel by declaring and opening multiple cursors.


Using Cursor FOR Loops
In most situations that require an explicit cursor, you can simplify coding by using a cursor FOR loop instead of the OPEN, FETCH, and CLOSE statements. A cursor FOR loop implicitly declares its loop index as a %ROWTYPE record, opens a cursor,
repeatedly fetches rows of values from the result set into fields in the record, and closes the cursor when all rows have been processed.
Consider the PL/SQL block below, which computes results from an experiment, then stores the results in a temporary table. The FOR loop index c1_rec is implicitly declared as a record. Its fields store all the column values fetched from the cursor c1. Dot notation is used to reference individual fields.
DECLARE
result temp.col1%TYPE;
CURSOR c1 IS
SELECT n1, n2, n3 FROM data_table WHERE exper_num = 1;
BEGIN
FOR c1_rec IN c1
LOOP
/* calculate and store the results */
result := c1_rec.n2 / (c1_rec.n1 + c1_rec.n3);
INSERT INTO temp VALUES (result, NULL, NULL);
END LOOP;

COMMIT;
END;

Passing Parameters
You can pass parameters to the cursor in a cursor FOR loop. In the following example, you pass a department number. Then, you compute the total wages paid to employees in that department. Also, you determine how many employees have
salaries higher than $2000 and/or commissions larger than their salaries.
-- available online in file ’examp8’
DECLARE
CURSOR emp_cursor(dnum NUMBER) IS
SELECT sal, comm FROM emp WHERE deptno = dnum;
total_wages NUMBER(11,2) := 0;
high_paid NUMBER(4) := 0;
higher_comm NUMBER(4) := 0;
BEGIN
/* The number of iterations will equal the number of rows
returned by emp_cursor. */
FOR emp_record IN emp_cursor(20) LOOP
emp_record.comm := NVL(emp_record.comm, 0);
total_wages := total_wages + emp_record.sal +
emp_record.comm;
IF emp_record.sal > 2000.00 THEN
high_paid := high_paid + 1;
END IF;
IF emp_record.comm > emp_record.sal THEN
higher_comm := higher_comm + 1;
END IF;
END LOOP;
INSERT INTO temp VALUES (high_paid, higher_comm,
’Total Wages: ’ || TO_CHAR(total_wages));
COMMIT;
END;

Implicit Cursors - FOR Loops
An Implicit Cursor is automatically associated with any SQL DML statement that does not have an explicit cursor associated with it.
This includes :
     1. ALL INSERT      statements 
     2. ALL UPDATE      statements
     3. ALL DELETE      statements
     4. ALL SELECT…INTO statements

QuickNotes - Implicit Cursors
1. Implicit cursor is called the “SQL” cursor --it stores information concerning the processing of the last  SQL  statement not associated with an explicit cursor.
2.OPEN, FETCH, AND CLOSE don’t apply.
3. All cursor attributes apply.

FOR UPDATE Clause
  • Use explicit locking to deny access for the duration of a transaction
  • Locks the rows before update or delete .
Syntax:  Select …..
     from
     FOR UPDATE  [ OF column reference ] [NOWAIT];
e.g.
Declare
    Cursor EmpCursor is
    select emp_id, last_name, dept_name
    from employees , department
    where employees.dept_id=department.dept_id
    and employees.dept_id=80
    FOR UPDATE OF salary NOWAIT;


Exception Handling

In PL/SQL, a warning or error condition is called an exception. Exceptions can be internally defined (by the run-time system) or user defined. Examples of internally defined exceptions include division by zero and out of memory. Some common internal exceptions have predefined names, such as ZERO_DIVIDE and STORAGE_ERROR. The other internal exceptions can be given names.

 
Exception Types
There are three types of exception


Exception Handlers 
 
Trapping an Exception:
If the exception is raised in the executable section of the block, processing branches to the corresponding exception handler in the exception section of the block. If PL/SQL successfully handles the exception, then the exception does not propagate to the enclosing block or environment. The PL/SQL block terminates successfully.

Propagating an Exception:
If the exception is raised in the executable section of the block and there is no corresponding exception handler, the PL/SQL block terminates with failure and the exception is propagated to the calling environment.


Predefined Exceptions

An internal exception is raised implicitly whenever your PL/SQL program violates an Oracle rule or exceeds a system-dependent limit. Every Oracle error has a number, but exceptions must be handled by name. So, PL/SQL predefines some common Oracle errors as exceptions. For example, PL/SQL raises the predefined exception NO_DATA_FOUND if a SELECT INTO statement returns no rows.

To handle other Oracle errors, you can use the OTHERS handler. The functions SQLCODE and SQLERRM are especially useful in the OTHERS handler because they return the Oracle error code and message text. Alternatively, you can use the pragma EXCEPTION_INIT to associate exception names with Oracle error codes.

PL/SQL declares predefined exceptions globally in package STANDARD, which defines the PL/SQL environment. So, you need not declare them yourself. You can write handlers for predefined exceptions using the names shown in the list below. Also shown are the corresponding Oracle error codes and SQLCODE return values.

User-Defined Exceptions

PL/SQL lets you define exceptions of your own. Unlike predefined exceptions, user-defined exceptions must be declared and must be raised explicitly by RAISE statements.


NonPredefined Error

To handle unnamed internal exceptions, you must use the OTHERS handler or the pragma EXCEPTION_INIT. A pragma is a compiler directive, which can be thought of as a parenthetical remark to the compiler. Pragmas (also called pseudoinstructions)
are processed at compile time, not at run time.

In PL/SQL, the pragma EXCEPTION_INIT tells the compiler to associate an exception name with an Oracle error number. That allows you to refer to any internal exception by name and to write a specific handler for it. You code the pragma EXCEPTION_INIT in the declarative part of a PL/SQL block, subprogram, or package using the syntax
PRAGMA EXCEPTION_INIT(exception_name, Oracle_error_number);
where exception_name is the name of a previously declared exception. The pragma must appear somewhere after the exception declaration in the same declarative section, as shown in the following example:

Error Reporting Functions

In an exception handler, you can use the built-in functions SQLCODE and SQLERRM to find out which error occurred and to get the associated error message.

1. For internal exceptions, SQLCODE returns the number of the Oracle error. The number that SQLCODE returns is negative unless the Oracle error is no data found, in which case SQLCODE returns +100. SQLERRM returns the corresponding error message. The message begins with the Oracle error code.

2. For user-defined exceptions, SQLCODE returns +1 and SQLERRM returns the message User-Defined Exception unless you used the pragma EXCEPTION_INIT to associate the exception name with an Oracle error number, in which case SQLCODE returns that error number and SQLERRM returns the corresponding error message.

The maximum length of an Oracle error message is 512 characters including the error code, nested messages, and message inserts such as table and column names.
If no exception has been raised, SQLCODE returns zero and SQLERRM returns the message ORA-0000: normal, successful completion.


Passing  an error number
You can pass an error number to SQLERRM, in which case SQLERRM returns the message associated with that error number. Make sure you pass negative error numbers to SQLERRM. In the following example, you pass positive numbers and so get unwanted results:
DECLARE
...
err_msg VARCHAR2(100);
BEGIN
/* Get all Oracle error messages. */
FOR err_num IN 1..9999 LOOP
err_msg := SQLERRM(err_num); -- wrong; should be -err_num
INSERT INTO errors VALUES (err_msg);
END LOOP;
END;

Passing a positive number to SQLERRM always returns the message user-defined exception unless you pass +100, in which case SQLERRM returns the message no data found. Passing a zero to SQLERRM always returns the message normal, successful completion.

SQLCODE or SQLERRM in SQL statements
You cannot use SQLCODE or SQLERRM directly in a SQL statement. Instead, you must assign their values to local variables, then use the variables in the SQL statement, as shown in the following example:
DECLARE
err_num NUMBER;
err_msg VARCHAR2(100);
BEGIN
...
EXCEPTION
...
WHEN OTHERS THEN
err_num := SQLCODE;
err_msg := SUBSTR(SQLERRM, 1, 100);
INSERT INTO errors VALUES (err_num, err_msg);

END;

The string function SUBSTR ensures that a VALUE_ERROR exception (for truncation) is not raised when you assign the value of SQLERRM to err_msg. The functions SQLCODE and SQLERRM are especially useful in the OTHERS exception handler
because they tell you which internal exception was raised.

Exceptions Propagation


Subprograms

Subprograms are named PL/SQL blocks that can take parameters and be invoked. PL/SQL has two types of subprograms called procedures and functions. Generally, you use a procedure to perform an action and a function to compute a value.


Uses of Procedures/Functions

Procedures are excellent for defining a PL/SQL code block that you know you will need to call more than once, and whose work may produce results largely seen in the database or perhaps some module, like an Oracle Form, or a client-side form, as opposed to work whose result is some single answer; that would probably be more appropriate for a function.

In addition, an anonymous PL/SQL block is parsed each time it is submitted for execution. But if that same anonymous block is assigned a name and created as a procedure, then Oracle will parse the procedure once, at the time it is created. Each subsequent call to that procedure will not require reparsing; it will simply execute, saving time over an anonymous block.

A PL/SQL procedure can be invoked from a single executable statement in another PL/SQL statement. These other PL/SQL statements could be in an anonymous PL/SQL block or in a named program unit, such as another procedure. A PL/SQL procedure can also be invoked from a single command-line executable statement in a SQL*Plus session.

A function's main purpose is to return a single value of some sort, as opposed to a procedure, whose main purpose is to perform some particular business process. Like a procedure, a function is a PL/SQL block that's been assigned a name; but unlike a procedure, the function will always return one—and only one—value of some sort. This returned value is embodied in the function call in such a way that the function becomes, in essence, a variable.

When you create a function, you must consider how you intend to use the function. There are two major categories of functions you can create:
  • Functions that are called from expressions in other PL/SQL program units. Any function can be used this way.
  • Functions that are called from within SQL statements, whether the SQL statement is part of a PL/SQL program unit or not. Some functions you create in PL/SQL can be used in this way.
It's possible to create functions that can be invoked in both manners. However, if you intend to make a function that can be called from a valid SQL statement, there are some restrictions you have to consider. For example, a function that returns a BOOLEAN datatype, which is perfectly acceptable in PL/SQL, cannot be invoked from a SQL statement, where BOOLEAN datatypes are not recognized.

Functions versus Procedures

Functions can be used in places where procedures cannot be used. Whereas a procedure call is a statement unto itself, a call to a function is not; a function call is part of an expression. This means that functions can be used as a part, or all, of the right side of the assignment statement. Functions can be used as part, or perhaps all, of the Boolean expression in an IF statement. In short, wherever you might use a variable, you can use a function.

Functions always return a single value, embodied in the function call itself. In other words, contrary to the optional OUT parameter feature in procedures, which you may or may not use to return multiple values from a procedure, a function must always return one—and only one—value through the very call to the function itself. This value is not returned in the form of an OUT parameter, but instead it is returned in the body of the function itself, so that the function call behaves like a variable. Technically, functions can use IN, OUT, and IN OUT parameters. In practice, functions are generally only given IN parameters.

Where Can You Store Procedures?
Procedures can be stored in the database, alongside tables and other database objects. Once a procedure is stored in the database, it can be invoked from any process with database access. If a process, such as a SQL*Plus window, Java program, Oracle Form, or another PL/SQL procedure, has access to the database, it can execute the procedure, provided that the proper privileges have been granted on the procedure (more on this later) to the schema under which the process is running.
 

Create, Alter and Drop

Creating Procedures
The following is a code sample that will create a stored procedure named PROC_RESET_ERROR_LOG:
CREATE PROCEDURE PROC_RESET_ERROR_LOG IS
BEGIN
  -- Clean out the ERRORS table
  DELETE FROM ERRORS;
  COMMIT;
END;


The syntax to create a function is similar to the syntax used to create a procedure, with one addition: the RETURN declaration. The following is a sample CREATE FUNCTION statement.
CREATE OR REPLACE FUNCTION FUNC_COUNT_GUESTS
  (p_cruise_id NUMBER)
RETURN NUMBER
IS

  v_count NUMBER(10)
BEGIN
  SELECT COUNT(G.GUEST_ID)
  INTO   v_count
FROM     GUESTS G,
         GUEST_BOOKINGS GB
WHERE    G.GUEST_ID = GB.GUEST_BOOKING_ID
  AND    GB.CRUISE_ID = p_cruise_id;
RETURN   v_count;
END;

This function will take a single parameter, p_cruise_id. This parameter could include the parameter type declaration, such as IN, OUT, or IN OUT, but this example leaves it out, so this parameter is assumed to be the default IN parameter type, just as it would be assumed in a procedure. This function will use the p_cruise_id parameter to query the database and count the total number of guests for a single cruise. The result of the query is then returned to the calling block, using the RETURN statement at the end of the function.

If you think of the entire function as a variable, then think of the RETURN datatype as the function's datatype.

Altering Procedures
Once a procedure has been created, you can use two methods to "alter" the procedure. If you are replacing the original source code with a new set of source code, use the OR REPLACE option discussed in the previous section. This is true for any code modification at all. If, however, you are recompiling the procedure without changing the code, then use the ALTER PROCEDURE command.

The ALTER PROCEDURE command is required when your stored procedure has not been changed in and of itself, but another database object referenced from within your procedure, such as a table, has been changed. This automatically causes your procedure to be flagged as INVALID.
CREATE OR REPLACE PROCEDURE PROC_RESET_ERROR_LOG IS
BEGIN
  -- Clean out the ERRORS table
  DELETE FROM ERRORS;
  COMMIT;
END;

ALTER PROCEDURE PROC_RESET_ERROR_LOG COMPILE;

As with a procedure, a function may reference database objects from within its code. As with a procedure, if those database objects are changed, then the function must be recompiled. To perform this recompilation, use the ALTER FUNCTION COMPILE command.
ALTER FUNCTION FUNC_COUNT_GUESTS COMPILE;

CREATE OR REPLACE FUNCTION FUNC_COUNT_GUESTS
  (p_cruise_id NUMBER)
RETURN NUMBER
IS
  v_count NUMBER(10)
BEGIN
  Statements;
END;

Dropping Procedures
An example of a command that drops a procedure is shown in the following code listing:
DROP PROCEDURE PROC_RESET_ERROR_LOG;
Once this command is successfully executed, the database response "Procedure dropped" will be displayed.

To drop a function, use the DROP … FUNCTION statement. The following is a sample command that will drop our sample function:
DROP FUNCTION FUNC_COUNT_GUESTS;

Invoking Procedures/Functions

Once a procedure has been created and stored in the database, it can be invoked from

  • An executable statement of a PL/SQL block
  • A command entered in the SQL*Plus command-line interface
Executing a Procedure from a PL/SQL Block
To invoke a procedure from another PL/SQL block, use a single statement that names the procedure. For example, suppose you've created a procedure called PROC_UPDATE_CRUISE_STATUS. The following PL/SQL block will execute the procedure:
BEGIN
  PROC_UPDATE_CRUISE_STATUS;
END;


Executing a Procedure from the SQL*Plus Command Line
You can execute a PL/SQL procedure from within the SQL*Plus command line without having to write another PL/SQL block to do it. The SQL command EXECUTE, or EXEC for short, must be used.

For example, if you have already stored a procedure called PROC_RUN_BATCH with no parameters, then the following statement, entered in the SQL*Plus window at the SQL prompt, will invoke the procedure:
EXECUTE PROC_RUN_BATCH;

Invoking Functions
Functions are never called in a stand-alone statement as procedures are. Instead, a function call is always part of some other expression. Valid PL/SQL expressions can incorporate functions anywhere that a variable would be accepted. Valid SQL expressions may also invoke functions, but with a few limitations—only certain types of functions can be invoked from SQL.

The following is a sample of a block that might call our sample FUNC_COUNT_GUESTS function:
PROCEDURE PROC_ORDER_FOOD (p_cruise_number NUMBER)
IS
  v_guest_count NUMBER(10);
BEGIN
  -- Get the total number of guests
-- for the given cruise
v_guest_count := FUNC_COUNT_GUESTS(p_cruise_number);
-- Issue a purchase order
  INSERT INTO PURCHASE_ORDERS
    (PURCHASE_ORDER_ID, SUPPLIER_ID, PRODUCT_ID, QUANTITY)
    VALUES
    (SEQ_PURCHASE_ORDER_ID.NEXTVAL, 524, 1, v_guest_count)
  COMMIT;
END;


Functions Called from PL/SQL Expressions
Any PL/SQL function can be called from a PL/SQL expression of another program unit. Remember that expressions can be found in many places within PL/SQL:
  • The right side of an assignment statement
  • The Boolean expression of an IF … THEN … END IF statement
  • The Boolean expression of a WHILE loop
  • The calculation of a variable's default value
In short, anywhere you might use a PL/SQL variable, you can issue a function call.

Examples:
1. DECLARE
  v_official_statement VARCHAR2(1000);
BEGIN
  v_official_statement := 'The leading customer is ' ||
                          leading_customer;
END;


2. Functions can even be used as parameter values to other functions. For example,
BEGIN
  IF (leading_customer(get_largest_department) = 'Iglesias')
  THEN
    DBMS_OUTPUT.PUT_LINE('Found the leading customer');
  END IF;
END;

3. SELECT     COUNT(SHIP_ID) NUMBER_OF_SHIPS,
           leading_customer
FROM       SHIPS;

Return

The use of the RETURN statement is unique to functions. The RETURN statement is used to return some value. In fact, the primary reason for storing a PL/SQL block as a function is to return this value—this is the purpose of the function. For example, if a function is meant to compute the total payments received so far from guest reservations booked on a cruise, then the function will do whatever it needs to do to arrive at this final value and use the RETURN statement at the end to send the result back to the function call.

If you attempt to compile a function that has no RETURN statement, you will succeed, and the function will be stored in the data dictionary with a status of VALID. However, when you attempt to execute the function, you will receive a message like this:

ORA-06503: PL/SQL: Function returned without value
ORA-06512: at "[schema.function_name]", line 6
ORA-06512: at line 1

Therefore, it is the developer's responsibility to remember the RETURN statement. The compilation process won't remind you that it's required.

The function processes its statements until the RETURN statement is reached. Once the RETURN statement is processed, the execution of the function will stop. Any statements that follow will be ignored, and control is returned to the calling source. Therefore, it is considered good design to make the RETURN statement the last executable statement. However, the parser does not require this. Your function will compile without any RETURN statement or with a RETURN statement that precedes other valid PL/SQL statements.

Parameters

A parameter is a variable whose value can be defined at execution time and can be exchanged between the procedure and the calling PL/SQL block. Parameter values can be passed in to the procedure from the calling PL/SQL block and can optionally have their values passed back out of the procedure to the calling PL/SQL block upon the completion of the procedure's execution

Parameters are declared at the top of the procedure within a set of parentheses. Each parameter declaration includes the following:

  • A name, defined by the developer, and adhering to the rules of object names (discussed earlier).
  • The type of parameter, which will either be IN, OUT, or IN OUT. The default is IN.
  • The datatype. Note that no specification or precision is allowed in parameter datatype declarations. To declare something as an alphanumeric string, you can use VARCHAR2, but you cannot use, for example, VARCHAR2(30).
  • Optionally, a parameter may be provided with a default value. This can be done by using the reserved word DEFAULT, followed by a value or expression that is consistent with the declared datatype for the parameter. The DEFAULT value identifies the value the parameter will have if the calling PL/SQL block doesn't assign a value.
After each parameter declaration, you may place a comma and follow it with another parameter declaration.

The following is an example of a procedure header that uses parameters:
PROCEDURE PROC_SCHEDULE_CRUISE
  ( p_start_date IN DATE DEFAULT SYSDATE
   , p_total_days IN NUMBER
   , p_ship_id IN NUMBER
   , p_cruise_name IN VARCHAR2 DEFAULT 'Island Getaway')
IS
... code follows ...
This procedure declares four parameters. Each parameter is an IN parameter. Each parameter is assigned a datatype. The parameter p_cruise_name is given a datatype of VARCHAR2; the length cannot be specified in a parameter datatype declaration.
Two of the parameters are assigned default values. The first, p_start_date, uses the Oracle pseudocolumn SYSDATE, and the second, p_cruise_name, is assigned the string, ‘Island Getaway’.

Functions parameters
Functions take parameters, just like procedures do, and just like procedures, a parameter for a function can be an IN, OUT, or an IN OUT parameter. The default parameter type is an IN parameter.

However, unlike a procedure, a function always returns a value through its unique RETURN statement, and this value replaces the original call to the function in the expression that calls the function. Given this, functions are not generally used to pass OUT or IN OUT parameters. Furthermore, the OUT and IN OUT parameter will not work with function calls that are made from SQL statements. For example, consider the following function:
FUNCTION FUNC_COMPUTE_TAX
(p_order_amount IN OUT NUMBER)
RETURN NUMBER
IS
BEGIN
  p_order_amount := p_order_amount * 1.05;
  RETURN p_order_amount * .05;
END;


This function has an IN OUT parameter. The parameter comes IN as some dollar amount representing an order; it goes OUT with tax added. The function RETURNS the amount of the tax itself, as a NUMBER datatype

Packages

A PL/SQL package is a single program unit that contains one or more procedures and/or functions, as well as various other PL/SQL constructs such as cursors, variables, constants, and exceptions. Packages bring these various constructs together in a single program unit.

Most applications include several Procedural Language/Structured Query Language (PL/SQL) procedures and functions that are logically related together. These various procedures and functions could be left as stand-alone individual procedures and functions, stored in the database. However, they can also be collected in a package, where they can be more easily organized and where you will find certain performance improvements as well as access control and various other benefits.

A package is a collection of PL/SQL program constructs, including variables, constants, cursors, user-defined exceptions, and PL/SQL procedures and functions, as well as PL/SQL-declared types. A package groups all of these constructs under one name. More than that, the package owns these constructs, and in so doing, affords them powers and performance benefits that would not otherwise exist if these constructs were not packaged together.


Create, Alter and Drop - Packages

The statements used to create, alter, and drop packages are rather straightforward. However, this process is a little more involved than merely creating a procedure or function. The first point to understand is that a package consists of two parts: the package specification and the package body. The two parts are created separately. Any package must have a specification.

A package may optionally include a package body but is not necessarily required to. The requirement for a package to have a body will be determined by what you declare in a package specification; you may simply declare a package specification and no body. However, most packages often include both the package specification and the package body.

You can declare a package specification without the package body and successfully store it in the database as a valid object. Furthermore, with only a package specification, it's possible to create other PL/SQL programs that call on the constructs of your package, even procedures or functions, whose code isn't written yet—the actual code can only be defined in the package body. However, the existence of the package specification enables other outside PL/SQL program units to reference the constructs of this package.

It's recommended that you create the package specification first, before the package body. The package specification, as we have seen, will successfully store, compile, and support the successful compilation of outside program units. A package body, on the other hand, cannot be compiled successfully without a corresponding package specification. However, the package body can be submitted and stored in the data dictionary without a package specification. The package body will simply be flagged with a status of INVALID in the USER_OBJECTS data dictionary view. After the package specification is successfully created, you need to either issue the ALTER PACKAGE … COMPILE statement, or simply reference a packaged construct and let the database automatically compile the package at that time.

Creating a Package Specification

The following is an example of a statement that creates a stored PL/SQL package specification:
CREATE OR REPLACE PACKAGE pack_booking AS
  c_tax_rate NUMBER(3,2) := 0.05;
  CURSOR cur_cruises IS
    SELECT CRUISE_ID, CRUISE_NAME
    FROM   CRUISES;
  rec_cruises cur_cruises%ROWTYPE;
  FUNCTION func_get_start_date
    (p_cruise_id IN CRUISES.CRUISE_ID%TYPE)
  RETURN DATE;
END pack_booking;
The syntax of the statement is the reserved word CREATE, followed by the optional OR REPLACE words, the reserved word PACKAGE, the name you choose for the package, and the reserved word AS. (The word IS is also accepted here.) Next is a series of declared constructs. Eventually, the closing END is included, followed by the package name, optionally repeated for clarity, and then the semicolon.

This package specification declares a constant c_tax_rate, a cursor cur_cruises, a record variable rec_cruises, and the function func_get_start_date. Notice that the function's actual code isn't included here, only the function header.
The package specification is the part of a package that declares the constructs of the package. These declared constructs may include any of the following:

  • Variables and/or constants
  • Compound datatypes, such as PL/SQL tables and TYPEs
  • Cursors
  • Exceptions
  • Procedure headers and function headers
  • Comments
The package specification contains no other code. In other words, the actual source code of procedures and functions is never included in the package specification. The specification merely includes enough information to enable anyone who wants to use these constructs to understand their names, parameters, and their datatypes, and in the case of functions, their return datatypes, so that developers who want to write calls to these constructs may do so. In other words, if any developer wants to create new programs that invoke your package constructs, all the developer needs to see is the package specification. That's enough information to create programs that employ the procedures and functions of your package. The developer does not need to have full access to the source code itself, provided that he or she understands the intent of the program unit.

Once the package specification has been successfully stored in the database, it will be given a status of VALID, even if the associated package body, containing the actual source code of any and all functions and/or procedures, has yet to be stored in the database.

Creating a Package Body
The following is a sample of a package body that correlates to the package specification we saw earlier:
CREATE OR REPLACE PACKAGE BODY pack_booking AS
  FUNCTION func_get_start_date
    (p_cruise_id IN CRUISES.CRUISE_ID%TYPE)
  RETURN DATE
  IS
     v_start_date CRUISES.START_DATE%TYPE;
  BEGIN
     SELECT START_DATE
     INTO   v_start_date
     FROM   CRUISES
     WHERE  CRUISE_ID = p_cruise_id;
     RETURN v_start_date;
  END func_get_start_date;
END pack_booking;

This package body defines the source code of the function func_get_start_date. Notice that the function header is completely represented here, even though it was already declared completely in the package specification. Also, notice that there are no provisions for the other declared constructs in the package specification. Only the functions and/or procedures that were declared in the package specification need to be defined in the package body. The package specification handles the full declaration of the other public constructs, such as variables, constants, cursors, types, and exceptions.

The package body is only required if the package specification declares any procedures and/or functions, or in some cases of declared cursors, depending on the cursor syntax that is used. The package body contains the complete source code of those declared procedures and/or functions, including the headers that were declared in the specification.

The package body can also include privately defined procedures and/or functions. These are program units that are recognized and callable only from within the package itself and are not callable from outside the package. They are not declared in the package specification, but are defined in the package body.

Altering a Package
Packages, like procedures and functions, should be recompiled with the ALTER command if their referenced constructs are changed for any reason. This includes any referenced database objects, such as tables, views, snapshots, synonyms, and other PL/SQL packages, procedures, and functions.
The syntax to recompile a package with the ALTER statement is
ALTER PACKAGE package_name COMPILE;

This statement will attempt to recompile the package specification and the package body.
The syntax to recompile just the package body is
ALTER PACKAGE package_name COMPILE BODY;

Note that the package is listed in the data dictionary with two records: one record for the PACKAGE and another for the PACKAGE BODY. Both have their individual status assignments. The PACKAGE, meaning the package specification, can be VALID, while the PACKAGE BODY is INVALID. If this is the case, then an ALTER PACKAGE package_name COMPILE statement will attempt to restore the entire package, including the body, to a status of VALID.

If a change is made to the package body and it is recompiled, then the package specification does not demand that the package be recompiled. Even if the recreated package body results in a change that is inconsistent with the package specification, the package specification will still show a status of VALID in the data dictionary (assuming it was VALID to begin with), and the package body will be flagged with a status of INVALID

Dropping a Package
You have two options when dropping a package. The following statement will remove the package body reservations from the database:
DROP PACKAGE BODY RESERVATIONS;
This statement will remove the package body, but will leave the package specification in the database. Furthermore, the package specification for reservations will still be VALID.
The following statement will remove the entire package:
DROP PACKAGE RESERVATIONS;

The result of issuing this statement to the database will be the complete removal of both the package specification and the package body from the database.
Dropping a package will cause any other program units that reference the package to be flagged with a status of INVALI

Public versus Private Constructs
Constructs that are declared in the package specification are considered public constructs. However, a package body can also include constructs that aren't declared in the package specification. These are considered private constructs, which can be referenced from anywhere within its own package body but cannot be called from anywhere outside the particular package body. Furthermore, any developers with privileges to use the constructs of the package do not necessarily have to see the package body, which means that they do not necessarily know of the existence of the private constructs contained within the package body.

Global Constructs
Package constructs, such as variables, constants, cursors, types, and user-defined exceptions, are global to the user session that references them. Note that this dynamic is irrelevant for packaged procedures and packaged functions, but applies to all other packaged constructs. This is true for both public and private constructs in the package. In other words, the values for these constructs will be retained across multiple invocations within the user session.

For example, if an anonymous PL/SQL block references a public packaged variable and changes its value, the changed value can be identified by another PL/SQL block that executes afterwards. Neither block declares the variable because it's declared as part of the package.

The user cannot directly access any private constructs, such as a variable, but imagine that a user invokes a packaged procedure, for example, that references its own private variable value and changes that value. If the user re-invokes that packaged procedure again within the same user session, the changed value will be recognized by the packaged procedure.

The value will be retained as long as the user session is still active. As soon as the user session terminates, the modified states of the packaged constructs are released, and the next time the user session starts up, the packaged constructs will be restored to their original state, until the user sessions modifies them again.

Invoking Packaged Constructs

Packages themselves are never directly invoked or executed. Instead, the constructs contained within the package are invoked. For example, procedures and functions within the package are executed. Other constructs in the package, such as constants and other declared constructs, can be referenced from within other PL/SQL programs, in the same manner that those program units could refer to their own locally declared PL/SQL program constructs.

Referencing Packaged Constructs
To call upon any construct of a package, simply use the package name as a prefix to the construct name. For example, to reference a procedure with no parameters called increase_wages that is stored in a package called hr, use this reference:
hr.increase_wages;
All packaged constructs are invoked in the same fashion: by including the package name as a prefix, with a period separating the package name and the construct name. This notation is often referred to as dot notation. It's the same format used to refer to database objects that are owned by a schema.

For example, if you have a package called assumptions that defines a public constant called tax_rate, you could use it this way in an expression:
v_full_price := v_pre_tax * (1 + assumptions.tax_rate);
Dot notation is required for references to any packaged constructs from outside of the package. However, although references to constructs from within the same package will accept dot notation, they do not require it.

Using Packaged Constructs
For the purpose of reviewing the rules of using packaged constructs, let's consider all constructs to be in either of two categories: packaged program units, meaning procedures and functions, and global constructs, meaning packaged variables, constants, cursors, exceptions, and types.

Packaged Program Units
The same rules apply to the use of packaged procedures and functions that apply to stand-alone procedures and functions. In other words, packaged procedures must be called from a single statement, whereas packaged functions must be called from within an expression, just like stand-alone PL/SQL stored functions. Parameters may be passed by positional notation or by named notation.
For example, the following PL/SQL block executes a packaged procedure:
BEGIN
  pack_finance.proc_reconcile_invoice(p_status => 'ACTIVE');
END;

Packaged Global Constructs
Packaged global constructs generally behave the same as their locally defined counterparts, with one dramatic difference: Their declaration is global to the user sessions.
Consider the following code sample:
PACKAGE rates AS
  bonus NUMBER(3,2);
END rates;


Form Components

Forms Builder provides various components, such as Data Block, Items, Property Palette, Canvases and Windows, Triggers, and Program Units that enable you to create a form.


Data Block
A data block is a virtual data set that represents the database table. You need to create the associated block in the Object Navigator for every table used in the form. A data block is bound to a table or a view in a database or a set of procedures. The association of a data block and a database allows a form to manipulate the data in a database. You can create a data block manually or using the Data Block wizard.

Items
An item is an interface object that helps display information in a GUI application. It enables you to store, insert, modify, and delete information in a database. Each item belongs to a block. The items in a block are bound to columns in a base table. They display the data stored in these columns. You may also enter the data in these items for later processing. An item may need not necessarily be bound to columns of base table, such as sum of fields. These items are known as non-database items. These items are used to display information from the tables associated with base tables.

Canvases and Windows
A canvas is a physical container or a layout on which you can place items. End users interact with the items on the canvas when a form is executed. You can create a canvas manually using the Layout Editor or the Layout wizard. A canvas can be displayed in different windows.

A Window is the basic Document Interface in the Forms Builder. For each window, you must create at least one canvas. The Windows are assigned appropriate properties to determine whether the application is a Multiple Document Interface (MDI) or Single Document Interface (SDI).

You need to place the canvas in a specific window to view the canvas and the items in it, when you execute a form. By default, a canvas is assigned the window called WINDOW1. You can assign a different window using the Window property in the property palette of the canvas.

Forms Builder enables you to create the following types of canvases:
  • Content
  • Stacked
  • Tab
  • Toolbars