Oracle Loan
Oracle Loans supports the entire loans management life cycle, from loan origination and approval, to servicing and eventual loan payoff.
Use Loans to:
- Track a loan from initial application until approval and funding
- Create approval conditions
- Set up periodic loan billing for all active loans
Loans is seamlessly integrated with other applications within the Oracle E-Business Suite to facilitate all aspects of loan management.
For example, Loans automatically integrates with:
Oracle Trading Community Architecture
Borrowers, co-borrowers, and guarantors are stored in the TCA Registry. When you create a new loan for an new or existing borrower, Loans leverages functionality from the Customer Data Hub to prevent you from creating duplicate borrower records.
When you create a new borrower in Loans, it is automatically entered into the TCA Registry.
Tip: Schedule the DQM: Setup Data Synchronization program to run as frequently as every minute in order to be able to search for new borrowers.
Oracle General Ledger
Oracle Payables
Loans integrates with Oracle Payables to disburse funds for approved direct loans.
Suppliers are created in the Loan Origination process. Payables invoices are created upon loan approval. Then Payables clerks validate the invoices and process the payments by check, wire or other Payables methods, to disburse funds to a third party agency or directly to the borrower
Oracle Receivables
When creating a loan application, you can select an existing receivable to create an ERS loan.
Additionally, billing documents (such as invoices and debit memos) are created in Receivables when you initiate the billing process for loans. These billing documents provide payment amounts for principal, interest, and fees. When payment is remitted, your Receivables clerk applies receipts to these documents. Your receivables clerk also transfers journal entries for billing and payments the general ledger.
Oracle Advanced Collections
Loans uses Advanced Collections scoring engines to identify when loan payments are overdue and set the status of the loan to Delinquent or In Default, depending upon the severity of the overdue condition. From there, Advanced Collections takes over and provides automated dunning or collections strategies to schedule calls and other collection activities for the collections agents. Advanced Collections processes payments and promises to cure the troubled loans.
Oracle Credit Management
Loans displays information from Oracle Credit Management in the Borrower Summary. This information can be used in the loan application and approval process.
Oracle Common Application Calendar
Use Oracle Notes to track comments and customer interactions, during both loan origination and servicing phases.
Use Oracle Attachments functionality to add attachments such as scanned documents or URLs to notes or loan approval conditions.
Oracle XML Publisher
Loans uses XML Publisher to generate statements and reports for Loans. These can be printed in multiple formats and made available to download or forward.
• Statements are used to inform the borrower about their next bill.
• The Loans Portfolio Report provides a listing of all loans along with critical loan summary information.
• The Loans Reconciliation Report assists lending organizations to review billing and payment discrepancies.
• The Loan Agreement Report provides a printable document of all loan details.
Oracle Loans Setup

This section provides you with an overview of the setup steps for implementing Oracle Loans.
These setup steps span the following Oracle applications:
1. Oracle HRMS
2. Oracle System Administrator
3. Oracle Resource Manager
4. Oracle General Ledger
5. Oracle Receivables
6. Oracle Payables
7. Oracle Workflow
8. Oracle Loans
Run the Replicate Seed Data program for each operating unit in which you plan to use Loans.
This step replicates the Loans batch source that you will use during Oracle Receivables setup as well as other data such as receivable activities and reason codes. You should complete this step before configuring the Loans credit memo batch source.
Profiles
LNS: Generate Loan Number
Set this profile option to Yes if you want Loans to automatically generate the loan number when you create a new loan. The default setting for this profile option is Yes.
LNS: Disable Loan Class Access
Set this profile option to prevent loan agents from creating loan applications by loan class. You can restrict access to ERS loans or direct loans. The default setting for this profile option is null.
Concurrent Report Access Level
Set this profile option to determine the access privileges to report output files and log files generated by concurrent programs.
If you set this profile option to Responsibility, users can access reports and log files submitted by any user with the same current responsibility.
Oracle Responsibilities
Loan Administration
Use this responsibility to set system options, enter accounting defaults, define loan conditions, fees, interest rates, and notifications.
Loan Agent
Use this responsibility to create loans, enter credits, view loan information and payment history, view and submit concurrent requests, and answer customer
service inquiries.
Functional manager users can also use this responsibility to approve loans and update loan accounting.
CRM Resource Manager Setup
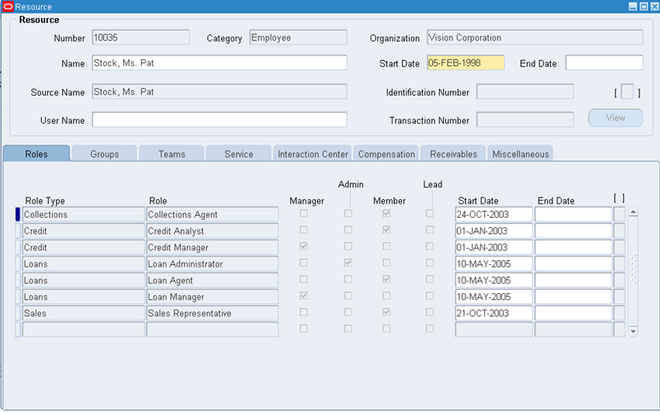
Using the CRM Resource Manager responsibility, complete the below steps:
1. In the Resource Manager, Navigate into maintain Resources -> Import Resources.
and then Import your employees as resources.
2. In the Resource Manager, Navigate into maintain Resources -> Resources
In the Resource Manager, query the newly imported resources and add one or more roles to each resource. Loans has two roles, Loan Manager and Loan Agent
Assign the oracle user name that 'll be used to acess the Loan Manager/Loan Agent responsibility.
Receivables Setup
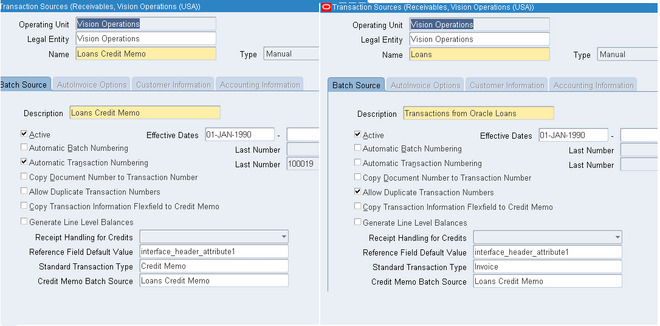
1. Define an active credit memo transaction batch source for Oracle Loans for use during the credit, or credit and rebill, process.
Ensure the Type is manual, and set Automatic Transaction Numbering to Yes.
2. Query the seeded Loans batch source in the Transaction Source window and, in the Credit Memo Batch Source field, enter the credit memo batch source that you created in the previous step.
3. (Optional) Define three default transaction types for use when billing:
• Loan principal
• Loan interest
• Loan fees
When defining these transaction types, be sure to set:
• Transaction Status to Open
• Creation Sign to Positive
• Tax Calculation to No
• Natural Application Only to Yes.
Note:
i. You can use existing transaction types for principal, interest, and fees, provided that you set the Tax Calculation option on those transaction types to No. If you use existing transaction types, then skip this step. Each transaction type must have a Credit Memo Type of Credit Memo defined.
ii. When defining transaction types for Loans, do not enter accounting information. Instead, enter default accounting in Loans.
4. Open GL periods so that you can successfully execute billing.
Depending on your loan requirements, you might need to open GL periods for up to one year in advance.
5. Confirm that you have no Revenue Policy system options defined.
In the System Options window, all fields on the Revenue Policy tab must be blank.
6. Query the seeded Receivable activity, Loan Conversion, and enter the GL account
for loan clearing to be used to automatically adjust an existing receivable when it is converted to a loan. This step is required if you create Extended Receivable Schedule loans and plan to automatically adjust the receivable balance to zero
Payables Setup
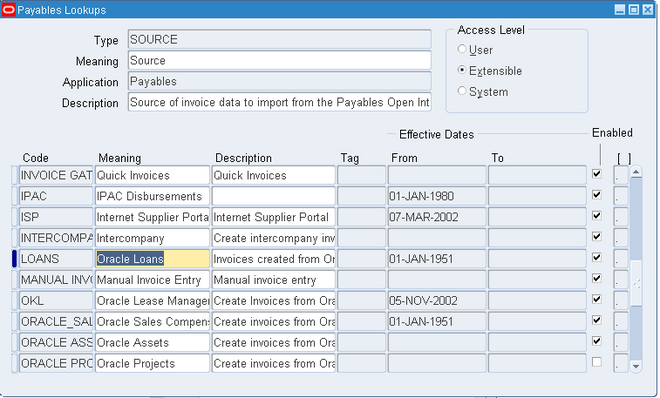
Loans integrates with Oracle Payables to disburse funds for a direct loan.
Loans as a source for transactions imported to Payables through the interface tables.
1. Verify that Loans appears in the Source Lookups in Payables.
2. If your organization pays invoices in multiple currencies: then you must
- Set up and enable additional currencies.
- Select Use Multiple Currencies on the Currency tab.
- Define additional internal bank accounts and remittance documents for each currency you will use.
Global Setup
Rates
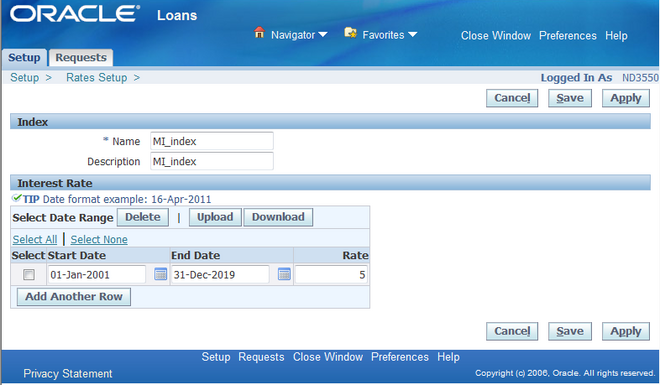
Set up the interest rate indices for your loans.
When a loan agent selects an index for a loan application, the rate will default for the index date selected from the index rates you set up.
You can enter interest rates manually or upload a file from an external source.
Tip: Save the index name before adding rates or importing rate files.
Use two decimal points for rate percentage. For example, enter 6.25 if the rate percentage is 6.25%. Save the spreadsheet with a .csv file extension.
Loan Conditions

Define the loan conditions that your agents can attach to a loan application. Condition names must be unique within an operating unit.
You can define conditions using the following types:
• Approval
• Conversion
• Delinquency
• Disbursement
• Servicing
You can update conditions at any time.
Note: Do not delete a condition that is attached to an approved loan.
Enabling Notifications
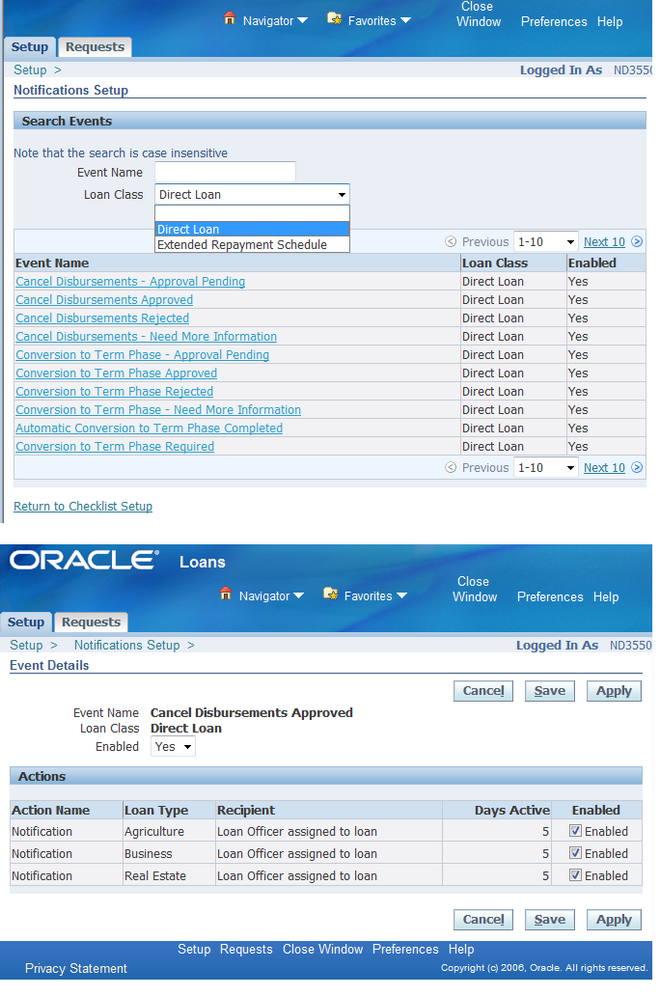
Event notifications can be enabled or disabled for an entire loan class or for individual loan types within a class. The default is enabled. You may want to disable notifications for some events to minimize the number of notifications sent to loan agents and managers. You can determine the critical event notifications and disable others to minimize the number of notifications sent to loans users.
Note: If you add loan types, you must enable the workflow and business events by linking the new loan type to the seeded workflows. To do this, you add the new loan type to the corresponding LNS_EVENT_ACTIONS tables.
• To enable or disable an event notification for an entire loan class, search for events by loan class. Select an event and change the enable flag.
• To enable or disable an event notification for a specific loan type within a loan class, search for a specific event, select the event for the corresponding loan class, and change the enable flag for the loan type.
Loan Types
Loan Type is a structure to which Loan Products are associated. A Loan Type provides the mandatory characteristics to set boundaries while defining Loan Products. Loan Type defines accounting, reserving funds, critical calculations, ability to convert construction loan to permanent loans and requirement for collateral. Setting these parameters ensures all associated Loan Products adhere to same default settings as set up in the selected loan type. Before creating a new loan type, you can search for existing loan types that match your criteria and duplicate the loan type.
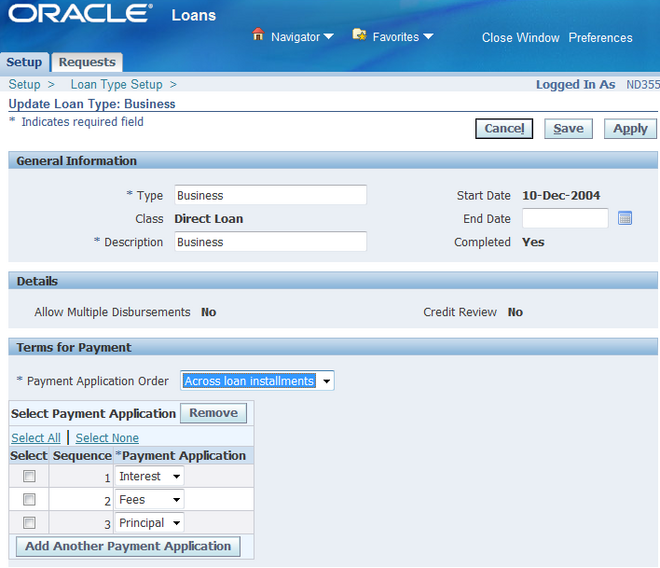
Creating a Loan Type
1. Enter the General Information for the loan type and select from Direct or ERS loan class.
- Direct Loan is a disbursement of funds under a contract that requires repayment of such funds with or without interest.
- Extended Repayment Schedule or ERS Loan is a loan converted from one or more receivables and assigned terms and conditions for repayment.
2. Based on the Class selected, the parameters in the Details section vary. If you selected Direct Loan, all parameters will be available. In case of ERS, the following parameters are not used:
• Allow Multiple Disbursements
Note: Setting Multiple Disbursement to Yes will allow funds to be disbursed in more than one payment to the borrower.
• Allow Permanent Conversion
Note: Setting Permanent Conversion to Yes will convert the loan to a permanent or term loan after the final disbursement.
Note: The option to Allow Permanent Conversion is only available when you set up a loan type for direct loans that have multiple disbursements.
• Credit Review
Note: This option allows you to configure the requirement to review credit status of the borrowers.
3. Select Payment Application and assign order in the Terms of Payment section. You can add new or remove existing payment applications.
You can only create loan products for loan types with a status of Completed. If any required fields for a loan type are not filled in, then the status is Incomplete.
You can only delete a loan type if it is Incomplete or if it is Completed without any loan products assigned to it. Loan types with loan products assigned to it can only be end-dated and made unavailable.
Updating a Loan Type
If you are updating a Loan Type, the Class, Type, Description and Start Date will appear as read-only fields and cannot be edited. You can end-date existing Loan Types which will ensure your Loan Type is not assigned to new Loan Products.
Duplicating a Loan Type
You can create loan types that are similar to existing types. Search for the Loan Type you wish to duplicate and click Duplicate. Replace the "Copy of <Loan Type Name>" with a new name (if necessary). Enter a Description and Start Date. The Class defaults from the original Loan Type and cannot be changed. Mark it Completed to make it
available for assignment to Loan Products.
Note: If you change the values of a Loan Type after marking it Completed, the new values will not affect existing loan products assigned to the loan type.
System Options
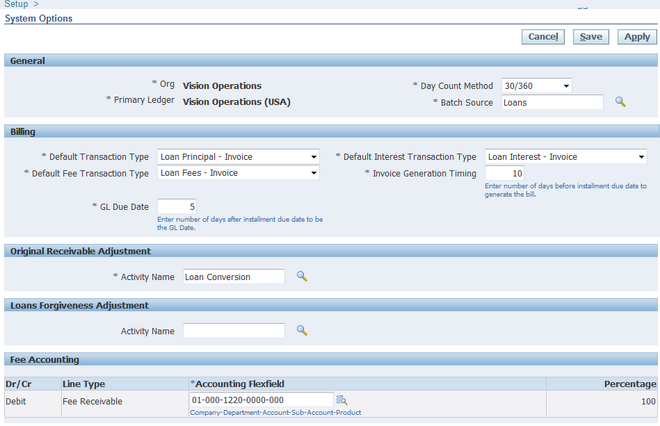
General:
1. Day Count Method
Determines the number of days in a period when calculating interest. Select the Day Count method appropriate for your organization. The Actual/Actual and 30/360 day count methods have been verified using industry standard tools.
2. Batch Source
Select Loans. You identify Loans bills in Oracle Receivables by this batch source.
Note: In Oracle General Ledger, the batch source for journal entries that are created for loans transactions is Oracle Loans.
Billing
1. Default Transaction Type
Select the Receivables transaction type for use when billing loan principal amounts.
2. Default Interest Transaction Type
Select the Receivables transaction type for use when billing loan interest amounts.
3. Default Fee Transaction Type
Select the Receivables transaction type for use when billing loan fee amounts.
4. Invoice Generation Timing
To indicate when you want Loans to generate bills for all active loans, enter the number of days before the installment due date.
Note: When submitting the LNS: Billing program, this system option populates the To Number of Days to Due Date parameter of the billing program.
5. GL Due Date
Enter the number of days after the payment due date to indicate the GL date for Loans transactions.
The GL date is the payment due date plus this number of days.
Original Receivable Adjustment:
1. Activity Name
Select the Receivables activity name for the automatic receivable adjustment created when an existing receivable is converted to a loan. This system option is required
only if your organization creates loans from receivables (loan class is ERS).
The activity name must have the following parameters:
• Activity Type: Adjustment
• GL accounts set up
• Status: Active
Loans recommends that you use the seeded activity name, Loan Conversion, for audit tracking purposes.
Fee Accounting:
1. Enter the default debit accounting flexfield for Fee Receivable. You can enter only one account. All fees automatically generated by Loans use this debit account.
Note: You must clear the cache and bounce the middle tier server whenever you change profile option settings at any level other than User level, or add or change values that appear in Loans pages.