Oracle Assets


* Asset Maintenance - Adjustment, Transfer, Reclass & Revaluation

Oracle Assets simplifies asset management and accounting complexities. It lowers the cost of asset ownership and secures your assets while giving you a global view. Oracle Assets is a member of Oracle’s Asset Lifecycle Management solution, which maximizes the return on your global assets.

Integration within the Oracle E-Business Suite optimizes your asset management processes:

  • Oracle Payables – Automate asset additions as part of the procure-to-pay process to interface depreciable capitalized assets. Push lease payment amounts to Oracle Payables to ensure timely payments of your leased assets.
  • Oracle Projects – Track construction-in-process project costs and capitalize them via integration with Oracle Projects. When retiring costly equipment and properties, track retirement project costs in Oracle Projects and transfer them into Oracle Assets for capital gains and loss calculations.
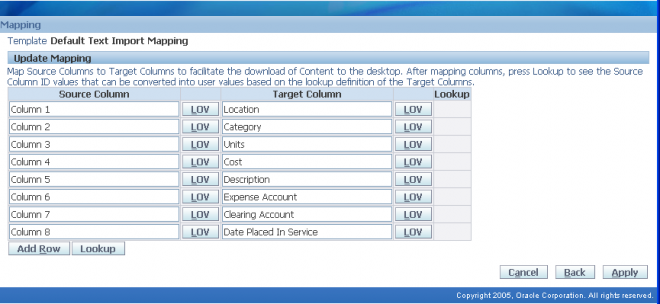
  • Oracle Application Desktop Integrator – Create assets and import physical inventory from spreadsheets.
Oracle Assets Workbenches
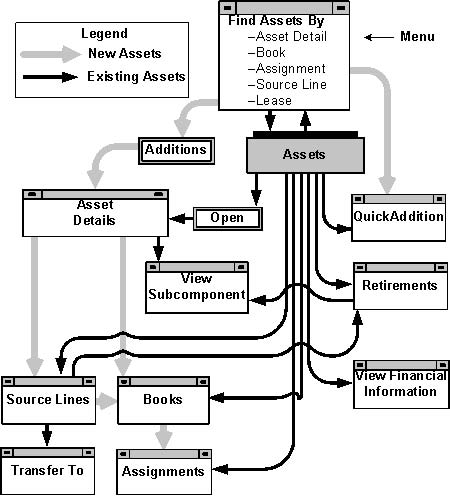
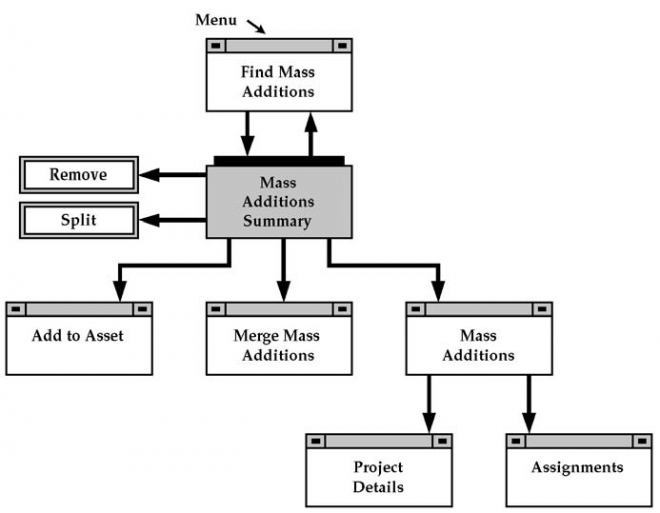
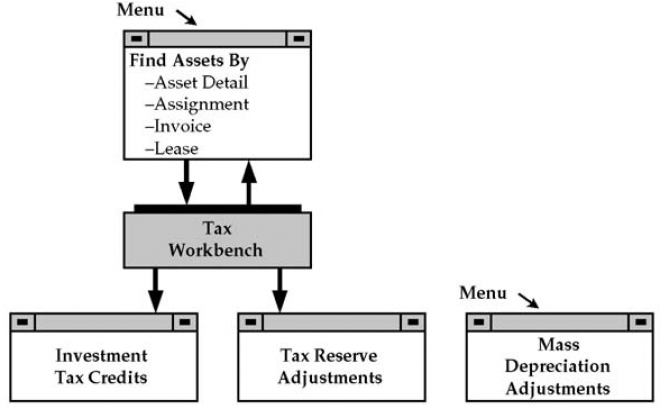
You can perform most of your transactions in Oracle Assets using just three windows: the Assets Workbench, Mass Additions Workbench, and Tax Workbench.
Assets Workbench
Use the Assets Workbench windows to add new assets to the system, and to perform transactions, such as retirements, adjustments, source line adjustments, and transfers. You can also review asset detail, financial, and assignment information using this workbench. The Assets Workbench graphic is a graphical representation of the windows in the Assets Workbench and their relationship to each other
 

Mass Additions Workbench

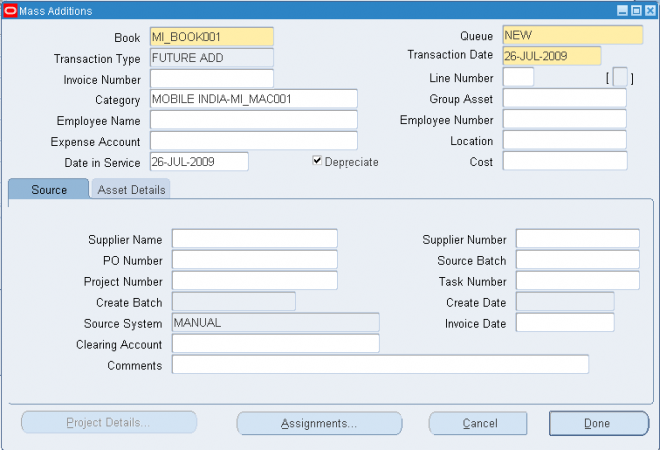
Use the Mass Additions workbench windows to review, merge, split, and remove mass additions. The Mass Additions Workbench graphic is a graphical representation of the windows in the Mass Additions Workbench and their relationship to
each other.
 
Tax Workbench
Use the Tax Workbench to assign investment tax credits and to perform reserve adjustments.
The Tax Workbench graphic is a graphical representation of the windows in the Tax Workbench and their relationship to each other.

1. Asset Setup Information

1.1. Asset Number
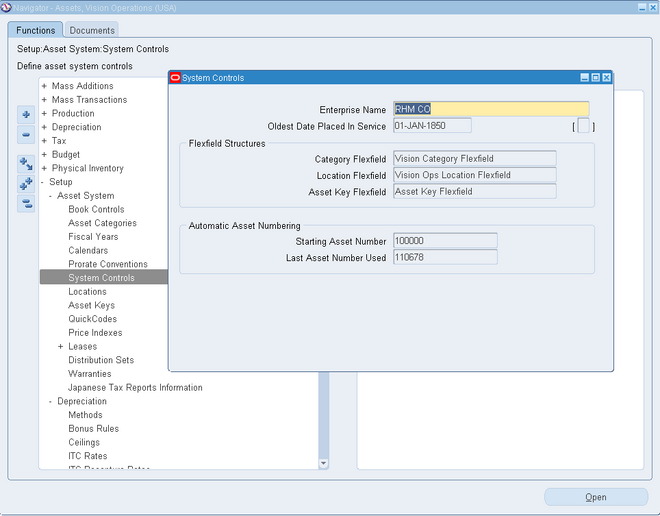
An asset number uniquely identifies each asset. When you add an asset, you can enter the asset number, or leave the field blank to use automatic asset numbering. If you enter an asset number, it must be unique and not in the range of numbers reserved for automatic asset numbering. You can enter any number that is less than the number in the Starting Asset Number field in the System Controls window, or you can enter any non–numeric value.You can enter any number that is less than the number in the Starting Asset Number field in the System Controls window, or you can enter any non-numeric value.

1.2 Description
Use list of values to choose a standard description you defined in the QuickCodes window, or enter your own.

1.3 Tag Number
If you enter a tag number, it must be unique. A tag number uniquely identifies each asset. For example, use the tag number to track asset barcodes, if you use them.

2.1 Category
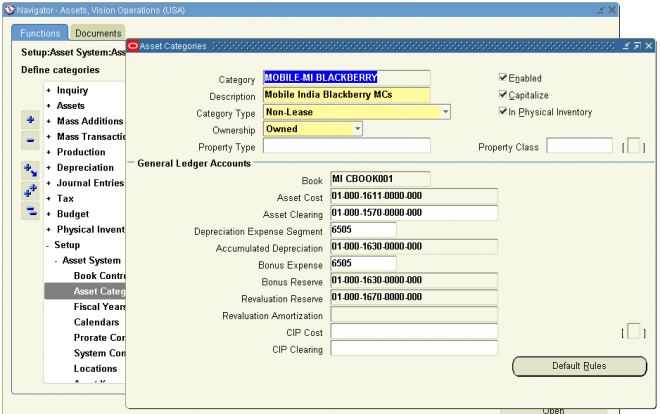
Oracle Assets defaults depreciation rules based on the category, book, and date placed in service. All assets in a category share the same asset cost accounts and depreciation accounts for each depreciation book.

Descriptive flexfields allow you to collect and store additional information about your assets. For each asset category, you can set up a descriptive flexfield to prompt you for additional information based on the asset category you enter. For example, you might want to track the license number for automobiles, but the square footage for buildings. When you specify a category for a new asset, you can enter your information in a descriptive flexfield.

2.2 Asset Key
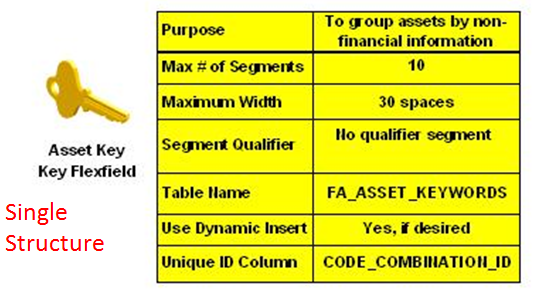
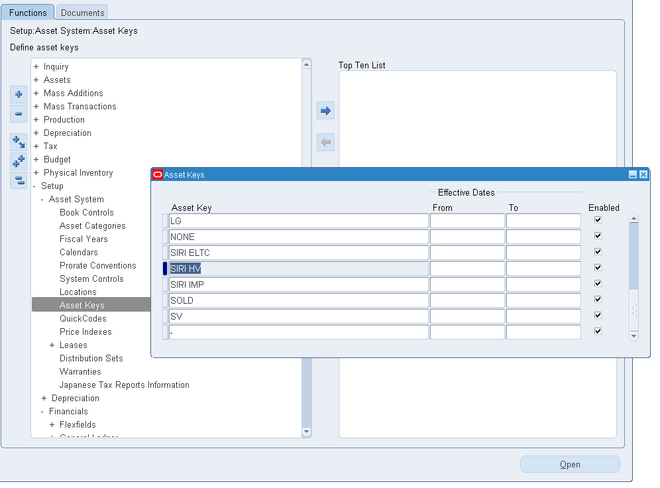
The asset key allows you to group assets or identify groups of assets quickly. It does not have financial impact; rather it can be used to track a group of assets in a different way than the asset category. For example, use an asset key to group assets by project.

2.3 Asset Type
Valid asset types are:

  1. Capitalized: Assets included on the company balance sheet. Capitalized assets usually depreciate. Charged to an asset cost clearing account.
  2. CIP (Construction–In–Process): Unfinished assets being built, not yet in use and not yet depreciating. Once you capitalize a CIP asset, Oracle Assets begins depreciating it. Charged to a construction–in–process clearing account.
  3. Expensed: Items that do NOT depreciate; the entire cost is charged in a single period to an expense account. Oracle Assets tracks expensed items, but does not create journal entries for them. Oracle Assets does not depreciate expensed assets, even if the Depreciate check box in the Books and Mass Additions Prepare windows is checked for that asset.
  4. Group: A group asset is a collection of member assets. You can add member assets to a group asset, transfer assets out, or between groups assets. Group asset cost is the sum of all the associated member assets costs. A group may contain many individual assets that were placed into service in different years, but share one depreciation account maintained for the group.  Group asset depreciation, known as group depreciation, is computed and stored at the group level.

3.1 Units
The number of units represents the number of components included as part of an asset. Use units to group together identical assets. For example, you might add an asset that is composed of ten separate but identical chairs. If you are adding an asset, accept the default value of one, or enter a different number of units.

3.2 Parent Asset
You can separately track and manage detachable asset components, while still automatically grouping them to their parent asset. For example, a monitor can be tracked as a subcomponent of its parent asset, a computer. You can specify a rule in the Asset Categories window by which Oracle Assets defaults the life for a subcomponent asset based on the category and the parent asset life.

Enter the parent asset to which your asset belongs if you are adding a subcomponent asset. The parent asset must be in the same corporate book. If you are adding a leasehold improvement, enter the asset number of the leased asset. To properly default the subcomponent life, add the parent asset before the subcomponent. You must set up the depreciation method for the subcomponent asset life before you can use the method for that life. If your subcomponent asset uses a depreciation method of type Calculated, Oracle Assets sets up the depreciation method for you. If the depreciation method is not Calculated and if it is not already set up for the subcomponent life rule default, Oracle Assets uses the asset category default life.

Oracle Assets does not automatically perform the same transaction on a subcomponent asset when you perform it on the parent asset. Use the Parent Asset Transactions Report to review the transactions that you have performed on parent assets during a period.

3.2 Warranty Number

You can set up and track manufacturer and supplier warranties online. Each warranty has a unique warranty number. Use the list of values or enter a previously defined warranty number to assign the asset to the coinciding warranty.

3.3 Lease Number
You can enter lease information only for an asset assigned to an asset category in which the Ownership field is set to Leased. You must define the lessor as a valid supplier in the Suppliers window, and define leases in the Lease Details window, before you can attach a lease to an asset you are adding in the Asset Details window.
If you are entering a leasehold improvement and you completed the Parent Asset field in the Asset Details window, Oracle Assets displays the related lease information from the parent asset. You cannot provide separate lease information for the leasehold improvement.

4.1 Ownership
You can track Owned and Leased assets. Choosing the value Leased from the Ownership list does not automatically allow you to enter lease information. You can enter lease information only if you assign the asset to a leased asset category.
If the lease has a Transfer of Ownership option, you can change the value of the Ownership field from Leased to Owned, even when the lease is attached to an asset. Changing the ownership of the lease does not affect the lease or any other financial attributes of the asset.

4.2 Bought

Enter as the asset is bought to the organization : Used or New

4.3 In Use
The In Use check box is for your reference only. It indicates whether the asset is in use. For example, a computer in storage still depreciates because it becomes obsolete over time whether or not it is in use. Use this check box to track that it is not in use.

4.4 In Physical Inventory
When you check the In Physical Inventory check box, it indicates that this asset will be included when you run the Physical Inventory comparison. When you set up categories, you define whether assets in a particular category should be included in physical inventory. You can use the In Physical Inventory check box in the Asset Details window to override the default.
 

Depreciation Rules (Books)


1. Book

An asset can belong to any number of depreciation books, but must belong to only one corporate depreciation book. You must assign a new asset to a corporate depreciation book before you can assign it to any tax books. You can only assign the asset to a book for which you defined the asset category.
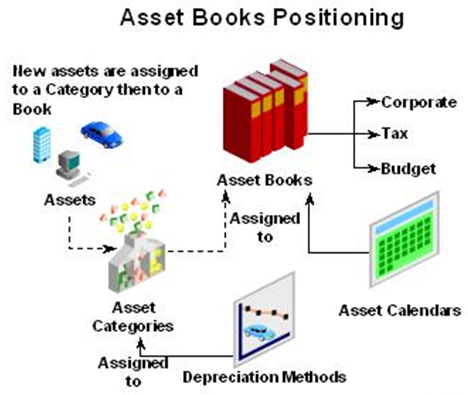
Oracle Assets defaults financial information from the asset category, book, and date placed in service. Each book can have independent accounts, an independent calendar, and independent depreciation rules. You can specify for which ledger a depreciation book creates journal entries.

The asset can also have different financial information in each book. For example, you can make the asset cost in your tax book different from the cost in your financial reporting book. The depreciation books are independent, so you can run depreciation for each book on a different schedule.

You can change financial and depreciation information for an asset in a book. You can choose whether to amortize or expense the adjustment.
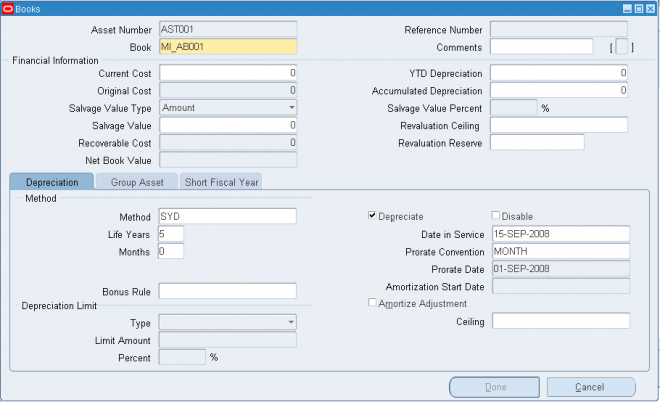
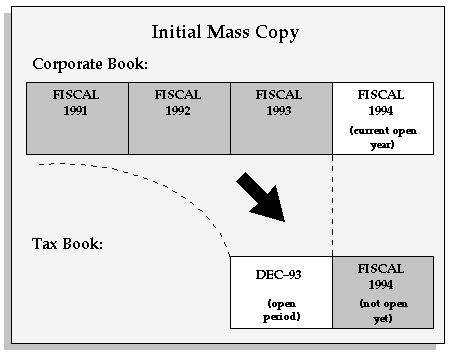
You can add an asset to a tax book using the Books window. To copy a group of assets to a tax book, use Mass Copy.


2.1 Current Cost
The current cost can be positive, zero, or negative. Oracle Assets defaults a cost of zero for construction-in-process (CIP) assets and you cannot change it. Oracle Assets automatically updates the cost to the sum of the invoice line costs after you add invoice lines to a CIP asset using the Mass Additions process. You can also change the cost of a CIP asset manually by entering non-invoiced items or transferring invoice lines between assets in the Source Lines window.

If this is a capitalized leased asset, and you previously calculated the cost to capitalize for the lease in the Lease Payments window and you have not override the result of the capitalization test, Oracle Assets automatically enters the Cost to Capitalize amount in the Current Cost field, and you can change it.

2.2 Original Cost
Oracle Assets displays the original cost of the asset and updates it if you make a cost adjustment in the period you added the asset. After the first period, Oracle Assets does not update the original cost.

2.3 Salvage Value
  • The salvage value(The estimated value of an asset at the end of its useful life.) cannot exceed the asset cost, and you cannot enter a salvage value for credit (negative cost) assets.
  • You can specify a salvage value as a percentage of an asset's acquisition cost or as an amount.
  • The percentage salvage value will be defaulted from the category default rules if you have defaulted the salvage value percentage at the category level in the Asset Categories window. The salvage value is calculated by multiplying the acquisition cost by the default salvage value percentage.
  • If you specify the salvage value as an amount, you simply enter the amount.
  • You can also select Sum of Member Assets if you are using the Group Depreciation feature.
  • You can perform salvage value adjustments if necessary.
  • You also can override the default salvage value when adding an asset during the Detail Additions process.
2.4 Recoverable Cost
The recoverable cost is the portion of the current cost that can be depreciated. It is the current cost less the salvage value less the Investment Tax Credit basis reduction amount. If you specify a depreciation cost ceiling, and if the recoverable cost is greater than that ceiling, Oracle Assets uses the cost ceiling instead.
Recoverable Cost = Current cost - salvage value

2.5 Accumulated Depreciation
You normally enter zero accumulated depreciation for new capitalized assets. If you are adding an asset that you have already depreciated, you can enter the accumulated depreciation as of the last depreciation run date for this book, or let Oracle Assets calculate it for you. If you enter a value other than zero, Oracle Assets uses that amount as the accumulated depreciation as of the last depreciation run date. If you have bonus reserve, the amount should be added to the accumulated depreciation and is no long tracked as bonus reserve.

2.6 Net Book Value
The net book value is defined as:
Net Book Value = Current Cost - Total Reserve (Accumulated Depreciation + Bonus Reserve)

2.7 Revaluation Reserve
If you are adding an asset, enter the revaluation reserve, if any. You cannot update the revaluation reserve after the period you added the asset. After that, Oracle Assets updates the revaluation reserve when you perform revaluations.
Revaluation Reserve = Existing Revaluation Reserve + Change in Net Book Value due to current revaluation

Note:

1. You can only enter revaluation amounts if you allow revaluation in the Book Controls window.
2. Revaluation reserves (or, more precisely, revaluation surplus reserves) arise when the value of an asset becomes greater than the value at which it was previously carried on the balance sheet, increasing shareholders funds .for example,if a building was valued at £900,000 in 2007,and its net book value at that date was only £700,000,the difference of £200,000 is revaluation reserve.if the net book value would have been £950,000, there would be a revaluation deficit of £50,000.

2.8 Revaluation Ceiling
If you try to revalue the asset cost above the ceiling, Oracle Assets uses the revaluation ceiling instead.
Note: You can only enter revaluation amounts if you allow revaluation in the Book Controls window.

3.1 Method

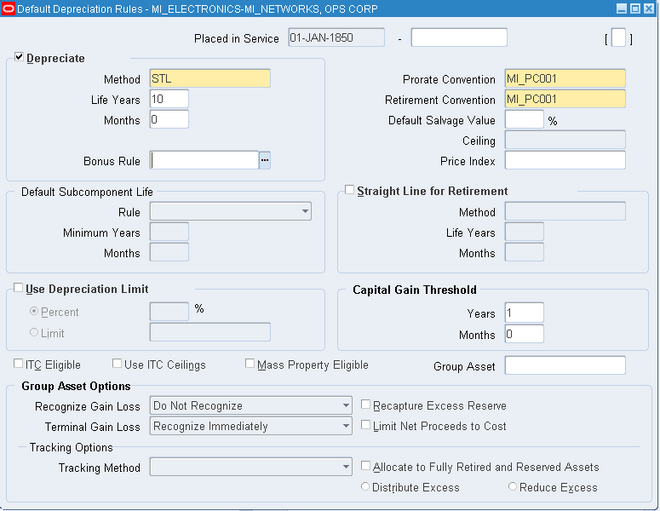
The depreciation method you choose determines the way in which Oracle Assets spreads the cost of the asset over the time it is in use. You specify default depreciation rules for a category and book in the Asset Categories window. You can use predefined Calculated, Flat-Rate, Formula, Table or Units of Production type methods, or define your own in the Methods window.
Depending on the type of depreciation method you enter in the Books window, Oracle Assets provides additional fields so you can enter related depreciation information.

3.2 Limit Amount
Limit the annual depreciation expense that Oracle Assets calculates for an asset. You can enter a depreciation limit based on an amount or a percentage of the asset cost.

3.3 Ceiling
Limit the recoverable cost used to calculate annual depreciation expense. You can enter a ceiling only for assets in tax depreciation books. You can enter a depreciation ceiling only for assets in books that allow depreciation ceilings. You enable depreciation ceilings for a book in the Book Controls window.

3.4 Date in Service
If the current date is in the current open period, the default date placed in service is the calendar date you enter the asset. If the calendar date is before the current open period, the default date is the first day of the open period. If the calendar date is after the current open period, the default date is the last day of the open period. Accept this date, or enter a different date placed in service in the current accounting period or any prior period. You cannot enter a date placed in service before the oldest date placed in service you specified in the System Controls window.

You can change the date placed in service at any time. If you change the date placed in service after depreciation has been processed for an asset, Oracle Assets treats it as a financial adjustment, and the accumulated depreciation is recalculated accordingly.

The asset category, book, and date placed in service determine which default depreciation rules Oracle Assets uses. If the asset category you entered is set up formore than one date placed in service range for this book, the date placed in service determines which rules to use.

If you enter a date placed in service in a prior period and zero accumulated depreciation, Oracle Assets automatically calculates catchup depreciation when you run depreciation, and expenses the catchup depreciation in the current period.

The date placed in service for CIP assets is for your reference only. Oracle Assets automatically updates this field to the date you specify when you capitalize the asset using the Capitalize CIP Assets window.

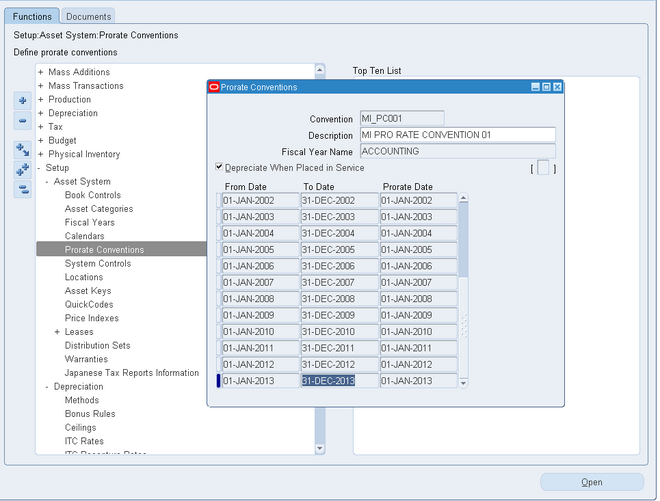
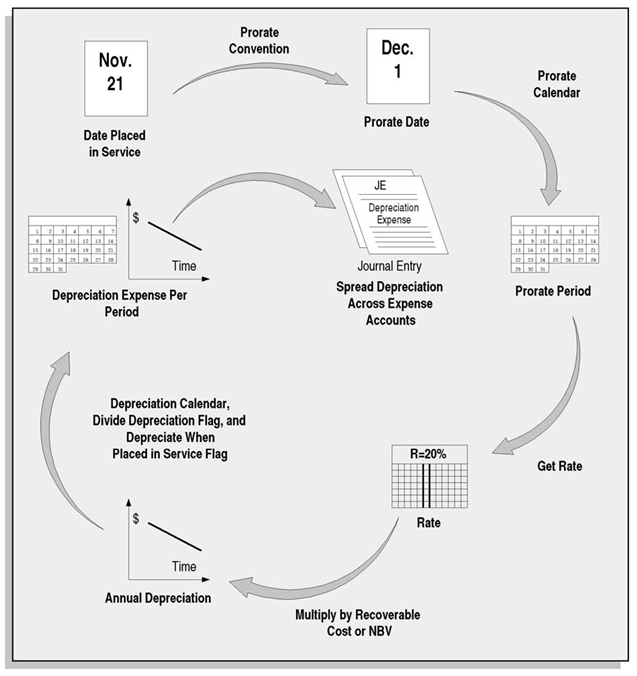
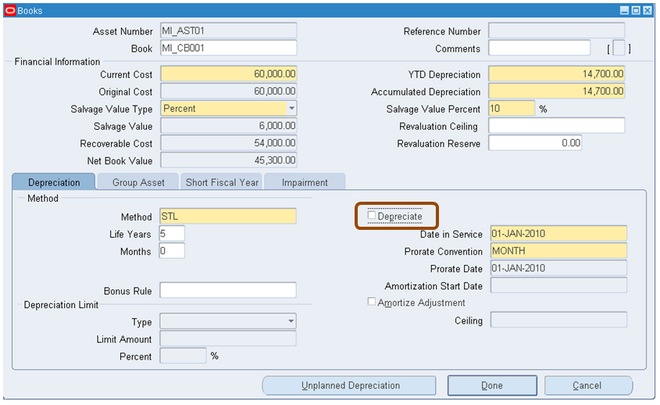
3.5 Prorate Convention and Prorate Date
Oracle Assets uses the prorate convention to determine how much depreciation to take in the first and last years of asset life. Oracle Assets determines the prorate date from the date placed in service and the prorate convention. It uses this date to determine how much depreciation to take during the first and last years of asset life.

3.6 Amortization Start Date
When you choose to amortize an adjustment, Oracle Assets uses the Amortization Start Date to determine the amount of catchup depreciation to take in the current open period. The remaining depreciation is spread over the remaining life of the asset.

The amortization start date defaults according to the rules described for the Date Placed in Service. You can change the default date to another date in the current period or a previous period.
When adding assets with depreciation reserve, you can choose to amortize the net book value over the remaining life of the asset. Oracle Assets uses the Amortization Start Date to spread the remaining recoverable cost over the remaining
useful life of the asset.  This can only be performed in the period of addition.

Notes
: Amortization is the pratice of writtening off the capital  expense especially the expense on intangible assets such as
copyrights, patents, goodwill( that is purchased)etc, over  a particular period of time. It should not be confused with
depreciation as depreciation is with regard to tangible  assets only. However it should be understood that this is a
book entry only & does not involve any cash outflow.It is  mainly done for income tax reduction pratice only.

4.1 Investment Tax Credit
The Investment Tax Credit (ITC) check box displays whether you claimed an ITC on an asset. You cannot claim an Investment Tax Credit on an asset unless it is using a life-based depreciation method. Allow ITC for a tax book in the Book Controls window and the category in the Asset Categories window. Assign ITC to an asset in a tax book in the Investment Tax Credits window.
Note: This field appears only when you are setting up a tax book.

Assignments

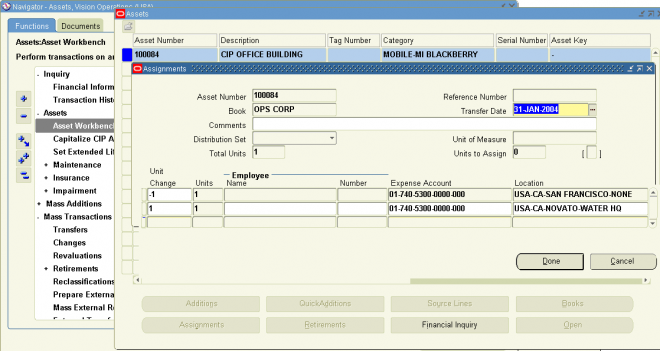
Assign assets to employees, general ledger depreciation expense accounts, and locations. You can share your assets among several assignment lines. You can automatically assign distributions to an asset by choosing a predefined Distribution Set.

You can transfer an asset between employees, expense accounts, and locations. Changing the expense account has a financial impact, since Oracle Assets creates journal entries for depreciation expense to the general ledger using the account. Changing the location or employee information, however, has no financial impact because Oracle Assets uses them solely for property tax and responsibility reporting.When you run a transaction report or create journal entries for a tax book, Oracle Assets uses the current assignment information from the associated corporate book.

The following are some of the fields that appear on the Assignments window:

Transfer Date
You can enter a date in the current or a prior accounting period. You cannot back-date transfers before the start of your current fiscal year, or before the date of the last transaction you performed on the asset. You also cannot enter a date that is after the last day of the current accounting period.
When you back-date a transfer, the depreciation program automatically adjusts the accumulated depreciation and year-to-date depreciation amounts for the affected general ledger accounts.

Distribution Set

You can use the Distribution Set poplist to choose a predefined distribution set for an asset. A distribution set allows you to automatically assign a predefined set of one or more distributions to an asset. When you choose a distribution set,
Oracle Assets automatically enters the distributions for you.

Show Merged Distributions (Mass Additions only)
The Show Merged Distributions check box appears in the Assignments window for a mass addition line only. You can only view the distribution for a merged parent or a merged child one at a time, unless you check the Show Merged Distributions check box.

Total Units
Oracle Assets displays the total of the number of units for the asset.

Units to Assign
Oracle Assets displays the number of units you must assign. For a two-sided transfer, the Units to Assign starts at zero. For one-sided transfers (additions, partial unit retirements, and unit adjustments) the Units to Assign starts at the number of units added, retired, or adjusted. The Units to Assign value automatically updates to reflect the assignment you enter or update. It must be equal to zero before you can save your work.

Unit Change
The Units field displays the number of units assigned to that assignment. You can transfer units between existing assignment lines or to a new assignment line. You can enter whole or fractional units. The number of units that you enter tells the depreciation program what fraction of depreciation expense to charge to that account.

You can transfer units out of only one assignment line in a single transaction, but you can transfer units into as many lines as you want. To transfer units out of a assignment, enter a negative number. To transfer units into a assignment, on a new line, enter a positive number.

Employee

Assign assets to the owner or person responsible for that asset. You must enter a valid, current employee number and name that you created in the Enter Person window.

Expense Account Assign assets to depreciation expense accounts.
Oracle Assets charges depreciation expense to the asset using the expense account and runs Responsibility Reports using the cost center information.

Location
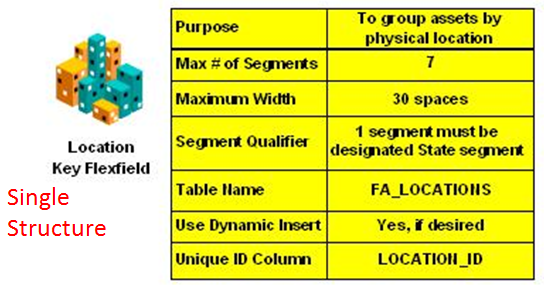
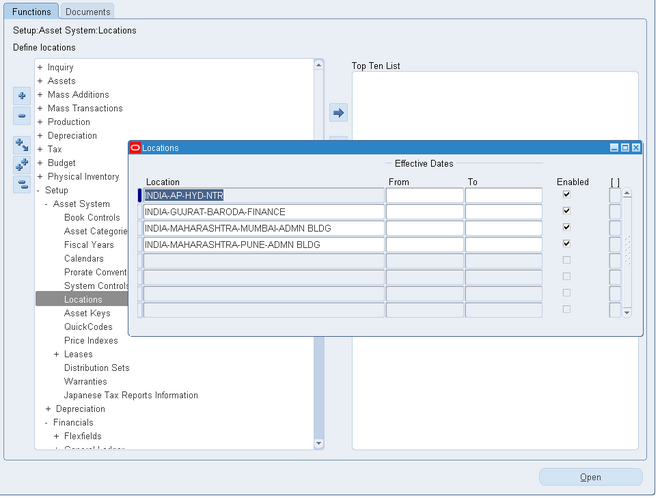
Enter the physical location of the asset. Oracle Assets uses location information for Property Tax reports.

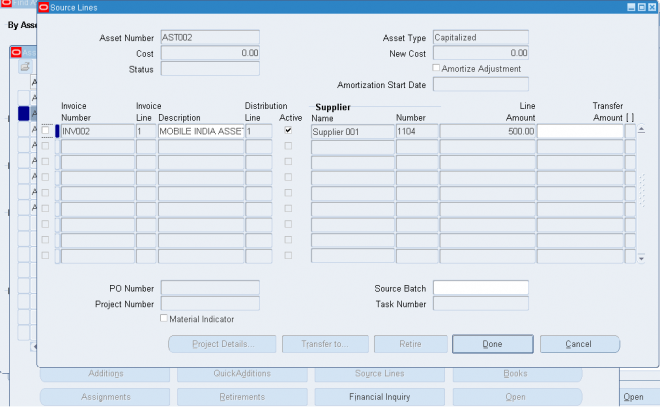
Source Lines

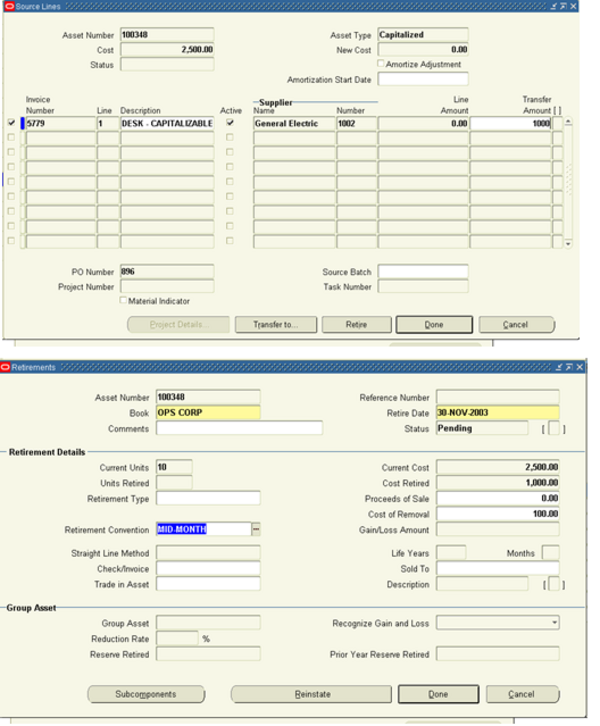
You can track information about where assets came from, including sources such as invoice lines from your accounts payable system and capital assets from Oracle Projects.
Each source line that came from another system through Mass Additions may include the following information:

  • Cost
  • Invoice Number
  • Line
  • Description
  • Supplier
  • Purchase Order Number
  • Source Batch
  • Project Number
  • Task Number
You change invoice information for a line using the Source Lines window only if you manually added the source line. For example, you can manually add a line, adjust the cost of an existing line, or delete a line for a CIP asset. You also can transfer lines between assets.

You cannot change invoice information if the line came from another system through Mass Additions.
If the source of the line is Oracle Projects, choose the Project Details button to view detail project information for the line in the Asset Line Details window.

Construction-in-Process (CIP) Assets

A construction-in-process (CIP) asset is an asset you construct over a period of time. You create and maintain your CIP assets as you spend money for raw materials and labor to construct them. Since a CIP asset is not yet in use, it does not depreciate. When you finish building the CIP asset, you can place it in service and begin depreciating it.

You can track CIP assets in Oracle Assets, or you can track detailed information about your CIP assets in Oracle Projects. If you use Oracle Projects to track CIP assets, you do not need to track them in Oracle Assets.Use the Asset Key to Track CIP Projects.The asset key is a set of key identifying information, such as project name and project number, that you define for each CIP asset. Use the asset key to group and track your CIP assets with common key words so you can find them easily for inquiry or transactions.

Acquire and Build CIP Assets
Create CIP assets using Mass Additions or manual additions.
Oracle Assets identifies invoices with distributions to CIP clearing accounts in Oracle Payables, and creates mass additions from them. You can create new CIP assets from your mass additions, or add them to existing assets. You can also add non-invoiced expenses, such as labor cost, to your CIP assets. You can perform transfers or adjustments on your CIP assets if necessary.

Automatically Adding CIP Assets to Tax Books
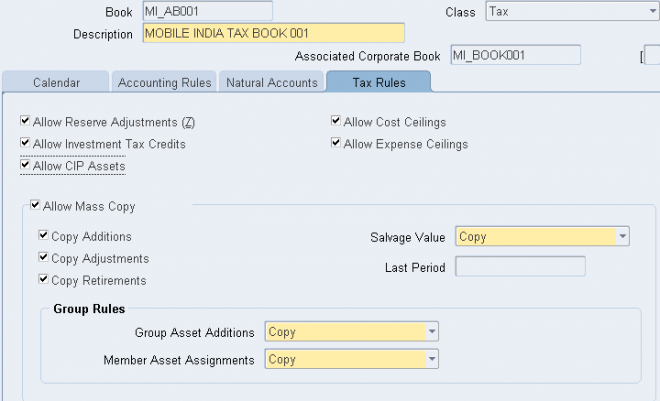
You can can set up Oracle Assets to automatically copy CIP assets to a tax book when a CIP asset is added to the corporate book.

To enable CIP assets to be automatically added to a tax book:
1. Navigate to the Book Controls window.
2. Query the tax book to which you want CIP assets copied.
3. Choose Accounting Rules from the poplist in the Book Controls window.
4. In the Tax Rules region, check the Allow CIP Assets check box.
5. Save your work.

Conditions When CIP Assets are Copied to Tax Books
After you set up Oracle Assets to automatically add CIP assets to your tax book, all CIP assets you add to your corporate book will automatically be added to your tax book at the same time. When you capitalize these CIP assets in your corporate book, the same assets will automatically be capitalized in your tax book, even if the corporate and tax books are in different accounting periods.
Important: If your corporate and tax books' accounting periods are not in the same fiscal year, and you add and capitalize a CIP asset in the corporate book, the same CIP asset may be added and capitalized in a different fiscal year in the tax book.

If you checked Allow CIP Assets and later you uncheck it, you may have CIP assets that were automatically added to the tax book while Allow CIP Assets was checked. Although Allow CIP Assets is no longer checked, those CIP assets in the tax book will be automatically capitalized when the same assets are capitalized in the corporate book.

Performing Transactions on CIP Assets
Although CIP assets can now appear in your tax books, you cannot perform any transactions directly to CIP assets in tax books. You can only perform transactions on CIP assets in your corporate book, and these transactions will automatically be replicated to the tax book.
Note: You cannot view CIP assets in tax books from the Asset Workbench. You can view this information in the View Financial Information window.

Place Finished Assets in Service
You capitalize CIP assets when you are ready to place them in service. You can capitalize or reverse capitalize a single asset or a group of assets.
When you capitalize an asset, Oracle Assets changes the asset type from CIP to Capitalized, changes the date placed in service to the date you enter, sets the cost to the sum of all source lines for the asset, and re-defaults the depreciation rules from the asset category. Oracle Assets creates an Addition transaction for an asset you added in a prior period or changes the CIP Addition transaction to an Addition for an asset you added in the current period.

When you reverse a capitalization, Oracle Assets changes the asset type from Capitalized back to CIP and leaves the date placed in service unchanged. It changes the Addition transaction to an Addition/Void for an asset you added in a prior period or changes the Addition transaction to a CIP Addition for an asset you added in the current period. It also creates a CIP Reverse transaction for assets you capitalized in a prior period.

Asset Setup

This chapter covers the following topics :

2.1. Manual Asset Additions

You can use one of the following processes to enter new assets:

2.1. Manual Asset Additions

  •  Adding an Asset Accepting Defaults (Quick Additions)
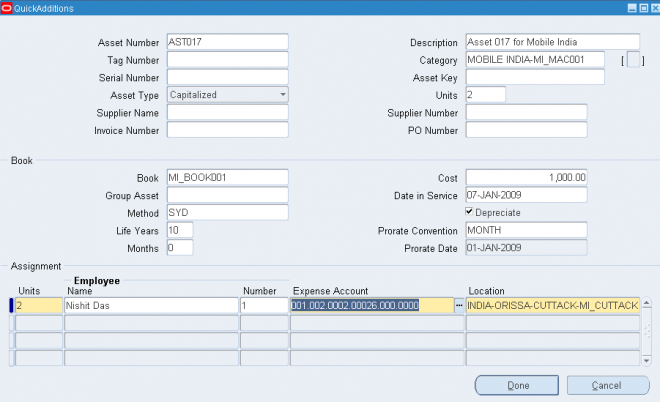
Use the QuickAdditions process to quickly enter ordinary assets when you must enter them manually. You can enter minimal information in the QuickAdditions window, and the remaining asset information defaults from the asset category, book, and the date placed in service.
  •  Adding an Asset Specifying Details (Detail Additions)
Use the Detail Additions process to manuallyadd complex assets which the QuickAdditions process does not handle:
• Assets that have a salvage value
• Assets with more than one assignment
• Assets with more than one source line
• Assets to which the category default depreciation rules do not apply
• Subcomponent assets
• Leased assets and leasehold improvements
  •  Correcting Current Period Addition Errors
2.2.  Overview of the Mass Additions Process
Use the Mass Additions process to add assets automatically from an external source. Create assets from one or more invoice distribution lines in Oracle Payables, CIP asset lines in Oracle Projects, asset information from another assets system, or information from any other feeder system using the interface. You must prepare the mass additions to become assets before you post them to Oracle Assets.
  •  Auto Prepare Mass Additions Lines
2.3. Adding an Asset Automatically from an External Source (Mass Additions)
  •  About the Mass Additions Interface
2.4. Creating Asset Additions Using Web ADI

Quick Asset Additions

To add an asset quickly accepting default information:
1. Choose Assets > Asset Workbench from the Navigator window.
2. Choose QuickAdditions from the Find Assets window.
3. Enter a Description of the asset.
4. Enter the asset Category.
5. Select the Asset Type of the asset.
6. Assign your asset to a corporate depreciation Book.
7. Enter the current Cost.
8. Optionally update the Date Placed In Service.
9. If you are entering a member asset, enter the number of the associated group asset
in the Group Asset field. See: Assigning Member Assets to a Group Asset,
10. Update the depreciation method and prorate convention, if necessary. The depreciation method and prorate convention are defaulted from the category default rules. However, you can update them here.
11. Assign the asset to an Employee Name (optional), a general ledger depreciation Expense Account, and a Location.
12. Save your work.
Note: When you create a new member asset and add it to a group asset as a prior period addition, Oracle Assets automatically submits the Process Group Adjustments concurrent program to calculate the prior period depreciation expense for the group asset. You must acknowledge the message containing the request number of the program submission.

Detail Asset Additions

Use the Detail Additions process to manually add complex assets that the QuickAdditions process does not handle.
Override default depreciation rules if necessary.


To add an asset specifying detail information:
1. Choose Assets > Asset Workbench from the Navigator window.
2. Choose Additions.
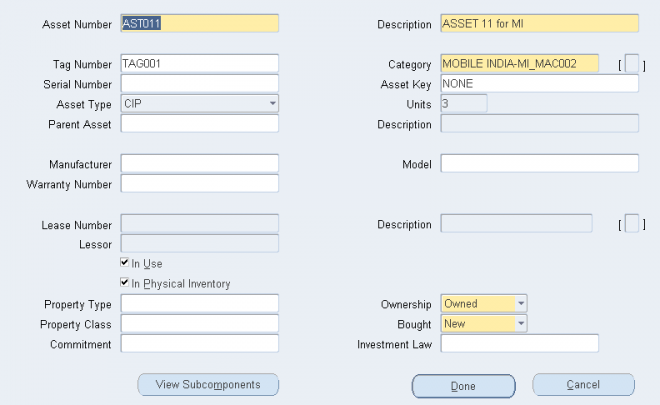
3. In the Asset Details window, enter a Description of the asset.
4. Enter the asset Category.
5. Select the Asset Type of the asset. For a description of the assets types.
6. Enter the number of Units.
7. If you are adding a subcomponent asset, enter the Parent Asset number. If you are adding a leasehold improvement, enter the leased asset number.
8. Optionally enter the Manufacturer and Model of your asset.
9. Enter the Warranty Number if you want to assign a pre-defined warranty to an asset.
10. Use the list of values to choose a lease number if you are adding a leased asset in a leased asset category.
11. Choose whether to include the asset in physical inventory comparisons. By default, the In Physical Inventory check box is set according to the asset category you specified, but you can override that value here.
12. Enter additional information, such as Property Type and Class, and whether the asset is Owned or Leased and New or Used.
13. Optionally choose Source Lines to enter purchasing information such as the Supplier Name and Purchase Order Number for the asset.
14. Choose Continue to continue adding your asset.
Note: The Detail Additions process requires you to provide descriptive, financial, and assignment information in the Asset
Details, Books, and Assignments windows.

Add an Individual Asset to Your Tax Book
To add an asset to a tax book:
1. Choose Assets:Asset Workbench from the Navigator window.
2. Find the asset you want to add to a tax book.
3. Choose the Books button.
4. Enter the tax Book to which you want to assign the asset and tab to the Current Cost field.
Oracle Assets automatically copies the date placed in service from the corporate book; however, if the date placed in service in the corporate book falls in a future period in the tax book, Oracle Assets defaults the date placed in service for the asset
in the tax book to the last day of the current tax period.
5. You can change the financial information defaulted from the corporate book, such as cost, date placed in service, depreciation method, life, rate, prorate convention, ceiling, and bonus rule.
6. Save your work.

Correcting Current Period Addition Errors

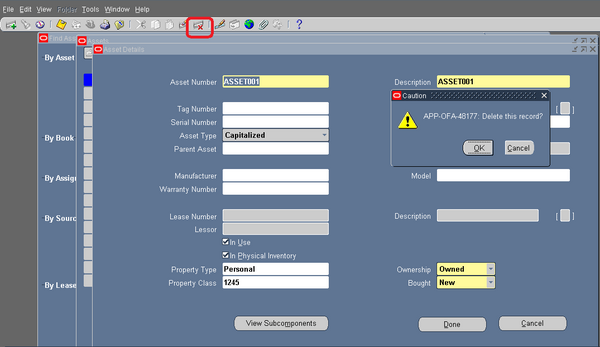
If you incorrectly added an asset, you can delete it from the system. You can only delete assets added in the current period.


To delete an asset you added in the current period:
1. Choose Assets > Asset Workbench from the Navigator window.
2. Find the asset you want to delete.
Note: For best performance, query by asset number or tag number since they are unique values.
3. Choose Open.
4. From the menu, select Edit, Delete Record.
5. Save your change to delete the asset from the system.
To change descriptive, financial, or assignment information for an asset you added in the current period:
• Correct any information for an asset added in the current period in any of the following windows: Asset Details, Source Lines, Books, and Assignments.

2.2. Overview of the Mass Additions Process

The mass additions process lets you add new assets or cost adjustments from other systems to your system automatically without reentering the data. For example, you can add new assets from invoice lines brought over to Oracle Assets from Oracle Payables, or from CIP asset lines sent from Oracle Projects. The steps in the mass additions process are described below:

Steps in the Mass Addition Process
1. Create - Enter invoices in Oracle Payables, or source information in any other feeder system. Run Create Mass Additions for Oracle Assets in Oracle Payables, the Interface Assets process in Oracle Projects, or use the interface to convert data from other systems.

2. Review - Review mass additions to become assets. Add mass addition lines to existing assets. Split, merge, or adjust mass additions.

3. Post - Post your mass additions to Oracle Assets.

4. Clean up - Delete unnecessary and posted mass additions. Purge deleted mass addition lines from Oracle Assets.

Mass Addition Queues
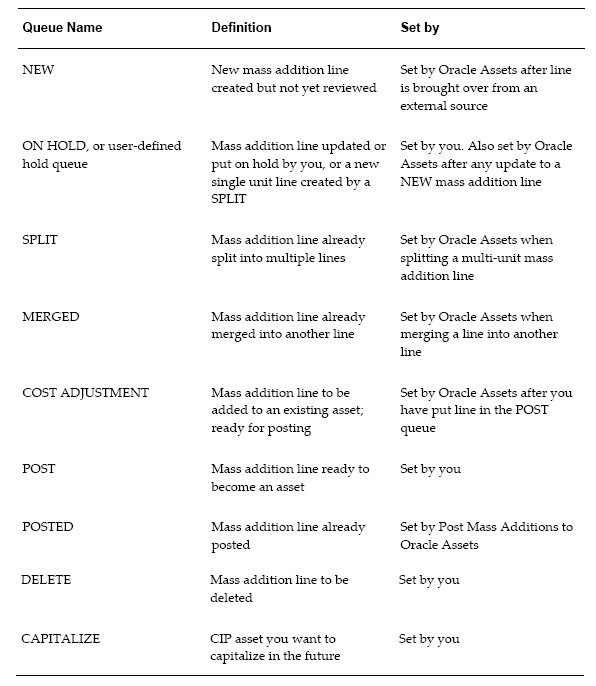
Each mass addition belongs to a queue that describes its status, and the queue name changes according to the transactions you perform on the mass addition. You can define your own mass additions hold queues in the QuickCodes window. The following table describes each Oracle Assets mass addition queue name:


Check the attached document for step by step process of Perform Asset Mass Addition.doc

Review Mass Additions

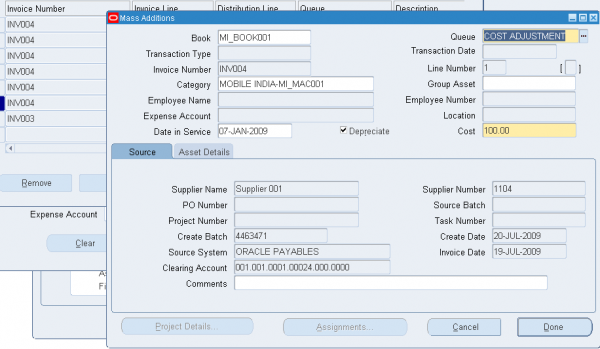
Review newly created mass addition lines before posting them to Oracle Assets. Enter additional mass addition source, descriptive, and depreciation information in the Mass Additions window. Assign the mass addition to one or more distributions, or change existing distributions, in the Assignments window. If the mass addition is not an asset,
or if it was created in error, you can delete it.

Once you have verified that the mass addition is ready to become an asset, change the queue to POST. The next time you Post Mass Additions to Oracle Assets this mass addition becomes an asset. The Mass Additions post program defaults depreciation rules from the asset category, book, and date placed in service. You can override the depreciation rules in the Books window if necessary.

Add to Existing Asset
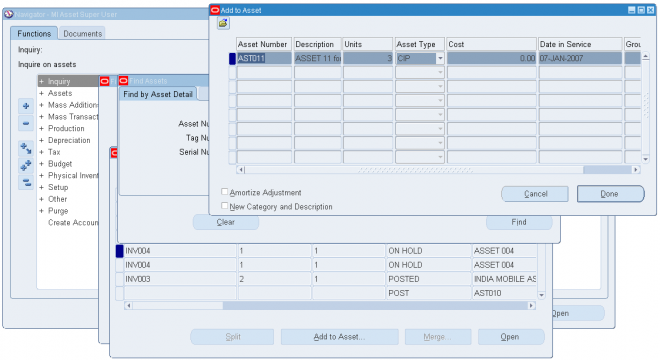
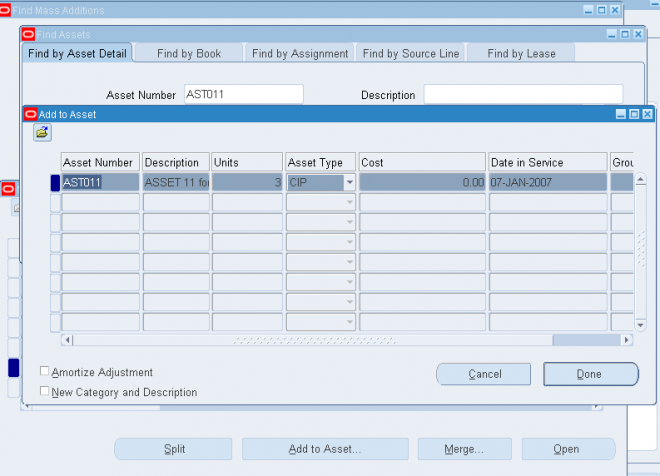
You can add a mass addition line to an existing asset as a cost adjustment. These mass additions lines can include future assets that have not yet been capitalized. Choose whether to change the category and description of the existing asset to those of the mass addition. Oracle Assets reclassifies the destination asset to the category and updates its description to that of the mass addition when you Post Mass Additions to Oracle Assets. Also choose whether to amortize or expense the cost adjustment.


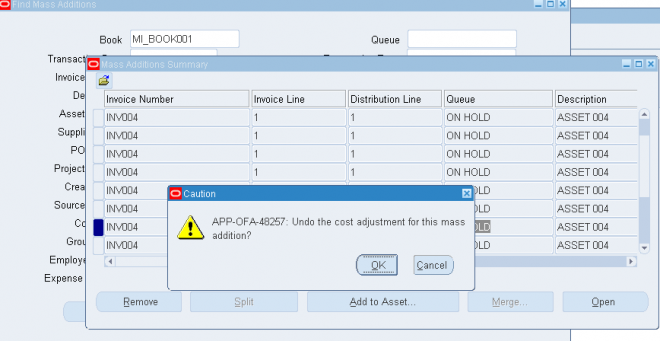
When you change the queue name to POST for a mass addition line you are adding to an existing asset, Oracle Assets automatically changes the queue name to COST ADJUSTMENT. This makes it easy to differentiate between adding a new asset or adjusting an existing asset. (In mass addition summary window the line 'll still remain as in HOLD)


Ccost line adjustment can be remobed from mass addition summary after adding a to an existing asset if it is not posted.

Merge Mass Additions

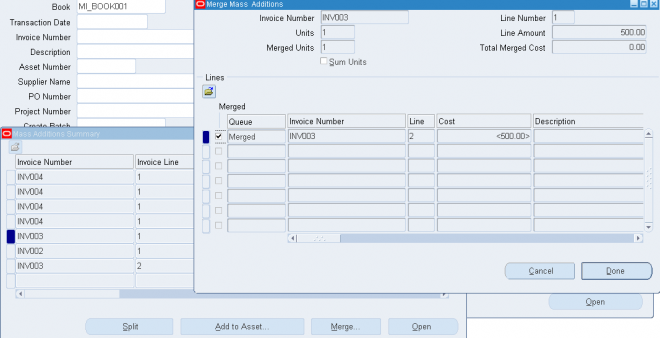
You can merge separate mass addition lines into a single mass addition line with a single cost. The mass addition line becomes a single asset when you Post Mass Additions to Oracle Assets.
For example, merge tax lines into the main invoice line distribution to maintain proper asset descriptions; merge a discount line with its appropriate mass addition line; or combine individual mass additions from different invoices into a single line and amount.


You can only merge mass additions in the NEW, ON HOLD, or user-defined hold queues. Choose whether to sum the number of units. As an audit trail after the merge, the original cost of the invoice line distribution remains on the line. The cost of the parent line will not be altered as a result of the merge and will remain the same. You can view the merged lines and the total merged cost in the Merge submenu. When you post the merged line, the asset cost is the total merged cost.
If you undo a merge, the mass addition lines appear as they did before the merge.

Important: You cannot merge split mass addition lines. For example, if you split a mass addition line with 5 units into five separate mass additions, you cannot merge two of the new lines together. You can, however, post one of the lines to create a new asset, and then add the second mass addition line to the existing asset as a cost adjustment.

ExampleFor example, you are asked to merge the mass additions line for invoice #220 into the line for invoice #100. Prior to the merge, both have a queue name of NEW. Details for the two lines are as follows:
Invoice #100, Line 1, $5000, 2 units, Queue = NEW, Description = Personal Computer
Invoice #220, Line 2, $67, 1 unit, Queue = NEW, Description = Tax on PC

After the merge, the line for invoice #100 has a queue name of ON HOLD and can become an asset. The line for invoice #220 has a queue name of MERGED and cannot become an asset. Details for the two lines are as follows:

• Invoice #100, Line 1, $5000, 2 units, Queue = ON HOLD, Description = Personal Computer
• Invoice #220, Line 2, $67, 1 unit, Queue = MERGED, Description = Tax on PC The following graphic illustrates the example:

Split Mass Additions

You can split a mass addition line with multiple units into several single unit lines. You can split a previously merged mass addition line.
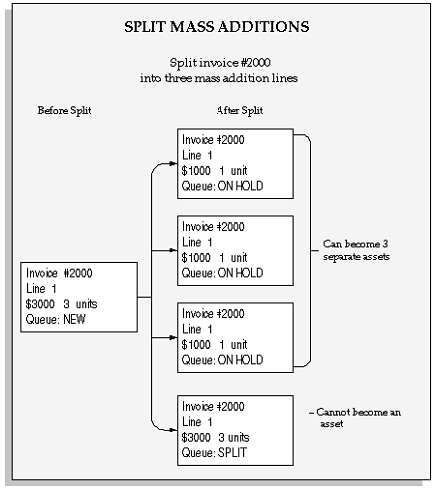
If you split a mass addition, the original line is put in the SPLIT queue as an audit trail of the split. The resulting split mass additions appear with one unit each, and with the same existing information from the source system. Each split child is now in the ON HOLD queue. You can review each line to become a separate asset. If you undo a split, Oracle Assets places the original multiple unit mass addition line in the ON HOLD queue and deletes the single unit lines.

Example
For example, you are asked to split a single mass addition line into three new lines.
Prior to the split, the mass addition line has a queue name of NEW. Details for the line are as follows:
• Invoice #2000, Line 1, $3000, 3 units, Queue = NEW
After the split, you have four mass additions lines. The original line now has a queue name of SPLIT and cannot be made into an asset. The three new lines have a queue name of ON HOLD and can become an asset. Details for the mass addition lines are now as follows:
• Invoice #2000, Line 1, $3000, 3 units, Queue = SPLIT
• Invoice #2000, Line 1, $1000, 1 unit, Queue = ON HOLD
The following graphic illustrates the example:

Post Mass Additions to Oracle Assets


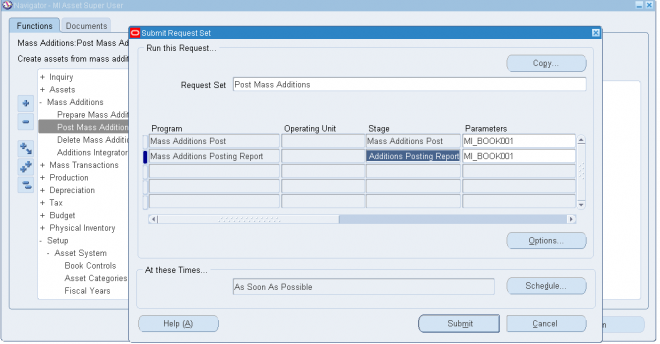
Use the Post Mass Additions to Oracle Assets program to create assets from mass addition lines in the POST queue using the data you entered in the Mass Additions window. It also adds mass additions in the COST ADJUSTMENT queue to existing
assets. You can run this program as often as you want during a period.


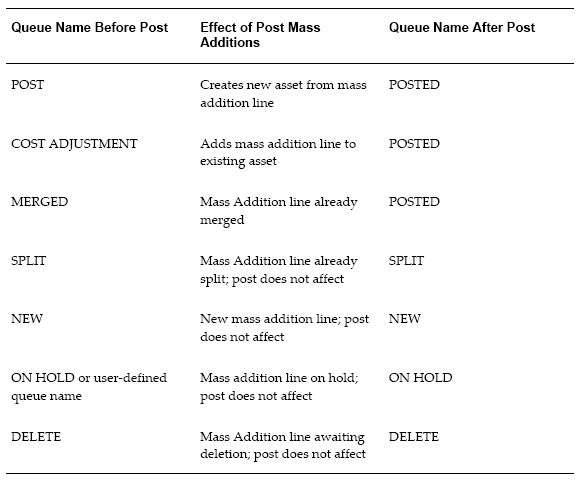
If you post many mass additions, you can set up Oracle Assets to run more than one process in parallel. The following table describes the effect of posting on each Oracle Assets mass addition queue name.


Clean Up Mass Additions

Delete unwanted mass addition lines


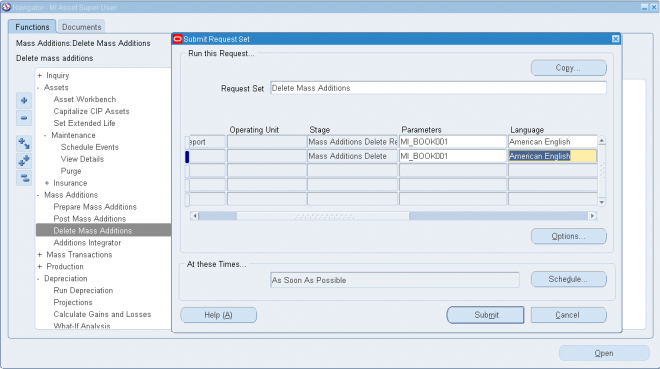
The Delete Mass Additions program removes mass addition lines in the following queues:
  • Mass additions in the SPLIT queue for which you have already posted the child mass addition lines created by the split
  • Mass additions in the POSTED queue that have already become assets
  • Mass additions in the DELETE queue.
Note that Oracle Assets does not create a journal entry to clear the clearing account, since the line does not become an asset Oracle Assets maintains an audit trail by moving lines in the DELETE queue to the interim table FA_DELETED_MASS_ADDITIONS. After you run Delete Mass Additions, these lines no longer appear in the Mass Additions window.

Removing The Audit Trail For Deleted Mass Additions

The Purge Mass Additions from Oracle Assets program removes mass additions from the interim table FA_DELETED_MASS_ADDITIONS. The items in the interim table are the audit trail from the mass addition lines you marked DELETE and removed using Delete Mass Additions. When you purge the interim table, you lose your audit trail. For security, the Purge Mass Additions from Oracle Assets program can only be accessed through the Fixed Assets Administrator standard responsibility.

To purge the audit trail for deleted mass additions:
1. Change Responsibilities to Fixed Assets Administrator.
2. Choose Purge > Mass Additions from the Navigator.
3. Enter the Batch Number of the Create Mass Additions batch associated with the deleted mass additions for which you want to purge the audit trail from Oracle Assets. The create batch number is on the Mass Additions window and the Create
Mass Additions Report.
4. Choose Submit to submit a concurrent process that removes archived lines from the audit trail table for deleted mass additions. When the program completes successfully, Oracle Assets automatically runs the Mass Additions Purge Report, which lists the mass addition lines you purged.
5. Review the log file and report after the request completes.

Create Mass Additions from Invoice Distributions in Payables

Mass Additions lets you add assets and cost adjustments directly into Oracle Assets from invoice information in Payables. The Create Mass Additions for Oracle Assets process sends valid invoice line distributions and associated discounts from Payables to an interface table in Oracle Assets. Then you review them in Oracle Assets and determine whether to create assets from the lines.

Register your Accounts
Account Type Must Be Asset
You must register the clearing accounts you want to use as Asset accounts in the Segment Values window. The create mass additions process selects Payables invoice line distributions charged to clearing accounts with the type of Asset.

Define Valid Clearing Accounts in Oracle Assets
For each asset category in Oracle Assets for which you want to import invoice line distributions from Payables, define valid asset clearing and construction-in-process clearing accounts. These accounts must be of type Asset. The create mass additions process only imports lines charged to accounts that are already set up in your asset categories.

Using Multiple Ledgers
Payables must be tied to the same ledger as the corporate book for which you want to create mass additions in Oracle Assets. If you use the multiple organization feature and have multiple corporate books in Oracle Assets, ensure that you create mass additions for the correct Oracle Assets corporate book. You cannot create mass additions for tax books.

Define Items with Asset Categories
You can define a default asset category for an item in Purchasing or Inventory. Then when you purchase and pay for one of these items using Purchasing and Payables, the mass additions process defaults this asset category. This is the only time Oracle Assets defaults an asset category for a new mass addition line.

If you want mass addition lines for an item to appear in Oracle Assets with an asset category, you must:

  • Define a default asset category for an item in the Item window in Purchasing or Inventory
  • Create a purchase order for that item
  • Receive the item in either Purchasing or Inventory
  • Enter an invoice in Payables and match it to the outstanding purchase order
  • Approve the invoice
  • Post the invoice to General Ledger
After you run create mass additions, the mass addition line appears with the asset category you specified for the item.

Enter Invoices in Payables
When you enter a new invoice in Payables, if you want the invoice line to be imported to Oracle Assets, you must charge the distribution to a clearing account that is already assigned to an asset category. The line amount can be either positive or negative.

Invoice Description Field
Any additional information you enter in the Description field in the Invoices Summary window in Payables appears in the Description field in the Mass Additions window in Oracle Assets.
Discount line distributions brought over to Oracle Assets automatically have a description of DISCOUNT.

Units
If you enter a purchase order in Purchasing with multiple units and match it completely to an invoice in Payables, the Create Mass Additions process uses the number of units specified by the original purchase order for the mass addition line. Mass addition lines created from invoices entered directly into Payables without matching to a purchase order default to one unit. You can update the number of units in the Mass Additions window.

After you approve and post the invoice in Payables, run the Create Mass Additions for Oracle Assets process to send valid invoice line distributions to Oracle Assets.

Handle Returns
You can easily process and track returns using mass additions. For example, you receive an invoice, post it, and create an asset using mass additions. You then discover that the asset is defective and you must return it.

First you reverse the invoice in Payables, charging the credit invoice line distribution to the same asset clearing account. Then you run mass additions to bring over the credit line. Add this line to the existing asset to bring the asset cost to zero. Now you can retire the asset. The asset does not affect your balance sheet, but its audit trail remains intact.

Conditions For Asset Invoice Line Distributions To Be Imported
For the mass additions create process to import an invoice line distribution to Oracle Assets, these specific conditions must be met:
  • The line is charged to an account set up as an Asset account
  • The account is set up for an existing asset category as either the asset clearing account or the CIP clearing account
  • The Track As Asset check box is checked. (It is automatically checked if the account is an Asset account)
  •  The invoice is approved
  •  The invoice line distribution is posted to Oracle General Ledger from Payables
  •  The general ledger date on the invoice line distribution is on or before the date you specify for the create program
  •  If you use the multiple organization feature, your Payables operating unit must be tied to the same ledger as the corporate book for which you want to create mass additions.

Conditions For Expensed Invoice Line Distributions To Be Imported
You can create expensed items from expensed invoice line distributions in Oracle Payables. Oracle Assets does not depreciate or create journal entries for expensed items.
You cannot change an expensed item to a capitalized or CIP asset.
The create mass additions process imports an expensed line only if:
  1. The invoice line distribution is charged to an Expense account
  2. Track as Asset is checked
  3. The invoice is approved
  4. The invoice line distribution is posted to Oracle General Ledger from Payables
  5. The general ledger date on the invoice line distribution is on or before the date you specify for the create program
  6. Your installation of Payables must be tied to the same ledger as the corporate book for which you want to create mass additions.
Running the Create Mass Additions For Oracle Assets Program in Payables
You can run Create Mass Additions for Oracle Assets as many times as you like during a period. Each time it sends potential asset invoice line distributions and any associated discount lines to Oracle Assets. Payables ensures that it does not bring over the same line twice.

Use the Post Accounting programs in Oracle Subledger Accounting to determine the line types that should be interfaced to Oracle Assets by the Mass Additions Create program. Please refer to the SLA user guide for more information on the Post Accounting programs.
Important: Verify that you are creating mass additions for the correct corporate book in Oracle Assets, because you cannot undo the process and resend them to a different book.

Payables sends line amounts entered in foreign currencies to Oracle Assets in the converted ledger currency. Since Oracle Assets creates journal entries for the ledger currency amount, you must clear any foreign currency invoices manually in your
general ledger. Review the Mass Additions Create Report to see both foreign and ledger currency amounts.

2.3. Adding an Asset Automatically from an External Source (Mass Additions)

Use the Mass Additions process to add an asset automatically from an external source. Review new mass addition lines created from external sources before posting them to Oracle Assets. You can also delete unwanted mass addition lines to clean up the system.

You can also load data into Oracle Assets using the Create Assets Feature in the Applications Desktop Integrator (ADI), which allows you to import data from an Excel spreadsheet.

Reviewing Mass Addition Lines
You must review newly created mass addition lines before you can post them to Oracle Assets to become assets. You can place a group of mass additions in the POST, ON HOLD, or DELETE queues all at once. You can also perform a split, merge, or cost adjustment on mass additions before you post them. You can continue to review a mass addition until you post it. To review mass additions that have not yet been posted, run the Unposted Mass Additions or Mass Additions Status Report.
Note: If you want to find mass additions by Invoice Number, PO Number, or Supplier Number in the Find Mass Additions window, your search criteria must match exactly, including capitalization.

Prerequisites
Create mass additions from external sources


About the Mass Additions Interface

You can create assets automatically from information in any other system using Mass Additions. Oracle Assets is already integrated with Oracle Payables; you can easily integrate it with other payables systems. You can also use the mass additions process to convert your assets from an outside system to Oracle Assets.
Important: Plan your conversion carefully and thoroughly, since you cannot undo it.

Create Assets From Oracle Payables
The Create Mass Additions program creates mass additions from invoice information in Oracle Payables. The concurrent process places the new mass additions in a holding area (the table FA_MASS_ADDITIONS) that is separate from the main Oracle Assets tables, so that you can review and approve the mass additions before they become asset additions.

Create Asset Additions From Another Payables System
To integrate Oracle Assets with another system, develop your own program to add mass additions to the FA_MASS_ADDITIONS table. Also, you may want to add another window to the Oracle Assets menu to run your concurrent process. A description of the columns in the FA_MASS_ADDITIONS table is included later in this essay.

Convert From Other Systems
Oracle Assets lets you convert from your previous asset system using mass additions. Instead of loading your asset information into multiple Oracle Assets tables, load your information into the FA_MASS_ADDITIONS table and use the mass additions process to simplify your work

Use Mass Additions to Import Your Asset Data
The Mass Additions feature of Oracle Assets is normally used to import asset information from Oracle Payables. Mass Additions automatically populates the many Oracle Assets tables from the relatively simple FA_MASS_ADDITIONS table. By
placing your data in this table, you can use the power of the Post Mass Additions to Oracle Assets program to perform the bulk of your import.
Mass Additions has three main components:
  • Create: finds potential new assets in Oracle Payables and brings them into the FA_MASS_ADDITIONS table
  • Prepare: allows you to review potential new assets and enter additional information
  • Post: creates assets by importing asset information from the FA_MASS_ADDITIONS table into several Oracle Assets tables
To import asset information from another payables system, load the FA_MASS_ADDITIONS table and then use Prepare and Post to add your assets to Oracle Assets.
To convert assets from another assets system, use only the Post component to move the asset information you store in the FA_MASS_ADDITIONS table into Oracle Assets.

To add a mass addition line to an existing asset

Note: You can only perform cost adjustments for mass additions in the NEW, ON HOLD, or user-defined hold queues.

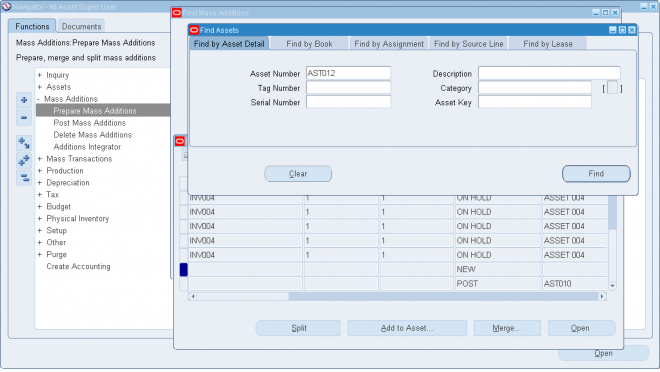
1. Choose Mass Additions > Prepare Mass Additions from the Navigator window.
2. Find the mass addition(s) for this transaction in the Find Mass Additions window.
3. Choose the mass addition line you want to add to an existing asset as a cost adjustment.
4. Choose Add to Asset.
5. Query and choose the asset to which to add the line. You can find assets by Asset Detail, Assignment, Source, and Lease.
6. Choose whether to amortize or expense the adjustment to the existing asset.
7. Check New Category and Description to change the category and description of the existing asset to those of the mass addition you are adding as a cost adjustment.
8. Save your work.
9. Choose Open and change the queue name to POST.
10. Save your work.

Loading Your Asset Data

This section describes how to define, load, and confirm your interim asset table. In many cases you have to load asset information into the Oracle tables from a non-Oracle file system. This section shows you how to use SQL*Loader to import your information.

Complete the following steps to load your asset data:
Note: If you are using Multiple Reporting Currencies (MRC), when loading the FA_MASS_ADDITIONS table with data from a legacy system (a feeder system other than Oracle Payables or Oracle Projects), you must also load the FA_MC_MASS_RATES table. For each mass addition line in FA_MASS_ADDITIONS, you need to provide exchange rate information in the FA_MC_MASS_RATES table for each reporting ledger associated with the corporate book into which the assets will be
added. It is recommended that you use the calculated exchange rate, not the official exchange rate, for each ledger. This will minimize rounding issues. See: Multiple Reporting Currencies in Oracle Applications, Multiple Reporting Currencies in Oracle Applications.

1. Define your interim table in the Oracle database.
Use a single interim table if possible. You can use multiple tables if the data exists in multiple tables or files in the old asset system. In either case, you must eventually place the data in a single table, the FA_MASS_ADDITIONS table.
If you wish, you may load data directly into FA_MASS_ADDITIONS, but it is more difficult due to the complexity of the table.

2. Load your interim table (Using SQL*Loader if asset data is external).

Use SQL*Loader to import information from outside your Oracle database. SQL*Loader accepts a number of input file formats and loads your old asset data into your interim table.
If the data already resides within an Oracle database, there is no need to use SQL*Loader. Simply consolidate the asset information in your interim table using SQL*Plus or import, and go directly to .
Follow these steps if you plan to use SQL*Loader:

  • Get the asset information in text form
Most database or file systems can output data in text form. Usually you can generate a variable or fixed format data file containing comma or space delimiters from the existing system. If you can't find a way to produce clean text data, try generating a report to disk, using a text editor to format your data. Another option is to have SQL*Loader eliminate unnecessary information during its run. If there is a large volume of information, or if the information is difficult to get in a loadable format, you can write your own import program. Construct your program to generate a SQL*Loader readable text file.
  • Create the SQL*Loader control file
In addition to the actual data text file, you must write a SQL*Loader control file. The control file tells SQL*Loader how
to import the data into your interim table. Be sure to specify a discard file if you are planning to use SQL*Loader to filter your data.
  • Run SQL*Loader to import your asset data
Once you have created your asset data file and SQL*Loader control file, run SQL*Loader to import your data. SQL*Loader
produces a log file with statistics about the import, a bad file containing records that could not be imported due to errors, and a discard file containing all the records which were filtered out of the import by commands placed in the control file.

3. Compare record counts and check the SQL*Loader files.
Check the number of rows in the interim table against the number of records in your original asset data file or table to ensure that all asset records are imported.
The log file shows if records were rejected during the load, and the bad file shows which records were rejected. Fix and re-import the records in the bad file.

4. Spot check interim table.
Check several records throughout the interim table and compare them to the corresponding records in the original asset data file or table. Look for missing or invalid data. This step ensures that your data was imported into the correct columns and that all columns were imported.

2.4. Creating Asset Additions Using Web ADI


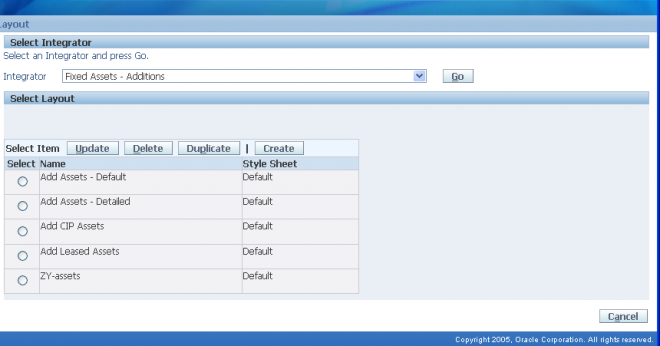
Oracle Assets integrates with Web ADI to enable you to create assets additions through the Additions Integrator. The Additions Integrator allows you to enter or load data into a spreadsheet using pre-defined mappings and layouts. Web ADI validates all required fields. If the Pre-Validate check box is checked, Web ADI validates both required and optional fields. After validating data, you can automatically upload your assets to Oracle Assets.


In the Integrator page, you need to select a corporate asset book. In the Layout page, you need to select a layout. Web ADI comes seeded with five layouts, but you can also create your own custom layouts. The seeded layouts are as follows:
  • Add Assets – Default
  • Add Assets – Detailed
  • Add Assets from Supplied Invoices
  • Add CIP Assets
  • Add Leased Assets
After creating your spreadsheet, you can upload the data into Oracle Assets.

4. Adding Assets in Short Tax Years

When assets are acquired as a result of a merger, in the first year during which the assets are acquired, these assets are usually depreciated during a shorter than normal tax year. It is essential that the acquiring company is able to depreciate the acquired assets correctly during the short tax year.
When you add assets in a short tax year, you identify the asset as a short tax year asset. When you add short tax year assets, you must use either the detail additions process or the mass additions process. You cannot use the quick additions process to add short tax year assets.

You can define custom depreciation formulas to help you to properly depreciate newly acquired assets in a short tax year.

Adding a Single Asset in a Short Tax Year

To add an asset to the corporate book in a short tax year:
1. Follow the steps to add an asset using the detail additions process.
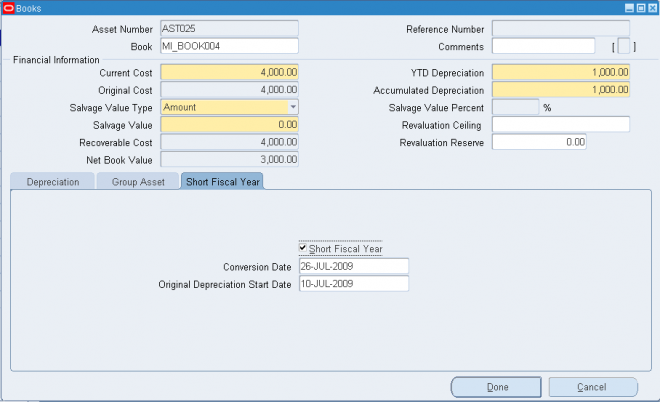
2. While in the Books window, check the Short Fiscal Year check box to indicate the current year is a short tax year.
3. Enter the conversion date. This is the date the short tax year asset begins depreciating in Oracle Assets in the acquiring company.
4. Enter the original depreciation start date of the acquired assets. This is the date when the assets began depreciating in the acquired company.
5. Continue adding the asset.

Adding Multiple Assets in a Short Tax Year

1. Add assets using the mass additions process.
Note: In the period you added short tax year assets, we recommend that you run depreciation without closing the period, verify the depreciation amounts, then close the period.
2. Use the mass copy process to copy the asset information into your tax books.
3. Upload depreciation information for tax books to the FA_TAX_INTERFACE table.
4. Run the Upload Short Tax Year Reserves concurrent program to update reserve in your tax book.
Note: You should run this program after running mass copy.

Uploading Tax Book Depreciation Information

When you use the mass copy process to copy asset information into your tax books, no depreciation or depreciation reserve amounts are copied into the tax books. After running mass copy, you use the FA_TAX_INTERFACE table and Upload Short Tax Year Reserves program to update depreciation information for the short tax year assets in your tax books.
You use SQL*Loader to load the FA_TAX_INTERFACE table, using the same procedure you used to load the FA_MASS_ADDITIONS table when you created mass additions.

How Oracle Assets Calculates Depreciation in a Short Tax Year

To depreciate assets properly in a short tax year, Oracle Assets needs to account for the acquired assets up to the date on which the assets are converted to the acquiring company's Oracle Assets system. When adding assets that will depreciate in a short tax year, you must enter a conversion date and original depreciation start date, and check the Short Fiscal Year check box on the Books window.

Note: The prorate date is determined by the date placed in service and the prorate convention. If the original prorate convention is different from that in the acquiring company, you may need to set up a new prorate convention for the converted assets to map the prorate date correctly.

The conversion date is the date an asset begins depreciating under the acquiring company's Oracle Assets system. Therefore, the year-to-date depreciation is zero at that time. The conversion date enables Oracle Assets to calculate the remaining life of the asset. You must choose a conversion date in the current open period of the corporate and tax books. Otherwise, the depreciation calculations may be incorrect. You cannot enter a conversion date in a past fiscal year or in future periods.

Note: Oracle Assets does not calculate any depreciation before the conversion date. You must enter the total depreciation taken (depreciation reserve) up to the conversion date.
Depreciation in a short tax year is calculated as follows:

Depreciable Basis * Annual Rate * No. of Months in Short Tax Year / No. of Months in the Full Tax Year

If the depreciation method has a calculation basis of NBV, the value of the depreciable basis is the net book value (NBV) as of the conversion date. The NBV is derived from the depreciation reserve.

MACRS Deductions in a Short Tax Year
You can define a formula-based MACRS depreciation method to calculate depreciation in a short tax year. For example, you could define a MACRS method with a straight-line switch as follows:
Greatest (2/Life, Decode (Short Year, 1, 1/Remaining Life 1, 0, 1/ Remaining Life 2)) In this example, Decode means the following: if the current year is a short tax year, then use Remaining Life 1. Otherwise, use Remaining Life 2.

  • Remaining Life 1 : Oracle Assets calculates the remaining life of the asset as of the conversion date or prorate date, which ever is later. If the prorate date is later than the conversion date, Oracle Assets calculates the remaining life based on the prorate date to avoid over-depreciating the asset.
  • Remaining Life 2 : Oracle Assets calculates the remaining life of the asset as of the first day of the fiscal year of the acquiring company, after the conversion date.
Note: Oracle Assets finds the number of months between the beginning of the fiscal year of the acquiring company and the end of the asset life. It then converts the value to years.

Adjustments and Revaluation
You cannot revalue short tax year assets or perform financial adjustments on short tax year assets.

Retiring Assets
Oracle Assets may take additional depreciation or reverse depreciation expense when you retire an asset. These amounts are controlled by the asset's retirement convention, date retired, and depreciation method. You may need to retire a short tax year asset during the short tax year in which it was acquired. You may want to set up special retirement conventions specifically for this scenario.
For example, your company has a short tax year that starts in May 1998 and ends in December 1998. You set up a half-year retirement convention with a prorate date in the mid-point of the short tax year (September 1). If you retire a short tax year asset in November 1998 using that half-year retirement convention, Oracle Assets backs out depreciation expense taken in September and October.

Asset Maintenance


3.1 Reclassifying Assets - Changing Asset Details

You can change descriptive information for an asset at any time. Changing asset descriptive information other than category and units has no financial impact on the asset.

Reclassifying Assets
Reclassify assets to update information, correct data entry errors, or when consolidating categories. You cannot reclassify fully retired assets.
Note: When you reclassify an asset in a period after the period you entered it, Oracle Assets creates journal entries to transfer the cost and accumulated depreciation to the asset cost and accumulated depreciation accounts of the new asset category. This occurs when you create journal entries for your general ledger. Oracle Assets also changes the depreciation expense account to the default depreciation expense account for the new category, but does not adjust for prior period expenses.

Reclassifying an Asset to Another Category

To reclassify an asset to another category:
1. Choose Asset > Asset Workbench from the Navigator window.
2. Find the asset you want to reclassify.
Tip: For best performance, find by asset number or tag number since they are unique values.
3. Choose Open.
4. Enter the new category.
5. Save your changes.
Note: Reclassification does not redefault the depreciation rules to the default rules from the new category. Manually change the depreciation rules in the Books or Mass Change windows if necessary.

Reclassifying a Group of Assets
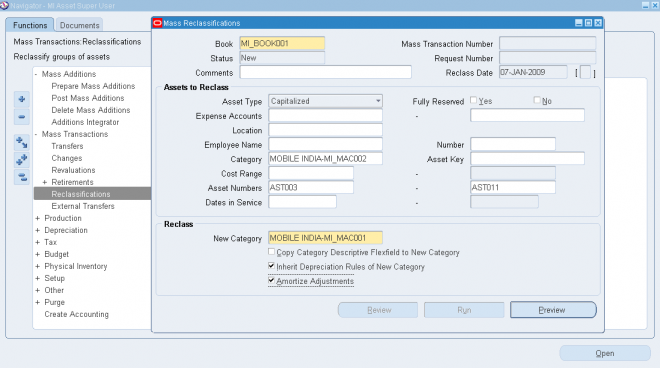
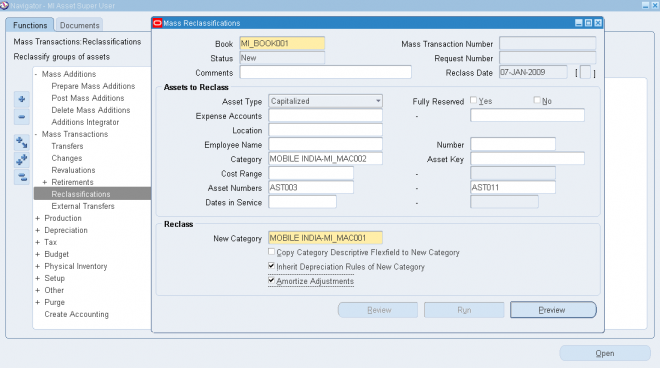
You can reclassify a group of assets using the Mass Reclassifications window. In addition to reclassifying assets to a new category, when you run the Mass Reclassification process, you have the option to have assets inherit the depreciation rules of the new category.
  • If you want only fully reserved assets to be reclassified, check the Fully Reserved - Yes check box. If you want only assets that are not fully reserved to be reclassified, check the Fully Reserved - No check box. If you do not check either check box, both fully reserved assets and assets that are not fully reserved will be reclassified.
  • When you run the Mass Reclassification process, Oracle Assets first reclassifies the assets (changes the assets from one category to another), then changes the depreciation rules, if you have chosen to have the reclassified assets inherit the depreciation rules of the new category. Oracle Assets reclassifies assets to a new category, even if inheriting depreciation rules fails. However, if reclassification fails (assets are not changed to the new category), assets will not inherit the depreciation rules of the new category.
  • If you choose to have the reclassified assets inherit depreciation rules, you can also choose to either amortize or expense the resulting depreciation adjustments.
  • Reclassification is done at the asset level. If an asset cannot be reclassified in one book, the asset will not be reclassified in any of the books to which it belongs. If you attempt to reclassify assets to the same category (for example, you have a group of assets assigned to category PC, and you run the Mass Reclassification process to reclassify the assets to category PC), the assets will not be reclassified and will not inherit depreciation rules.
  • You cannot reclassify an asset in a prior period.
Notes
  • If the Depreciate check box on the Books window is checked for an asset before the asset is reclassified, the check box will remain checked after reclassification. If the Depreciate check box is not checked for an asset before the asset is reclassified, that asset will inherit the depreciation rules of the new category, but the Depreciate check box will remain unchecked.
  • If you check the Inherit Depreciation Rules of New Category check box, you must also ensure you have checked the Allow Mass Changes check box in the Accounting Rules region of the Book Controls window, for any assets that you want to inherit depreciation rules. If the Allow Mass Changes check box is not checked, reclassified assets will not inherit depreciation rules, even though you checked the Inherit Depreciation Rules of New Category check box on the Mass Reclassifications window.
Previewing Your Mass Reclassifications
You can run the Mass Reclassification Preview Report before submitting the Mass Reclassifications process. The report allows you to preview the changes before actually submitting them. The report lists all the assets that the mass reclassification process will reclassify.

Running the Mass Reclassification Process
After reviewing the Mass Reclassification Preview Report, run the mass reclassification process. If reclassification fails for any of the assets, the mass reclassification process completes with a warning. You need to review the log file to determine the reasons the assets were not reclassified.
To review the changes to category and depreciation rules, run the Mass Reclassification Review Report.

Adjusting Units for an Asset
To adjust the number of units for an asset:
1. Choose Asset > Asset Workbench from the Navigator window.
2. Find the asset whose units you want to adjust.
Tip: For best performance, find by asset number or tag number since they are unique values.
3. Choose Open.
4. Change the number of Units.
5. Update assignment information to reflect the new number of units in the Assignments window. Save your work.
6. 

System Setup

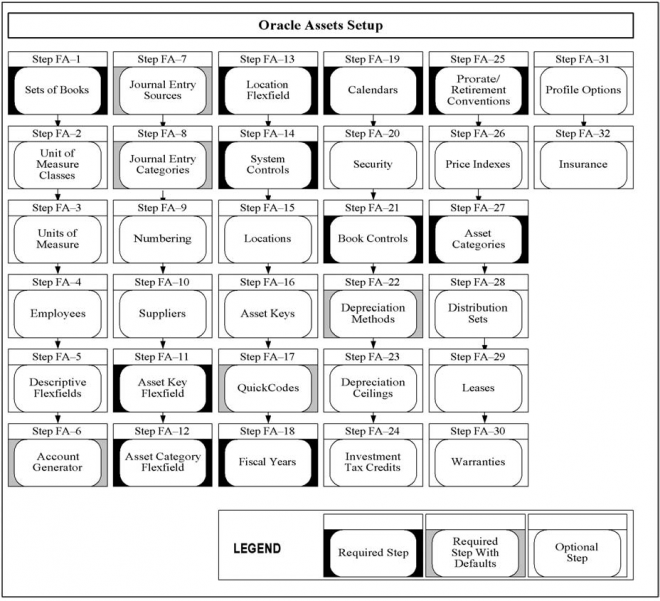
Some of the steps outlined in this flowchart and setup checklist are Required and some are Optional. Required step with Defaults refers to setup functionality that comes with pre–seeded, default values in the database; however, you should review those defaults and decide whether to change them to suit your business needs. If you want or need to change them, you should perform that setup step. You need to perform Optional steps only if you plan to use the related feature or complete certain business functions.


Oracle Assets With Multiple Sets of Books

You can use Oracle Assets with multiple sets of books, within a single Oracle Assets installation.
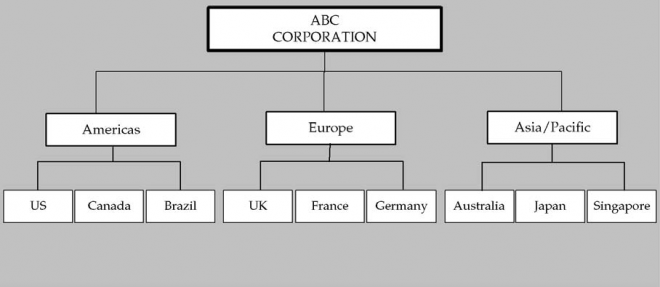
You can handle multiple companies in two different ways. You can have multiple companies within one general ledger set of books, or you can have multiple companies each with its own general ledger set of books. Regardless of the way you choose, you create at least one depreciation book for each set of books that you want to use.
Example: Global Computers is a parent company with three subsidiaries. They are:

  • Global Computers G/L set of books 1
  • Real Estate G/L set of books 2
  • Research & Development G/L set of books 3
  • Distribution G/L set of books 3

 
Since Global Computers and the Real Estate subsidiary are in different sets of books, they must be in different depreciation books. The Research & Development and Distribution subsidiaries are in the same set of books so you can either set up one depreciation book for both, or a separate depreciation book for each.

Implementation
You need only one copy of Oracle Assets to implement multiple sets of books. Use AutoInstall to install the single copy.
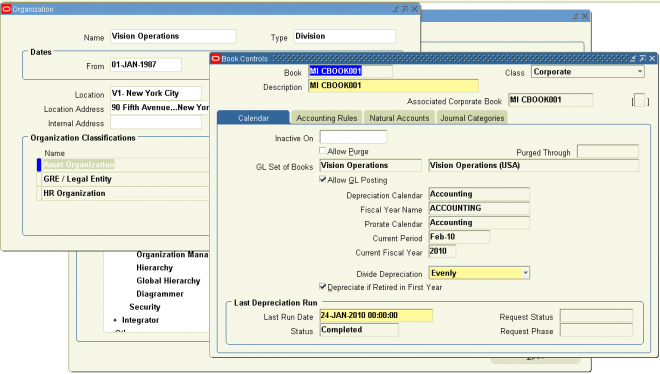
Once you install Oracle Assets, use the Book Controls window to set up as many depreciation books as you need. For each depreciation book, you choose to create journal entries to the appropriate set of books.

Remember that before you use the Book Controls window to set up your depreciation books, you must:
  • Set up the Account structure (chart of accounts) associated with each general ledger sets of books
  • Use Oracle General Ledger to set up the general ledger sets of books you need. If you do not have Oracle General Ledger, you can set up your sets of books using the Set of Books window in Oracle Assets
  •  
Limitations
Implementing multiple sets of books in Oracle Assets has the following limitations:
  • If you want to transfer assets that are in different corporate depreciation books, you must retire the asset from one depreciation book and add it to the other.
  • You can run depreciation projections for several books at once if all books have the same Account flexfield structure. If they have different structures, you must project them separately.
 

FA Fiscal Years & Calendar Periods


Creating Fiscal Years

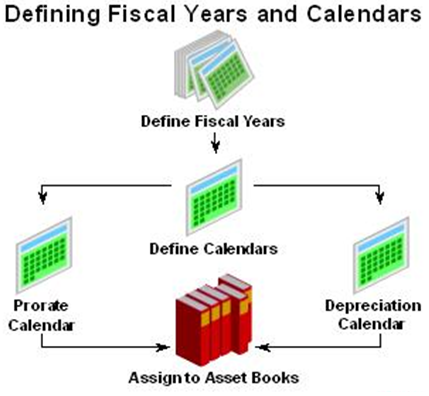
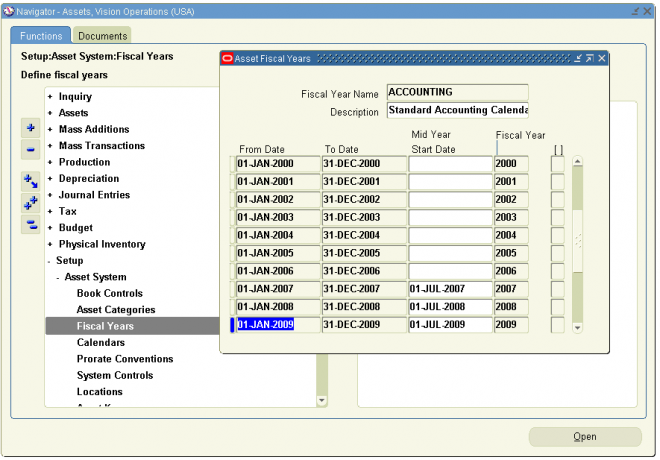
Specify the start and end dates of each fiscal year for a fiscal year name. Create fiscal years from the oldest date placed in service through at least one fiscal year beyond the current fiscal year. Depreciation will fail if the current fiscal year is the last fiscal year.
You can set up multiple fiscal years in this window. You can assign different fiscal years to your different corporate books. The calendar for a tax book must use the same fiscal year name as the calendar for the associated tax book.

To create a fiscal year:

1. Open the Asset Fiscal Years window.
2. Enter a Fiscal Year Name and Description. You can set up multiple fiscal years with different names.
Suggestion: The name you enter appears in List of Values windows which allow no more than 15 spaces. You may want to limit your name to 15 characters.
3. Enter the start and end date of each fiscal year.
4. Enter the Fiscal Year you are defining.
5. Save your work.

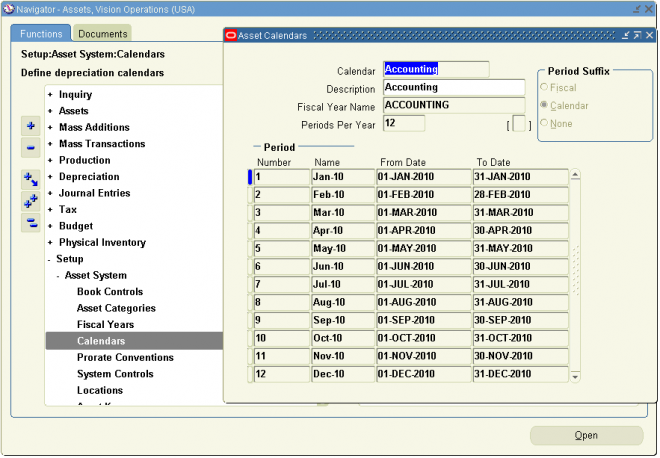
Specifying Dates for Calendar Periods

You can set up as many calendars as you need. Each book you set up requires a depreciation calendar and a prorate calendar. The depreciation calendar determines the number of accounting periods in a fiscal year, and the prorate calendar determines the number of prorate periods in your fiscal year. You can use one calendar for multiple depreciation books, and as both the depreciation and prorate calendar for a book.

Your corporate books can share the same calendar. A tax book can have a different calendar than its associated corporate book. The calendar for a tax book must use the same fiscal year name as the calendar for the associated tax book.

The depreciation program uses the prorate calendar to determine the prorate period which is used to choose the depreciation rate. The depreciation program uses the depreciation calendar and divide depreciation flag to determine what fraction of the annual depreciation expense to take each period. For example, if you have a quarterly depreciation calendar, Oracle Assets calculates one–fourth of the annual depreciation each time you run depreciation.

You must initially set up all calendar periods from the period corresponding to the oldest date placed in service to the current period. You must set up at least one period before the current period. At the end of each fiscal year, Oracle Assets automatically sets up the periods for the next fiscal year.

Attention: If you use this depreciation calendar in a depreciation book from which you create journal entries for your general ledger, you must make the period names identical to the periods you have set up in your general ledger.
You can define your calendar however you want. For example, to define a 4–4–5 calendar, set up your fiscal years, depreciation calendar, and prorate calendar with different start and end dates, and fill in the uneven periods. To divide annual depreciation proportionately according to the number of days in each period, enter By Days in the Divide Depreciation field in the Book Controls window.

Notes

The period names in GL and FA should be same, else system ‘ll throw below error while running ‘create journal entry’ program.
The specified period is not postable in General Ledger. The period must exist in the associated
set of books,and the status must be Open or Future Enterable.
select set_of_books_id, period_name, closing_status
from gl_period_statuses
where set_of_books_id in
(select set_of_books_id
from fa_book_controls
where book_type_code = '&your_deprn_book');

select period_name, period_counter, deprn_run
from fa_deprn_periods
where book_type_code = '&your_deprn_book'
order by period_counter, period_name ;
 

Asset Organization

Oracle Assets shares organization and hierarchy information with Oracle Human Resources. If your business does not currently use Oracle Human Resources, you define this data using the Oracle Human Resources windows provided with Oracle Assets.

Organizations are departments, sections, divisions, companies, or other organizational units in your business.
The illustration below depicts ABC Corporation’s organization structure. There are three levels of organizations. ABC Corporation, the top–level organization, has three child organizations Americas, Europe, and Asia/Pacific. Each of these organizations also has several child organizations. For example, the Americas organization has the following child organizations: US, Canada, and Brazil.


Organization Classifications - Asset
Oracle Human Resources uses organization classifications to determine the type of organizations being set up. To flag an organization for use in Oracle Assets, you enable the Asset Organization classification.
An asset organization is an organization that allows you to perform asset–related activities for specific Oracle Assets corporate depreciation books. Oracle Assets uses only organizations designated as asset organizations.

Organization Hierarchies in Oracle Assets
Organization hierarchies show reporting lines and other hierarchical relationships among the organizations in your business.
You use the Organization Hierarchy window to specify your organization hierarchy.
You need to define the top organization in the hierarchy and at least one organization subordinate to it.

Security
Security Profiles
A security profile allows you to control access to Oracle Assets through responsibilities that you create and assign to users of the system. Users can sign on to Oracle Assets only through the responsibilities that you give them. Their responsibilities control what they can see and do in the system.
A responsibility always includes a security profile, which you associate with a work structure such as an organization hierarchy.

Security List Maintenance Process
This process maintains the lists of organizations, positions, employees, and applicants that security profile holders can access. You should schedule it to run every night to take account of changes made during the day. If a disruption, such as a power outage, occurs while the process is running, you can manually restart it from the Submit Requests window.

Setting Up FA: Security Profile
The FA: Security Profile profile option restricts access to the organizations defined in the security profile. The options available for the FA: Security Profile are the previously defined security profile values.

For example, you may want to set up the security profiles for the ABC Corporation. Since there is a one to one correspondence between an organization and a security profile, a logical naming standard for the security profile value would include the organization name and the organization identification number. In this case, the organization ABC Corporation might have a security profile value of ABC_Corporation_100, the organization Americas might have a profile value of Americas_200, and so forth.

Depreciation Books


You can define corporate, tax, and budget depreciation books. You must set up your depreciation books before you can add assets to them. You can set up multiple corporate books that create journal entries for different general ledger sets of books, or to the same set of books. In either case, you must both run depreciation and create journal entries for each depreciation book. For each corporate book, you can set up multiple tax and budget books that are associated with it.

To define a depreciation book:

Open the Book Controls window. Enter the name of the book you want to define.
The book name cannot contain any special characters, and must not begin with a number.
Suggestion: The name you enter appears in List of Values windows which allow no more than 12 spaces. You may want to limit your name to 12 characters.

Entering Calendar Information for a Book
1. In the Book Controls window, choose the Calendar tabbed region.

2. Optionally enter a disable date for the depreciation book.

3. Choose whether to Allow Purge for the book.

4. Enter the general ledger set of books for which you want to create journal entries. Allow GL Posting if you want to create journal entries for this book. You cannot allow general ledger posting for your budget books.
Your tax book must have the same account structure, general ledger calendar, and functional currency as the associated corporate book. If you want to create journal entries from your tax book, you must enter a different set of books for your tax book and the associated corporate book. You can then Allow G/L Posting.

5. Enter the name of the Depreciation Calendar you want to use for this book.
The depreciation calendar determines the number of accounting periods in your fiscal year.

The depreciation program uses the depreciation calendar and the Divide Depreciation flag (located on the Book Controls form) to determine what fraction of the annual depreciation expense to take each period. For example, if you have a quarterly depreciation calendar, Oracle Assets calculates one-fourth of the annual depreciation each time you run depreciation.

6. Enter the name of the Prorate Calendar that you want to use for this book.
The prorate calendar determines what rate Oracle Assets uses to calculate annual depreciation by mapping each date to a prorate period, which corresponds to a set of rates in the rate table.

Use the prorate calendar with the smallest period size or resolution you need for determining your depreciation rate. For example, you may want to use a monthly prorate calendar in a tax book that uses a quarterly depreciation calendar to allow finer control of the annual depreciation amount for some monthly prorate/method combinations.

7. Enter the current open period name for this book.
Attention: You must set up the depreciation calendar for at least one period before the current period.

8. Enter the method for dividing the annual depreciation amount over the periods in your fiscal year for this book.
  • Choose Evenly to divide depreciation evenly to each period
  • Choose By Days to divide it proportionally based on the number of days in each period
9. Choose whether to depreciate assets in this book that are retired in their first year of life.

10. Enter the date on which you last calculated depreciation for this book. Oracle Assets updates this date when you run depreciation.

Entering Accounting Rules for a Book


1. In the Book Controls window, choose the Accounting tabbed region.

2. Check the Allow Amortized Changes check box to allow amortized changes in this book.

3. Choose Allow Mass Changes to allow mass changes in this book.
Note: Oracle Assets does not allow mass change to assets for which you have entered unplanned depreciation.

4. Enter the minimum time you must hold an asset for Oracle Assets to report it as a capital gain when you retire it. If you want Oracle Assets to report a capital gain for all assets when you retire them, enter zero for the threshold.
If you hold the asset for less than the threshold, Oracle Assets reports it as ordinary income.

5. If you choose to Allow Revaluation, specify revaluation rules:
Revalue Accumulated Depreciation If you do not revalue accumulated depreciation, Oracle Assets transfers the accumulated
depreciation to the revaluation reserve account upon revaluation.
Revalue YTD Depreciation Check this check box to revalue year–to–date depreciation.
Retire Revaluation Reserve Check this check box to retire revaluation reserve.
Amortize Revaluation Reserve Check this check box to allow revaluation reserve to be amortized in this book.
Revalue Fully Reserved Assets Check this check box to revalue fully reserved assets.
Maximum Revaluations Enter the maximum number of times an asset in this book can be revalued as fully reserved. If you leave this field blank, Oracle Assets does not limit the number of times you can revalue an asset as fully reserved.
Life Extension Factor Enter the life extension factor for fully reserved assets in this book. Oracle Assets multiplies the life
extension factor by the asset original life to determine the asset’s new, extended life.
Life Extension Ceiling The life extension ceiling limits the
depreciation adjustment when revaluing fully reserved assets.

6. Choose Allow Group Depreciation to allow group assets to be added in this book. If you choose to allow group depreciation, specify these group depreciation rules:
Allow CIP Depreciation in Group Assets Check this check box to allow depreciation of member CIP asset cost.
Allow Intercompany Member Asset Assignments Check this check box to allow the group asset and its member assets to have a different balancing segment value. If the check box is not checked, the group asset and each of its member assets must have the same balancing segment value.

Entering Natural Accounts for a Book

1. In the Book Controls window, choose the Natural Accounts tabbed region.

2. Enter Retirement Accounts.
You can set up your gain and loss accounts so that Oracle Assets creates individual journal entries for each component of the gain/loss amount to separate accounts, or to a single account for the net gain or loss.

3. Enter Intercompany Receivables and Payables clearing account numbers.

4. Enter Deferred Depreciation Reserve and Deferred Depreciation Expense accounts.

5. Enter the general ledger account that you want to use as an offset account for the entry against accumulated depreciation when you perform reserve adjustments.

6. Enter the Account Generator default segment values for this book’s journal entries.
By default, Oracle Assets creates journal entries without cost center level detail for all accounts except the depreciation expense account. Using the default assignments, it creates journal entries using the balancing segment from the expense account in the Assignments window and the account segment from the asset category or book, depending on the account type. The Account Generator uses the other segments from the default segment values you enter for the book in this field.

Entering Journal Entry Categories for a Book


1. In the Book Controls window, choose the Journal Categories tabbed region.

2. Enter the Journal Source of your general ledger entries. This source labels the journal entries that come from Oracle Assets.

3. Enter the general ledger category you want to use for capitalized and CIP journal entries.

4. Save your work.

Entering Tax Rules for a Book

The Tax Rules tabbed region is only available for tax books. This tabbed region will not appear if you did not select Tax in the Class field in the Book Controls window.


1. In the Book Controls window, choose the Tax Rules tabbed region. Check Allow Reserve Adjustments if you want to allow changes to the accumulated depreciation in your tax book.
You can Allow Cost/Expense Ceilings in a depreciation book; however, you cannot apply a cost ceiling and an expense ceiling to the same asset in a depreciation book.

2. Check Allow CIP Assets if you want to be able to automatically add CIP assets to your tax book when you add them to your corporate book.

3. If you choose to Allow Mass Copy into this tax book, choose whether to copy additions, adjustments, retirements, and/or
salvage value.

4. In the Group Asset Additions field, choose Copy if you wish to allow mass copy of group assets into this tax book. The default value is Do Not Copy.
Note: Mass Copy does not copy group reclassification transactions that are performed when changing member assets’
group assignment. Mass Copy does not copy an type of group adjustment, including group reserve transfer, group retirement adjustments, and group unplanned depreciation.

5. In the Member Asset Assignments field, choose Copy if you wish to allow mass copy of the member asset group asset assignments into this tax book. The default value is Do Not Copy.

Depreciation Methods

Once you start using a method you cannot update it. Enter another method if you need different rates.

To define a calculated depreciation method:
1. Navigate to the Depreciation Methods window.
2. Enter a depreciation Method name and Description.
3. Select Calculated from the Method Type poplist.
4. The calculation basis automatically defaults to Cost (NBV is not valid for calculated methods).
5. Choose whether this depreciation method allows you to depreciate an asset in the year it is retired.
6. Choose the Exclude Salvage Value check box if you want this method to exclude the salvage value from the depreciable basis.
7. Enter the number of Years and Months of asset life.
8. Save your work.

To define a table–based depreciation method:
1. Navigate to the Depreciation Methods window.
2. Enter a depreciation Method name and Description.
3. Select Table from the Method Type poplist.
4. Choose whether to use Cost or NBV as the basis for calculating
depreciation from the Calculation Basis poplist.
5. Choose whether this depreciation method allows you to depreciate an asset in the year it is retired.
6. Choose the Exclude Salvage Value check box if you want this method to exclude the salvage value from the depreciable basis.
7. Choose whether this method is a straight–line method.
8. Enter the number of Years and Months of asset life.
9. Enter the number of Prorate Periods Per Year this method uses.
10. Choose the Rates button to enter rates in the Depreciation Rates window.
11. Enter annual depreciation rates.
You must enter rates that fully depreciate an asset over its life. If you specify a calculation basis rule of Cost, the sum of all the years’ rates for each period must be one. If you specify a calculation basis rule of NBV, the rate for the last year of life for each period must be one and all the other rates must be between zero and one.
Attention: For table methods, the annual rate you enter for each prorate period must reflect the fraction of the fiscal year the asset was in service. The rate must be prorated based on the number of periods in the year and on the prorate convention.
12. Save your work.

To define a units of production depreciation method:
1. Navigate to the Depreciation Methods window.
2. Enter a depreciation Method name and Description.
3. Select Production from the Method Type poplist.
4. The calculation basis automatically defaults to Cost (NBV is not valid for units of production methods).
5. Choose the Exclude Salvage Value check box if you want this method to exclude the salvage value from the depreciable basis.
6. Save your work.

To define a flat–rate depreciation method:

1. Navigate to the Depreciation Methods window.
2. Enter a depreciation Method name and Description.
3. Select Flat from the Method Type poplist.
4. Choose whether to use Cost or NBV as the basis for calculating depreciation from the Calculation Basis poplist.
5. Choose whether this depreciation method allows you to depreciate an asset in the year it is retired.
6. In the Depreciable Basis Rule field, select a depreciable basis rule from the poplist.
7. Choose the Exclude Salvage Value check box if you want this method to exclude the salvage value from the depreciable basis.
You can exclude salvage value only if you have a flat–rate method that uses NBV as the calculation basis.
8. Check the Polish Adjustment Calculation Basis check box, if applicable. This check box affects the calculation when creating negative cost adjustments to assets depreciating under Polish tax depreciation.
Note: This check box is available only if you have selected one of the Polish tax depreciable basis rules as your depreciable
basis rule.
9. Choose the Rates button to enter rates in the Depreciation Rates window.
10. Enter basic rates.
11. Enter the adjusting rate, or loading factor.
12. Save your work.

Notes:
The Prorate Calendar is defined with a number of periods per year.
The Depreciation Method is, also, defined with a number of periods per year.
The number of periods for the depreciation method must be the same as the  number assigned to the prorate calendar.


Asset Categories


Category information is common for a group of assets. Oracle Assets defaults these depreciation rules when you add an asset, to help you add assets quickly. If the default does not apply, you can override many of the defaults for an individual asset in the Asset Details or Books windows. You set up default values for each category in each book. The default depreciation rules that you set up for a category also depend upon the date placed in service ranges you specify.

Prerequisites
❑ Set up your Account segment values and combinations.

❑ Set up your depreciation books.
❑ Set up your QuickCode values.
❑ Set up your prorate conventions.
❑ Set up your depreciation methods.

To set up an asset category:
1. Open the Asset Categories window.

2. Enter a Category name and Description to identify the asset category you want to set up.
Suggestion: The concatenated name you enter appears in fields which display 20 spaces. You may want to limit your name to 20 characters.

3. Check Enabled if you want to use this category.

4. Check Capitalize if you want to charge items in this category to an asset account when you pay for them and if you want to depreciate items in this category.

5. Check In Physical Inventory if you want assets in this category to be included in physical inventory comparisons.

6. Choose Lease, Leasehold Improvement, or Non–Lease from the Category Type poplist.
You can only enter lease information in the Asset Details window if you assign the asset to a Lease category type.

7. Choose Owned or Leased from the Ownership poplist.

8. Enter the Property Type and Class to which the assets in this category usually belong.
You set up your QuickCode values for Property Type in the QuickCodes window. If you have assets in the United States, enter 1245 for personal property and 1250 for real property.

9. Enter general ledger accounts.

10. Enter default depreciation rules for each depreciation book for which the category is defined.

To enter general ledger accounts for a category:
1. In the Asset Categories window, enter the Book for which you want to set up this asset category.

2. Enter the Asset Cost account for this category and book. Oracle Assets uses this account to reconcile asset costs to your general ledger. Oracle Assets creates journal entries for this account to reflect additions, retirements, capitalizations,  cost changes, transfers, revaluations, & reclassifications. (Asset A/C)

3. Enter the Asset Clearing account for this category and book. (Asset A/C)
For manual asset additions and cost adjustments, Oracle Assets uses this account to reconcile your payables system and Oracle Assets.
For mass additions, it uses the complete Account combination that comes over with a mass addition line to reconcile the asset addition or cost adjustment with your payables system.

4. Enter the general ledger Depreciation Expense Segment to which you charge depreciation for assets in this category and book. This is the default value for the account segment of the depreciation expense account in the Assignment window. (Expense A/C)

5. If you have set up bonus rates, enter the Bonus Expense account. If  you do not enter a value in this field, it defaults to the Depreciation Expense account. (Expense A/C)

6. Enter the Accumulated Depreciation account for this category and book. This account is the contra–account for the asset cost account for this category. (Asset A/C)

7. If you have set up bonus rates, enter the Bonus Reserve account. If you do not enter a value in this field, it defaults to the Accumulated Depreciation account. (Asset A/C)

8. Enter the Revaluation Reserve account for this category and book. This account is used for the change in net book value due to revaluation, if you revalue accumulated depreciation. (Asset A/C)

9. Enter the Revaluation Amortization account for this category and book. This account is used to amortize the revaluation reserve over the remaining life of the asset after you revalue it, if you amortize revaluation reserve.

10. Enter the CIP Cost account for this category and book. This account is used to reconcile CIP asset costs to your general ledger.

11. Enter the CIP Clearing account for this category and book if you entered a CIP Cost account.

12. Enter default depreciation rules for each depreciation book for which the category is defined.

Notes:
1. You can set up Oracle Assets to charge bonus depreciation expense to a different account from that of normal depreciation expense. You can also set up Oracle Assets to charge bonus depreciation reserve to a different account from that of the normal accumulated depreciation account.

Additional depreciation deductions allowed by the IRS under certain circumstances and possibly in certain areas.After the devastating effect of the 9/11 attacks,business owners were allowed to take a first-year depreciation deduction of up to 50 percent of the basis of property placed in service between specified dates. This was in contrast to the normal deduction of 3.63 or 2.56 percent for real property, depending on whether it was commercial or residential rental.Again,after the 2005 hurricane season,the IRS allowed the same bonus depreciation for property placed in service in specifically named Gulf Opportunity Zone counties in the affected states. The IRS says:

    This special "bonus depreciation" allowance is available to all businesses and applies to most types of tangible personal property and computer software acquired and placed in service in 2008[and 2009]. It allows taxpayers to deduct 50 percent of the cost of qualifying property in addition to the regular depreciation allowance that is normally available.

Unless this special bonus depreciation is extended, it will not be available after December 31, 2009.

Defining Distribution Sets

Use this window to define default distribution sets. Then, when you add a new asset using the Detail Additions or Mass Additions process, you can choose a predefined distribution set from a poplist in the Assignments window to quickly assign the appropriate distributions to a new asset.

You can define a distribution set to allocate percentages of asset units to different depreciation expense accounts, locations, and employees. You can define one or more distributions in a set. You can also change the distribution information for a distribution set at any time.
Attention: If you change the distribution information for a distribution set, note that it does not affect assets already assigned to that distribution set.

To define a distribution set:


1. Navigate to the Distribution Sets window.

2. Enter a unique Name and a Description of the Distribution Set you want to define.

3. Enter the corporate Book for the distribution set.
Note: You cannot assign distribution sets to assets in tax or budget books.

4. Optionally enter the date placed in service range this distribution set is effective. You can leave the to date blank if you want the distribution set to be effective indefinitely.

5. For each distribution in the set, enter the Units Percent, Depreciation Expense Account, and Location. Optionally enter the Employee Name or Number.
Units Percent: Enter the percentage of the asset you want to assign to this distribution. You can enter 100% for one distribution, or break up the total percentage into several distributions. The total percentage for the set must equal 100%.

6. Save your work.

ACCOUNTING ENTRIES

Acquisition
The term ‘acquisition’ rather than ‘purchase’ is normally used with regards to non-current assets. The two terms mean exactly the same, but in order to avoid confusion between expenditure on non-current assets (capital expenditure) and expenditure on goods for resale (revenue expenditure), we tend to refer to ‘acquisition of a non-current asset’ and
‘purchase of goods for resale’.

To record the acquisition of a non-current asset we need to remember that, as for any other transactions, the dual aspect must be reflected. This requires clear thinking – especially if the cost is not paid immediately. Therefore, the best way to consider this is to start with a straightforward acquisition, which is paid in full at the point of acquisition. We can then adapt our treatment to reflect an acquisition on credit or by raising some form of finance.

Finally, the most complex possibility – when part of the cost is settled by selling a non-current asset – is considered in the section below on ‘part exchange’. 

When a non-current asset is paid for immediately, the payment is likely to be by cheque. As non-current assets are usually quite expensive, it is unlikely that any organisation would use cash (notes and coins). Thus, the dual aspect is that  non-current assets have increased, while the current asset of the balance at the bank has reduced. (Or, if the bank account
is already overdrawn, the overdraft will increase.)

So, the double entry is as follows:
                       Debit Non-current assets at cost
                                                                   Credit Bank


If the cost of the asset is not paid immediately, two possibilities are that a normal period of trade credit has been obtained, or a loan has been raised to pay for the asset.
In the case of trade credit, the credit entry will be to the trade payables account. If a loan is raised, we will create a loan account with a credit entry, and debit the cash account with the receipt of the loan, and then the double entry is the same as above.

Depreciation
It is important to note that depreciation does not involve a cash transaction. Rather, it is a book entry, whereby a share of the cost of non-current assets is transferred to create a charge against profit. The accounting equation is maintained, as the value of non-current assets is reduced, by the same amount as the charge against profit.

From this, it follows that the depreciation charge leads to a debit entry in an expense account (depreciation charge). The corresponding credit entry is to the non-current asset. As it is convenient to maintain a record of the cost of non-current assets, we carry the reduction in value to date as a separate balance. Therefore, the credit entry is not made in the same ledger account as the cost of non-current assets. Rather, a separate account (accumulated depreciation) is used to record the amount of depreciation charged to date.

Thus the entry is:
            Debit Depreciation charge
                                 Credit Accumulated depreciation


Disposal
To deal with the disposal of a non-current asset, several steps are required.
As discussed above in the section on depreciation, the balances relating to the asset are carried in two accounts. So, to remove the asset from the accounting records, we must make a credit entry in the cost account, and a debit entry in the accumulated depreciation account. These entries are completed with corresponding entries in the asset disposal account. The entries are:
Cost of asset:
Debit Asset disposal account
                                 Credit Non-current assets at cost

Accumulated depreciation to the point of disposal:
Debit Accumulated depreciation account
                                 Credit Asset disposal account


These entries mean that the net book value has been transferred to the disposal account. If we compare the net book value with the proceeds of disposal, the resulting balance is the profit or loss on sale. A profit arises if the proceeds are greater than the net book value; if the proceeds are less than net book value, a loss has been sustained. The balance
on the disposal account is transferred to the income statement.

Therefore, we credit the disposal proceeds to the disposal account. If the proceeds have been received immediately, they will have been lodged to the bank, leading to a debit entry in the bank account. If the buyer has been allowed a period of credit, this will be reflected by a debit entry in the trade receivables account. The other possibility is that the disposal of the asset has been a part-exchange transaction. This is considered below.

Debit Bank Cash account
Debit Accumulated depreciation account
                        Credit Non-current assets at cost
             Proit/Loss Account


Part exchange
When a non-current asset is replaced by another non-current asset, it is quite common to use the sale of the original asset as part of the transaction. This is referred to as ‘part exchange’ (or sometimes ‘trade in’). By stating the transaction in this way, we have recognised that it is, in fact, two separate transactions.

The first transaction is the sale of a non-current asset. This is dealt with in broadly the same way as the straightforward sale discussed above. The difference is that instead of receiving payment for the asset sold, the sale proceeds settle part of the cost of the acquisition. So the debit entry is made in the non-current assets at cost account. This means that the amount to be settled is the balance of the cost of the acquisition. This is recorded in the same way as any other acquisition, except that the value of the entries is less than the full cost of the acquisition.

Scrapping
When an asset is scrapped, this simply means that it has been disposed of, but the sale proceeds are nil. Therefore, there is nothing to offset against the net book value, which represents a loss.

Assets Accounting & Report

Fully Reserved Assets Report

Use this report to find the assets that became fully depreciated in a range of accounting periods. The report is sorted by period, balancing segment, asset account, and asset number. It prints totals for each asset account, balancing segment, and period.
The report prints a line for each of the periods the asset is fully reserved which fall in the period range you requested. If you adjust a fully reserved asset, the report only shows the asset in the period you adjusted it if it again becomes fully reserved. If you run the report for a range of periods an asset may appear more than once on the report.

You must enter a Book and From/To Period range when you request this report.

Asset Accounting
Asset Addition
Asset Cost A/C Dr.
                               Asset Clearing A/C Cr.

Asset Depreciation
Asset Depreciation A/C Dr.
                                       Depreciation Reserve A/C Cr.

1.1 Adjusting Accounting Information

You can adjust financial, depreciation, distribution, and invoice information for an asset.

Changing Financial and Depreciation Information
You can correct an error or update financial and depreciation information for a single asset or for multiple assets. You can also override depreciation information for an asset while adding it using the Detail Additions process.

Before running depreciation (in the period in which you added the asset), you can change any field. After you have run depreciation (in any period after the one in which you added the asset), you can change asset cost, salvage value, prorate
convention, depreciation method, life, capacity and unit of measure (in the corporate book), rate, bonus rule, depreciation ceiling, and revaluation ceiling.

If the asset is fully reserved, you can adjust the same fields as for an asset for which you have run depreciation. If the asset is fully retired, you cannot change any fields.

You can choose whether to amortize or expense the adjustment.


To change financial information for a single asset:
1. Choose Asset > Asset Workbench from the Navigator window.
2. Find the asset for which you want to change financial information.
Suggestion: For best performance, find by asset number or tag number since they are unique values.
3. Choose Books.
4. Choose the Book to which the asset belongs.
5. Choose whether to Amortize Adjustment or expense it in the current period.
Note: When you adjust a group or member asset using a prior period amortization start date, Oracle Assets automatically submits the Process Group Adjustments concurrent program to calculate the prior period depreciation expense for the group asset. You must acknowledge the message containing the request number of the program submission.
6. Enter the new financial information for the asset.
Attention: You can change the depreciation method from units of production to a flat–rate or life–based method if the asset is not depreciating by units of production in any associated tax book.
Attention: You can only change the depreciation method from life–based or flat–rate to units of production in the period you added the asset.
7. Save your work.

Changing Financial Information for Multiple Assets (Mass Change)
When you change financial information for multiple assets using the Mass Changes window, the mass change transaction will exclude the following assets from the mass change transaction:
  • CIP assets.
  • Retired assets.
  •  
To change financial information for multiple assets
1. Choose Mass Transactions > Changes from the Navigator window.

2. Enter the Book to which the assets belong.

3. Select Amortize Adjustments if you wish to amortize your adjustments. If Amortize Adjustments is not selected, the
adjustments will be expensed in the current period. When Amortize Adjustments is selected, enter the Amortization Start
Date in the Change Date field. This allows you to select the date the amortization begins. The new date selected defaults to the current period date.
Note: When you adjust a group or member asset using a prior period amortization start date, Oracle Assets automatically
submits the Process Group Adjustments concurrent program to calculate the prior period depreciation expense for the group asset. You must acknowledge the message containing the request number of the program submission.

4. In the Change Date field, enter the date of the mass change.
You can perform a prior period depreciation rule change by entering a prior period date in the Change Date field and checking the Amortize Adjustment check box. The date in the Change Date field defaults to the current period date.

5. Select the assets you wish to change. Specify the asset numbers, dates placed in service, and category for which the mass change applies.

6. Select the asset type of the assets you wish to change in the Asset Type field, you can select one of the following values:
  • Capitalized
  • Group
The system will automatically include assets with an asset type of Capitalized or Group if you do not select an Asset Type.
7. Choose whether to Change Fully Reserved Assets.

8. You can use the Before and After fields as either information to change or as a selection criterion without changing the information.
When you enter the same value for the Before and After fields, the mass change affects only assets that match that information.

9. Specify the new financial information for these assets in the After column.

10. Select the group asset association of the assets you wish to change.
In the Group Association field, you can select one of the following values:
  • Member: The system will select only member assets belonging to a group asset for the mass change transaction.
  • Standalone: The system will select only standalone assets for the mass change transaction. All the member assets are excluded from the mass change transaction.
  • No Selection: The system will include all assets, regardless of the group association of the assets. For example, the system will include group, member, and standalone assets for the mass change transaction. If you do not select the group asset association in a Before field, you cannot select the Member or Standalone values in the corresponding After field. The default value of the Before and After fields is No Selection.
11. If you selected the Member value for the Group Association field, you must enter a valid group asset number in the Group Asset field.

12. Choose Preview to run the Mass Change Preview report. Use this report to preview what effects to expect from the Mass Change before you perform it. If necessary, update the definition and run the preview report again.
The mass change status determines what action to perform next.
The following table defines each mass change status and their next actions available.

13. To perform the mass change, query the definition and choose Run. Oracle Assets submits a concurrent process to perform the change. If you wish to simultaneously run this program in more than one process to reduce processing time, Oracle Assets can be set up to run this program in parallel. For more information on setting up parallel processing and the FA: Number of Parallel Requests profile option,

14. To review a completed mass change, query the definition and choose Review. Oracle Assets runs the Mass Change Review report.

15. Review the log file and report after the request completes.

Performing Group Reclassifications using Mass Change
You can also use the Mass Changes window to perform a group reclassification by changing the group asset assignment of a range of assets. However, you cannot change both the depreciation rules and the group asset assignment of the capitalized assets in the same mass change transaction. You must perform the mass group reclassification as a separate mass change transaction.

When you use the Mass Changes window to change the group asset assignment of capitalized assets, the system will always use the Calculate transfer type to process the reclassification. The date placed in service of the asset changed is used as the group amortization start date. The date in the Change Date field has no affect on the group amortization start date.

2.1 Transferring Assets

You can transfer assets between employees, depreciation expense accounts, and locations. When transferring assets, you should consider the following:

  • You can change the transfer date to a date in a prior period for a particular transfer, but the transfer must occur within the current fiscal year
  • You can change the transfer date of an asset to a prior period only once per asset.
  • You cannot transfer an asset to a future period.
Transferring a Single Asset
To transfer an asset between employees, expense accounts, and locations:
1. Choose Asset > Asset Workbench from the Navigator window.
2. Find the asset you want to transfer between employees, expense accounts, and/or locations.
Suggestion: For best performance, find by asset number or tag number since they are unique values.
3. Choose Assignments.
4. Optionally update the Transfer Date.
Note: If you transfer an asset during the period in which it was added, the Transfer Date automatically defaults to the
asset’s date placed in service and you cannot change it.
5. In the Units Change field, enter a negative number for the assignment line from which you want to transfer the asset.
6. Create one or more new lines, entering a positive number in the Units Change field for the assignment lines to which you want to transfer the asset.
7. Enter the new Employee Name, Expense Account, and/or Location for the new distribution.
8. Save your changes.

Transferring Multiple Assets in One Transaction

Oracle Assets allows you to transfer multiple assets in one transaction.
You use the Transfer From and Transfer To fields to identify the assets to be transferred.
You can transfer between expense accounts, locations, and employees and employee numbers. By selecting any combination of these criteria, you can further restrict the range of assets to be transferred.

Transferring Between Expense Accounts
For the From account, you can enter a single expense account or a range of expense accounts. When entering a single account number, you need to enter the account number in both the low and high fields for the From account. You can enter the entire account combination or only a partial combination.

For the To account, you can enter the entire account combination or only a partial combination. Note that when specifying partial combinations for both From and To accounts, you do not need to specify the same segment in both. For example, you can specify the first segment for the From account, and the second segment for the To account.
The following table shows an example of transferring between expense accounts:


Transferring Between Locations and Employees
You can transfer an asset between two locations, for example from the New York office to the Dallas office. You can also transfer assets between employee name and number. For example, you can transfer and asset from Robert Smith (employee 103) to Janet Jones (employee 214).
The following is an example of an asset transfer:
 
The above transfer affects all assets that are assigned to Robert Smith in New York with an expense account in the range of 1 through 100. An asset must satisfy all three criteria to be transferred to Janet Jones in Dallas with an expense account of 10000.

To transfer multiple assets between employees, expense accounts,and locations:
1. Choose Mass Transactions > Transfers from the Navigator window.

2. Choose the corporate depreciation Book for the assets you want to transfer.

3. Optionally select a Category to use as a selection criterion for the mass transfer.

4. Optionally update the Transfer Date.
You can change the transfer date to a a prior period date. You cannot change the date to a future period date.

5. Enter one or more selection criteria for the mass transfer in the Transfer From and Transfer To fields.

6. Choose Preview to run the Mass Transfers Preview report. Use this report to preview the expected effects of the Mass Transfer before you perform it. If necessary, update the definition and run the preview report again.

7. To perform the Mass Transfer, query the mass transfer and choose Run. Oracle Assets submits a concurrent process to perform the transfer.
If you wish to simultaneously run this program in more than one process to reduce processing time, Oracle Assets can be set up to run this program in parallel.

8. Review the log file after the request completes.

1.2 Asset Adjustment - Changing Invoice Information

If you brought over mass addition lines from invoices or discounts in your payables system, use the Source Lines window to change invoice information for an asset. You can:

  • Add a new invoice line to an asset
  • Change the cost of a invoice line
  • Delete an invoice line from an asset
  • Transfer invoice lines between assets
To change invoice information for an asset

1. Choose Asset > Asset Workbench from the Navigator window.

2. Find the asset whose invoice information you want to change.
Suggestion: For best performance, find by asset number or tag number since they are unique values.

3. Choose Source Lines.
  • Enter a description and cost to manually add a new invoice line to the asset.
  • Change the cost of a line for a CIP asset if necessary.
  • To delete an invoice line, uncheck Active.
Note: When you adjust a source line or add a new source line to an existing member asset using a prior period amortization
start date, Oracle Assets automatically submits the Process Group Adjustments concurrent program to calculate the prior
period depreciation expense for the group asset. You must acknowledge the message containing the request number of the program submission.

4. Save your changes.

Changing Invoice Information for an Asset
If you brought over mass addition lines from invoices or discounts in your payables system, use the Source Lines window to change invoice information for an asset. You can:
  • Add a new invoice line to an asset
  • Change the cost of a invoice line
  • Delete an invoice line from an asset
  • Transfer invoice lines between assets
To change invoice information for an asset
1. Choose Asset > Asset Workbench from the Navigator window.

2. Find the asset whose invoice information you want to change.
Suggestion: For best performance, find by asset number or tag number since they are unique values.

3. Choose Source Lines.
  • Enter a description and cost to manually add a new invoice line to the asset.
  • Change the cost of a line for a CIP asset if necessary.
  • To delete an invoice line, uncheck Active.
Note: When you adjust a source line or add a new source line to an existing member asset using a prior period amortization
start date, Oracle Assets automatically submits the Process Group Adjustments concurrent program to calculate the prior
period depreciation expense for the group asset. You must acknowledge the message containing the request number of the program submission.

4. Save your changes.

Mass External Transfers of Assets and Source Lines

The Mass External Transfers features provides a mechanism for accepting data about asset transfers and source line transfers from external systems. The system includes an interface table that allows other systems to pass details of assets and source lines to be transferred. A preview screen lets you view, accept, or reject the transfers from external systems. A new process, similar to the existing Post Mass Additions program, processes the transfer detail information from the new table directly to Oracle Assets.

 
To process asset and source line transfers from external systems:
1. After populating the interface table, from the Navigator, select Other > Requests > Run.
2. In the Submit Request window, select Post Mass External Transfers in the Request Name field to process asset transfers. To process source line transfers, select Post Mass Source Line Transfers.
3. Choose Submit Request to post the mass external transfer information to Oracle Assets.
If the system finds errors in the batch information, the mass external transfer process is aborted. You can view the errors to determine what transactions caused the process to abort. After you have submitted the mass external transfer batch for posting, use the following process to look for possible errors.

To check a mass external transfer batch for errors:
1. From the Navigator, choose Mass Transactions > External Transfers.
2. In the Find External Transfers window, enter the Transfer Number or other information in the window and click Find.
3. In the External Transfers Summary window, scroll down to view the Transaction Status for each transaction.
4. If you locate a transaction with a status of Error, highlight that row and click Open to view and correct the transaction details in the Modify External Transfer window.
After you determine what corrections need to be made, use the following process to make those corrections.

To correct mass external transfer transaction errors:
1. From the Navigator, select Mass Transactions > External Transfers.
2. In the Find External Transfers window, enter the Transfer Number or other information in the window and choose Find.
3. In the External Transfers Summary window, select the transaction you want to modify and click Open.
4. In the Modify External Transfer window, modify specific information as appropriate and click Done. Repeat this process to
make all the necessary corrections before you resubmit the batch.
5. From the Navigator, select Other > Requests > Run to submit a request to run the Post Mass External Transfer process again. This process resubmits the batch for processing.
After the mass external transfer batch has completed successfully, you can delete the mass transfer information from the interface table using the following process:

To delete the mass external transfer information from the interface table:
1. Open the batch that you want to purge in the Modify External Transfer window.
2. Change the Transaction Status to Delete.
3. From the Navigator, select Other > Requests > Run.
4. In the Submit Request window, select Purge Mass External Transfers in the Request Name field.
5. Click Submit Request to delete the mass external transfer information from the interface table.

5.1 Placing Construction–In–Process (CIP) Assets in Service

Capitalize finished assets that are ready to be placed in service. You can capitalize a single asset or a group of assets in a transaction. If you erroneously capitalize a CIP asset, you can reverse the capitalization.
Note: If you have CIP assets in both your corporate book and your tax book, you capitalize the CIP assets in your corporate
book, and they are automatically capitalized in the tax book.

To capitalize a CIP asset:

1. Navigate to the Capitalize CIP Assets window.
2. Find assets with asset type CIP.
3. Enter the date you placed the asset in service. Oracle Assets uses this date to begin calculating depreciation for the assets you are placing in service.
4. Choose the CIP asset(s) you want to capitalize. Choose Special, Check All if you want to capitalize all the assets in the Capitalize CIP Assets window.
5. Choose Capitalize.
6. Override the depreciation rules re–defaulted from the asset category if necessary

To reverse capitalize an asset:
1. Navigate to the Capitalize CIP Assets window.
2. Query assets with type Capitalized.
3. Choose the asset(s) you want to reverse capitalize. Choose Special, Check All to reverse capitalize all the assets in the Capitalize CIP Assets window.
Attention: You can reverse capitalize an asset only in the period you capitalized it, and only if you did not perform any transactions on it.
4. Choose Reverse.

4.1 Revaluing Assets

Revalue assets to adjust the value of your capitalized assets in a highly inflationary economy. You can revalue all categories in a book, all assets in a category, or individual assets.
You can revalue all assets using the Mass Revaluation process. The Mass Revaluation process does not use price indexes to revalue assets.  The Mass Revaluation process includes the following steps:

  1. Create Mass Revaluation Definition
  2. Preview Revaluation
  3. Run Revaluation
  4. Optionally Review Revaluation
To revalue all assets in a category:
1. Navigate to the Mass Revaluation window.
2. Enter the Book for which you want to revalue assets.
3. Enter a Description of the revaluation definition.
4. Specify revaluation rules.
5. Enter the category you want to revalue.
6. Enter the revaluation percentage rate to revalue your assets. Enter either a positive or negative number.
7. Override revaluation rules if necessary.
8. Choose Preview.
Oracle Assets runs the Mass Revaluation Preview Report so you can preview what effect this revaluation will have when you
perform it. If necessary, update the definition and run the preview report again.
9. Find the revaluation definition using the Mass Transaction Number.
10. Choose Run. Oracle Assets begins a concurrent process to perform the revaluation.
11. Review the log file after the request completes.
Note: You cannot run Mass Revaluation more than once per period. Once you run Mass Revaluation, values are changed in
the Oracle Assets system. If you re–run Mass Revaluation in the same period, the Mass Revaluation calculation will be
based on the previous Mass Revaluation calculation. You can run the Mass Revaluation Preview report as many times as you
like, without affecting actual values in the system.

To revalue an individual asset:
Enter the asset number you want to revalue instead of a category. If you revalue a single asset in a category which is also being revalued, the rate you enter for the asset overrides the category rate.

To review the effects of a revaluation:
1. Navigate to the Mass Revaluations window.
2. Find the revaluation definition you want to review.
3. Choose Review to run the Mass Revaluation Review Report.
4. Review the log file and report after the request completes.

4.2 Asset Management in a Highly Inflationary Economy (Revaluation)

Oracle Assets allows you to periodically adjust the value of your capitalized assets due to inflation or deflation, according to rates you enter. This process is known as revaluation. The rules for revaluation often differ from country to country. Oracle Assets has the flexibility to handle your specific requirements.
Oracle Assets multiplies the asset cost by the revaluation rate you enter in the Mass Revaluations window to determine the adjustment to the asset cost.

A revaluation only affects assets added in a prior period. It does not process:

  • Assets added in the current open period
  • Fully retired assets
  • Assets with pending retirements
Suggestion: Since Oracle Assets does not Mass Copy revaluations, when you perform a revaluation in your corporate
book, also perform it in each tax book associated with that corporate book.

Set Up Revaluation Accounts

You must set up the following revaluation accounts before you can perform a revaluation:
  • Revaluation reserve account and revaluation amortization account for each category in the Asset Categories window
  • Revaluation reserve retired gain and loss accounts in the Book Controls window
Control Your Revaluation
Use the status to track your revaluation. The revaluation status determines what action to perform next. The following table defines each revaluation status and their next action available.

Use Mass Transaction Number to Track Your Revaluation Definition When you save a new definition, Oracle Assets gives it a unique Mass Transaction Number. Use this number to find your revaluation definition when you want to perform the next stage in the transaction cycle.

Mass Revaluation Process
The following figure graphically illustrates the Mass Revaluation process. A detail description of the process was provided in the preceding text.

5.2 Physical Inventory

Physical inventory is the process of ensuring that the assets a company has listed in its production system match the assets it actually has in inventory. A company takes physical inventory by manually looking at all assets to ensure they exist as recorded, are in the appropriate locations, and consist of the recorded number of units.

A person taking physical inventory can collect physical inventory data in a number of ways, such as by writing down information about the asset manually, or by using a barcode scanner to automatically scan asset information into a file such as an Excel spreadsheet. After this information is collected, any discrepancies need to be reconciled. For example, if a computer is located in Room 549 according to your production data, but is actually in Room 346, you need to either change the record to reflect the true location of the computer, or move it to Room 549.

About Physical Inventory

The Physical Inventory feature in Oracle Assets assists you in comparing and reconciling your physical inventory data. To use the Physical Inventory feature, you must first take physical inventory of your assets. You need to include the following information about your assets:

  •  A unique identifier, which can be either the asset number, tag number, or serial number
  •  The location
  •  The number of units
You can include other information that may make it easier for you to keep track of the assets you are comparing, such as a description of each asset, but only the information listed above is required.

You load your physical inventory data into Oracle Assets using the Physical Inventory Entries window, or you can use the Record Physical Inventory process in the Applications Desktop Integrator (ADI), which allows you to import data from an Excel spreadsheet. You can also use SQL*Loader to import physical inventory data from a non–Oracle file system.

When you finish entering physical inventory data into Oracle Assets, you run the Physical Inventory comparison program, which highlights the differences between the asset information in Oracle Assets and the actual assets in physical inventory. This program compares your physical inventory data with your Oracle Assets data for all assets that have the In Physical Inventory check box checked.

You can view the results of the comparison online in the Physical Inventory Comparison window, or by running the Physical Inventory Comparison Report. The comparison results highlight differences between the assets in your production system and those in physical inventory You can reconcile the differences between physical inventory and the information in your database by updating each asset manually, or you can use the mass additions process to add assets that are missing from the production system.
 
When you have completed your physical inventory, you can run the Missing Assets Report, which lists all assets that have not been accounted for in the physical inventory process.

Setting Up Oracle Assets Data to be Included in Physical Inventory

Assets listed in Oracle Assets will be compared by the Physical Inventory Comparison program only if the In Physical Inventory check box is checked for those assets. If the In Physical Inventory check box is not checked for a particular asset, that asset will be ignored in the comparison.


The In Physical Inventory check box allows you to determine which assets are included in the physical inventory process. For example, you may have several buildings that you track as assets in Oracle Assets, but you do not want the buildings included in the physical inventory process.

Mass Additions
You can designate a group of assets to be included in the physical inventory process by checking the In Physical Inventory check box in the Mass Additions window.

Asset Categories
When you set up asset categories in the Asset Categories window, the In Physical Inventory check box is checked by default. If you do not want assets in a particular category to be included in physical inventory, you can uncheck the In Physical Inventory check box when you set up the category. For example, you may set up a category called BUILDING, which includes all of the buildings owned by your company. You may not want your buildings included in the physical inventory process, so you can uncheck the In Physical Inventory check box so that all assets with a category of BUILDING will not be included in physical inventory.

After setting up categories, you can override the value of the In Physical Inventory check box for individual assets using the Asset Details window.

Asset Details
You can use the Asset Details window to override the value of the In Physical Inventory check box. For example, you may have assets with a category of COMPUTER designated to be included in the physical inventory process. You may also have a particular asset with a category of COMPUTER that you do not want included in the physical inventory process. You can open the Asset Details window for that particular asset and uncheck the In Physical Inventory check box.

5.3 Scheduling Asset Maintenance

Oracle Assets allows you to schedule repair and service events for your long–term capital assets, to help ensure you maintain your long–term assets in a timely manner. You can plan for maintenance to occur at appropriate times, such as seasonal downtime. You can also schedule maintenance to occur at specific intervals, for example, monthly. Using Oracle Assets to schedule your asset maintenance also allows you to record the maintenance history of assets, in addition to scheduling
future maintenance events.

To schedule asset maintenance:

1. Navigate to the Schedule Maintenance Events window.
2. Enter the Start Date and End Date.
3. Enter the depreciation book containing the assets for which maintenance will be scheduled.
4. Optionally enter additional selection criteria, such as asset numbers, date placed in service, and category.
5. Enter event information, such as the Event name and Description of the event.
6. Choose Run to schedule maintenance events.

To view maintenance schedules:
1. Navigate to the Maintenance Details window.
2. Query the asset for the maintenance event you want to view.
3. Optionally enter changes.
4. Save your work.

To purge maintenance schedules:
1. Navigate to the Purge Maintenance Schedules window.
2. Enter the selection criteria to select the maintenance schedules that need to be purged, such as Schedule ID, Asset Number, or Maintenance Date.
3. Choose Purge.

Asset Key Flexfield


Oracle Assets uses the asset key flexfield to group your assets by non–financial information. You design your asset key flexfield to record the information you want. Then you group your assets by asset key so you can find them without an asset number.

Group Assets According To Your Needs
Use the asset key flexfield to group your assets. Group your assets according to non–financial information. You can assign the same asset key to many assets to easily find similar assets. All Oracle Assets transaction forms allow you to query using the asset key, and help you find your assets without an asset number.

Asset Key Flexfield Structure
You define your asset key flexfield structure to fit the specific needs of your organization. You choose the number of segments, the length of each segment, and the name and order of each segment in your asset key flexfield. You can define up to ten asset key segments. This key flexfield supports only one structure.

Not Using The Asset Key Flexfield
If you choose not to track assets using the asset key, you must define at least one segment asset key flexfield without validation.

Example
You decide to use a two segment asset key flexfield. A typical asset key  combination might be  ENGINE.MODELNO.MANUFACTURER. To set up your asset key flexfield you must set up value sets, enable your segments, and enter valid segment values.

First, use the Value Set windows to set up a value set for each segment. For example, you create the value sets Project and Component. Then use the Key Flexfield Segments window to enable your segments. Enter each segment and the value set for validation in the Segments window.

Now use the Segment Values windows to enter the valid values for each asset key segment. For example, you enter JET 10 as a valid value for the Project segment. Now, when you enter an asset, you can specify JET 10.ENGINE as the asset key. Since you checked Allow Dynamic Inserts, Oracle Assets creates the combination for you if it doesn’t already exist. Or you can create the combination explicitly in the Define Asset Key Flexfield Combinations form.


Asset Location


Track Asset Location According To Your Needs
Define the location flexfield to fit the way you track your asset locations. Use the location flexfield to track the physical location of your assets. For example, if you do business internationally (or plan to do so in the future), you may want to track the country an asset is in.

Other segments you may want include are state, city, and site. If you track asset location to more detail, such as for barcoding, you can also add segments for building and room number.

Location Flexfield Structure
You define your location flexfield structure to fit the specific needs of your organization. You choose the number of segments, the length of each segment, and the name and order of each segment in your location flexfield. You must define a state segment and you can also define up to six other location segments.

Property Tax Reporting
You can run the Property Tax Report for your states. The Property Tax Report sorts your assets by the location segment with the state qualifier set to Yes.

Mass Transfer By Location
You can transfer assets that share location information as a group. Or you can use the location as a criterion to select assets to transfer between employees or general ledger expense accounts.

State
You must have exactly one State segment in your Location Flexfield. Oracle Assets uses the State segment for property tax reporting.

Setting Up Security by Book


Oracle Assets shares organization and hierarchy information with Oracle Human Resources. If your business does not currently use Oracle Human Resources, you define this data using the Oracle Human Resources windows provided with Oracle Assets.


FA: Security Profile
The FA: Security Profile profile option restricts access to the organizations defined in the security profile. The options available for the FA: Security Profile are the previously defined security profile values.

For example, you may want to set up the security profiles for the ABC Corporation. Since there is a one to one correspondence between an organization and a security profile, a logical naming standard for the security profile value would include the organization name and the organization identification number. In this case, the organization ABC Corporation might have a security profile value of ABC_Corporation_100, the organization Americas might have a profile value of Americas_200, and so forth.

Restrictions
Users associated with a security profile are not able to delete setup data (such as categories and depreciation methods). These types of deletions must be performed by someone with access to the FA Manager responsibility, and who is not associated with a security profile and can therefore, access all data.

You cannot create a tax book for an organization in a node that is higher up in the security hierarchy than its associated corporate book. To prevent the data in your corporate and tax books from becoming corrupted, a tax book must be at the same level or at a lower level than its associated corporate book.

Default Depreciation Rules for a Category


In the Default Depreciation Rules window, enter the date Placed in Service range for which these category defaults are effective. When you add an asset, the depreciation rules default according to the date placed in service of the asset, the category, and the book.

You can specify as many ranges of default depreciation rules as you wish. If you leave the end date blank, Oracle Assets uses that set of depreciation rules indefinitely. To add a new range of valid depreciation rules, terminate your current record by adding an end date, then choose Edit, New Record from the menu to add the new record.


1. Check Depreciate if you normally depreciate assets in this book and category.

Note: Oracle Assets does not depreciate EXPENSED assets, regardless of the default value you enter in this field.

1.1 Enter the depreciation Method that you normally use for assets in this book and category:

If you enter a life-based method, you must enter the asset Life in Years and Months. The method you enter must have the same number of periods as the prorate calendar for this book.

If you enter a flat-rate method, you must enter default values for the Basic Rate and Adjusted Rate that you normally use to depreciate assets in this book and category. If you are defining this category for a tax book, you also can enter a Bonus Rule.

If you enter a units of production method, you must enter the unit of measure (UOM) and production Capacity that you normally use to depreciate assets in this book and category. If you are defining this category a tax book, enter the UOM and capacity you entered for the corporate book.

1.2 Enter the bonus rule that you normally use for assets in this book and category. You can use bonus rules for corporate books and tax books, using all depreciation methods except UOM.

2.1 Enter the Prorate Convention that you normally assign to assets in this book and category.

2.2 Enter the Retirement Convention that you normally assign to assets in this book and category.

2.3 If you chose Use Default Percent from the Salvage Value poplist in the Book Controls window for this book, you can enter a Default Salvage Value percentage for this category, book, and range of dates placed in service. See: Entering Accounting Rules for a Book and Defaulting Asset Salvage Value as a Percentage of Cost.

For example, if you want the salvage value to default to 10% of the cost, enter 10 in this field. When you perform transactions affecting asset cost, Oracle Assets uses this default percentage to calculate the salvage value according to the following formula:

Salvage Value = Cost Default Percentage

System Controls


Use the system controls form to specify your company name, asset numbering scheme, and key flexfield structures.

Prerequisites
Set up your Category, Location, and Asset Key Flexfields. See: Setting Up the Asset Category Flexfield, Setting Up the Asset Key Flexfield, and Setting Up the Location Flexfield.

To specify system controls:
1. Open the System Controls window.

2. Enter the enterprise name as you want it to appear on reports.

3. Enter the Oldest Date Placed In Service, which controls what dates are valid to place assets in service and on what date to begin your calendars.

If you change this field, you do not affect the assets already in the system. However, you cannot place new assets in service before the new date.

Note: You can only update the Oldest Date Placed in Service before you assign any calendars to depreciation books.

4. Enter the Starting Number at which you want Oracle Assets to begin automatically numbering your assets. Note that some asset numbers may be skipped.

Suggestion: If you are converting from another system, enter a starting number greater than the number of assets you want to convert so converted assets keep the same number from the previous system. For example, if you are converting 75,000 assets, you may want to enter 100,000 as the Starting Number to reserve the numbers 1 to 100,000 for manual asset numbering. Note that adding the 75,000 assets will increment the automatic numbering sequence by 75,000 (automatically numbered assets will begin at 175,001).

Note that asset numbers with a letter in them are not reserved for automatic asset numbering, since the automatic numbers are a numerical sequence.

If you are using automatic numbering, then manual numbering must be less than the starting asset number that you have in the System Controls window. Oracle Assets does not support asset numbers that exceed 2,000,000,000.

5. Enter the Location, Category, and Asset Key Flexfield structures you want to use.

Prorate Conventions


You can set up or review prorate and retirement conventions in the Prorate Conventions window.

You must initially set up all your prorate conventions from the convention period corresponding to the oldest date placed in service through the end of the current fiscal year. At the end of each fiscal year, Oracle Assets automatically sets up your prorate conventions for the next fiscal year.

Prerequisites

  •       Set up your Oldest Date Placed in Service. See: Specifying System Controls.
  •       Set up your fiscal years. See: Creating Fiscal Years.
  •       Set up your depreciation and prorate calendars.

To specify dates for prorate conventions:

1.  Open the Prorate Conventions window

2. Enter a Convention name and Description.

3. Enter the Fiscal Year Name for which you want to set up this convention.

4. Select the Depreciate When Placed in Service check box if you want to start taking depreciation in the accounting period that corresponds to the date placed in service, instead of the period that corresponds to the prorate date.

 This option determines over how many periods to spread the annual depreciation amount. For assets that use a calculated (straight-line) method, Oracle Assets ignores this option and always starts taking depreciation in the accounting period that corresponds to the prorate date.

 5. Enter date ranges and corresponding prorate dates for assets where the date placed in service is between the From Date and the To Date.
Note: Your convention must include every date in your fiscal year; otherwise, Oracle Assets cannot calculate depreciation properly.

Example


Depreciation

Depreciation is a  noncash expense that reduces the value of an asset as a result of wear and tear, age, or obsolescence. Most assets lose their value over time (in other words, they depreciate), and must be replaced once the end of their useful life is reached. There are several accounting methods that are used in order to write off an asset's depreciation cost over the period of its useful life. Because it is a non-cash expense, depreciation lowers the company's reported earnings while increasing free cash flow.

Depreciation is used in accounting to try to match the expense of an asset to the income that the asset helps the company earn. For example, if a company buys a piece of equipment for $1 million and expects it to have a useful life of 10 years, it will be depreciated over 10 years. Every accounting year, the company will expense $100,000 (assuming straight-line depreciation), which will be matched with the money that the equipment helps to make each year.

In Oracle, you can run depreciation to process all assets in a book for a period. If you have assets that have not depreciated successfully, these assets are listed in the log file created by Oracle Assets when you run depreciation.

Closing a Depreciation Period
When you run depreciation, Oracle Assets gives you the option of closing the current period if you check the Close Period check box on the Run Depreciation window. If all of your assets depreciate successfully, Oracle Assets automatically closes the period and opens the next period for the book. If you do not check the Close Period
check box when you run depreciation, Oracle Assets does not close the period.

Once depreciation has been processed for an asset in the current open period, you cannot perform any transactions on those assets unless depreciation is rolled back or the current period is closed

Multiple Reporting Currencies
If you are using Multiple Reporting Currencies (MRC), you can only run the Calculate Gains and Losses and depreciation programs using the standard Fixed Assets or MRC primary responsibility. You cannot run these programs using an MRC reporting responsibility. When you run the Calculate Gains and Losses and depreciation
programs using the standard Fixed Assets or MRC primary responsibility, these program will also run automatically for the associated reporting responsibilities.

To run depreciation:

1. Open the Run Depreciation window.
2. Choose the Book for which you want to run depreciation.
3. Choose whether you want Oracle Assets to close the period after successfully depreciating all assets.
4. Choose Run to submit concurrent requests to run the calculate gains and losses, depreciation, and reporting programs.
Attention: You cannot enter transactions for the book while depreciation is running.
Oracle Assets automatically runs the Journal Entry Reserve Ledger report when you run the depreciation program for a corporate book, and the Tax Reserve Ledger report for a tax book, so you can review the depreciation calculated. These reports are run automatically for the primary currency only. You can use the Standard Report Submission (SRS) process to manually run these reports for the reporting currencies.
5. Review the log files and report after the request completes.
6. If the log file lists assets that did not depreciate successfully, correct the errors and re–run depreciation.

Rolling Back Depreciation


If you have run depreciation for a particular period, you can use the Rollback Depreciation feature to restore assets to their state prior to running depreciation. For example, you may have outstanding adjustments or transactions that you need to process for a period. However, you have already run depreciation for that period. If the Close Period check box was not checked when you ran depreciation, you can roll back depreciation to include these outstanding transactions.

You must run depreciation with the Close Period check box checked to open the next period. You can roll back depreciation only for the current open period.

To roll back depreciation:
1. Select Rollback Depreciation from the navigator menu to open the Submit Requests window and the parameters window.
2. On the Parameters window, specify the book for which you want to roll back depreciation. The period automatically defaults to the current open period.
3. Choose Submit Request to roll back the depreciation.

Depreciation Override


Depreciation Override allows you to optionally override the depreciation amounts calculated by Oracle Assets. Using this feature, you can manually override the calculated default depreciation amounts for standalone and group assets.
Before running depreciation or performing adjustments, you must provide the necessary information in the Depreciation Override window or the FA_DEPRN_OVERRIDE table, and indicate whether the override data is for depreciation or adjustments. When running depreciation, the system will upload and use the depreciation amounts provided in the interface table.

If you do not use the Depreciation Override window to input the override amounts, you must first populate the  FA_DEPRN_OVERRIDE table with the necessary depreciation data. Next, the feature uploads and overrides the system calculated depreciation amounts with the amounts you provided in the override interface table.

Note:
1. Set the profile option FA: Enable Depreciation Override to Yes.
2. For MRC–enabled books, you do not need to provide the override amounts for the reporting currency books. The system will derive the reporting book values based on the ratio of asset cost in the reporting book to asset cost in the primary book.

To override the system calculated depreciation amounts using the Depreciation Override window:
1. Navigate to the Depreciation Override window.
2. You can use the Find Assets window to find assets for which you want to change depreciation.
3. If you did not use the Find Assets window, or query, to find the assets records you wish to modify, enter the asset number, book, and period of the asset in the rows of Depreciation Override window.
4. In the Depreciation field, you can enter the override depreciation amount.
5. In the Bonus Depreciation field you can enter the override bonus depreciation amount.
6. In the Use By field, you can select the adjustment type of Depreciation or Adjustment. The default value is Depreciation
when creating a new record.
7. The Status field displays the current status of the override record, which may be New, Post, or Posted. If the status is Post or Posted, you cannot update the record, you can only delete the record and reenter the updated record.
8. Select Save from the menu to save your work.

Depreciation Calculation


Run the depreciation program independently for each of your depreciation books. The depreciation program calculates depreciation expense and adjustments, and updates the accumulated depreciation and year–to–date depreciation.

When you run depreciation, the depreciation program submits three separate requests to:
  • Calculate gains and losses for retired assets and catch up depreciation for retired and reinstated assets
  • Calculate depreciation expense and adjustments for the period, and close the current period
  • Run the reserve ledger report

Depreciation expense is calculated as follows:
Depreciation Expense = (Current Cost – Recoverable Cost) * Basic Rate

Depreciation Calendar
The depreciation calendar determines the number of accounting periods in your fiscal year.

Prorate Calendar
The prorate calendar determines what rate Oracle Assets uses to calculate annual depreciation by mapping each date to a prorate period, which corresponds to a set of rates in the rate table.

Prorate Date
Oracle Assets prorates the depreciation taken for an asset in its first fiscal year of life according to the prorate date. Oracle Assets calculates the prorate date when you initially enter an asset. The prorate date is based on the date placed in service and the asset prorate convention. For example, if you use the half–year prorate convention, the prorate date of all assets using that convention is simply the mid–point of your fiscal year. So assets acquired in the same fiscal year take the same amount (half a year’s worth) of depreciation in the first year. If however, you use the following month prorate convention, the prorate date is the beginning of the month following the month placed in service, so the amount of depreciation taken for assets acquired in the same fiscal year varies according to the month they were placed in service.

Your reporting authority’s depreciation regulations determine the amount of depreciation to take in the asset’s first year of life. For example, some governments require that you prorate depreciation according to the number of months you hold an asset in its first fiscal year of life. In this case, your prorate convention has twelve rate periods––one for each month of the year. Other reporting authorities require that you prorate depreciation according to the number of days that you hold an asset in its first year of life. This means that the fiscal year depreciation amount would vary depending on the day you added the asset. Thus, your prorate convention contains 365 prorate periods––one for each day of the year.

Calculation Basis

Oracle Assets calculates depreciation using either the recoverable cost or the recoverable net book value as a basis. If the depreciation method uses the asset cost, Oracle Assets calculates the fiscal year depreciation by multiplying the recoverable cost by the rate.
If the depreciation method uses the asset net book value, Oracle Assets calculates the fiscal year depreciation by multiplying the recoverable net book value as of the beginning of the fiscal year, or after the latest amortized adjustment or revaluation, by the rate.

Determining the Prorate Period
Oracle Assets uses the prorate date to choose a prorate period from the prorate calendar.
For life–based methods, the prorate period and asset age then determine which rate Oracle Assets selects from the rate table. The depreciation program calculates asset age from the date placed in service as the number of fiscal years that you have held the asset. If two assets are placed in service at different times, but have the same depreciation method and life, Oracle Assets uses the same rate table, but may choose a different rate from a different column and row in the table.

Flat–rate methods use a fixed rate and do not use a rate table.

Determining the Depreciation Rate
For life–based depreciation methods, Oracle Assets uses the depreciation method and life to determine which rate table to use. Then, it uses the prorate period and year of life to determine which of the rates in the table to use. Note that the life of an asset has more fiscal years than its asset calendar life if it is placed in service during a fiscal year. Flat–rate depreciation methods determine the depreciation rate using fixed rates, including the basic rate, adjusting rate, and bonus rate.

Recoverable Cost
For depreciation methods with a calculation basis of cost, Oracle Assets calculates depreciation using the recoverable cost. The recoverable cost is calculated as the lesser of either the cost less the salvage value less the investment tax credit basis reduction amount, or the cost ceiling. Oracle Assets depreciates the asset until the accumulated depreciation equals the recoverable cost.

Allocate Annual Depreciation Across Periods
After calculating the annual depreciation amount, Oracle Assets uses your depreciation calendar, the divide depreciation flag, and the depreciate when placed in service flag to determine how much of the fiscal year depreciation to allocate to the period for which you ran depreciation.

If you choose to allocate depreciation evenly to each of your accounting periods, Oracle Assets divides the annual depreciation by the number of depreciation periods in your fiscal year to get the depreciation per period. If, however, you choose to allocate it according to the number of days in each period, Oracle Assets divides the annual depreciation by the number of days the asset depreciates in the fiscal year and multiplies the result by the number of days in the appropriate accounting period.

Spreading Depreciation Across Expense Accounts
Finally, Oracle Assets allocates the periodic depreciation to the assignments to which you have assigned the asset. Oracle Assets does this according to the fraction of the asset units that is assigned to each depreciation expense account in the Assignments window.

Adjustments
The following are some examples of financial adjustments you can expense or amortize:
  • Recoverable Cost Adjustments
  • Depreciation Method Adjustments
  • Life Adjustments
  • Rate Adjustments
  • Capacity Adjustments

Suspend Depreciation


You can suspend depreciation by unchecking Depreciate in the Books window. If you suspend depreciation of an asset when you add the asset, Oracle Assets expenses the missed depreciation in the period you start depreciating the asset.
For table and calculated methods, Oracle Assets calculates depreciation expense for the asset based on an asset life that includes the periods you did not depreciate it. If you suspend depreciation after an asset has started depreciating, Oracle Assets catches up the missed depreciation expense in the last period of life.

For flat–rate methods, Oracle Assets continues calculating depreciation expense for the asset based on the flat–rate. For flat–rate methods that use net book value, Oracle Assets uses the asset net book value at the beginning of the fiscal year in which you resume depreciation. The asset continues depreciating until it becomes fully reserved.

Period Close
Oracle Assets automatically closes the book’s current period and opens the next when you run the depreciation program. You cannot have more than one open period for a given depreciation book.

Year–End Processing
You can close the year independently in each depreciation book. The depreciation program automatically resets year–to–date amounts on a book the first time the depreciation program is run on that book in a fiscal year. Oracle Assets automatically creates the depreciation and prorate periods for your new year when you run depreciation for the last period of the previous fiscal year.
Verify the depreciation and prorate periods that Oracle Assets creates before you enter transactions in the new year.

Prior Period Additions
If you enter an asset with a date placed in service before the current accounting period, Oracle Assets automatically calculates the missed depreciation and adjusts the accumulated depreciation on the next depreciation run.
If you provide accumulated depreciation when you add the asset, Oracle Assets does not recalculate the accumulated depreciation. It accepts the amount you entered.

For table and calculated methods, even if the entered accumulated depreciation differs from what Oracle Assets would have calculated, Oracle Assets does not depreciate the asset beyond the recoverable cost. If the accumulated depreciation is too low, Oracle Assets takes additional depreciation in the last period of the asset’s life so that the asset becomes fully reserved. If the asset’s accumulated depreciation is too high, Oracle Assets stops depreciating the asset when it becomes fully reserved, effectively shortening the asset life.

Prior Period Transfers
If you back date an asset transfer, Oracle Assets automatically reallocates depreciation expense by reversing some of the depreciation charged to the ”from” account, and redistributing it proportionally to the ”to” accounts. Retroactive transfers do not impact the total depreciation. You cannot backdate a transfer to a prior fiscal year.

Prior Period Retirements / Reinstatements
If you back date a retirement, Oracle Assets automatically adjusts the depreciation for the year by the appropriate amount, resulting in a one–time adjustment in depreciation expense for the period. Oracle Assets then computes the gain or loss using the resulting net book value.

You cannot backdate a retirement to a previous fiscal year, nor can you reinstate a retirement performed in a previous fiscal year. Prior Period Amortized Adjustments If you back date an amortized adjustment, Oracle Assets automatically calculates depreciation from the retroactive amortization start date, and adds the retroactive depreciation to the current period. You can perform multiple prior period amortized adjustments to an asset.

Credit Assets
You can enter a credit asset as an asset with a negative cost, and Oracle Assets credits depreciation expense and debits accumulated depreciation each period for the life of the asset.

Depreciation Calculation for Flat-Rate Methods


Use a flat-rate method to depreciate the asset over time using a fixed rate. Oracle Assets uses a flat-rate and either the recoverable cost or the recoverable net book value as of the beginning of the fiscal year to calculate depreciation using a flat-rate depreciation method. The asset continues to depreciate until its recoverable cost and accumulated depreciation are the same.

An asset's prorate convention and depreciation method control when Oracle Assets starts to depreciate new assets. For assets using flat-rate methods, depreciation starts in the accounting period that either the date placed in service or the prorate date falls into, depending on the depreciate when placed in service flag. Oracle Assets allocates the first year's depreciation to the accounting periods remaining in the fiscal year.

Example

Suppose your fiscal year ends in May, you have a monthly (12 period) depreciation calendar, and you want to allocate depreciation evenly to each period in the year. You place a $10,000 asset in service in the third period of your fiscal year (AUG-92) using a half-year prorate convention. The rate for the  diminishing value (calculation basis of NBV) depreciation method is 20%.

Since the asset is using a half-year prorate convention, the prorate date is in December--the mid-point of your fiscal year. For assets that have a prorate date at the mid-point of the fiscal year, depreciation expense for the first fiscal year of life is 50% of the amount for a full fiscal year. For the asset in our example, a full fiscal year depreciation amount is $2,000 (20% of $10,000), so the depreciation for the first year (fiscal 1993) is $1,000.

You can specify whether to start taking depreciation in the period of the date placed in service or the prorate date using the depreciate when placed in service flag for the prorate convention. If you elect to start depreciation in the accounting period corresponding to the date placed in service, Oracle Assets starts to depreciate the asset in AUG-92, and the depreciation for each period is $100 ($1000 divided by 10--the number of periods from August to May).

If you elect to start depreciation on the prorate date, Oracle Assets does not start to depreciate the asset until December. The depreciation for each period from DEC-92 to MAY-93 is $166.67 ($1,000 divided by 6--the number of periods from December to May).

Depreciation in the Remaining Years of Life

For methods using the net book value, you use the flat-rate and the recoverable net book value at the beginning of each fiscal year to calculate the annual depreciation. In the second year of the asset life (fiscal 1994), the net book value as of the beginning of the fiscal year is $9,000. Applying the 20% rate yields an annual depreciation amount of $1,800. Oracle Assets divides this amount evenly across all twelve accounting periods in the year, so depreciation expense for each period is $150.

Similarly, the net book value at the beginning of the 1995 fiscal year is $7,200. Oracle Assets calculates annual depreciation of $1,440 and divides this amount evenly to get the depreciation amount for each period. Oracle Assets repeats this process until the asset is fully depreciated or retired

What-If Depreciation
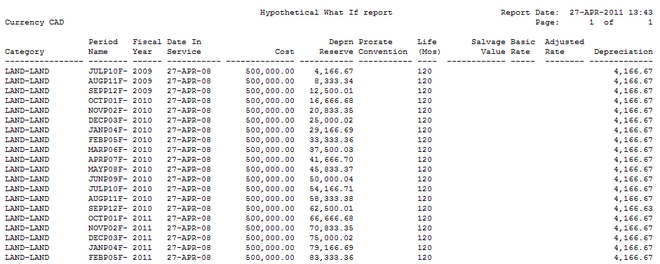


You can use what-if depreciation analysis to forecast depreciation for groups of assets in different scenarios without making changes to your Oracle Assets data. You can run what-if depreciation analysis on assets defined in your Oracle Assets system or on hypothetical assets that are not defined in Oracle Assets.

Notes:
1. You may use What-if Analysis to project depreciation for a group asset. However, you may not create a hypothetical group asset.
2. Note that Prorate Convention has no relevance to group or member assets.

What-if depreciation analysis differs from depreciation projections in that what-if depreciation analysis allows you to forecast depreciation for many different scenarios without changing your Oracle Assets data. Depreciation projection allows projection only for the parameters set up in Oracle Assets.

To perform what-if depreciation analysis in Oracle Assets, you enter different combinations of parameters for a set of assets in the What-If Depreciation Analysis window. When you run what-if analysis based on the parameters you entered, Oracle Assets automatically launches a report, from which you can review the results of the analysis. You can run what-if analysis for as many scenarios as you like. Each time you run what-if analysis, Oracle Assets launches a separate report.

If you are satisfied with the results of your analysis, you can enter the new parameters in the Mass Changes window to update your assets according to the parameters you specified in the what-if analysis.

You may want to run what-if depreciation analysis for several different scenarios for comparison purposes. You can run what-if depreciation analysis for any number of scenarios. The results of an analysis will not overwrite the results of previous analyses.

Forecast depreciation using what-if depreciation analysis:
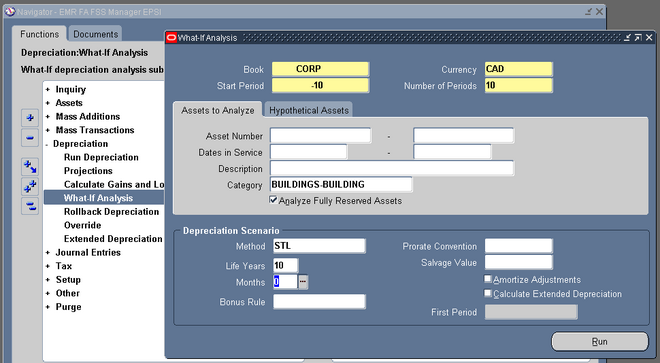
1. Navigate to the What-If Depreciation Analysis window in Oracle Assets.

2. The value in the Currency field defaults to the book's currency. If the book you chose is an MRC book, the Currency field defaults to the primary currency. If you want to run What-if Analysis for the reporting currency, change the value in the Currency field to the reporting currency.

3. Enter the starting period for which you want to run What-if Analysis.

4. Enter the number of periods for which you want to run What-if Analysis.
Note: You cannot run What-if Analysis for hypothetical assets in the reporting currency.

5. Enter the book containing the assets for which you want to run what-if analysis.

6. In the Assets to Analyze tabbed region, enter the parameters you want to use to identify the set of assets for which you want to run what-if depreciation analysis.
OR
In the Hypothetical Assets tabbed region, enter the parameters to identify the hypothetical asset for which you want to run what-if depreciation analysis.


7. Enter the Depreciation Scenario parameters to identify the depreciation rules to be
used in the analysis.

8. Choose Run to run what-if depreciation analysis.

9. Review the results of the What-If Depreciation Report or the Hypothetical What-If Report by navigating to the View My Requests window.

10. Update your assets according to the specified parameters in the Mass Changes window.
OR
Repeat this procedure using different parameters.

Parameters
You run what-if depreciation analysis based on parameters you specify in the What-If Depreciation Analysis window in Oracle Assets. You enter these parameters for purposes of analysis only. The parameters you enter in these windows do not affect depreciation of your Oracle Assets data.

Assets to Analyze Parameters
Use the Assets to Analyze tabbed region when you want to perform what-if depreciation analysis on assets that exist in your Oracle Assets system. You use this group of parameters to tell Oracle Assets on which assets to perform what-if analysis. If you leave the optional fields blank, Oracle Assets defaults to performing analysis on all
possible assets.

Hypothetical Assets Parameters
Use the Hypothetical Assets tabbed region when you want to perform what-if depreciation analysis on assets that have not been defined in your Oracle Assets system. The following table provides explanations of the parameters:
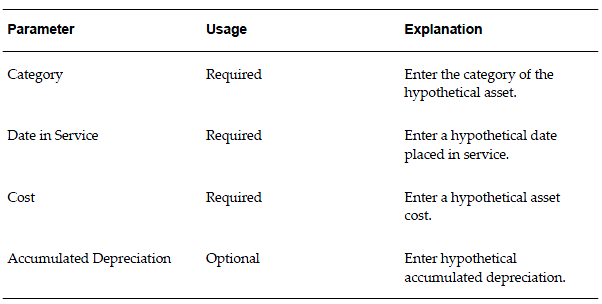
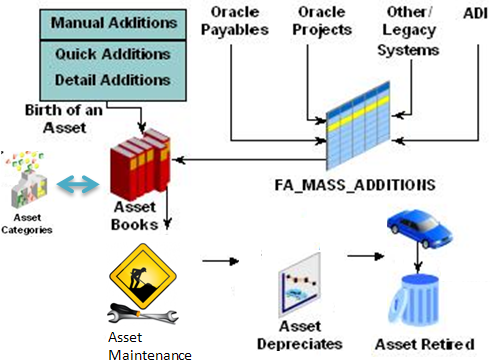
Asset Retirements


Asset is retired when it is no longer in service. For example, retire an asset that was
stolen, lost, or damaged, or that you sold or returned. You can retire an entire asset or you can partially retire an asset.
• When you retire an asset by units, Oracle Assets automatically calculates the fraction of the cost retired
• When you retire an asset by cost, the units remain unchanged and the cost retired is spread evenly among all assignment lines.

Restrictions
You cannot retire assets by units in your tax books; you can only perform partial and full cost retirements in a tax book. Also, you can only perform full retirements on CIP assets; you cannot retire them by units, or retire them partially by cost.
If you perform multiple partial retirements on an asset within a period, you must run the calculate gains and losses program between transactions.
Gain/Loss = Proceeds of Sale - Cost of Removal - Net Book Value Retired +
Revaluation Reserve Retired

If you partially retire a units of production asset, you must manually adjust the capacity to reflect the portion retired.

Independence Across Depreciation Books
You can retire an asset or a group of assets from any depreciation book without affecting other books. To retire an asset from all books, retire it from each book separately, or set up Mass Copy to copy retirements to the other books in the Book Controls window.

Retirement and Reinstatement Statuses
Each retirement transaction has a status. A new retirement receives the status PENDING. After you run depreciation or calculate gains and losses, the status changes to PROCESSED.
When you reinstate a PENDING retirement, Oracle Assets deletes the retirement transaction and the asset is immediately reinstated. If you reinstate a PROCESSED retirement, Oracle Assets changes the status to REINSTATE, and you must rerun the Calculate Gains and Losses program or run depreciation to process the reinstatement.

When you perform a mass retirement, Oracle Assets creates PENDING retirement transactions. If you submit a mass reinstatement before running the Calculate Gains and Losses program, Oracle Assets immediately reinstates these assets. If you submit a mass reinstatement to reinstate PROCESSED retirements, you must rerun the Calculate Gains and Losses program or run depreciation to process the reinstatements.

Correct Retirement Errors
You can undo asset retirement transactions, and Oracle Assets creates all the necessary journal entries for your general ledger to catch up any missed depreciation expense. You can reinstate an individual or mass retirement transaction. For multiple partial retirements, you can reinstate only the most recent partial retirement. You cannot reinstate an asset retired in a previous fiscal year. You can only reinstate assets retired in the current fiscal year

Retirement Transactions


You cannot retire an asset if you added it in the current period. Instead, you must enter your retirement as a prior period retirement after you run depreciation. Or if you do not want to create any journal entries, use Edit, Delete Record from the menu in the Asset Details window to delete the asset any time in the current period.


For prior-period retirement dates:
You can retire retroactively only in the current fiscal year, and only after the most recent transaction date. You cannot perform prior period retirements to assets having unplanned depreciation
amounts.

You can retire an individual asset in the Retirements window. You can retire a group of assets in the Mass Retirements window.

To FULLY retire an asset:
1. Choose Assets > Asset Workbench from the Navigator window. Find the asset you want to retire and Choose Retirements.
2. Select the depreciation Book from which you want to retire the asset.
3. Enter the date of the retirement. It must be in the current fiscal year, and cannot be before any other transaction on the asset.
4. To fully retire the asset, enter all the units or the entire cost. 
5. If you are retiring an asset before it is fully reserved, enter the Retirement Convention.
6. Enter the Retirement Type.
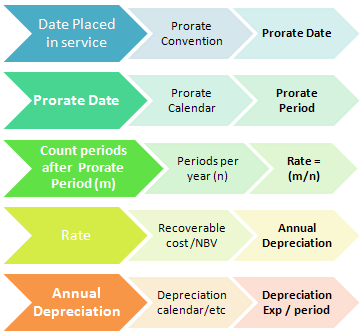
7. Save your work. Oracle Assets assigns each retirement transaction a unique Reference Number that you can use to track the retirement.
Optionally calculate gains and losses to change the status of the retirement transaction from PENDING to PROCESSED.

To retire asset costs using Source Lines:

1. Select Assets > Asset Workbench from the Navigator window.
2. Find the asset whose invoice information you want to change.
Tip: For best performance, find by unique values, such as asset number or tag number.
3. Select Find to navigate to the Assets window.
4. Choose the asset whose source lines you want to retire.
5. Select Source Lines to navigate to the Source Lines window.
6. Choose the source line or enter the amount you want to retire.
7. Select Retire to navigate to the Source Line Retirement window.
8. Modify the necessary fields.
Note: You cannot modify units retired or cost retired. You must cancel out of the retire window before changing the units or cost information. You can change this information in the Source Lines
window. Source Line window changes are propagated to the Retire window when you navigate to it.
9. Select Done to save your work.


Reinstatements


You cannot reinstate assets retired in the previous fiscal year. You can reinstate only the most recent partial retirement. You can reinstate both individual and mass retirement transactions. You can use Oracle Assets to retire a group of assets by populating an external interface table with these assets, setting the line status to POST, and running the Post Mass Retirements process.

Oracle Assets allows both partial cost and partial unit retirements. However, retirements can only be grouped using a Batch Number, which restricts you from fully utilizing the benefit of the Oracle Assets Mass Retirements feature.

To correct a retirement error:
1. Choose Assets > Asset Workbench from the Navigator window.
2. Find the asset you want to reinstate.
3. Choose Retirements.
4. Query the retirement transaction you want to undo.
5. If the retirement has a status of PROCESSED, choose Reinstate. If it is PENDING, choose Undo Retirement.
6. If the retirement has a status of PROCESSED, calculate gains and losses to reinstate the asset. If it is PENDING, Oracle Assets deletes the retirement transaction.

Asset Accounting

Oracle Assets is fully integrated with Oracle Subledger Accounting for generating accounting entries, transaction drilldown, and reporting. The Create Accounting – Assets concurrent program creates journal entries for transaction events in Oracle Assets. The journal entries can be transferred to and posted in General Ledger. If you choose not to transfer the journal entries to General Ledger at
this time, you can run the Transfer Journal Entries to GL – Assets concurrent program to do this at a later time.

If you are upgrading from Release 11i and you have asset books set up, then the upgrade program automatically sets the value of the FA: Use Workflow Account Generation profile option to Yes, meaning the account generation rules set up in Oracle Workflow will be used.

Asset Accounting & Journal Entries
Run the Create Accounting process to create accounting entries.
You do not need to run Depreciation before creating accounting transactions. You can run the Create Accounting process as many times as necessary within a period.

The Create Accounting process creates journal entries for the appropriate ledger. You can review these journal entries in the general ledger and post them.

Adjusting Journal Entries
Prior Period Transactions
Oracle Assets creates adjusting journal entries to depreciation expense, bonus expense, accumulated depreciation accounts, and bonus reserve accounts when you enter prior period additions, transfers, or retirements:
• For a prior period addition, Oracle Assets creates journal entries for the missed depreciation
• For a prior period transfer, Oracle Assets reverses a portion of the depreciation expense posted to the "from" depreciation expense account and posts it to the "to" depreciation expense account
• For prior period retirements, Oracle Assets creates journal entries that reverse the depreciation taken for periods after the retirement prorate date

Depreciation Adjustments
Oracle Assets creates separate journal entries for adjustments to depreciation expense and current period depreciation. You can review the effect of your adjustment transaction and your current period depreciation expense separately in the general ledger. 


Journal Entry Examples


Debit (Dr.) A debit to the asset cost, asset clearing, bonus expense, CIP cost, CIP clearing, depreciation expense,proceeds of sale clearing, or intercompany receivables account is an addition to the account. A debit to the accumulated depreciation, bonus reserve, cost of removal clearing, or intercompany payables account is a subtraction from the account. In the journal entry examples, debits are in the left column.

Credit (Cr.) A credit to the accumulated depreciation, bonus reserve, cost of removal clearing, or intercompanypayables account is an addition to the account. A credit to the asset cost, asset clearing, bonus expense, CIP cost, CIP clearing, depreciation expense, proceeds of sale clearing, or intercompany receivables account is a subtraction from the account. In the journal entry examples, credits are in the right column.

Journal Entries for Depreciation
When you run depreciation, Oracle Assets creates journal entries for your accumulated depreciation accounts and your depreciation expense accounts. Oracle Assets creates journal entries for your bonus reserve accounts and your bonus depreciation accounts, if any. Oracle Assets creates separate journal entries for current period depreciation expense and for adjustments to depreciation expense for prior period transactions and changes to financial information.

Oracle Assets creates the following journal entries for a current period depreciation charge of $200 and a bonus charge of $50:

Journal Entries for Additions and Capitalizations
For manual additions, Oracle Assets gets the clearing account from the category. For mass additions, the clearing account comes from your source system.
Example: The recoverable cost is $4,000 and the method is straight-line 4 years.

You purchase and place the asset into service in Year 1, Quarter 1.

You place an asset in service in Year 1, Quarter 1, but you do not enter it into Oracle Assets until Year 2, Quarter 2. Your payables system creates the same journal entries to asset clearing and accounts payable liability as for a current period addition.
 
Construction-In-Process (CIP) Addition
You add a CIP asset. (CIP assets do not depreciate)
Oracle Assets
 Deleted
Mass Additions
Oracle Assets creates no journal entries for deleted mass additions and does not clear the asset clearing accounts credited by accounts payable. You clear the accounts by either reversing the invoice in your payables system, or creating manual journal entries in your general ledger

Tax Book

 
The Initial Mass Copy program populates the tax book from the corresponding corporate book. It copies all the existing assets in the corporate book.  You can create as many tax books as you need,
maintain your asset information in your corporate book, and then update your tax books with assets and transactions from your corporate book.

You must allow Mass Copy and choose whether to copy additions, cost adjustments, retirements, and salvage value for your tax book in the Book Controls window before you can run mass copy.

You also specify which corporate book mass copy uses as the source. You cannot copy assets from one corporate book into another corporate book. If you choose to copy adjustments, Oracle Assets copies cost adjustments from the associated corporate book if the unrevalued cost in the corporate book before the adjustment matches the unrevalued cost in the tax book. It copies both adjustments that are ADJUSTMENT type in the tax book and adjustment transactions that create a new
ADDITION type and update the ADDITION/VOID in the tax book.

How Initial Mass Copy Works
Initial Mass Copy copies all the assets added to your corporate book before the end of the current tax fiscal year into the open accounting period in your tax book. The following graphic illustrates the Initial Mass Copy process. In the following example, your fiscal year is from January to December. Your corporate book open accounting period is February 1994 and your tax book open period is December 1993.


When using Initial Mass Copy for the first time in your tax book, you can run it as many times as necessary for the first period to copy all existing assets. When you rerun the process, Initial Mass Copy only looks at assets which it did not copy into the tax book during previous attempts, so no data is duplicated.

If you wish to simultaneously run this program in more than one process to reduce processing time, Oracle Assets can be set up to run this program in parallel.

What Gets Copied
The current fiscal year in your tax book determines which assets Initial Mass Copy copies into your tax book. If the current fiscal year of your tax book is 1994, Initial Mass Copy copies all assets into your tax book as they appeared at the end of 1994 in your corporate book, even if 1995 is the current fiscal year of your corporate book. Only run Initial Mass Copy for the first period of your tax book. For following periods in your tax book, run Periodic Mass Copy.

Initial Mass Copy does not copy assets retired before the end of that year or assets added after the end of that year. You do not need to copy any adjustments or partial retirements you performed before the end of the fiscal year. When you close this initial period, Oracle Assets calculates the net book value of your assets that have zero accumulated depreciation in the tax book, and opens the next period.

When the Initial Mass Copy program copies an asset into a tax book, the following basic financial information comes from the corporate book:

  1. Cost
  2. Original Cost
  3. Units
  4. Date Placed in Service
  5. Capacity and unit of measure, for units of production assets
  6. Salvage Value, if you choose to Copy Salvage Value for the tax book in the Book Controls window

The remaining depreciation information comes from the default category information for your tax book according to the asset category and the date placed in service. You must set up your asset categories with default information for your tax book before you run Initial Mass Copy.

Since tax books share the category and assignments with their associated corporate book, you do not need to copy reclassifications or transfers from one book to another. Tax books also share production amounts with their associated corporate books for assets depreciating under units of production. Initial Mass Copy does not copy any transactions on CIP assets or expensed items.

For subcomponent assets, copy the parent asst first. Then copy the subcomponent asset, defaulting the asset life according to the subcomponent life rule you defined for the tax category and the parent asset life. You must set up the depreciation method for the subcomponent asset life before you can use the method and life. If your subcomponent asset uses straight-line depreciation, Oracle Assets sets up the depreciation method for the calculated life for you. If the depreciation method is not
straight-line and not already set up for the subcomponent life rule default, Oracle Assets uses the asset category default life.

Group and member assets are copied like any other asset in Oracle Assets. As with any asset in Oracle Assets, the group assets must exist in a corporate book before they are added to the associated tax book. Mass copy will copy group assets from a corporate book to the associated tax book only if the same category exist in both books.

Correcting Current Period Addition Errors

 
If you incorrectly added an asset, you can delete it from the system. You can only delete assets added in the current period. Once you run the depreciation and close one period for a book, system won’t allow you to delete any record.
Assets added though mass addition can also be deleted manually.

To delete an asset you added in the current period:
1. Choose Assets > Asset Workbench from the Navigator window.
2. Find the asset you want to delete.
Note: For best performance, query by asset number or tag number since they are unique values.
3. Choose Open.
4. From the menu, select Edit, Delete Record.
5. Save your change to delete the asset from the system

YTD Depriciation, Acc Depriciation for each asset in a corp book

Select fa.asset_number, x.asset_id,
fa.asset_id,fa.asset_category_id, fa.attribute_category_code, fb.book_type_code,
 fb.deprn_method_code,fb.life_in_months,fb.original_cost, fb.eofy_reserve,
 fb.cost, x.D_AMOUNT YTD_DEP, fb.eofy_reserve + x.D_AMOUNT AS ACC_DEP
from FA_ADDITIONS_b fa,
apps. FA_BOOKS_V fb,
(
Select asset_id, SUM(DEPRN_AMOUNT) AS D_AMOUNT
from fa_deprn_detail
where deprn_source_code='D' and book_type_code =:book_type_code
Group By asset_id
) x
where fa.asset_id=x.asset_id
AND fa.asset_id=fb.asset_id